Business Automation

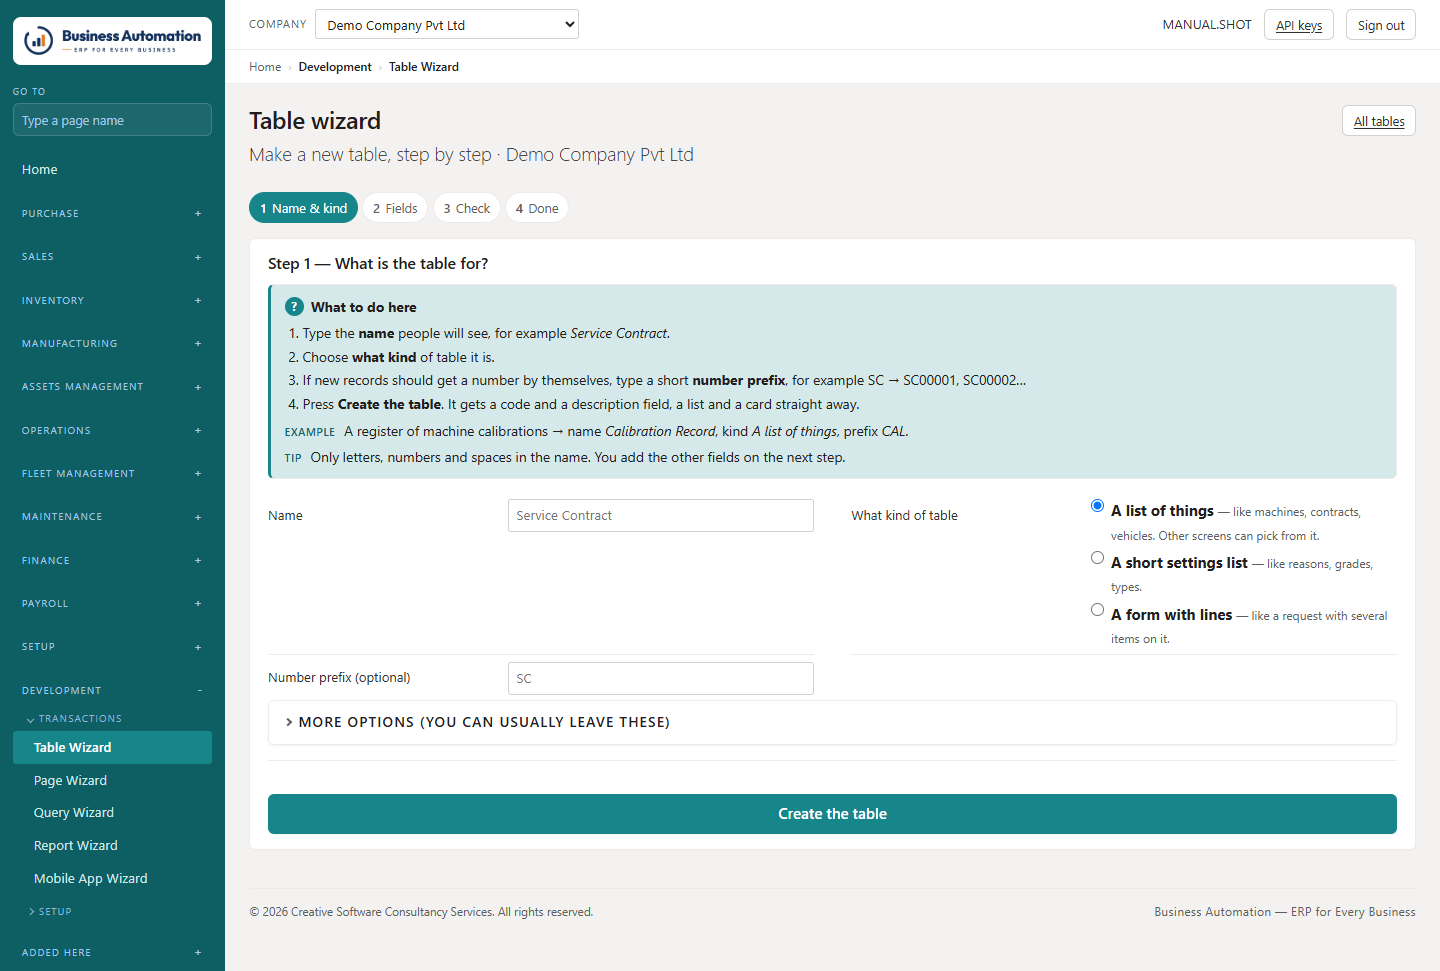
Business
Automation

ERP for Every Business
User Manual
PurchaseSalesInventoryFinanceGST & TDSPayrollManufacturingFixed AssetsFleetMaintenanceReportsAdministration
by Creative Software Consultancy ServicesCSCS · Step-by-step guide with screenshots
October 2026Edition 1.0

How to use this manual

Each chapter is one person's job, in the order they do it. Every task has a purpose, the place in the menu, numbered steps and a screenshot.

Numbered stepsFollow them in order. Button and field names are in bold, exactly as they appear on screen.
WhereThe grey box under each heading shows the menu path, and the page address in brackets.
ScreenshotsTaken from the DEMO company. Your own company's names, colours and figures will differ.
💡
Tip. A quicker way, or something worth knowing.
ℹ
Note. How the system behaves, and why.
⚠
Important. A rule that stops a mistake — read it.
❖
Where. Menu › Page (/address) — type the page name in Go to to jump there.

Contents

Click any line to go to it.

  1. 1Getting startedEverybody, on the first day
    1. Three things that are true everywhere
    2. Signing in
    3. The screen and your home page
    4. Using it on a phone
    5. Before anything can be posted: Getting started
    6. Finding your way around a list
    7. Personalise a list or card
    8. Analysis: pivot and chart any list
    9. Moving from one record to the next
    10. The "How it works" box on every document
    11. Working with a document
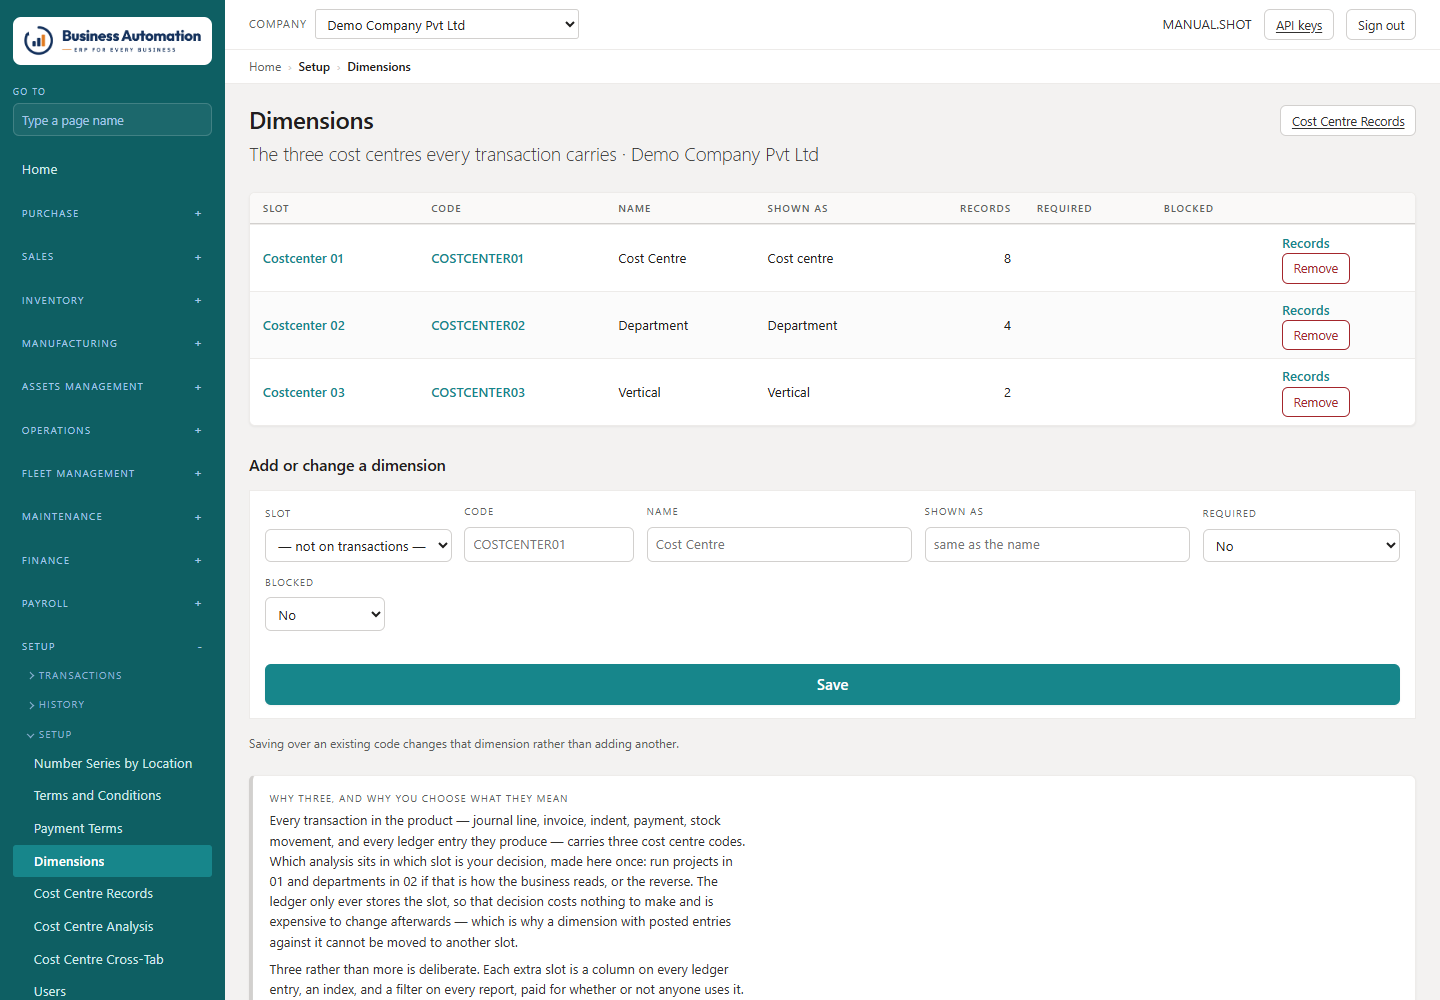
    12. Cost centres
    13. Search data
  2. 2The storeStorekeepers
    1. What is on the shelf
    2. Receiving goods (GRN)
    3. Issuing material against an indent
    4. Moving stock between stores
    5. Locations and their bins
    6. An item's own bin
    7. QR labels
    8. Counting the store (physical count)
    9. Stock adjustments and reclassification
    10. Where did it go? Tracing a number
    11. How stock is costed and valued
  3. 3BuyingBuyers
    1. The buying chain
    2. Setting up a vendor
    3. Vendor receiving addresses
    4. Vendor prices by date
    5. Raising an indent
    6. Asking suppliers: the enquiry (RFQ)
    7. Choosing: the comparative statement
    8. The purchase order
    9. Receiving against the order
    10. The bill: purchase invoice
    11. Looking up posted purchase documents
    12. Sending goods back: purchase credit note
    13. Approvals for purchase documents
    14. Verifying vendors and bank accounts
    15. TDS
  4. 4SellingSales staff
    1. The selling chain
    2. Customers and their ship-to addresses
    3. Customer price lists
    4. Taking the order
    5. Bill cum Dispatch
    6. One invoice for several challans
    7. Posted shipments and invoices
    8. Credit notes
    9. E-invoice and e-way bill
    10. Collecting tax at source (TCS)
  5. 5AccountsAccountants
    1. Money in: receipts
    2. Money out: payment approval
    3. Following a figure: chart of accounts
    4. The general journal
    5. Bank reconciliation
    6. Settling entries
    7. Statements
    8. GST returns
    9. Closing a period and a year
    10. Opening a new company's books
    11. Fixed assets
    12. Where stock posts to
  6. 6PayrollWhoever runs the wages
    1. The month, in order
    2. Before the first month
    3. The attendance: muster roll
    4. Wages and revisions
    5. Amounts that change every month
    6. Income tax on salaries
    7. Running and posting the month
  7. 7Operations and fleetGate, weighbridge, trips, manufacturing, fuel and maintenance
    1. The morning list: Daily MIS
    2. The gate
    3. The weighbridge
    4. Trips against a contract
    5. Making things: manufacturing
    6. Fuel
    7. Maintenance: job cards
    8. Tyres and batteries: the tyre bank
  8. 8Reading the figuresManagers and owners
    1. The company on one page: Dashboard
    2. Balances that prove themselves
    3. Who is late: ageing
    4. What a project or department cost
    5. The statements and the trial balance
    6. Everything that was posted: registers
    7. Reports and stock reports
    8. Drawing your own report
  9. 9AdministrationWhoever sets the system up
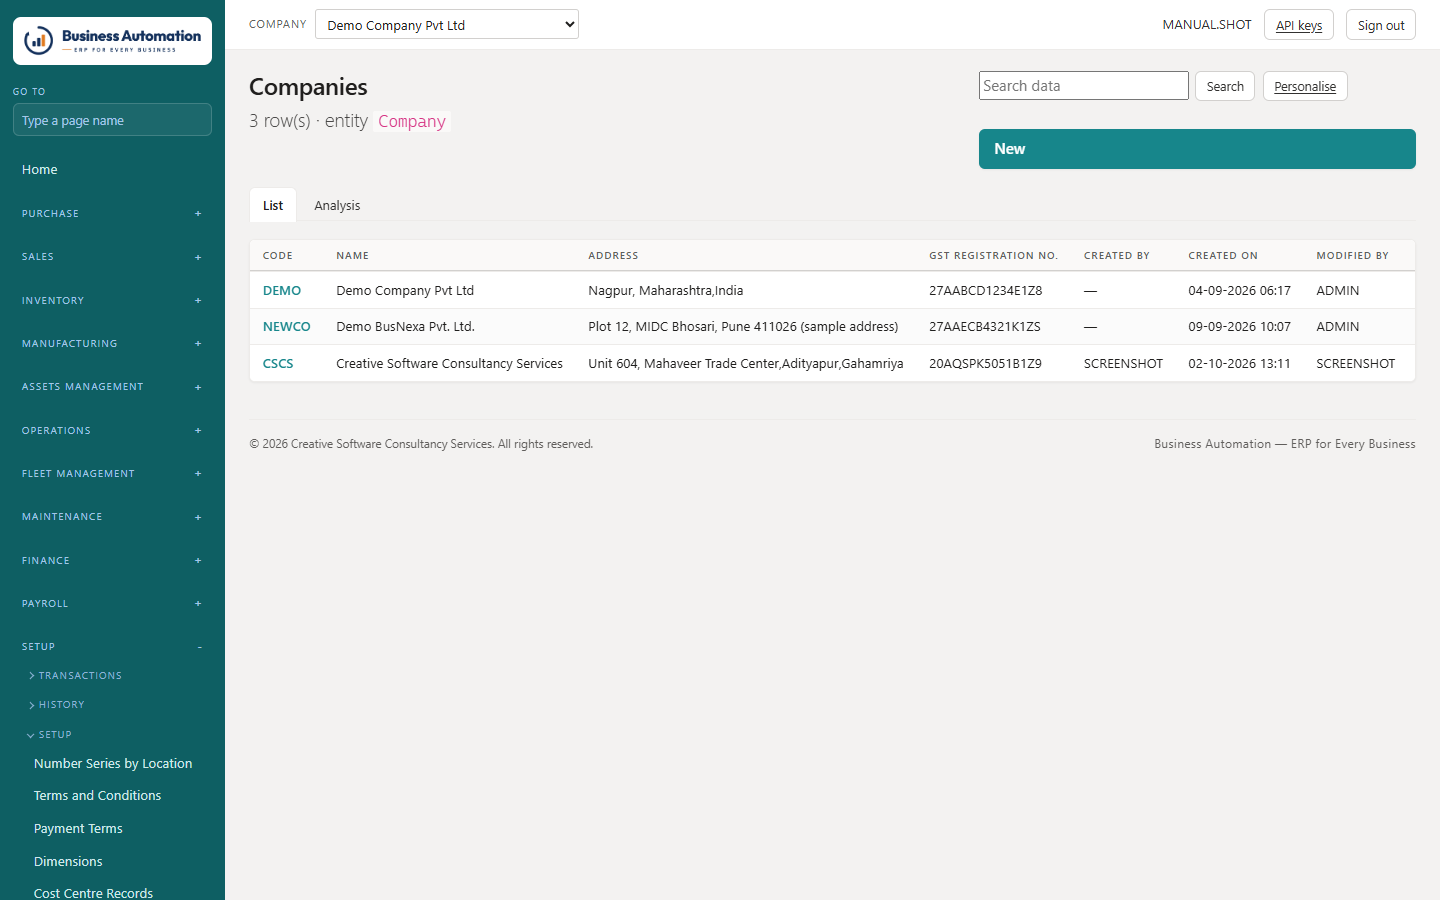
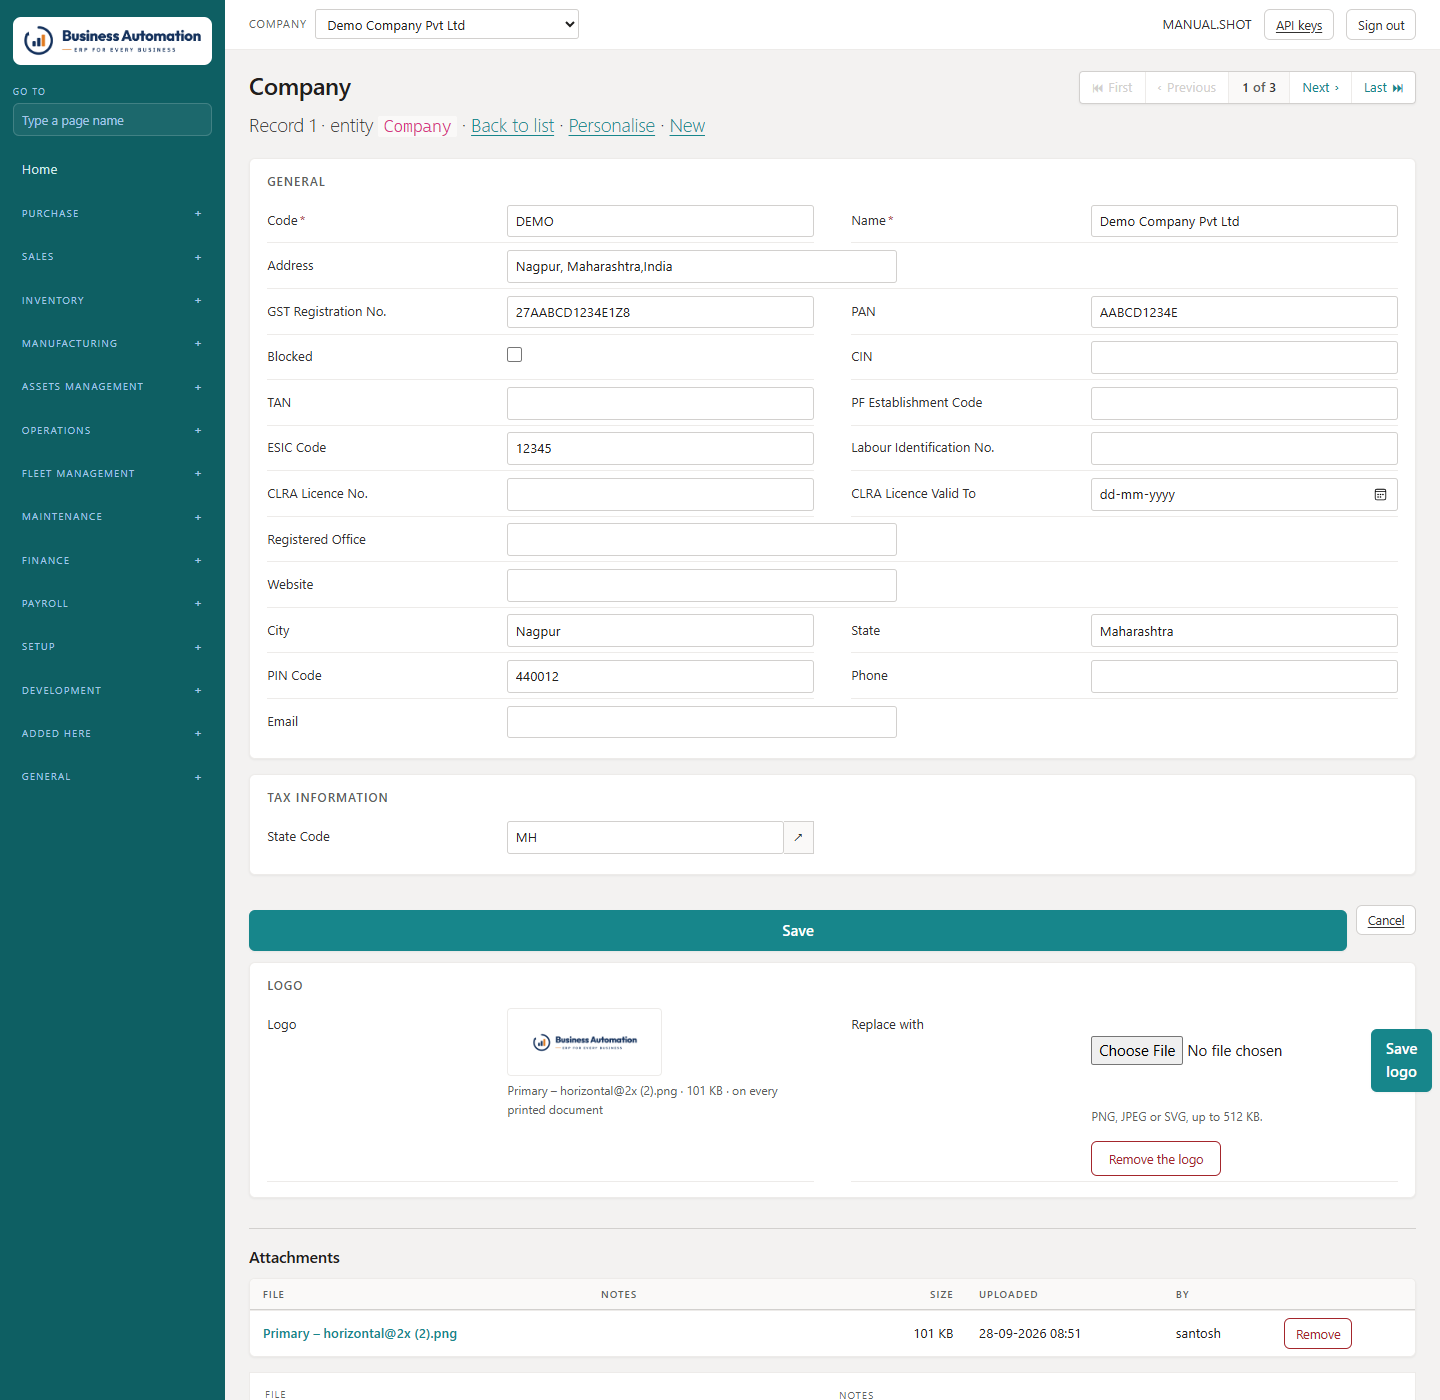
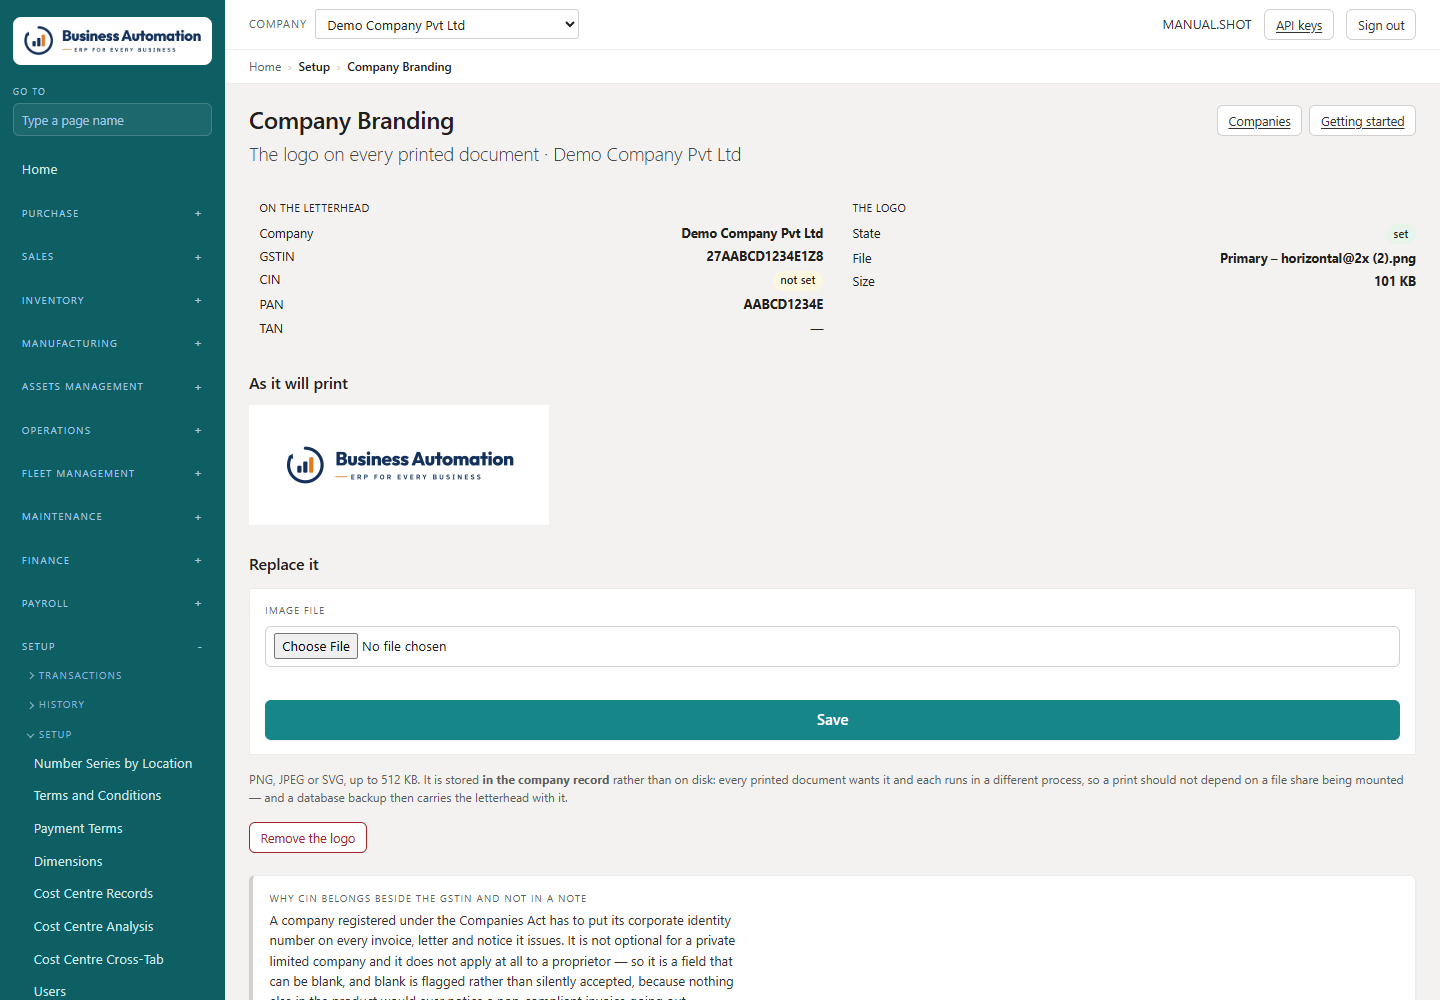
    1. The company itself
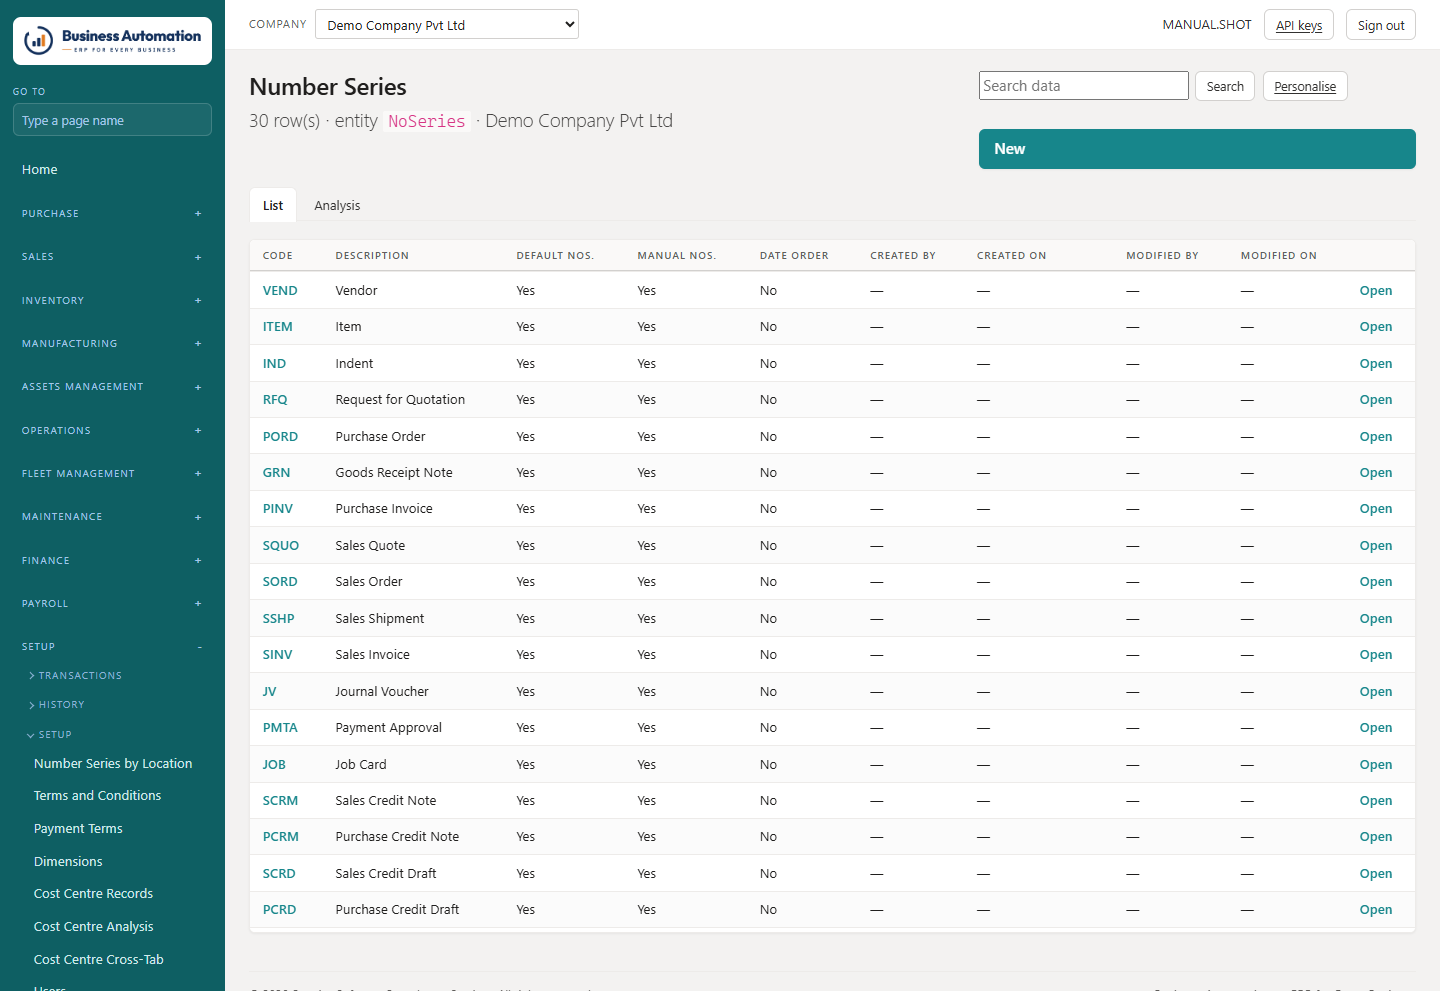
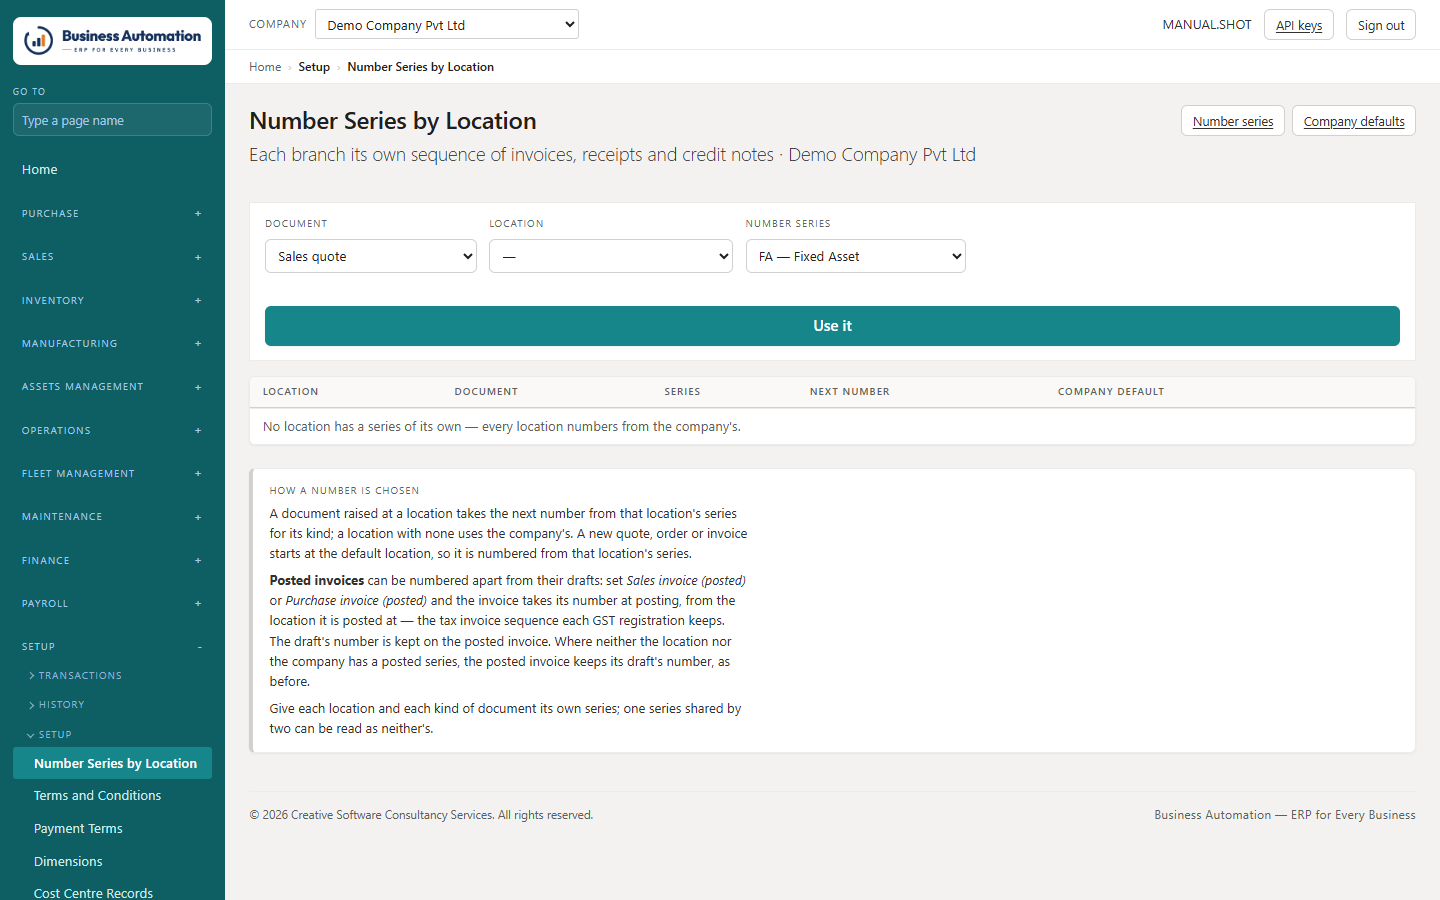
    2. Number series
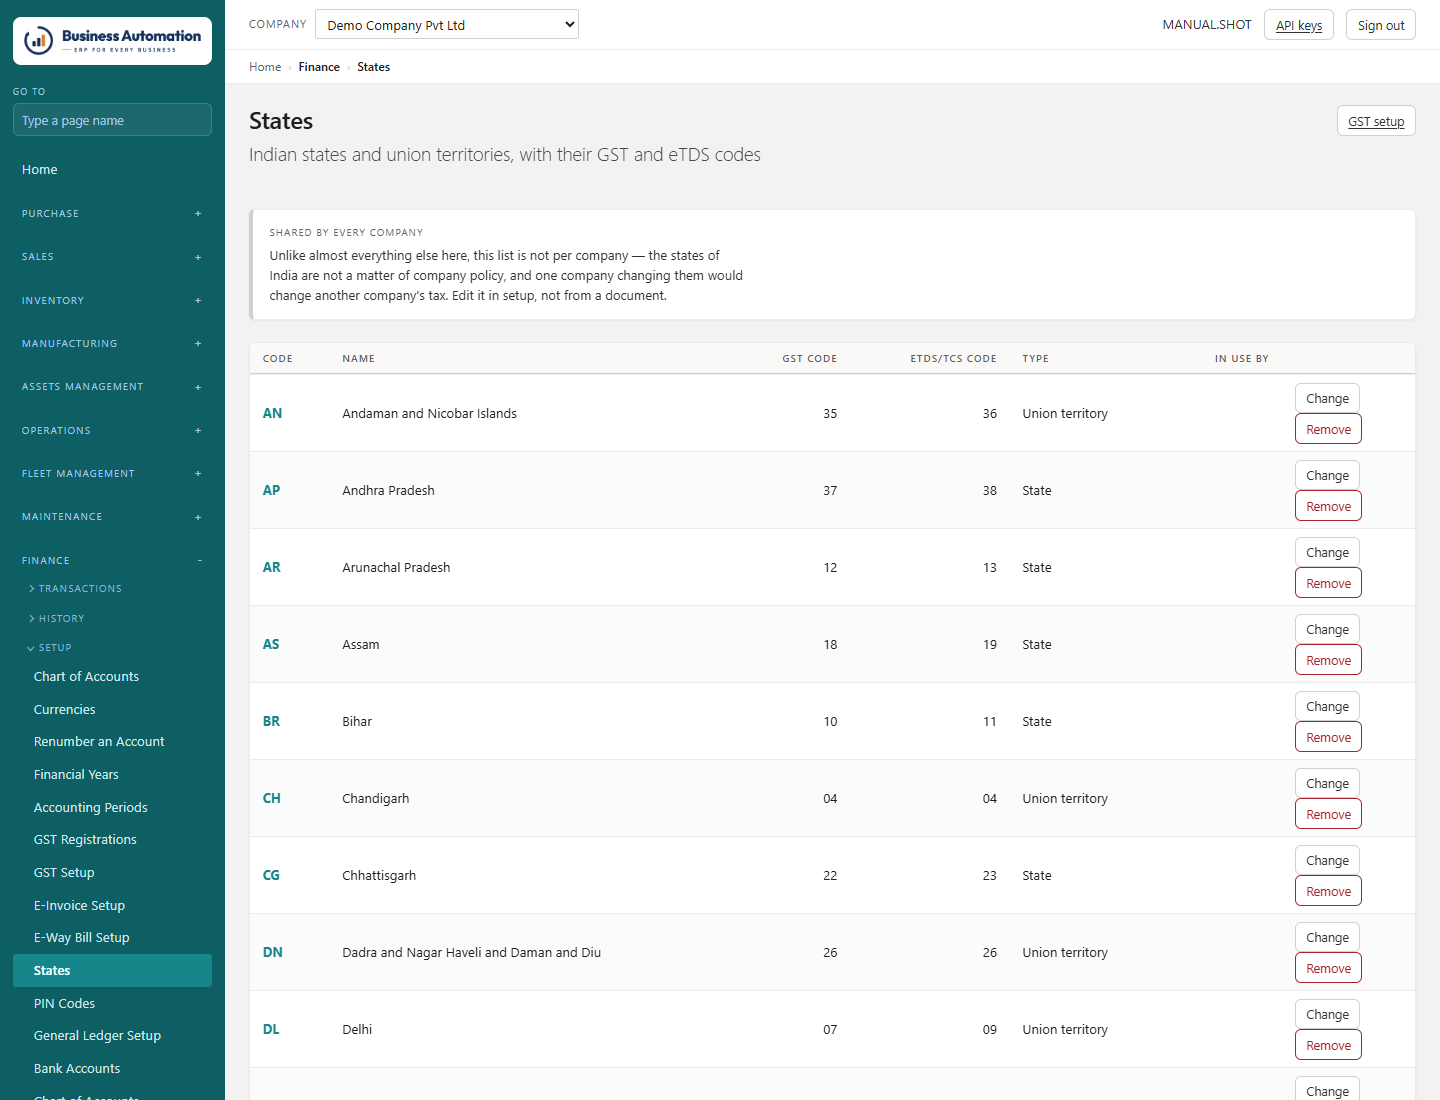
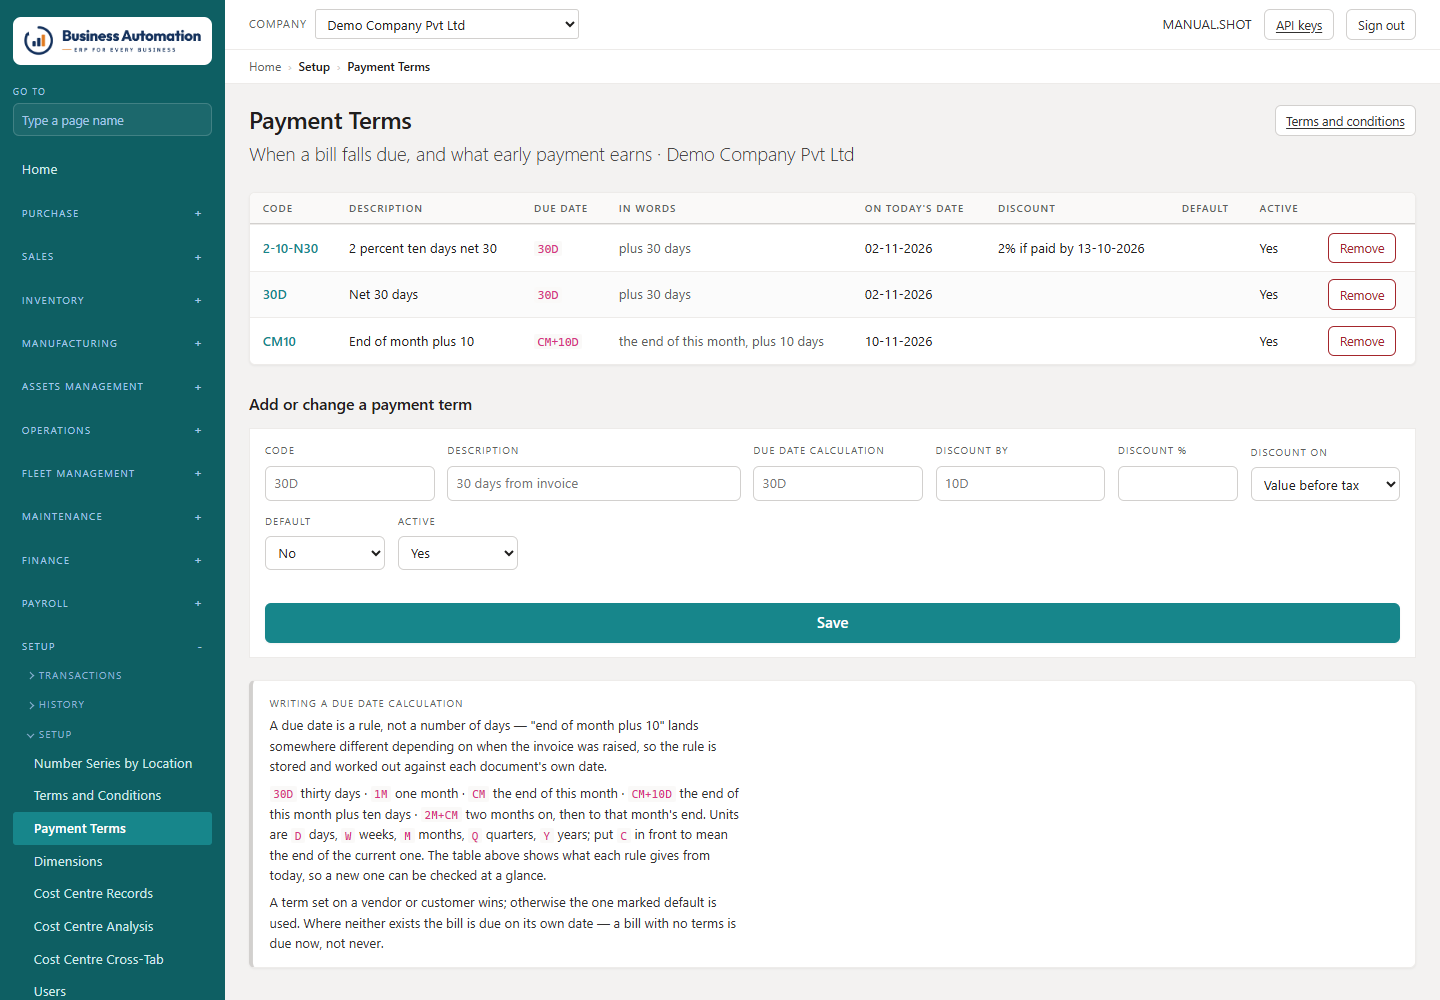
    3. Cost centres, states and terms
    4. Copying a company
    5. Free trials for website visitors
    6. Users and User Setup
    7. Special rights: taking back posted documents
    8. Permission sets
    9. Giving someone access: User Permissions
    10. Approvals: workflow approvers
    11. Theme, home page and role centres
    12. Mail, outbox and digital signatures
    13. Currencies
    14. Bringing data in
    15. Audit trail, web services and the wizards
    16. The licence
  10. AWhere do I find…Quick reference
  11. BGlossaryThe words used in this manual

Three things that are true everywhere

Read these once. They explain almost every message the system will ever give you.

  • Nothing is posted until you post it. Every document is a draft you can change, delete or abandon. Posting is the moment it becomes part of the accounts.
  • A posted document cannot be edited or deleted. It is corrected by a new document — a credit note, a reversal — never by editing the old one. What was printed and sent to a customer or supplier must still say the same thing next year.
  • Every figure can be followed. Wherever a number is shown, click it to see the entries that make it up, rather than recalculating it by hand.
ℹ
Note. When something is refused, the system says why in one sentence, and it is nearly always literally true. Read the message before looking for a workaround.
It saysIt means
The period is closedSomebody closed the month or year. Post in an open period, or ask for it to be reopened.
Account … is missingSetup points at an account that does not exist in this company's chart.
… is blockedThe master record is deliberately out of use.
There is not enough stockThe store shows less than you are taking out. Count it before you force it.
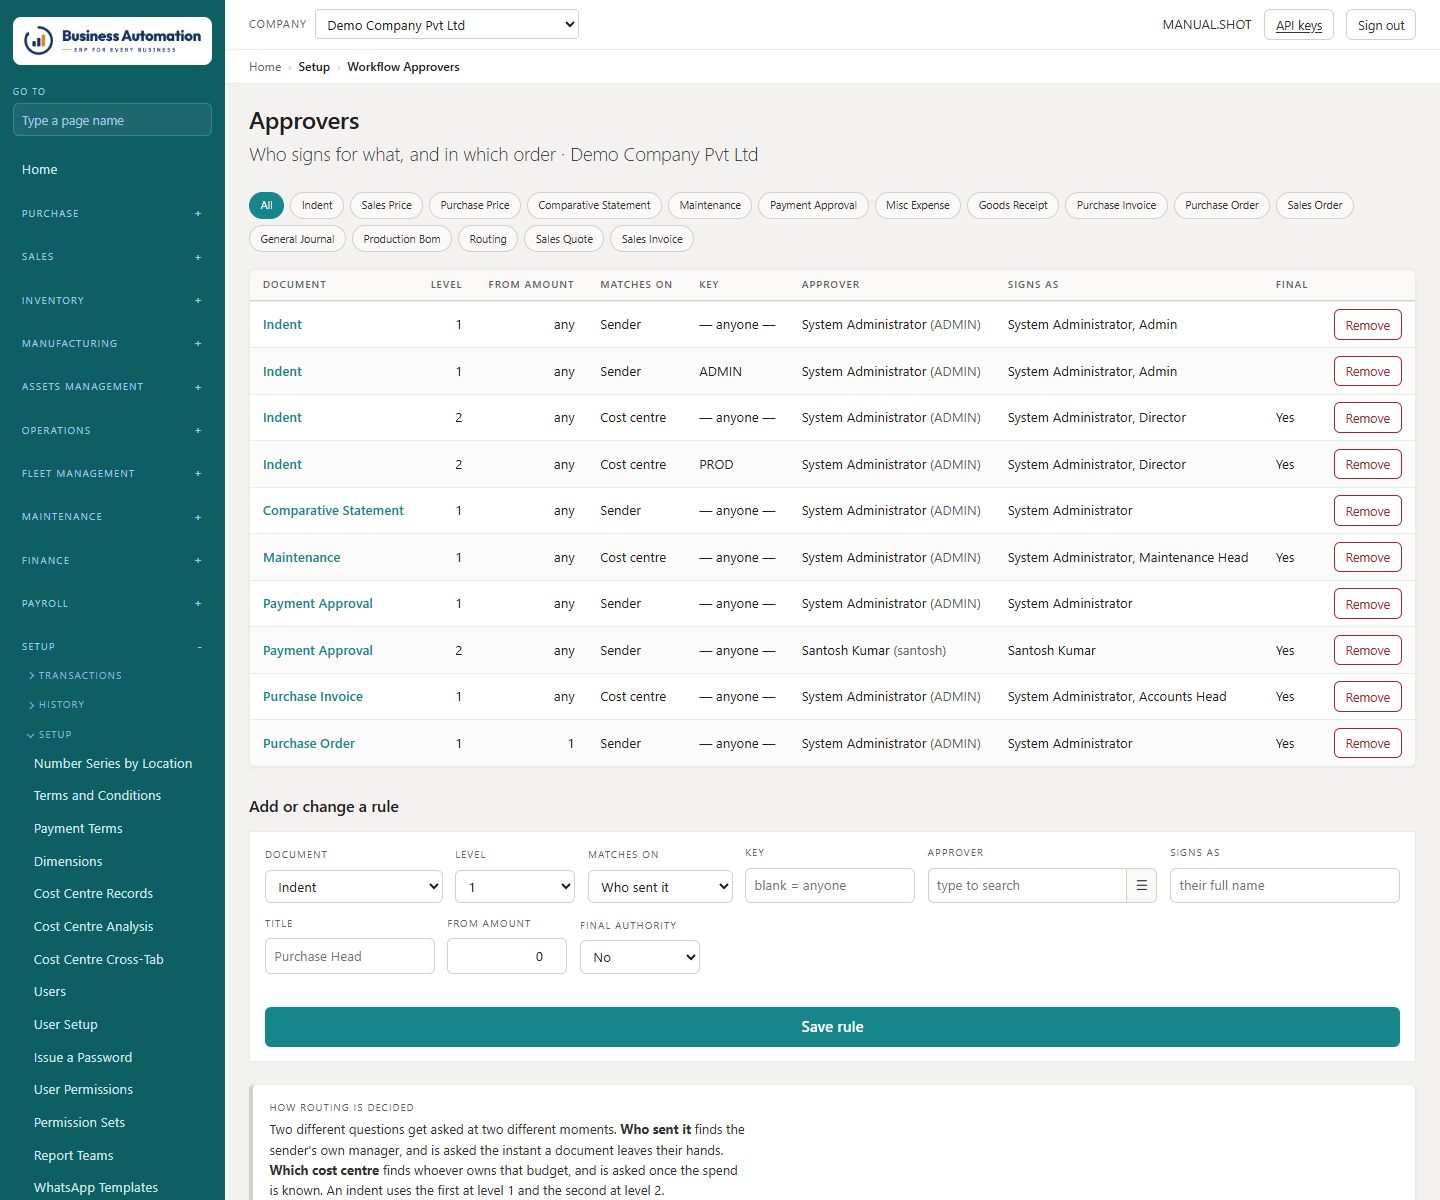
No approver is set up for …The approval matrix has no rule for this person or cost centre.

Signing in

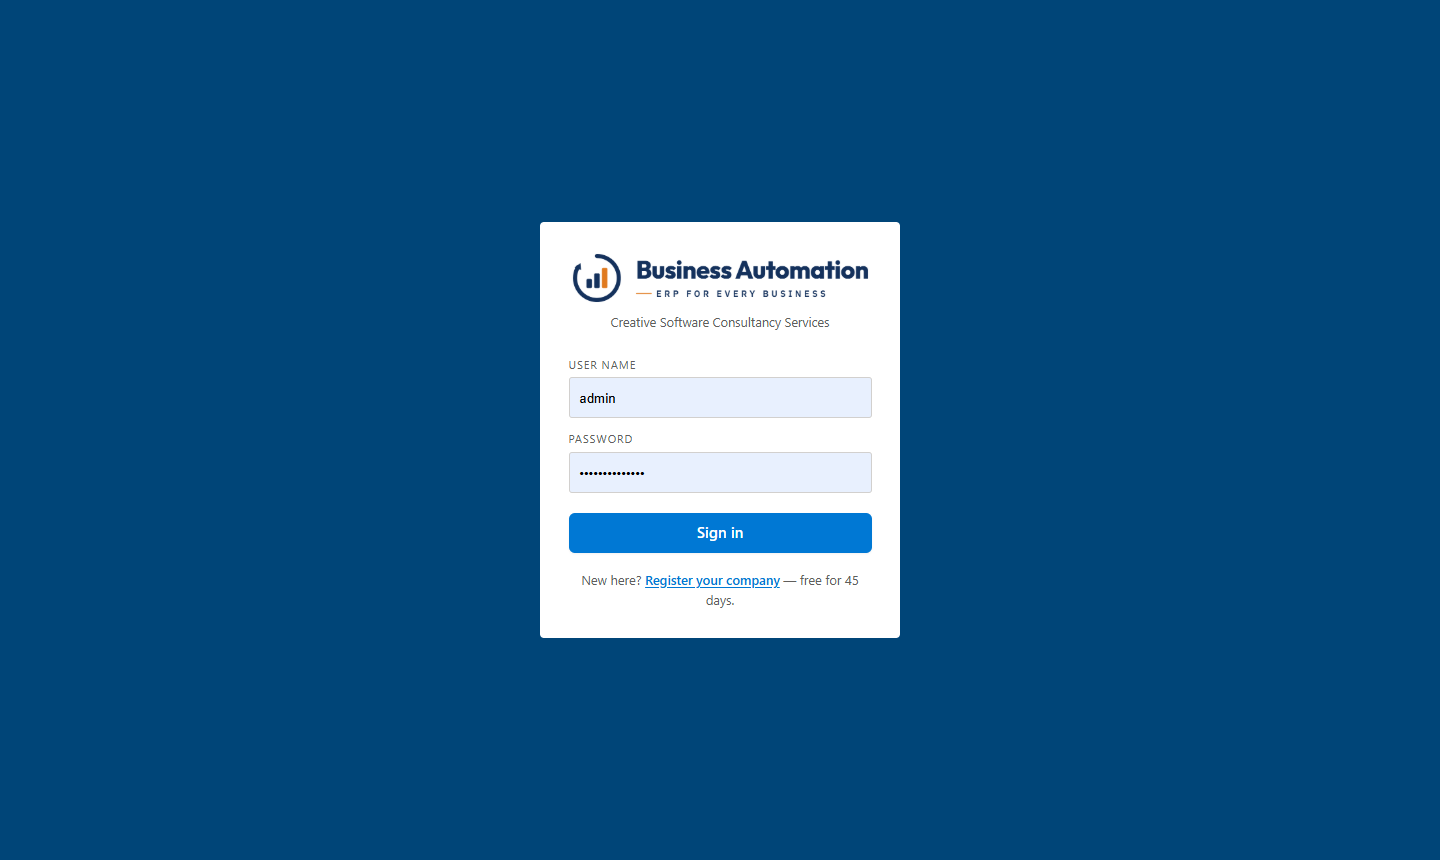
Open Business Automation in your browser and sign in with the user name and password your administrator gave you.

WhereThe address given by your administrator, for example http://SERVER:5231
  1. 1
    Open the address in your browser (Edge or Chrome). The Sign in page opens.
  2. 2
    Type your User name and Password.
  3. 3
    Press Sign in.
  4. 4
    The first time, you are asked to change your password. The new one must be at least ten characters, carry at least one letter and one number, and cannot be the one you were given.
Business Automation
The sign-in page
Figure 1.1 The sign-in page
💡
Tip. If the password is wrong, the message does not say whether the user name or the password was wrong. That is on purpose — it stops anyone using the login screen to find out who has an account.
⚠
Important. A forgotten password cannot be looked up by anybody, including your administrator. It can only be reset to a new one. Five wrong passwords lock the name for fifteen minutes.

The screen and your home page

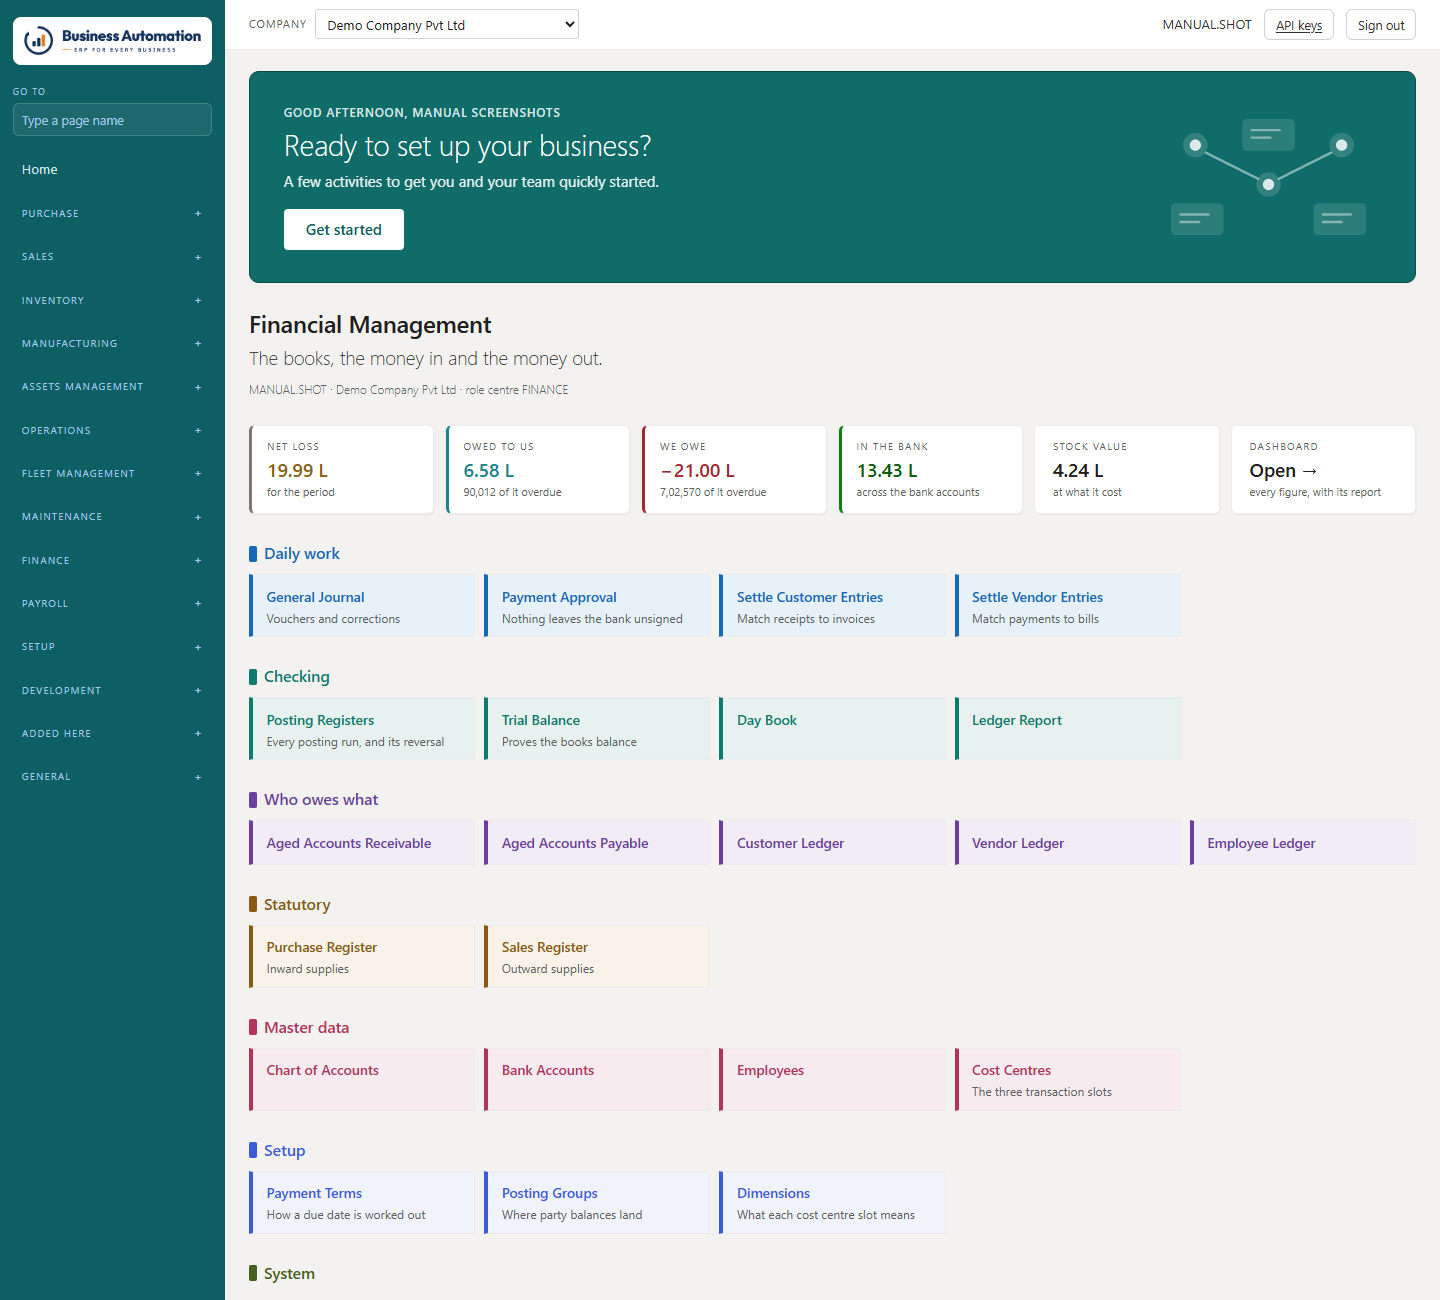
Know the three parts of every screen: the menu on the left, the company box at the top and your home page.

  1. 1
    The menu runs down the left, grouped by the kind of work: Purchase, Sales, Inventory, Finance, Payroll and so on. You see only the groups you have permission for.
  2. 2
    Click a group (for example PURCHASE) to open it. Each department opens on three shelves: Transactions (today's work), History (what has been posted, registers and reports) and Setup (the masters and settings).
  3. 3
    Go to at the top of the menu jumps to a page by name — type part of the name and pick it from the list.
  4. 4
    Your home page is what you land on. It is set per person (a role centre), so a storekeeper and an accountant see different things. The strip of figure tiles at the top opens the report each figure came from.
  5. 5
    COMPANY at the top shows the company you are working in. Choose another company there to switch. Everything you see — masters, documents, balances — belongs to that company alone.
Business Automation
The home page: the menu on the left, the company box at the top, the figure strip and your daily links
Figure 1.2 The home page: the menu on the left, the company box at the top, the figure strip and your daily links
💡
Tip. If your home page does not show what you need, ask your administrator to change your role centre. That is a setting, not a change to the software.

Using it on a phone

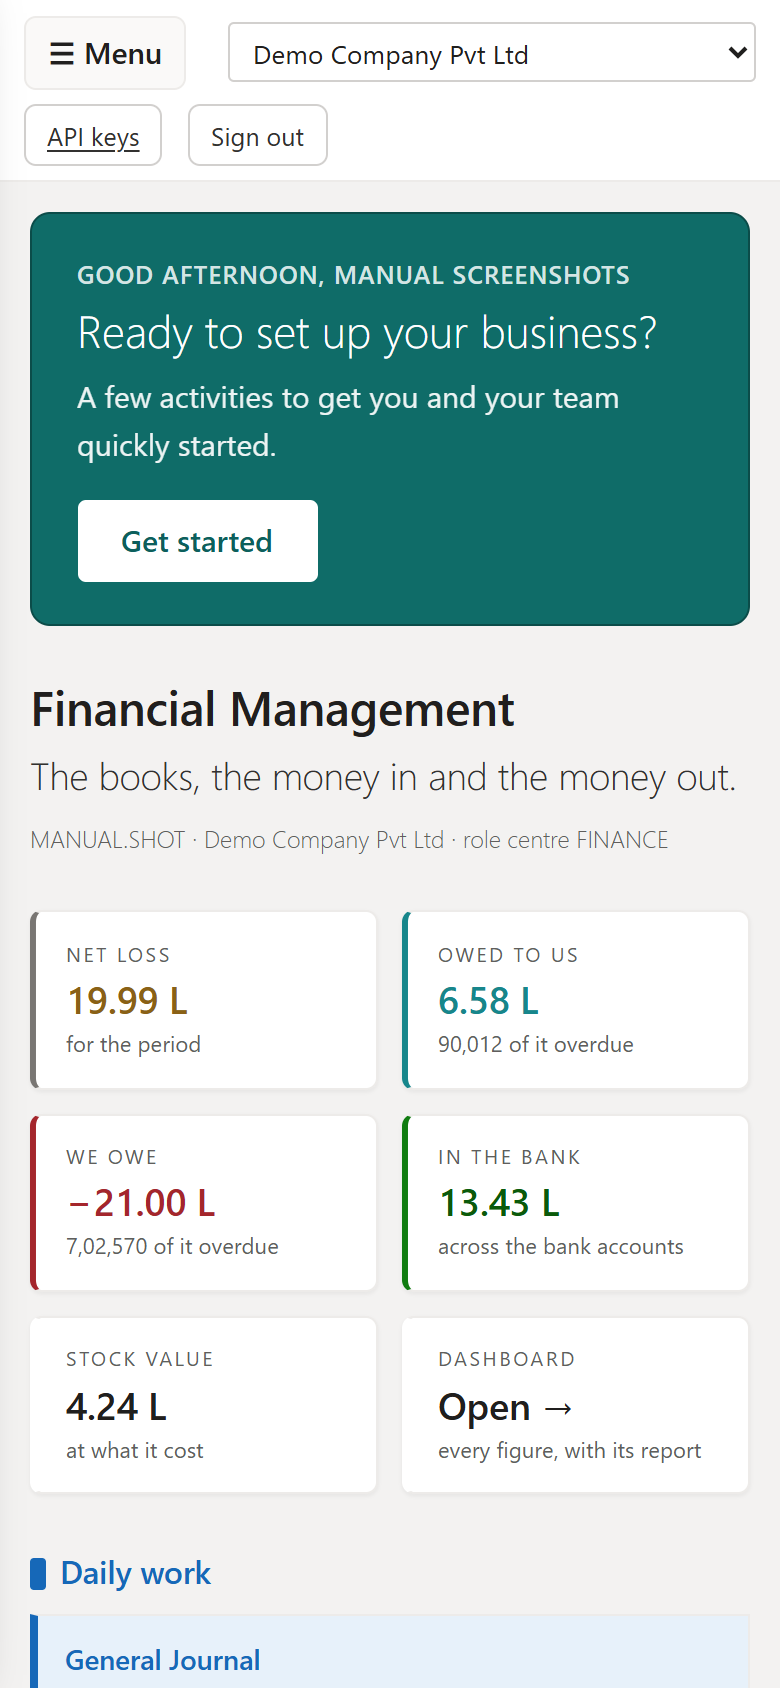
The same application works on a phone; the menu becomes a drawer.

  1. 1
    Open the same address on your phone and sign in.
  2. 2
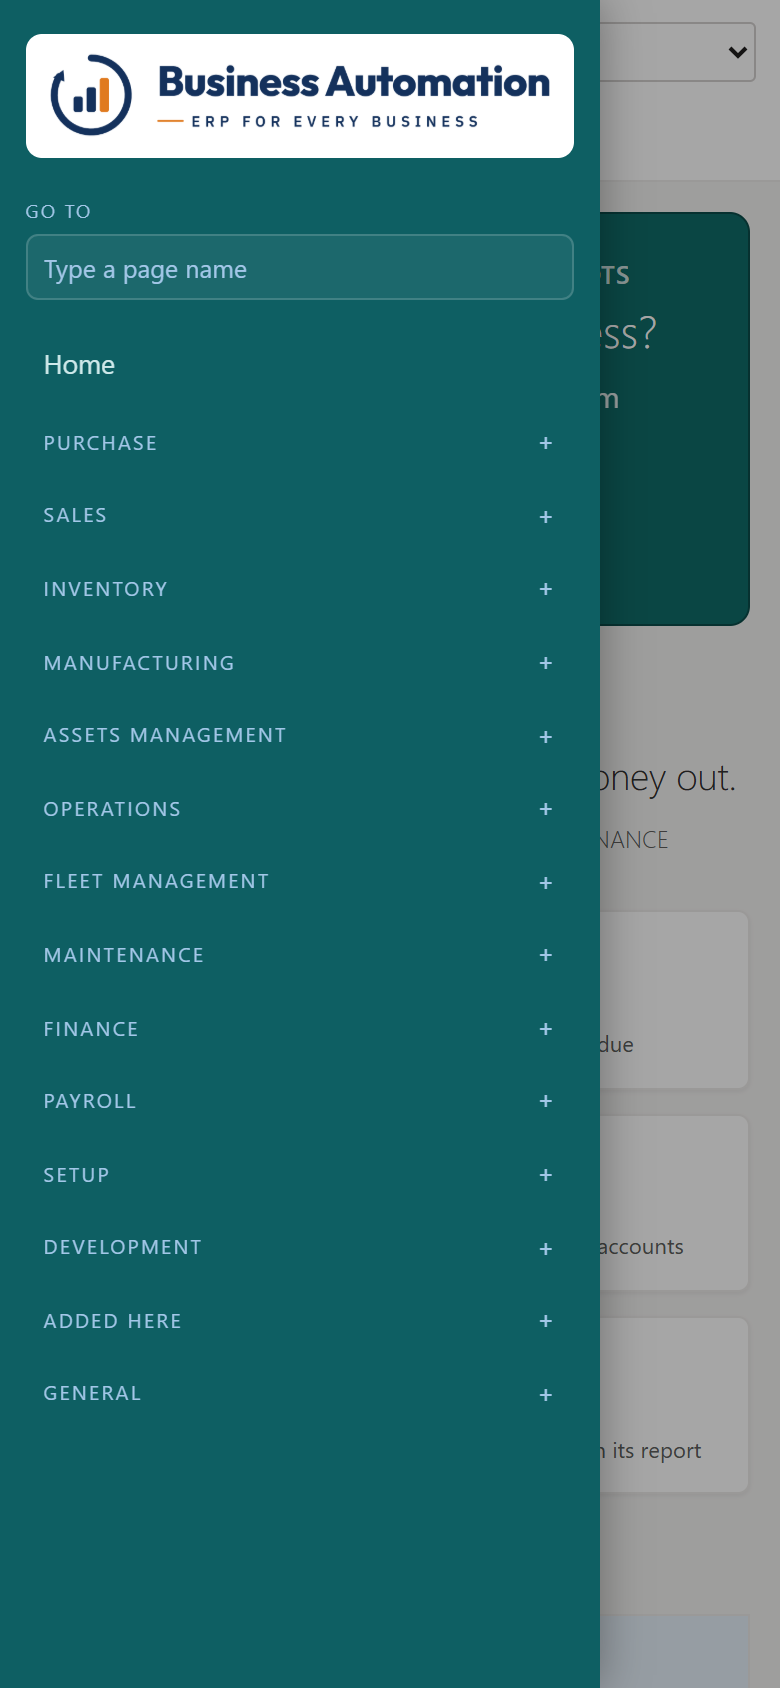
    Tap ☰ Menu at the top left. The menu slides over the page.
  3. 3
    Choose a page — the menu closes by itself. To close it without choosing, tap the shaded part of the screen.
Business Automation
The home page on a phone
Figure 1.3 The home page on a phone
Business Automation
The menu drawer open
Figure 1.4 The menu drawer open

Before anything can be posted: Getting started

Check that the company is ready to post.

WhereSetup › Getting started (/setup)
  1. 1
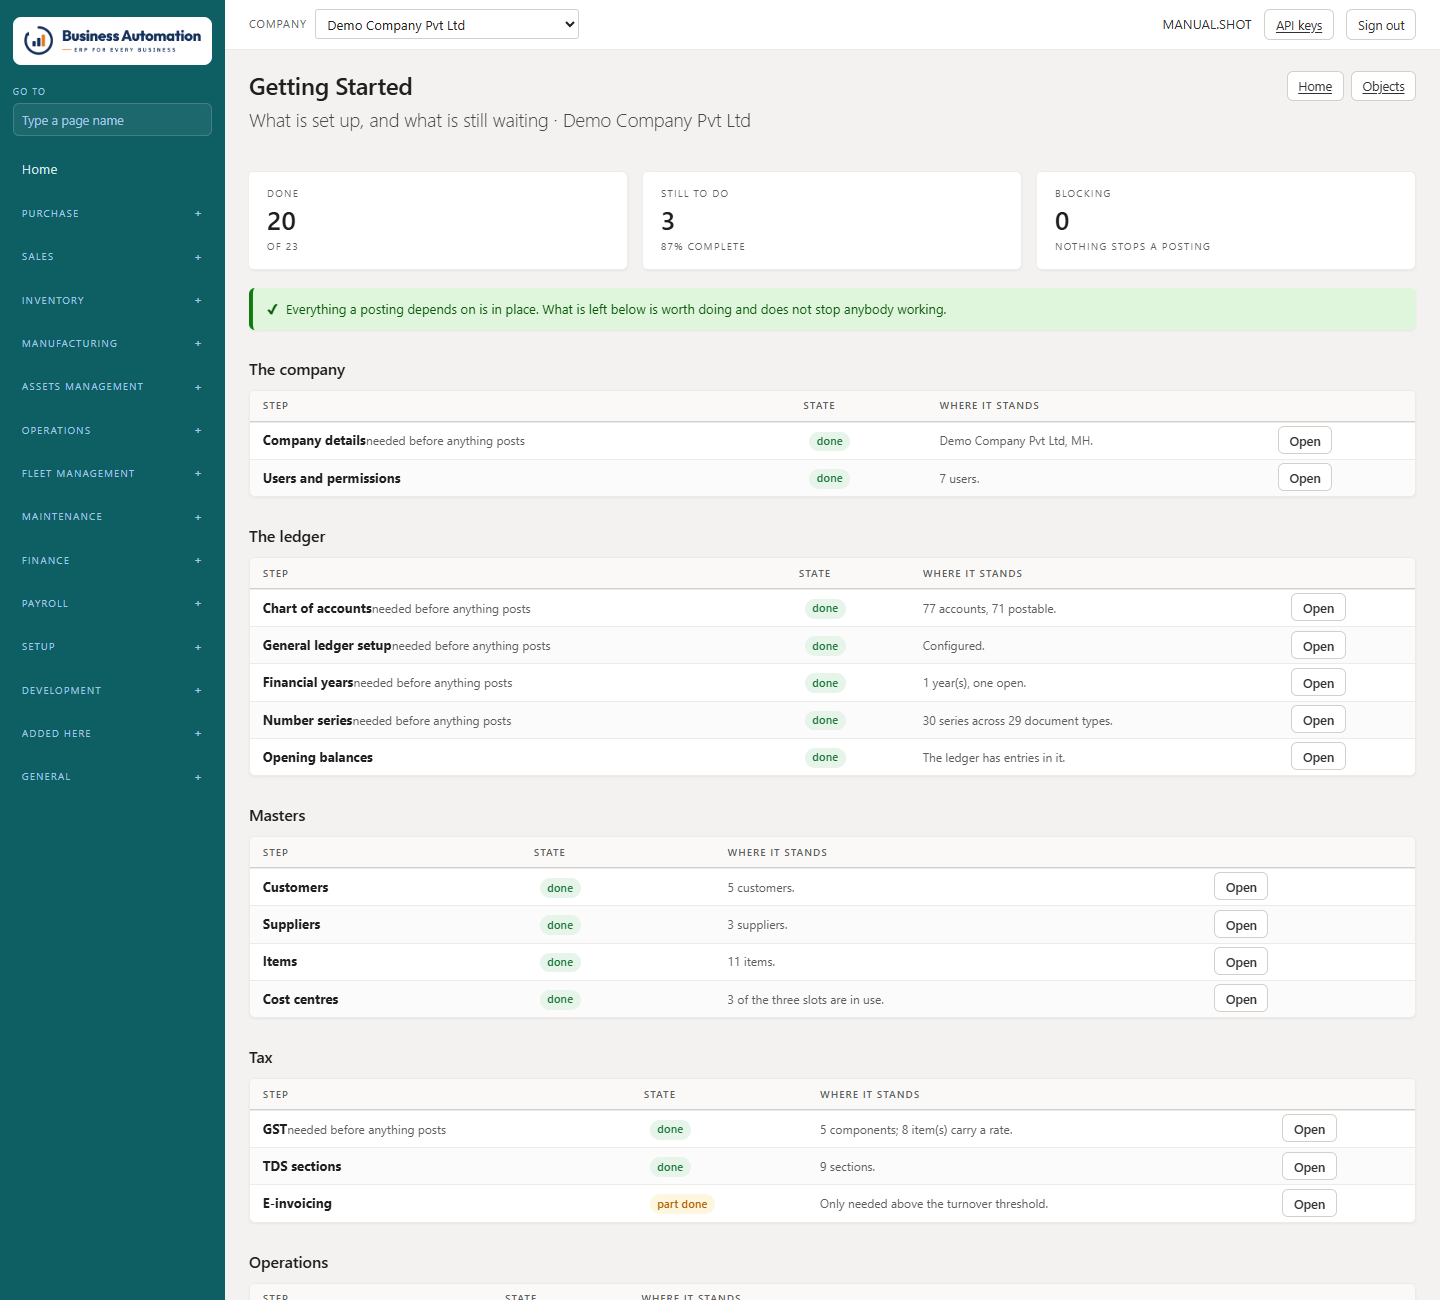
    Open Getting started. The page works out from your data what is set up and what is not, every time you open it. Nothing is ticked by hand.
  2. 2
    Complete the six essential steps — nothing posts until they are done: the company's own details with its GSTIN; a chart of accounts; general ledger setup; an open financial year; number series for your documents; posting groups.
  3. 3
    Work through the rest as time allows. Steps for modules you do not use stay quiet.
Business Automation
Getting started: what is ready and what is not, worked out from the data
Figure 1.5 Getting started: what is ready and what is not, worked out from the data

Finding your way around a list

Every list in the system works the same way.

  1. 1
    Click the number or code on a row to open the record. Open at the end of the row does the same.
  2. 2
    Press New to start a record (a posted ledger has no New — its rows are written by posting).
  3. 3
    Use the filter row to narrow what is shown.
  4. 4
    Follow any code shown as a link — a cost centre opens its analysis, an account opens its ledger, a document number opens the document or Search data.
  5. 5
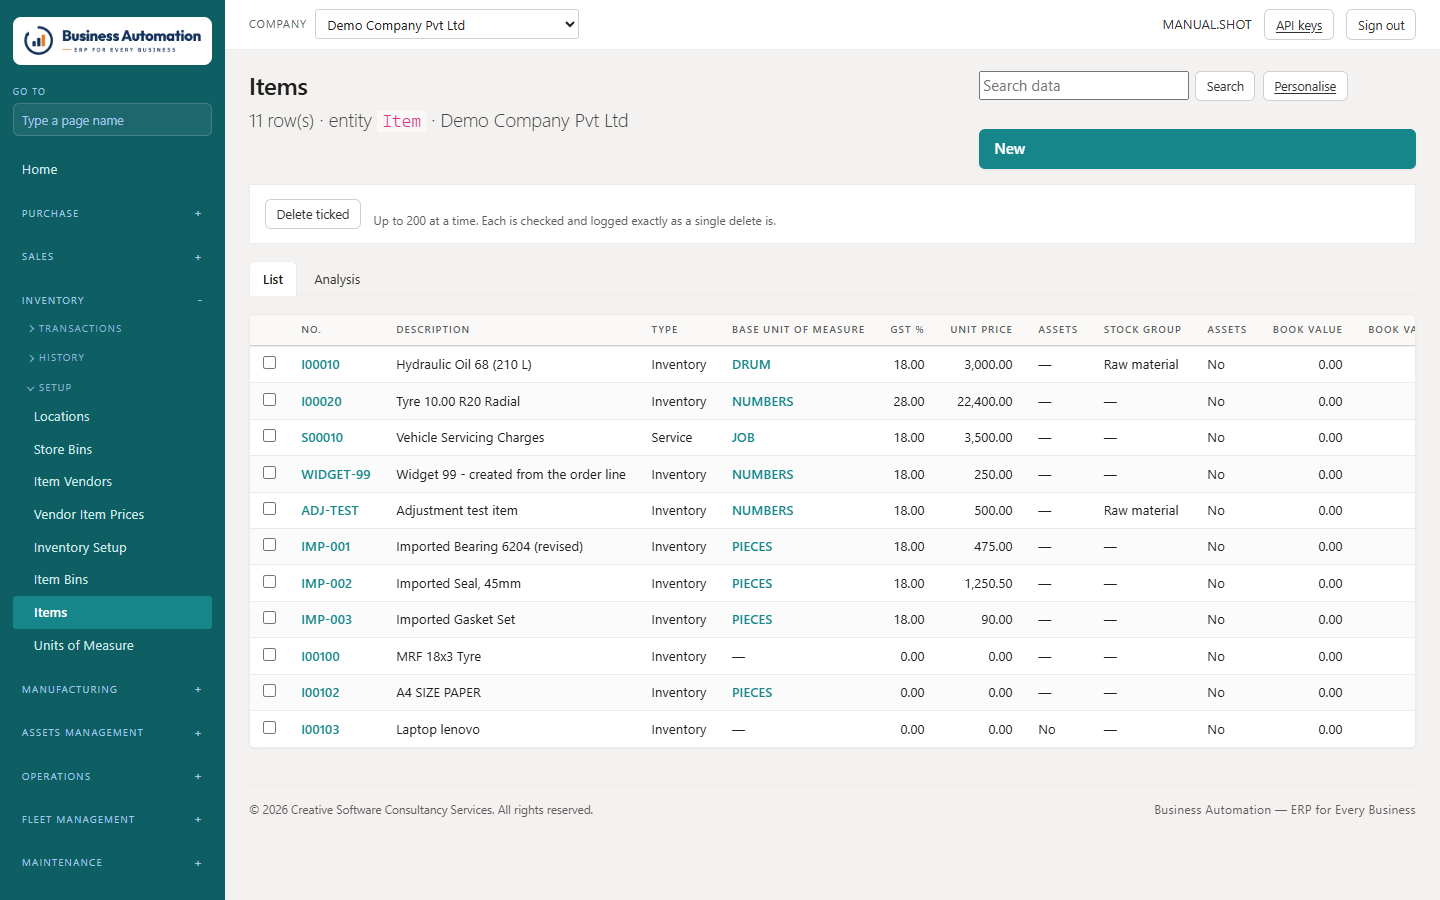
    Created by, Created on, Modified by and Modified on are always the last four columns: who keyed the record and when, and who last changed it. They cannot be typed. On a posted ledger they read Posted by and Posted at.
Business Automation
A list: filter row, links, and the four audit columns at the end
Figure 1.6 A list: filter row, links, and the four audit columns at the end

Personalise a list or card

Hide the columns you never use and put the rest in your own order. It changes the page for you only.

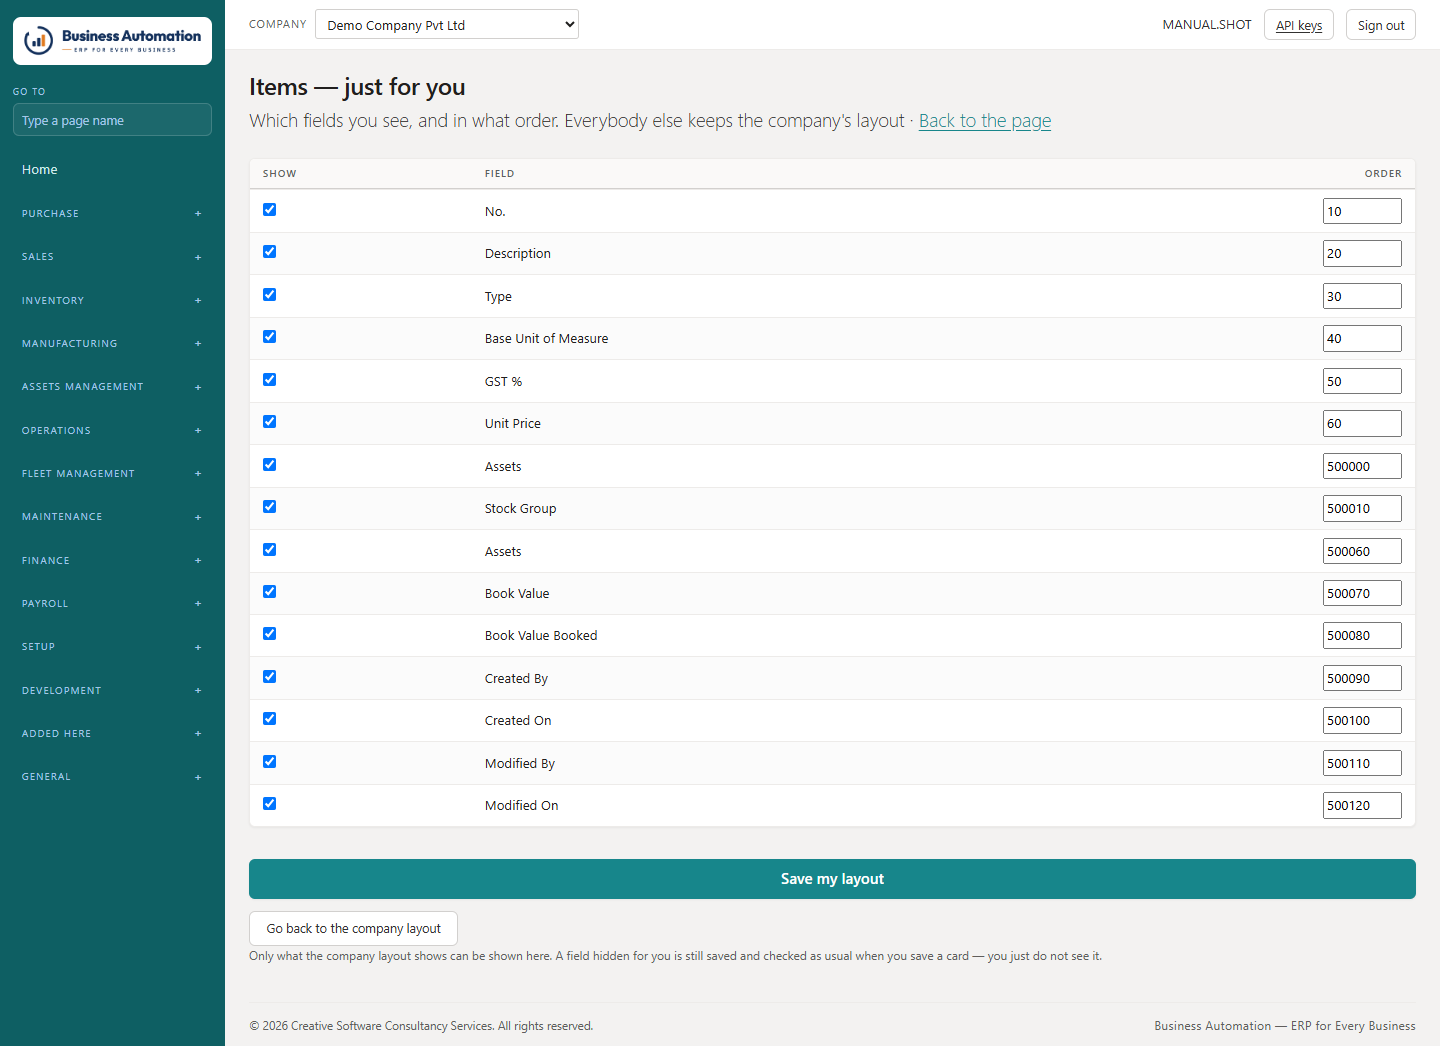
  1. 1
    Press Personalise at the top of a list (or beside Back to list on a card).
  2. 2
    Untick the fields you do not want to see.
  3. 3
    Change the order numbers to arrange the rest, and save.
Business Automation
Personalise: your own columns, in your own order
Figure 1.7 Personalise: your own columns, in your own order

Analysis: pivot and chart any list

Every list has a second way of looking at the same rows — a pivot grid or a chart.

  1. 1
    On any list, press Analysis. The page switches; press List to come back.
  2. 2
    Turn on Pivot mode: choose something down the side, something across the top and the figure where they meet. Dates can be cut by month, quarter or financial year.
  3. 3
    Use Showing to switch between the figures and a chart (columns, bars, line, filled line, pie or doughnut).
  4. 4
    Export the figures to a spreadsheet, or save the chart as PNG, JPG or SVG.
Business Automation
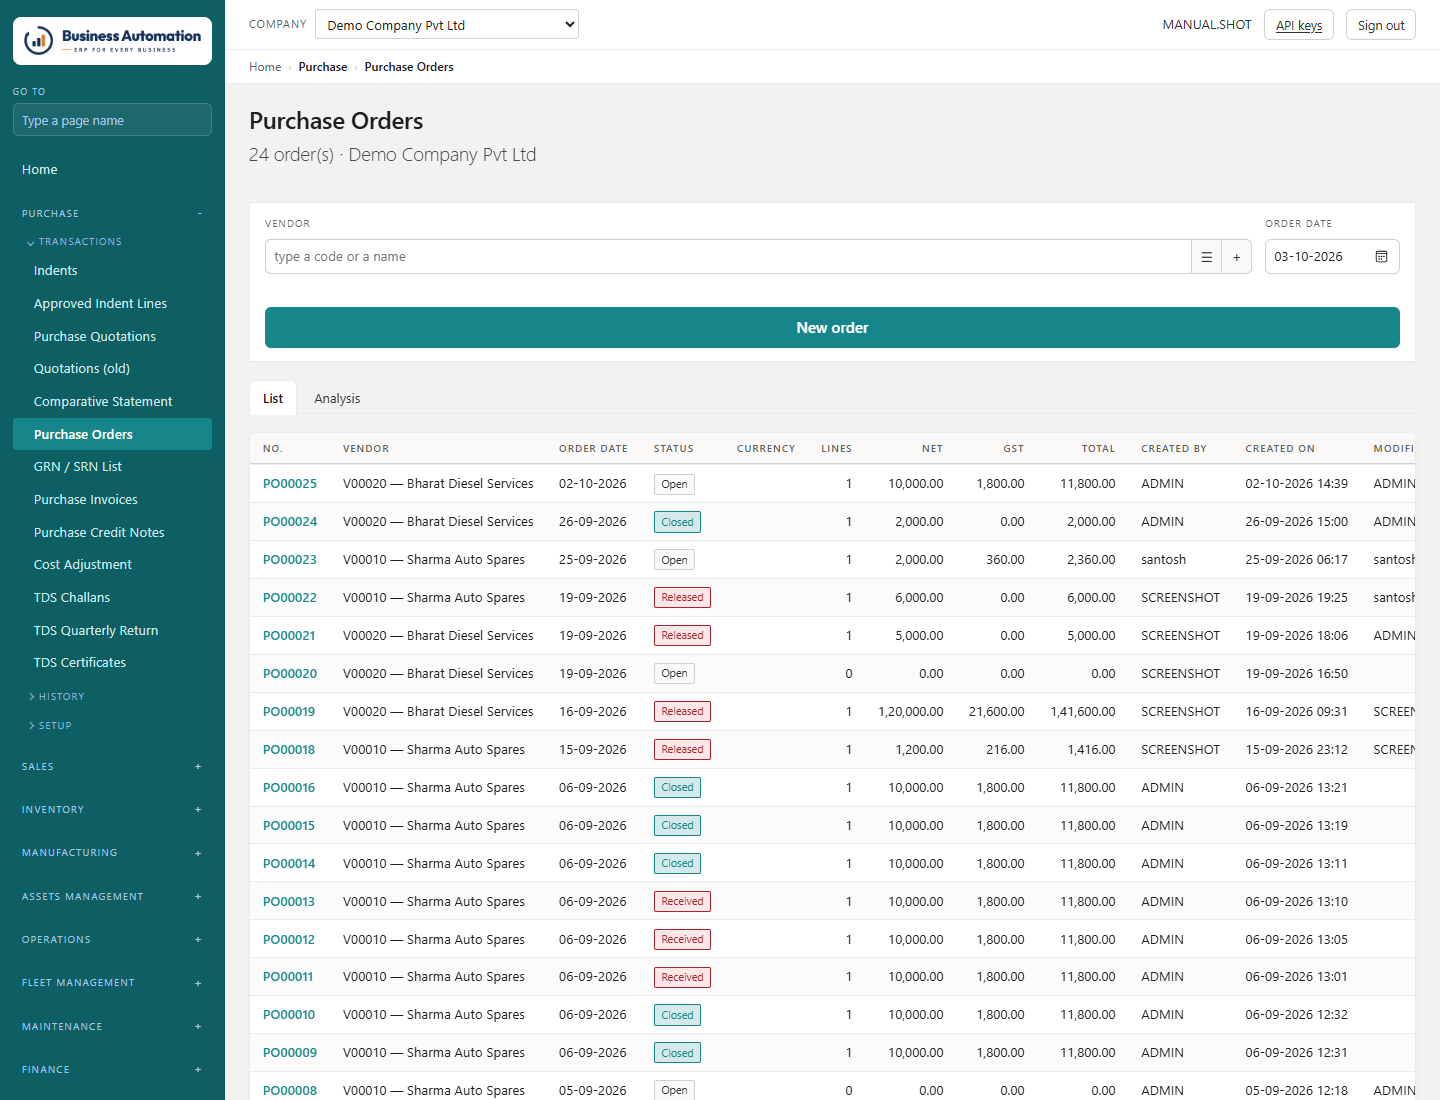
Analysis on the purchase order list
Figure 1.8 Analysis on the purchase order list
💡
Tip. Whatever filter narrows the list also narrows the analysis. "Issues by item by month" or "purchases by vendor by quarter" is two clicks from the list itself.

Moving from one record to the next

Step through records without going back to the list.

  1. 1
    Open a card from a list. At the top right is ⏮ First · ‹ Previous · 7 of 83 · Next › · Last ⏭.
  2. 2
    Press Next or Previous to walk the records of that list. The list's filter goes with you.
  3. 3
    Keyboard: Ctrl+Alt+Home (first), Ctrl+Alt+Page Up (previous), Ctrl+Alt+Page Down (next), Ctrl+Alt+End (last).
⚠
Important. Save before you step. A step leaves the card, and anything typed and not saved is not kept.

The "How it works" box on every document

A short guide to the document's steps, from entering it to posting it.

  1. 1
    Open any document — an order, invoice, indent, job card and so on.
  2. 2
    Beside the First / Previous / Next / Last bar, click ? How it works.
  3. 3
    Read the numbered steps. Click it again to fold it away.
Business Automation
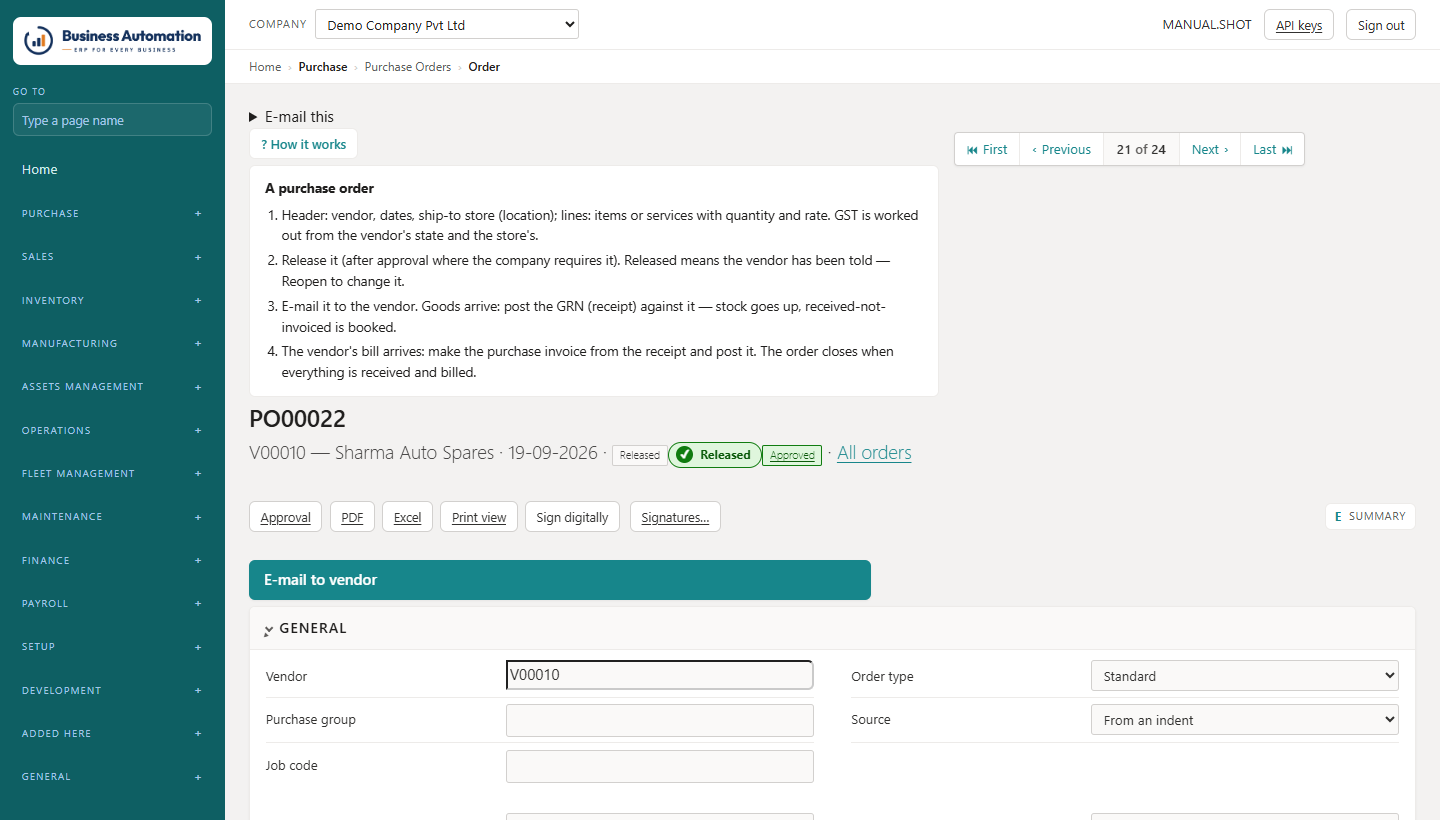
"How it works" opened on a purchase order, beside the record bar
Figure 1.9 "How it works" opened on a purchase order, beside the record bar

Working with a document

All documents have a header and lines, and follow the same order of work.

  1. 1
    Create the document. It gets its number straight away.
  2. 2
    Fill in the header — who it is for, when, which store, which cost centres.
  3. 3
    Add the lines — what is on it.
  4. 4
    Release it, where the document has a release step. Released means the other side has been told, so the header can no longer be changed.
  5. 5
    Post it. Now it is in the accounts.
  • Fields that point at a master show a list as you type (code or name). ☰ opens the whole list in a new tab; ↗ opens the record the field holds. A code that is not in the master, or is blocked, is refused when you save.
  • The document's figures (lines, totals, cost centre) are behind the small E at the top right; C folds them away.
  • Attachments (the supplier's bill, the signed challan, the weighbridge slip) follow the document down the chain and stay on the posted document, read-only.

Cost centres

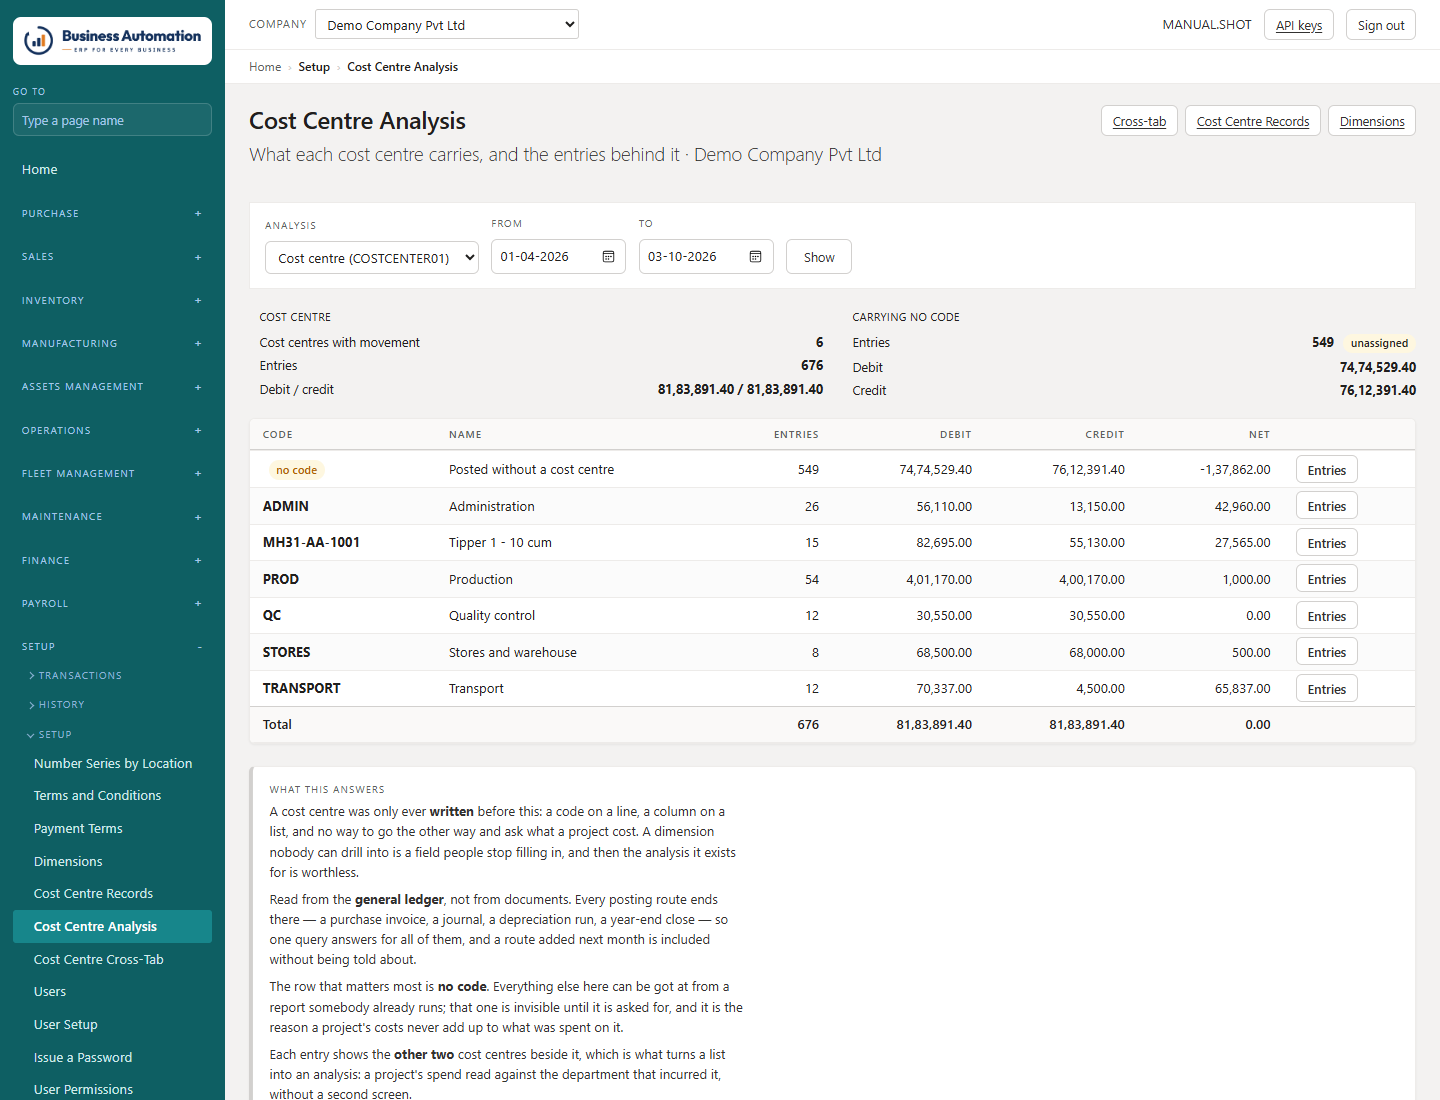
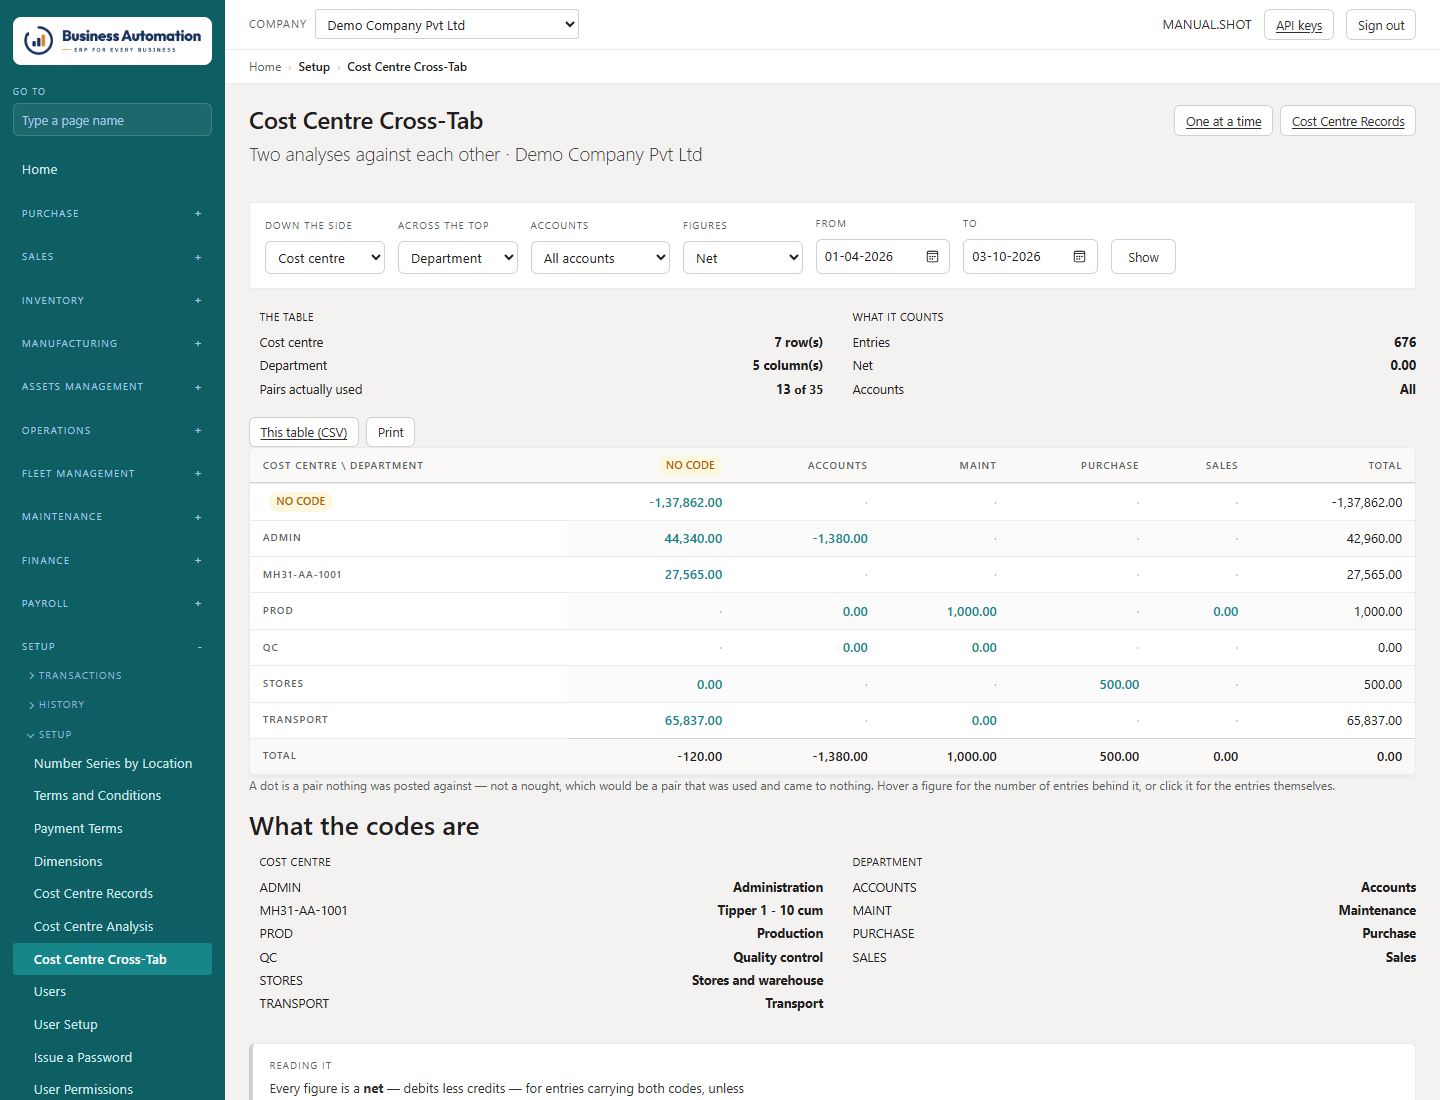
Three codes travel on every document so you can later ask what a project or department cost.

  1. 1
    Fill in Cost centre 01, 02 and 03 on the header. Your company decides what each means (project, department, vertical) and the names on screen are your own.
  2. 2
    The lines take the header's codes. Change a line's code if part of the document belongs elsewhere — what is on the line is what reaches the accounts.
⚠
Important. Getting cost centres wrong is invisible: the totals still add up, the money just falls under "unattributed".

Search data

Find any number, code, name or amount across every table.

WhereSearch data box at the head of every list, or /find
  1. 1
    Type a number, a code, a name or an amount. Part of a number works too: 00027 finds PO00027.
  2. 2
    Every table that knows it answers under its own heading, with its newest ten rows and a link into each.
Business Automation
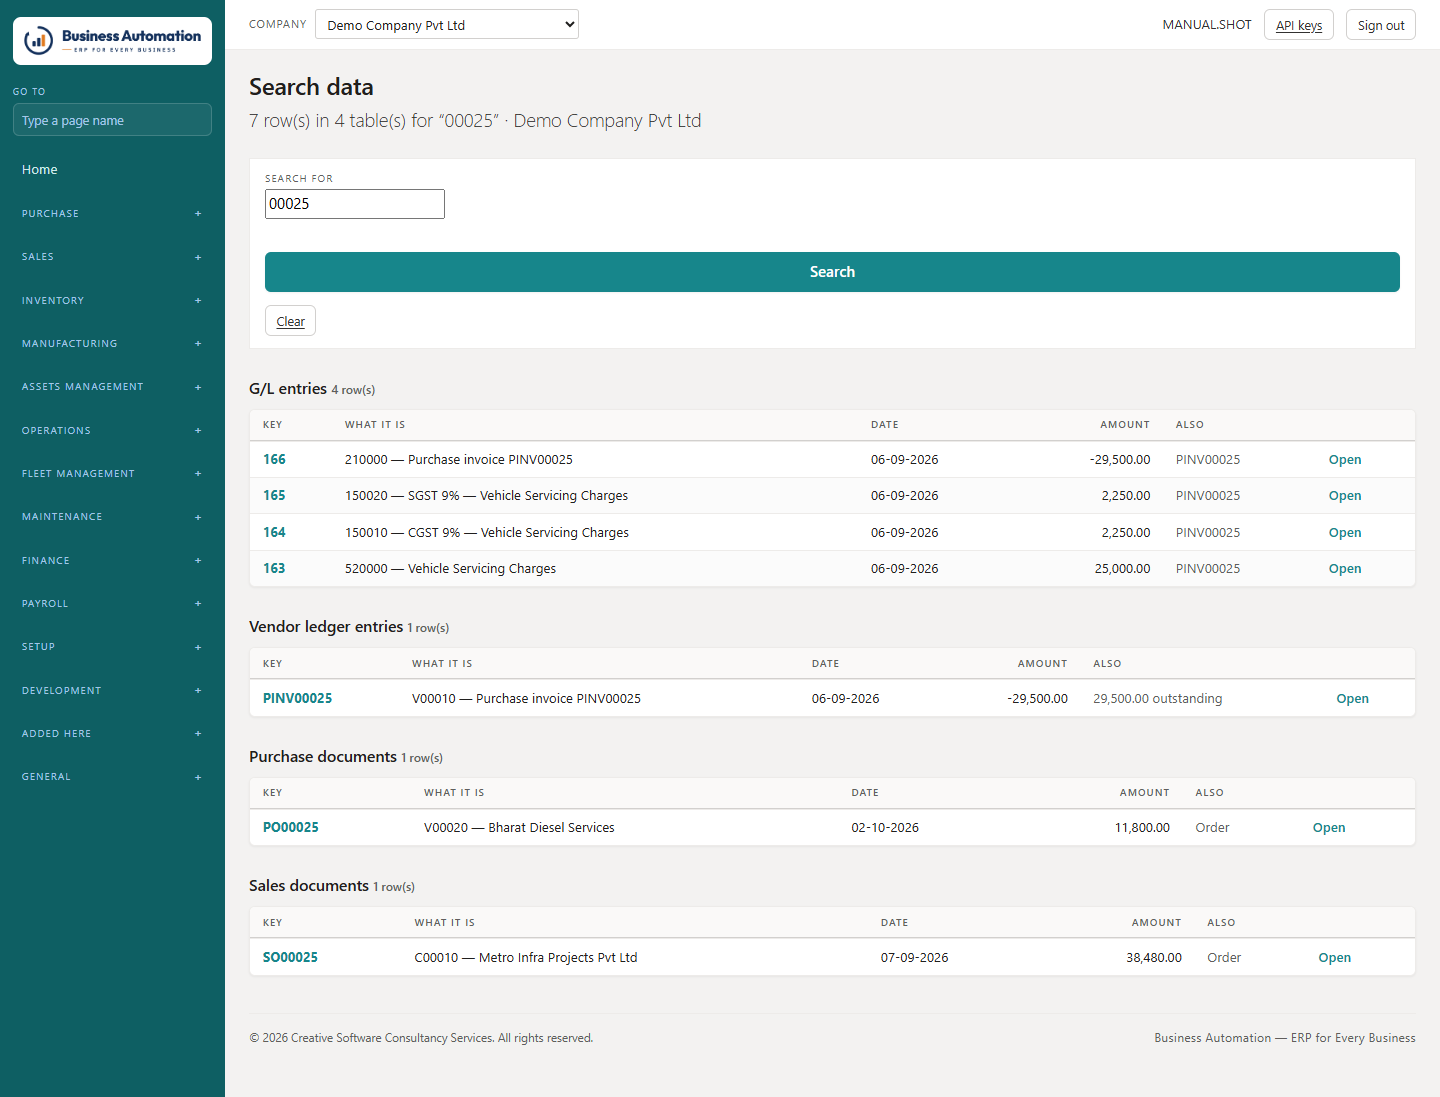
Search data: every table that knows the number
Figure 1.10 Search data: every table that knows the number
💡
Tip. An amount finds the entries for that amount — the quickest way to trace a figure on a bank statement.

What is on the shelf

See quantity by item and store — the figure the system will let you issue against.

WhereInventory › Stock on Hand (/inventory/stock)
  1. 1
    Open Stock on Hand. Each row is an item at a location.
  2. 2
    Choose a location chip to see one store, or Everywhere.
  3. 3
    Press By bin to break the figures down to item, store and rack. Press By store to return.
  4. 4
    Press Movements on any row to open the item ledger narrowed to it.
Business Automation
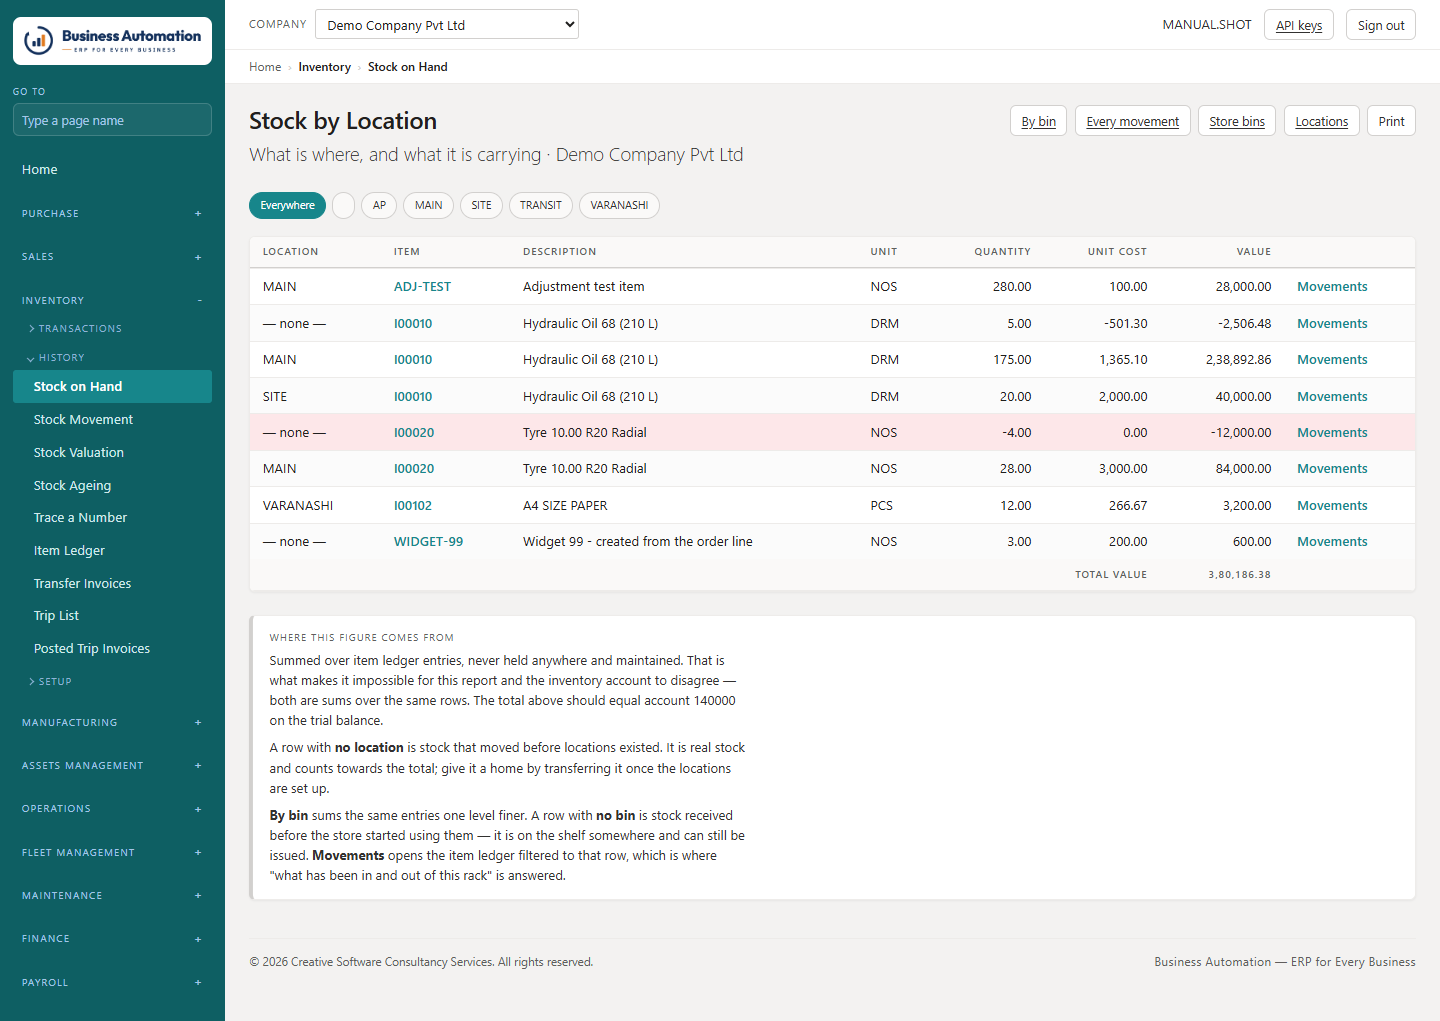
Stock on hand by item and store
Figure 2.1 Stock on hand by item and store
Business Automation
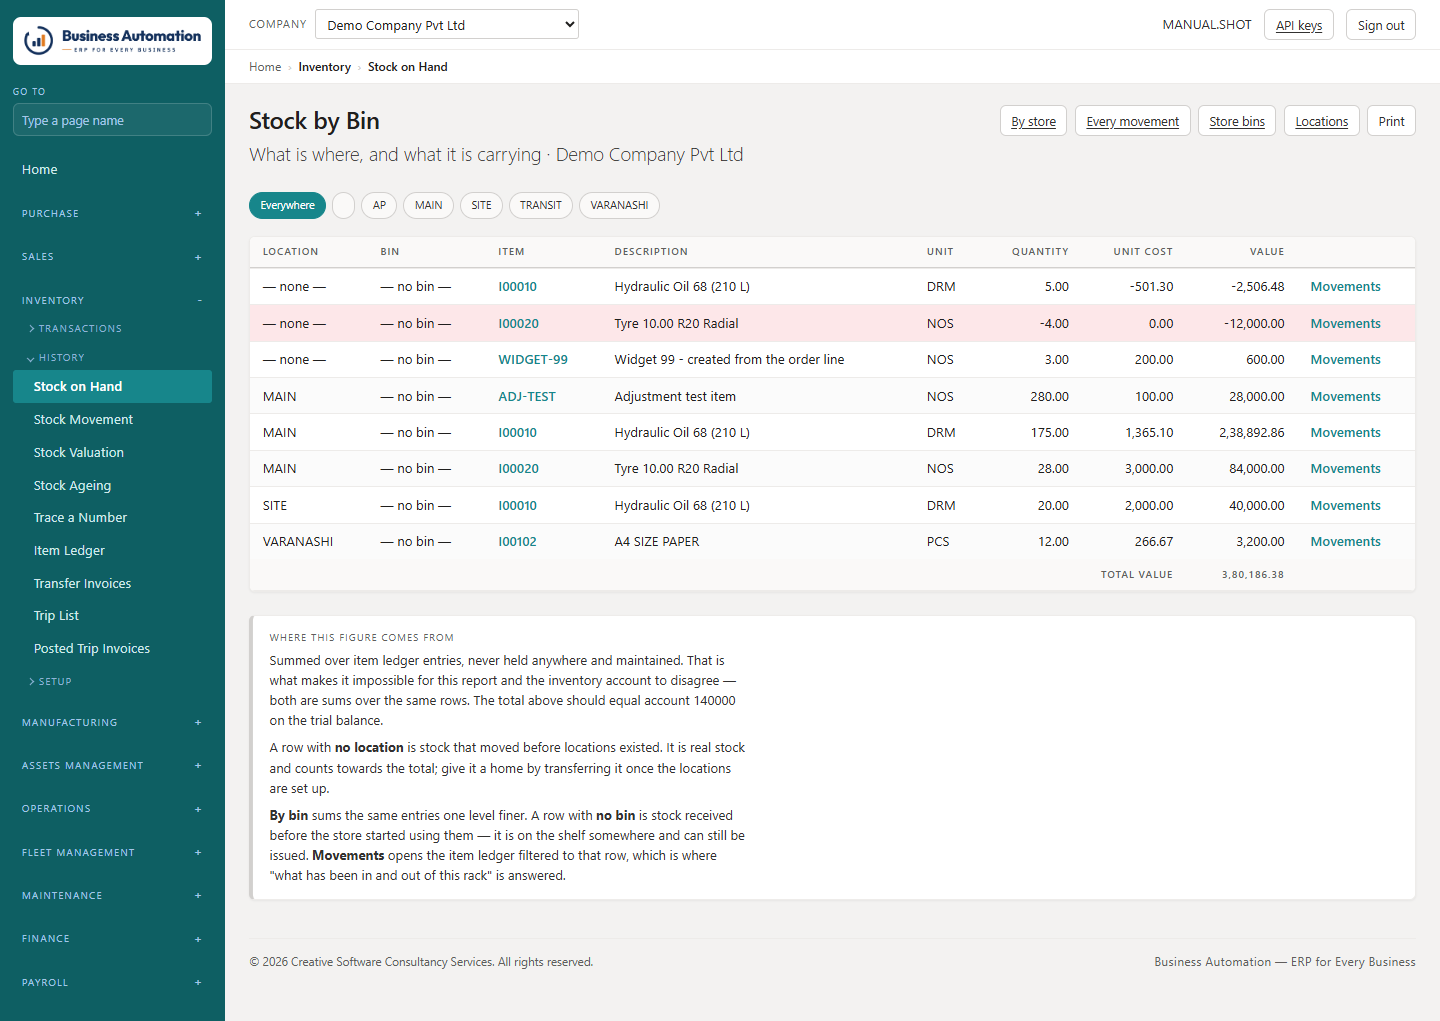
The same stock, by bin
Figure 2.2 The same stock, by bin
ℹ
Note. A row saying no bin is stock that came in before the store used bins — it is real stock and can be issued. A negative bin row means something was issued from a rack it was never booked into.

Receiving goods (GRN)

Record what arrived against the purchase order — you never key a receipt from scratch.

WherePurchase › GRN / SRN List (/purchase/grn-list) → New from order
  1. 1
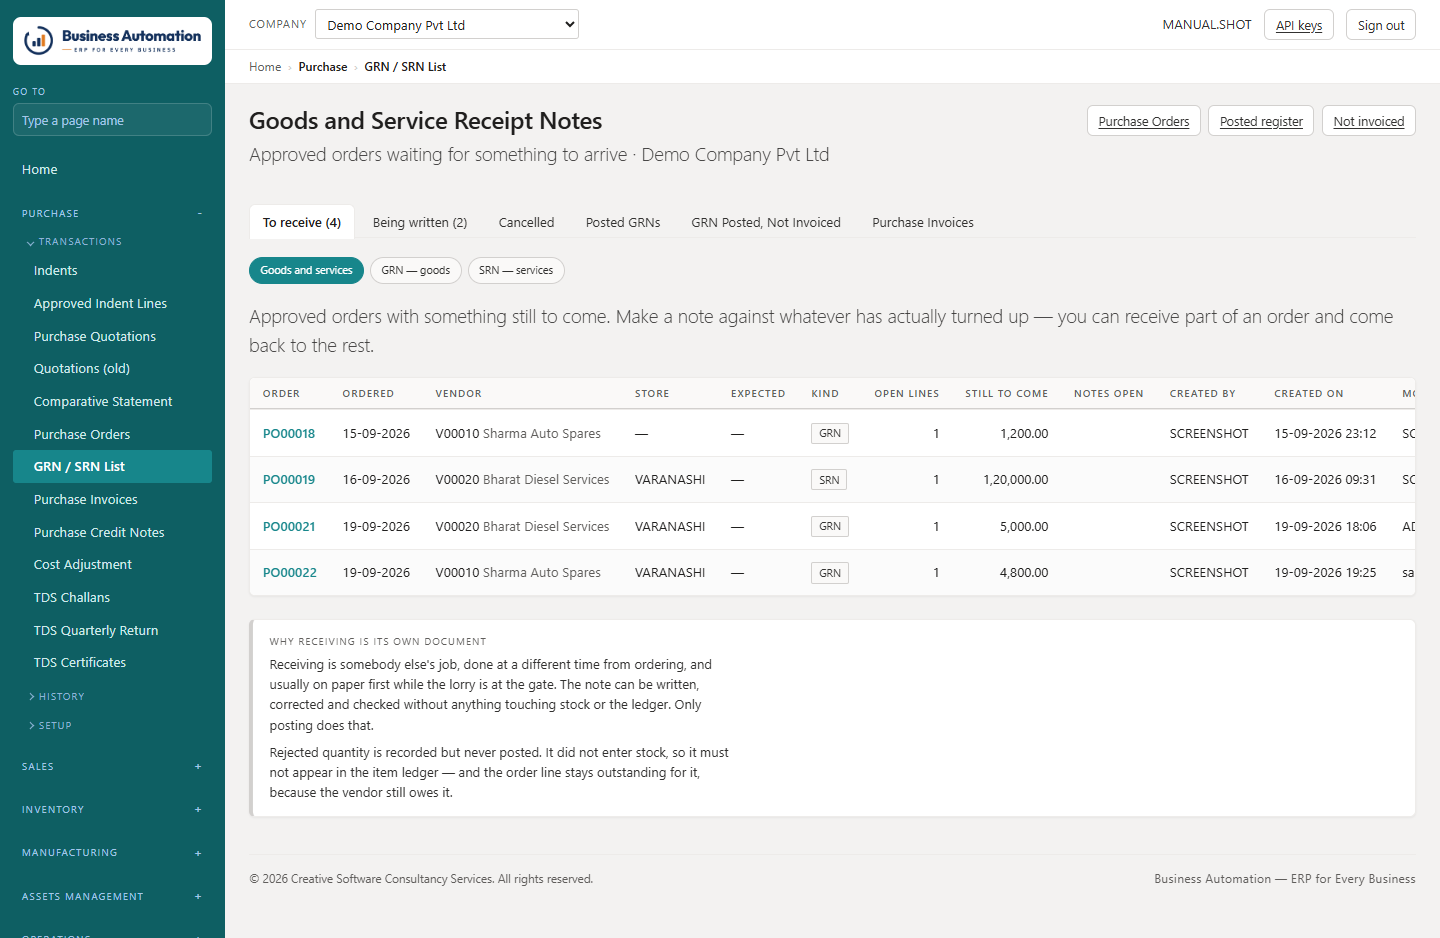
    Open the list of orders awaiting receipt. Overdue orders are marked.
  2. 2
    Choose the order the load is against. Every outstanding line comes onto the note with the accepted quantity set to what is still owed.
  3. 3
    Change the figures that are wrong — that is the whole job.
  4. 4
    Record what the challan said, and what you accepted or turned away. Give each line the bin it is put away in.
  5. 5
    For items with serial numbers, tick which units arrived and were accepted.
  6. 6
    Attach the challan (and the gate photo).
  7. 7
    Post it.
Business Automation
Orders waiting to be received
Figure 2.3 Orders waiting to be received
Business Automation
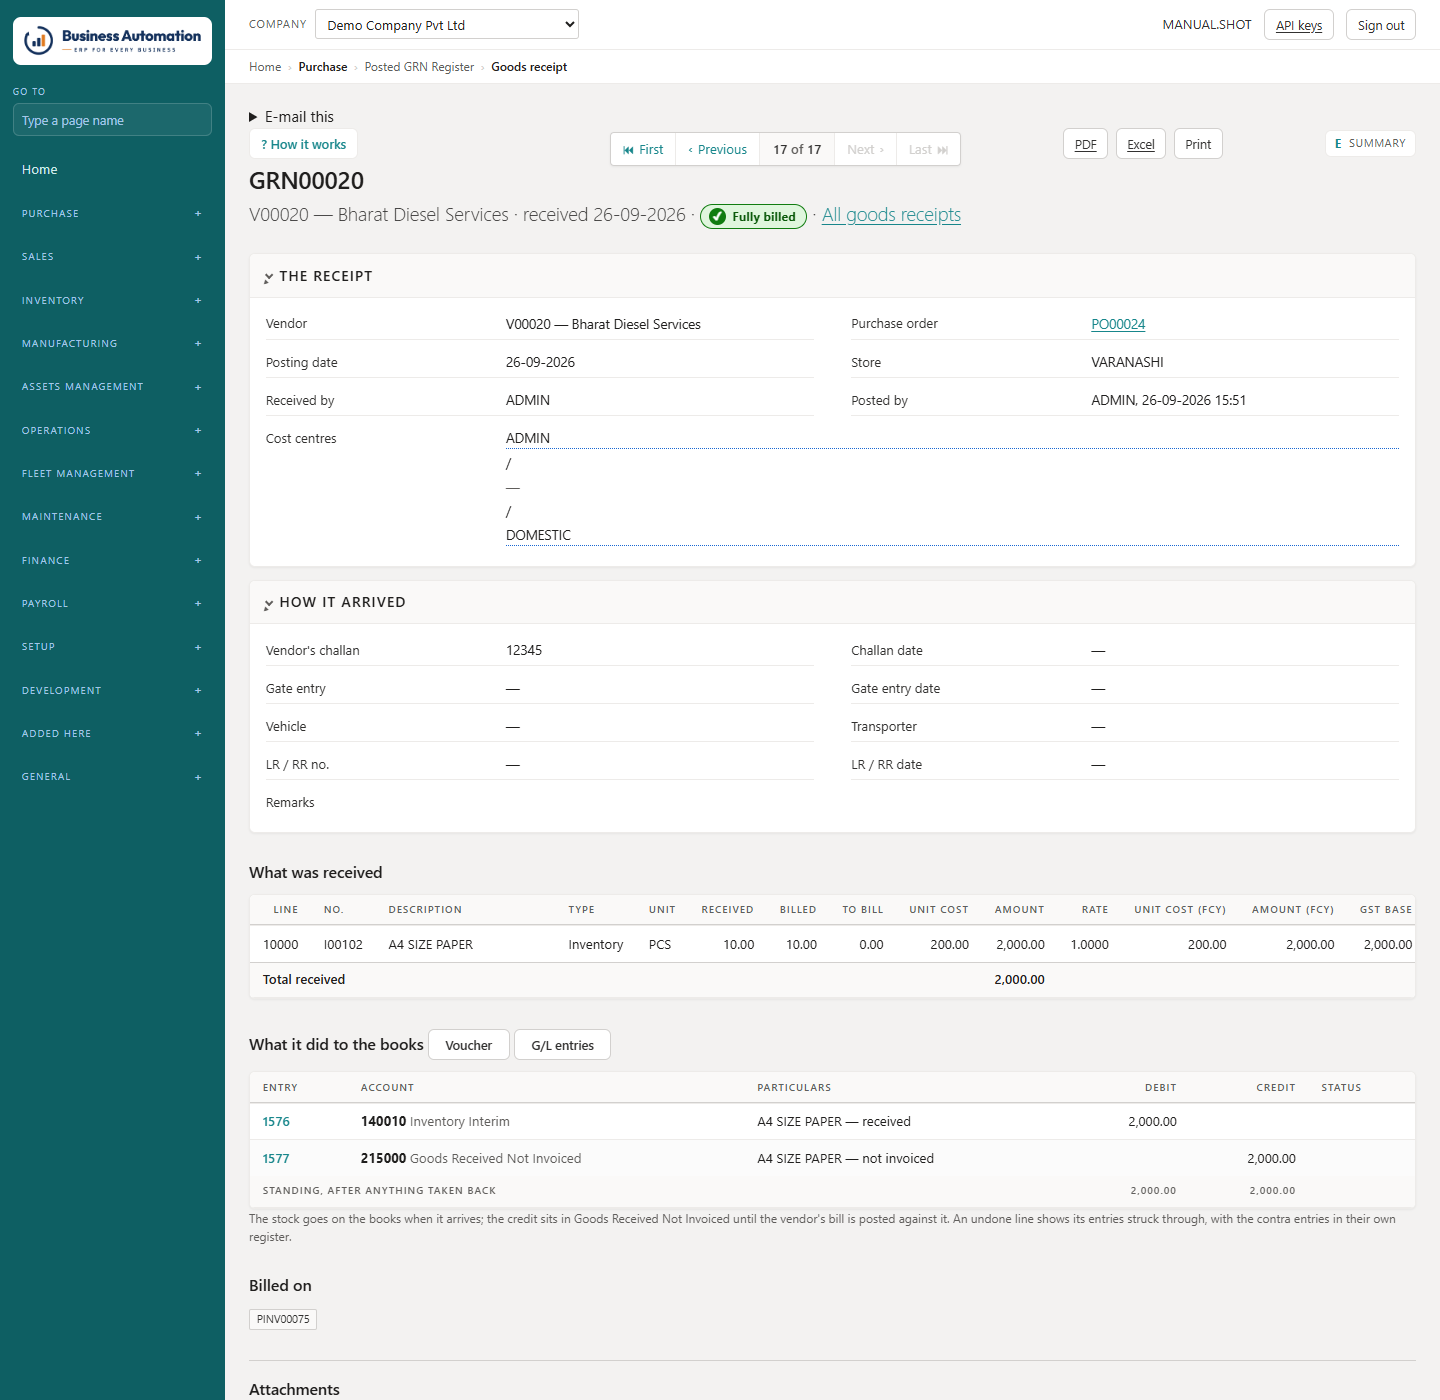
A goods receipt note
Figure 2.4 A goods receipt note
ℹ
Note. Rejected quantity is not posted at all. It never entered your stock, and the order line stays outstanding for it because the supplier still owes it.
💡
Tip. Wrong load? Cancel the note before posting — the order goes back to fully outstanding. After posting, correct it with Undo on the line (see Buying) or a purchase credit note.
  • What posting does: stock goes up, and the value sits in Goods Received Not Invoiced until the supplier's bill arrives.
  • Serial-numbered items: a receipt is refused until the serial numbers are on the order line (one per line of the box, from the packing list). For batch items, enter Batches arriving — H-2291 120 — on the order line.

Issuing material against an indent

Hand material over against an approved indent and charge it to the job, machine or cost centre.

WhereInventory › Approved Indents (/indents/to-issue) · Issue From Stock (/indents/issue)
  1. 1
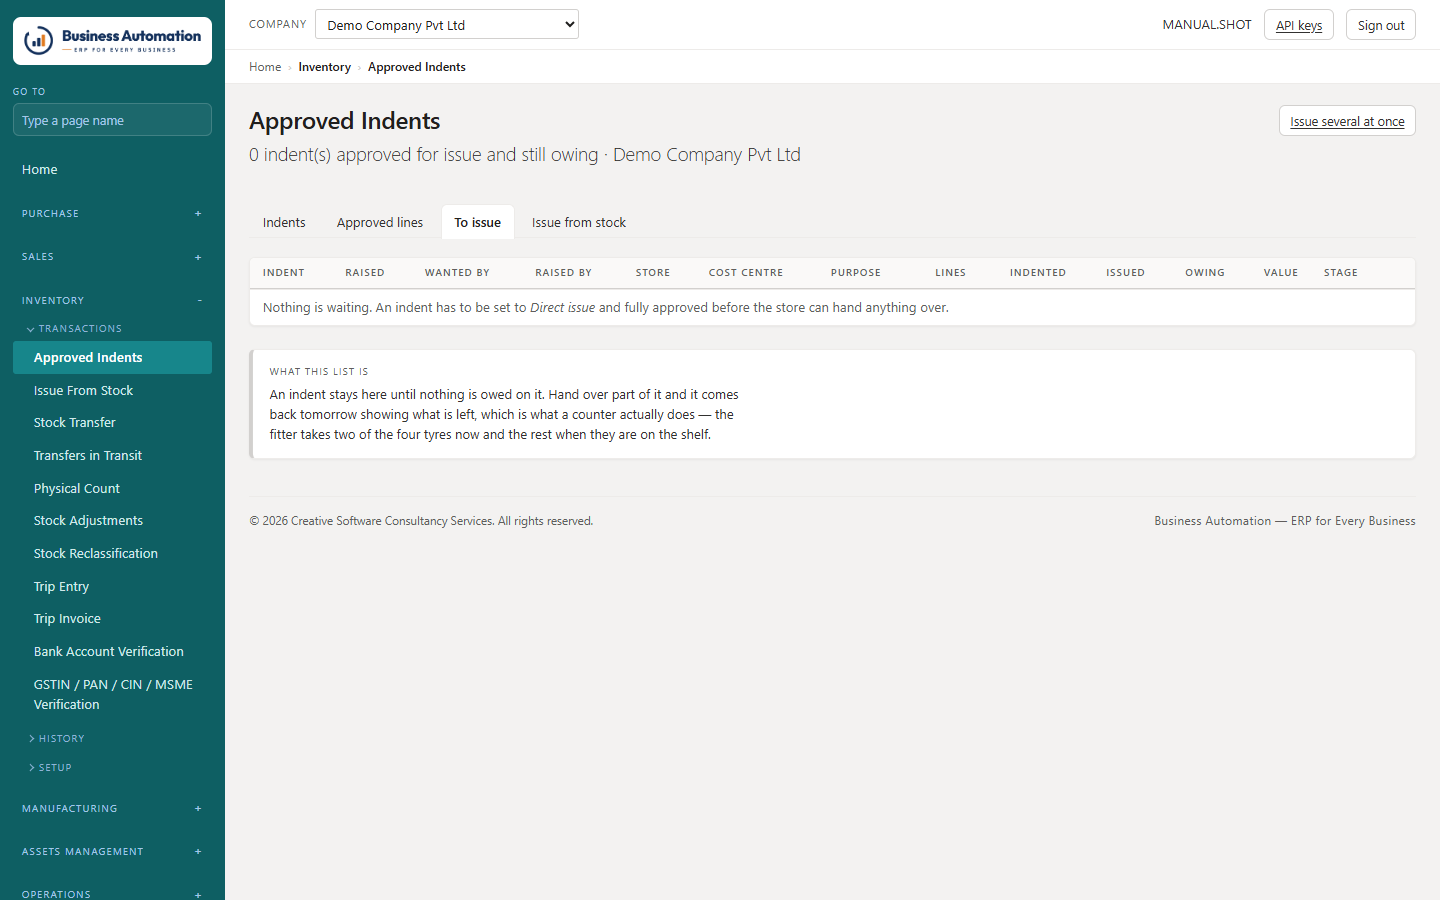
    Open Approved Indents. Every approved direct issue still owing is listed, newest need first; those past their wanted by date are marked.
  2. 2
    Open the indent. Each line still owing shows what is in this store and anywhere.
  3. 3
    Type how many go now, the bin they come off, and who is taking them.
  4. 4
    For serial-numbered items, tick the numbers being handed over under Serial numbers. For batch items, type how much of each batch and press Take these.
  5. 5
    Press Issue what is typed.
Business Automation
Approved indents waiting at the counter
Figure 2.5 Approved indents waiting at the counter
Business Automation
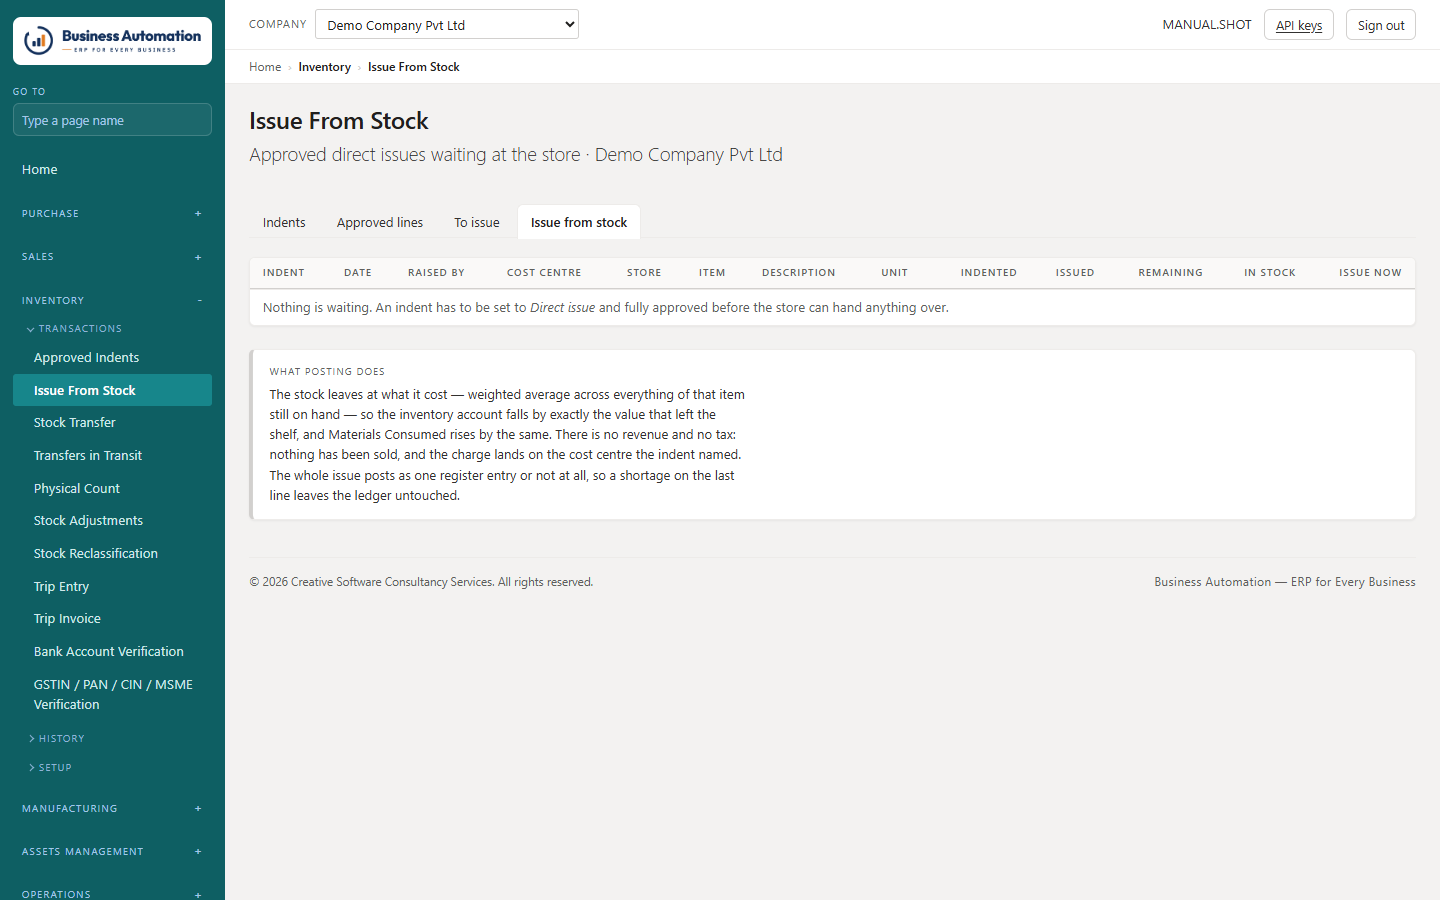
Issue from stock
Figure 2.6 Issue from stock
⚠
Important. You cannot issue what is not there. Negative stock is refused at the moment you can still walk over and look.
💡
Tip. Hand over part of it and the indent comes back showing what is left. The name of whoever collected it is kept on the stock entry.

Moving stock between stores

Move quantity from one location to another; the value does not change.

WhereInventory › Stock Transfer (/indents/transfer)
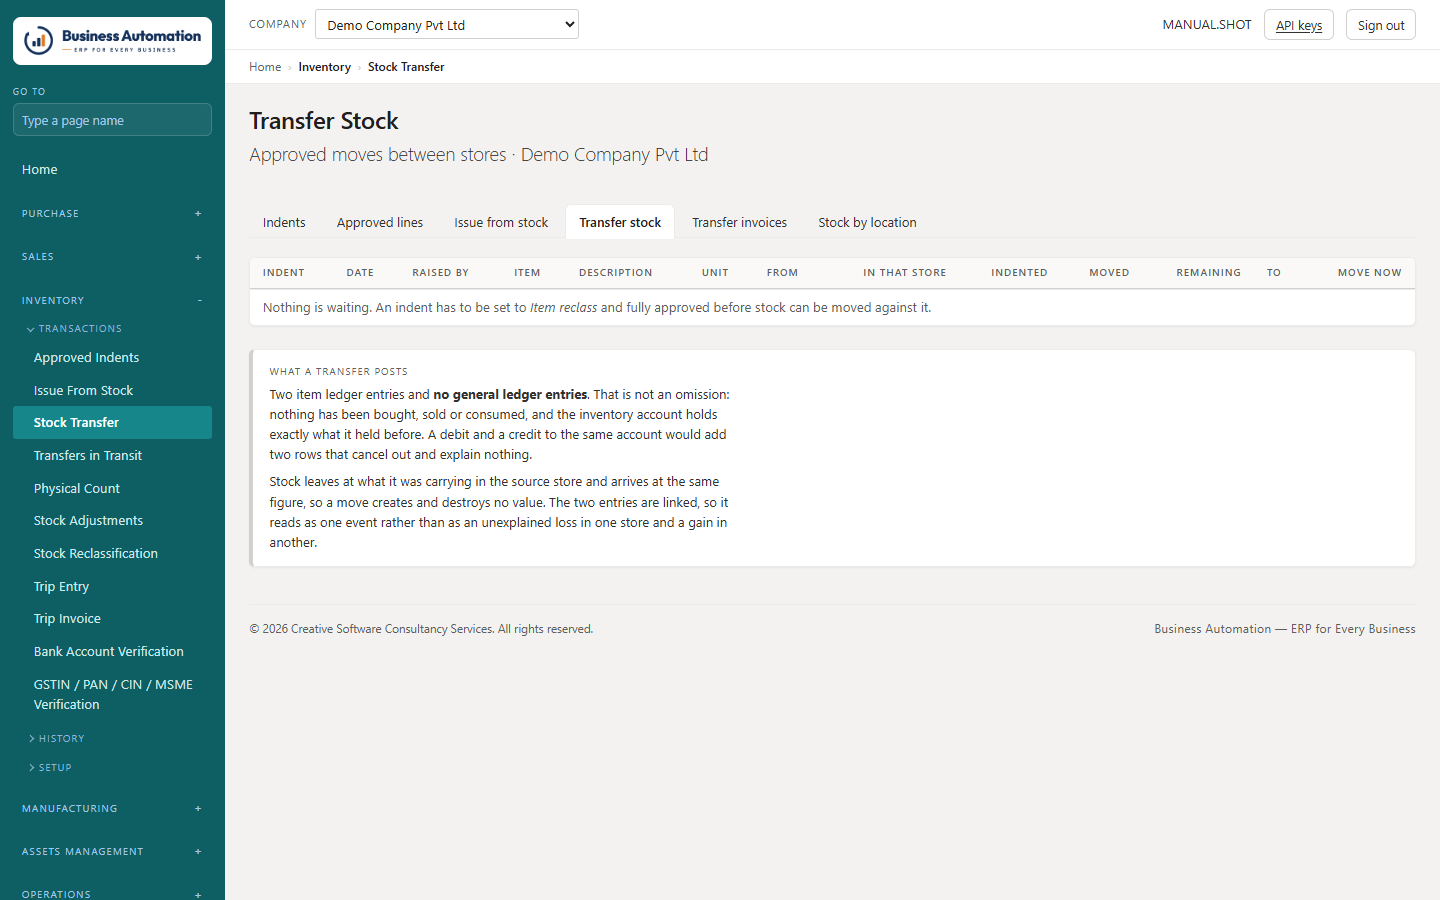
  1. 1
    Open Stock Transfer and choose the indent line or item, the store it leaves and the store it goes to.
  2. 2
    For serial-numbered stock, pick the numbers on the indent line first.
  3. 3
    Post. If Transfers go via in-transit is set in Inventory Setup, the goods wait in the in-transit store.
  4. 4
    At the receiving store, open Inventory › Transfers in Transit, type how much arrived and the bin, and press Receive.
Business Automation
Stock transfer
Figure 2.7 Stock transfer
ℹ
Note. Moving stock to a store under a different GSTIN raises a transfer invoice (STI00001) as well. Register it on Finance › E-Invoices and take its e-way bill from E-Way Bills.

Locations and their bins

Set up your stores, and the racks inside them.

WhereInventory › Locations (/locations)
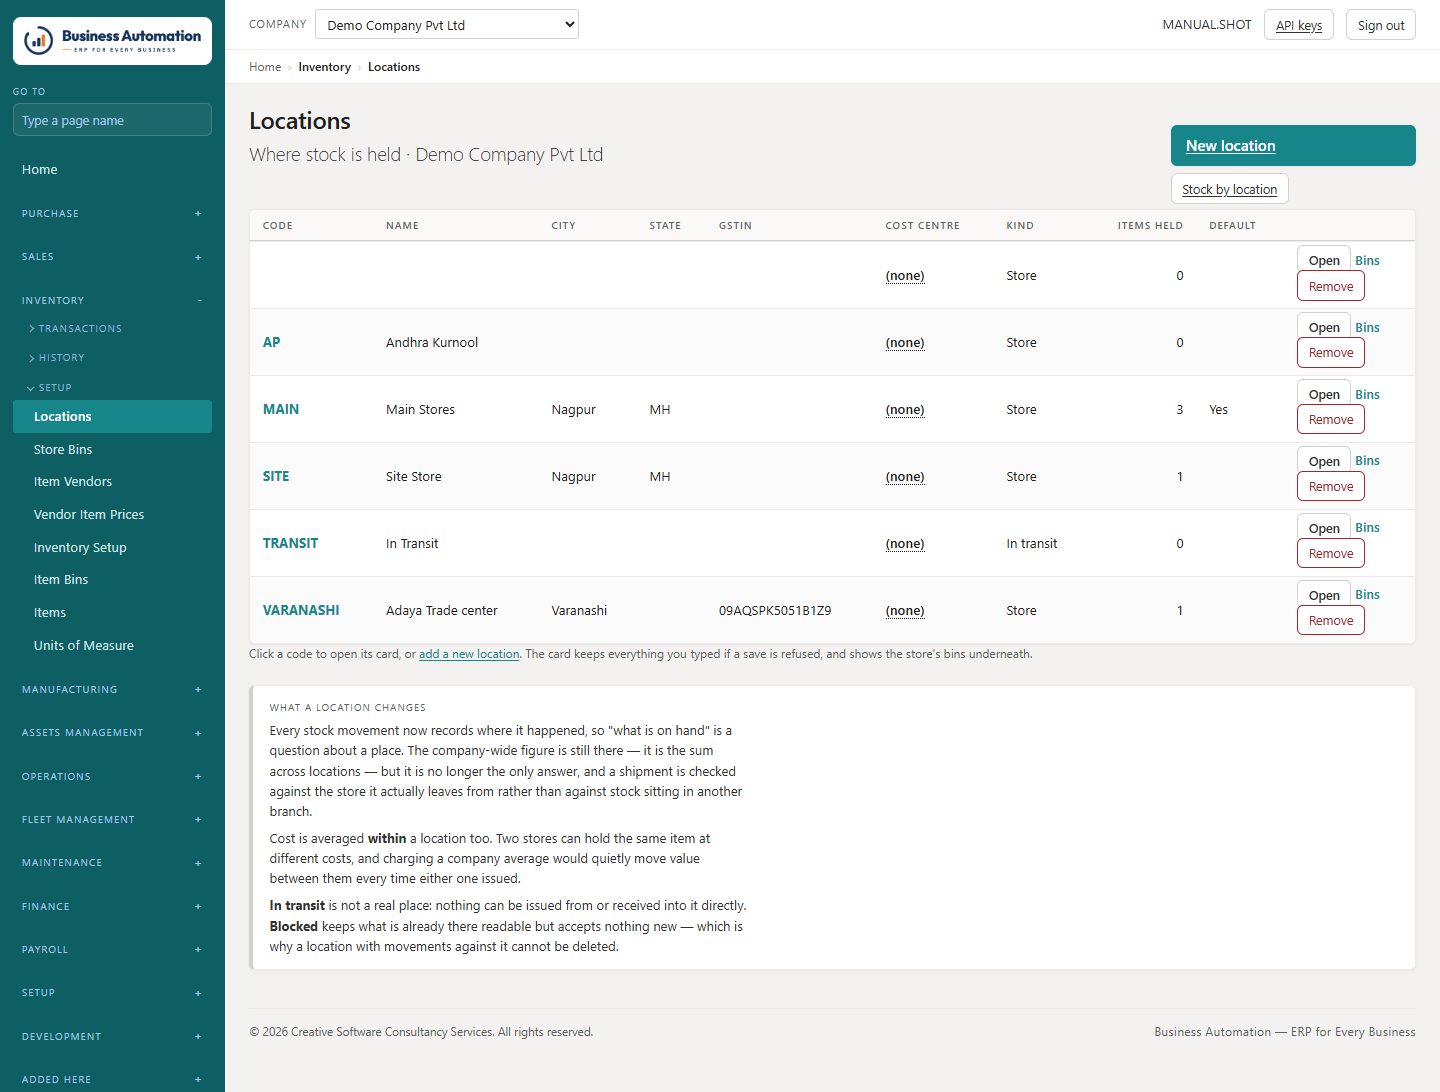
  1. 1
    Open Locations. Click a store's code to open its card, or press New location.
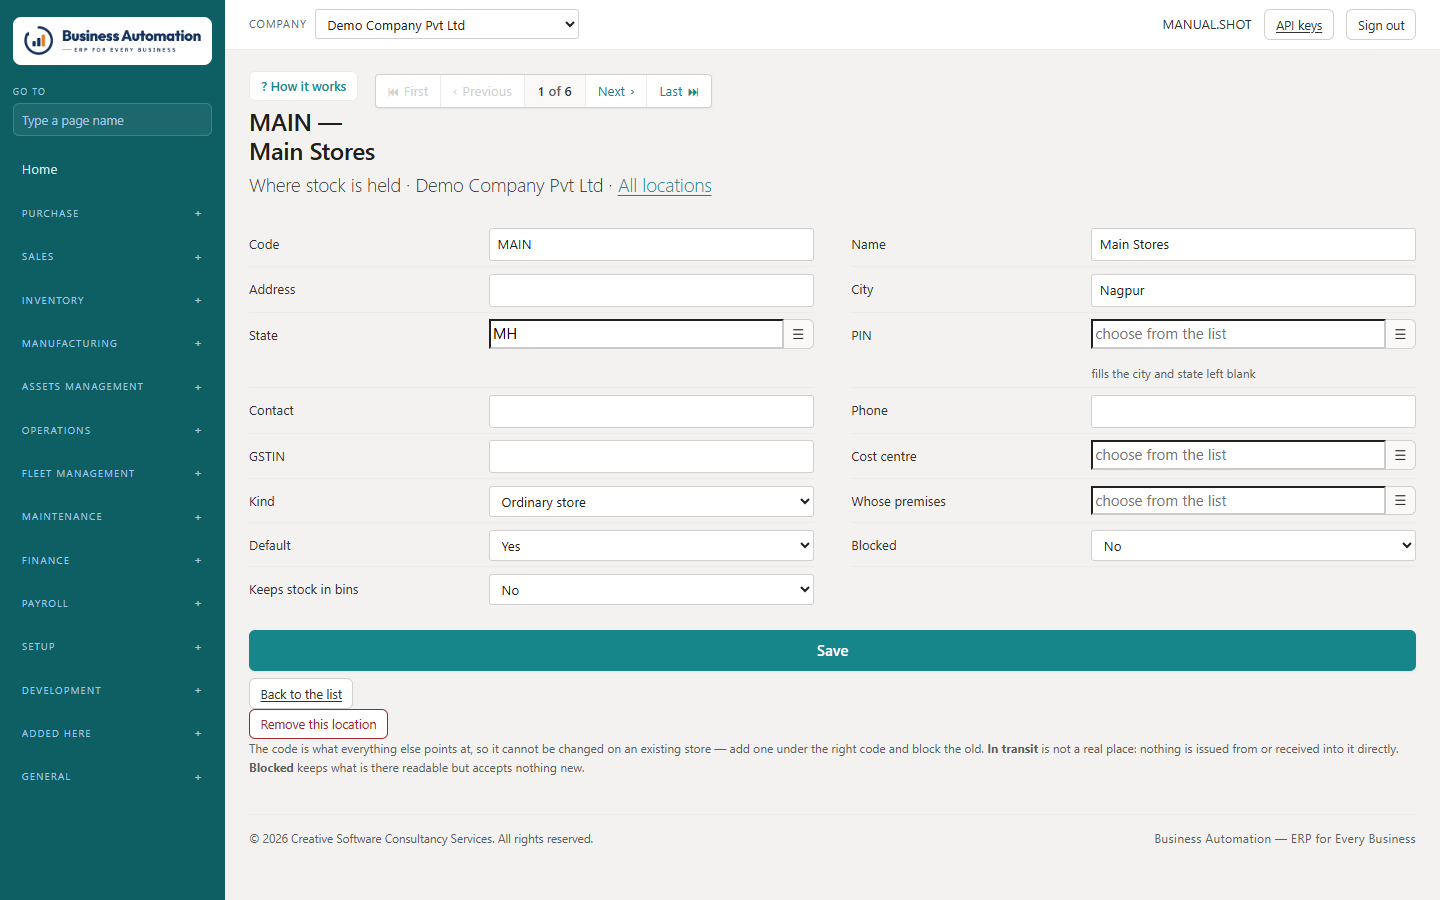
  2. 2
    Fill in the code, name and address. Choose the State from its list and type the PIN — the city and state fill in from it. The state decides the tax on everything raised there.
  3. 3
    Tick Keeps stock in bins if every movement must name a bin (a works store with forty racks). Leave it off for a site cabin.
  4. 4
    Save. The store's bins are listed underneath the card.
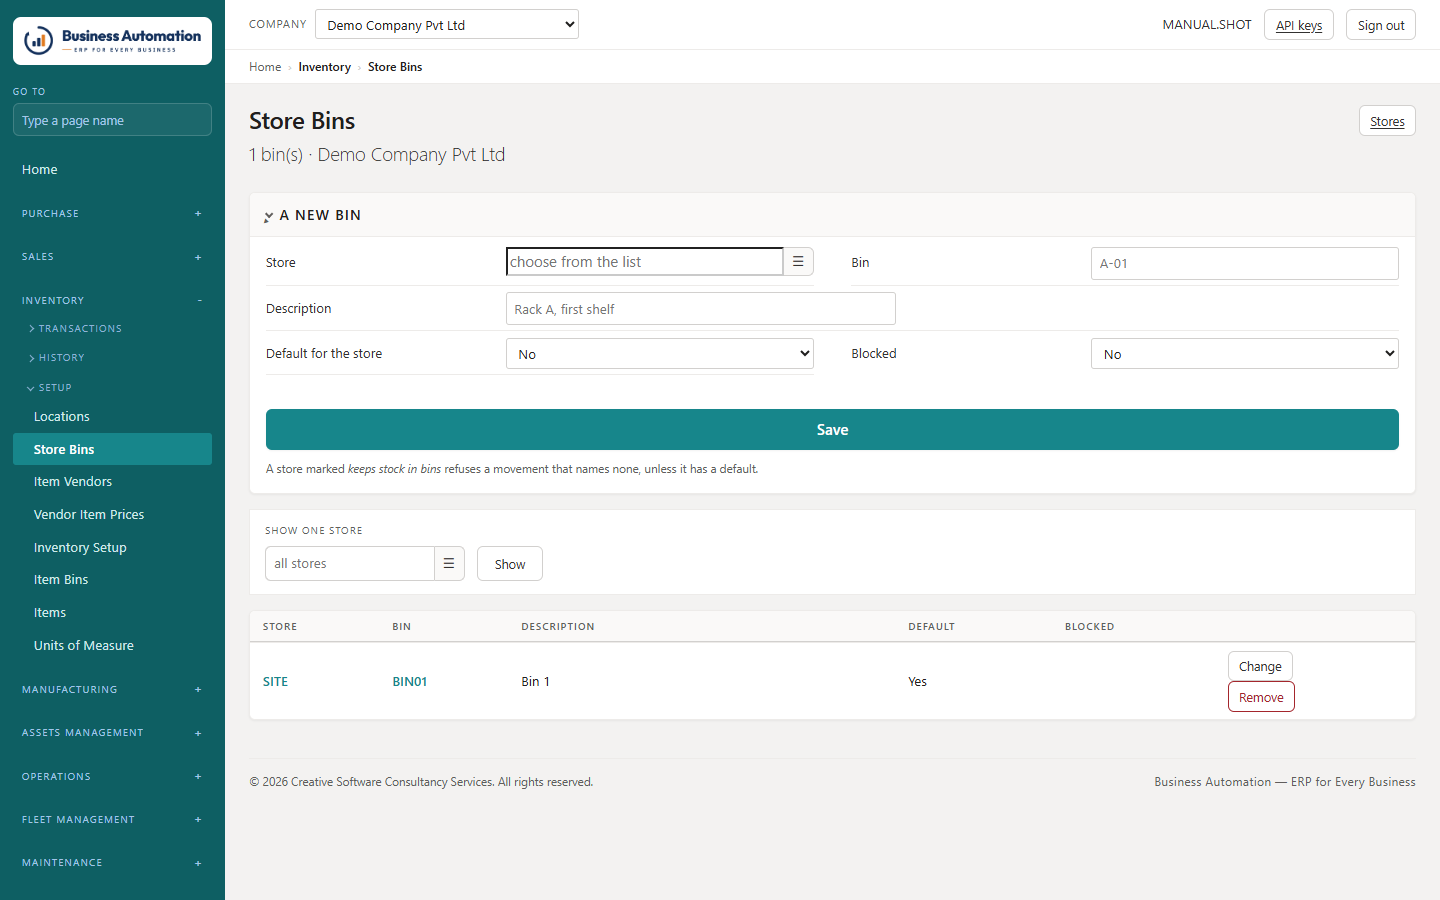
  5. 5
    Open Inventory › Store Bins to add racks and shelves, and mark one bin the default — where goods land when nobody says which rack.
Business Automation
The location list
Figure 2.8 The location list
Business Automation
A location card, with its bins underneath
Figure 2.9 A location card, with its bins underneath
Business Automation
Store bins
Figure 2.10 Store bins
ℹ
Note. The code of a store cannot be altered once it exists — everything posted points at it. To re-code, add the new store and block the old one.

An item's own bin

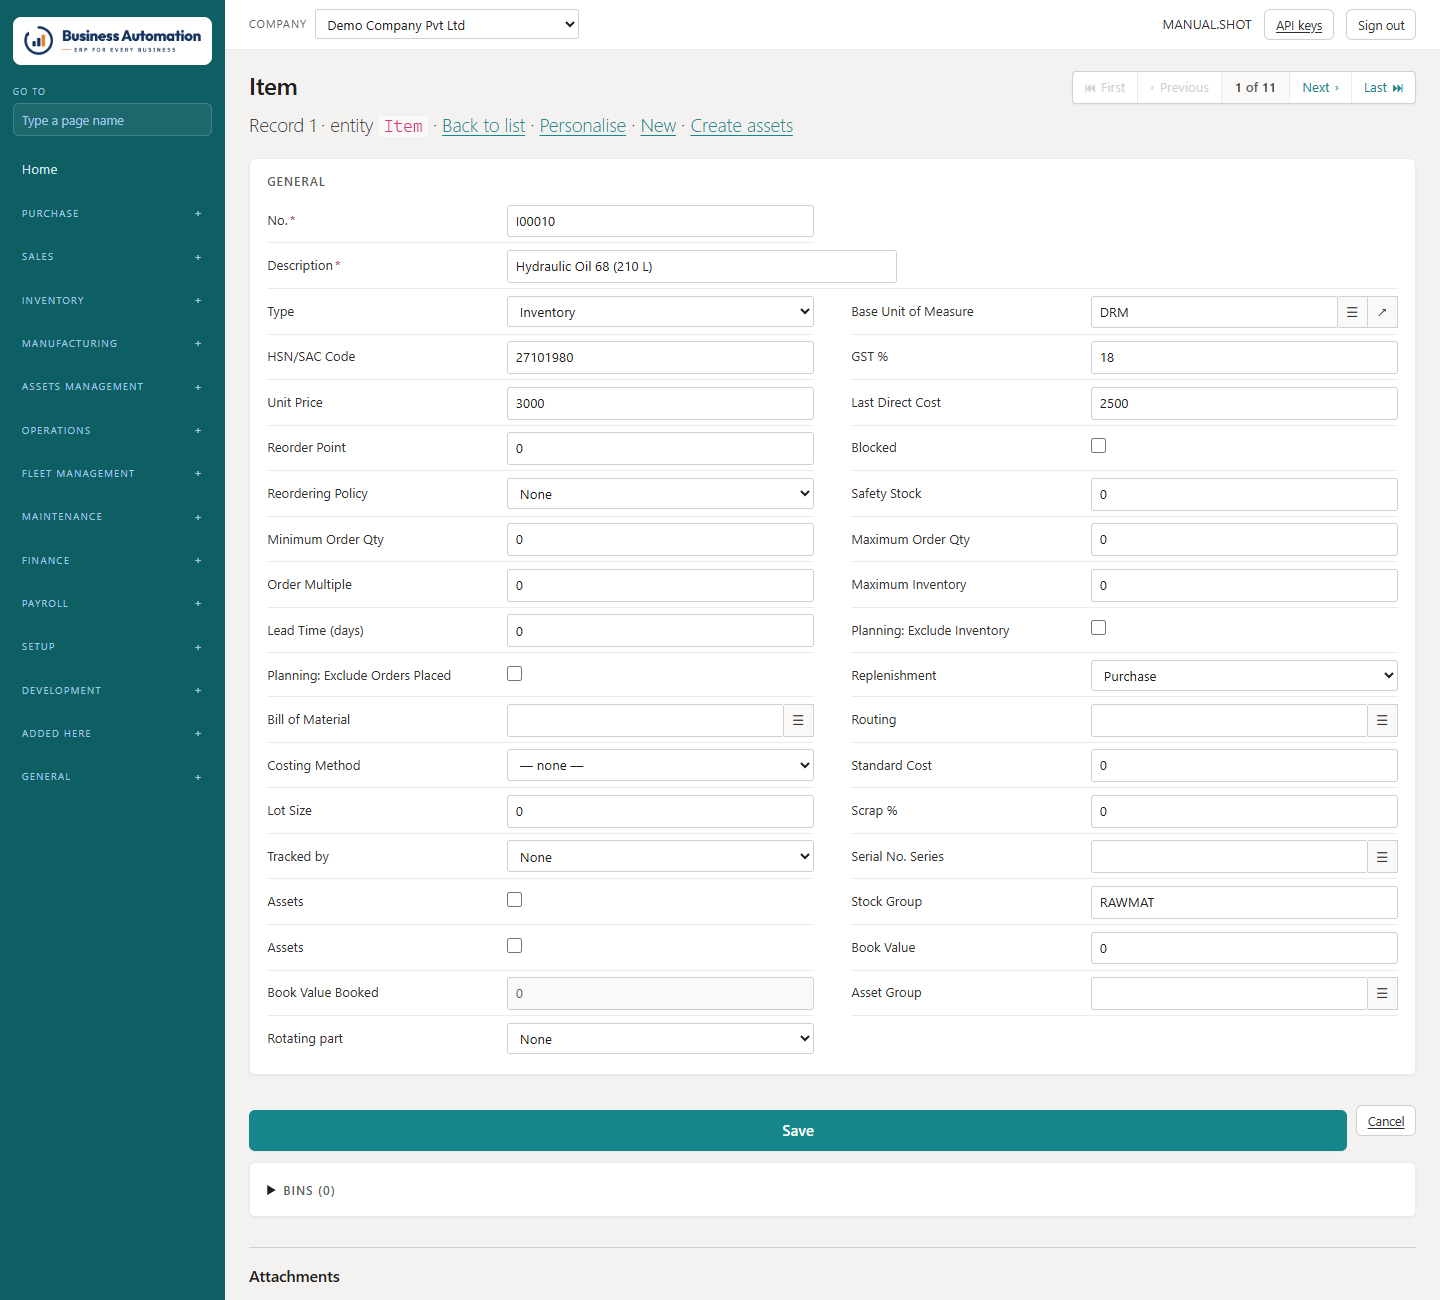
Give an item a default bin at a store; sales lines take it first.

WhereItem card › Bins (bottom of the card)
  1. 1
    Open the item card and scroll to the bottom.
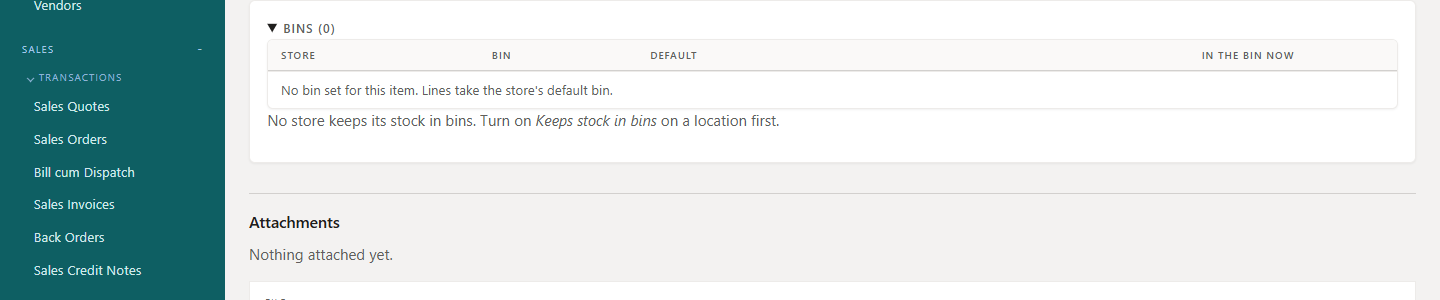
  2. 2
    Under Bins, add the store and the bin, and tick Default. A bin that does not exist at the store yet is created.
  3. 3
    Sales lines for the item now take this bin first, before the store's default bin.
Business Automation
The item card
Figure 2.11 The item card
Business Automation
The Bins section at the bottom of the item card
Figure 2.12 The Bins section at the bottom of the item card

QR labels

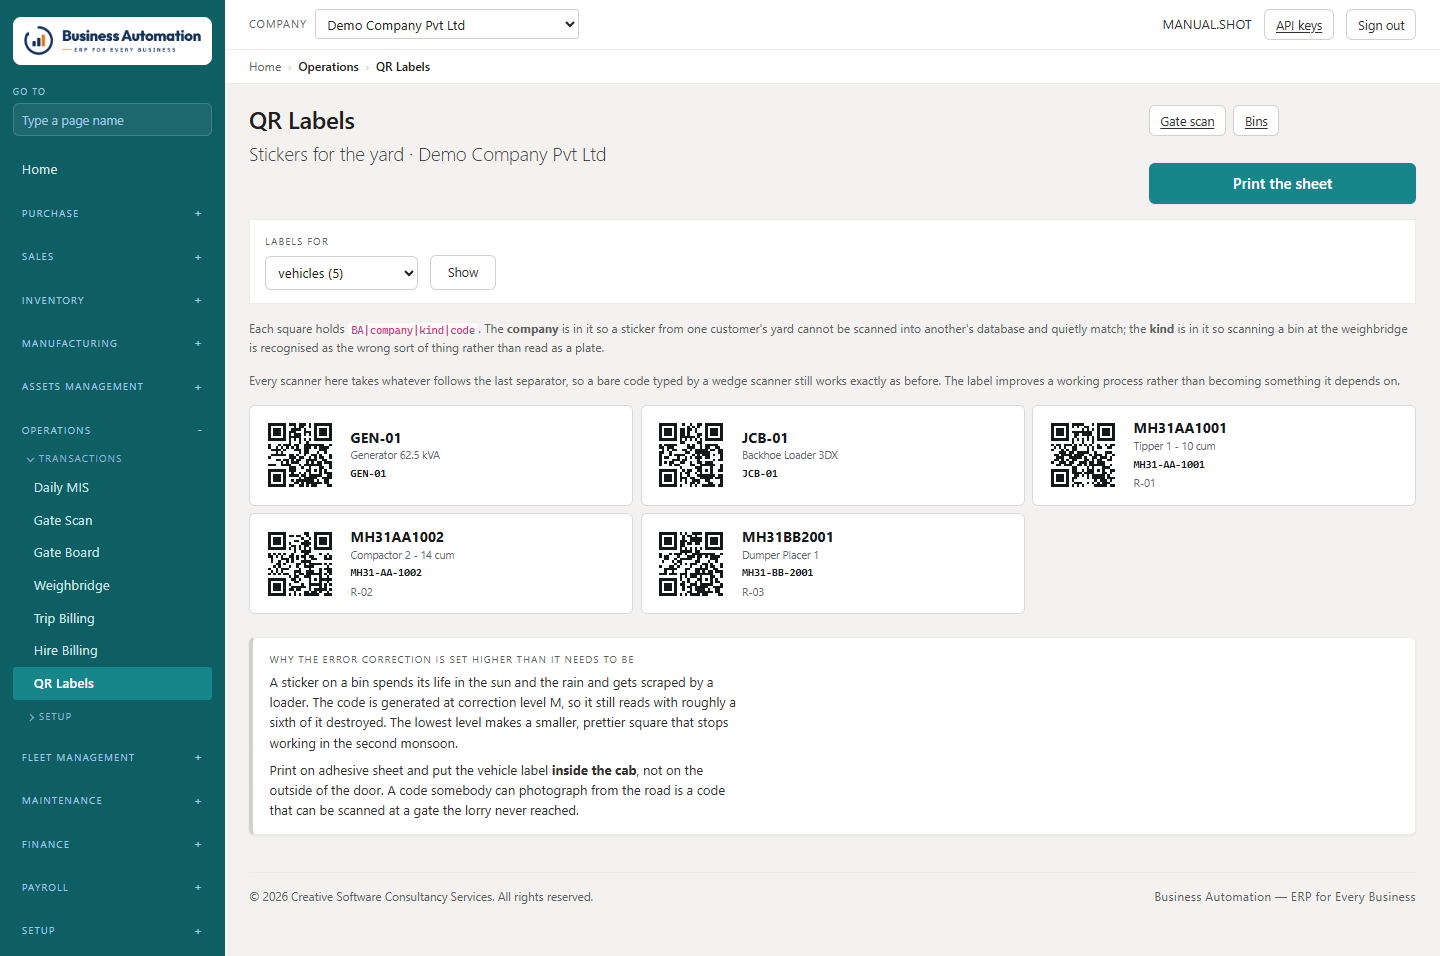
Print scannable labels for items, vehicles, employees, bins, areas and assets.

WhereOperations › QR Labels (/labels)
  1. 1
    For a whole sheet: open QR Labels, pick what the labels are for, and print. They are sized for adhesive sheets.
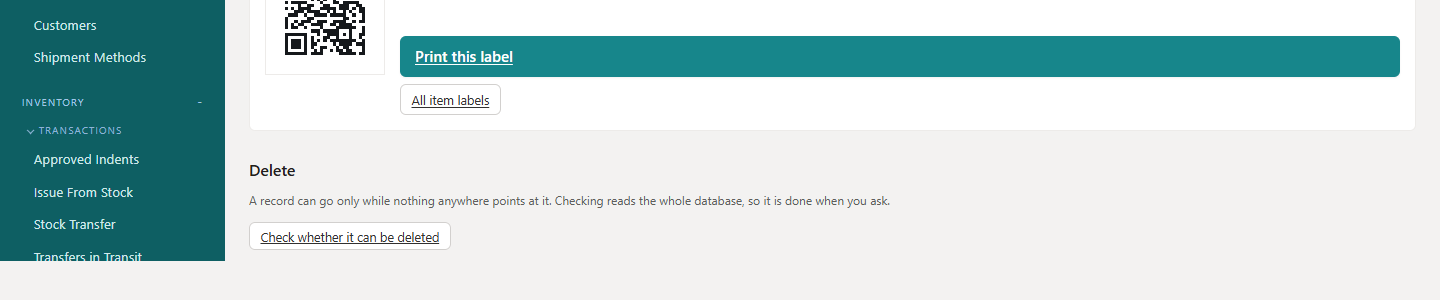
  2. 2
    For one item: open the item card, scroll past the fields to its QR code and press Print this label. Ask for as many copies as you need.
Business Automation
QR labels for a whole sheet
Figure 2.13 QR labels for a whole sheet
Business Automation
One item's own label, on its card
Figure 2.14 One item's own label, on its card
ℹ
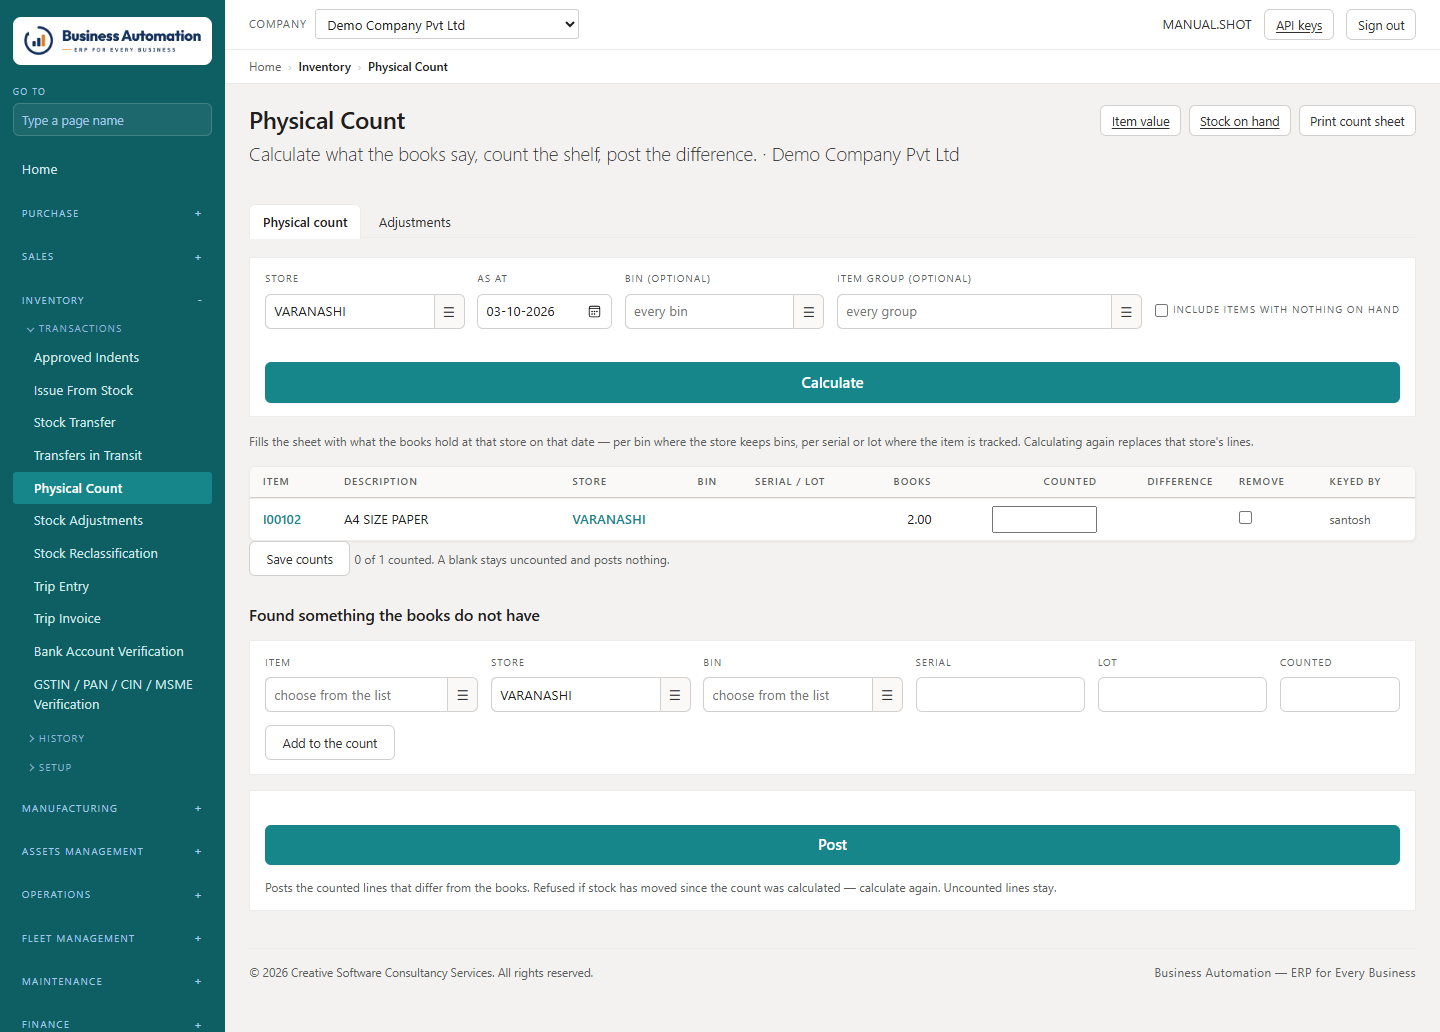
Note. A blocked item shows no code, and says so — a sticker on something the system will refuse is worse than no sticker.

Counting the store (physical count)

Count what is on the shelf and post the differences.

WhereInventory › Physical Count (/inventory/stock-journal)
  1. 1
    Choose the Store and the As at date, and if you count one bin or group at a time, the Bin or Item group. Press Calculate.
  2. 2
    Press Print count sheet, count, and write down what you find.
  3. 3
    Type each figure into Counted and press Save counts. Leave uncounted lines blank; for a serial number, 1 means present and 0 absent.
  4. 4
    Anything found that is not on the sheet goes in with Found something the books do not have.
  5. 5
    Press Post. Only lines that differ are posted, against the inventory adjustment account.
Business Automation
Physical count
Figure 2.15 Physical count
ℹ
Note. If something is issued or received after you pressed Calculate, posting refuses those lines and asks you to calculate again.

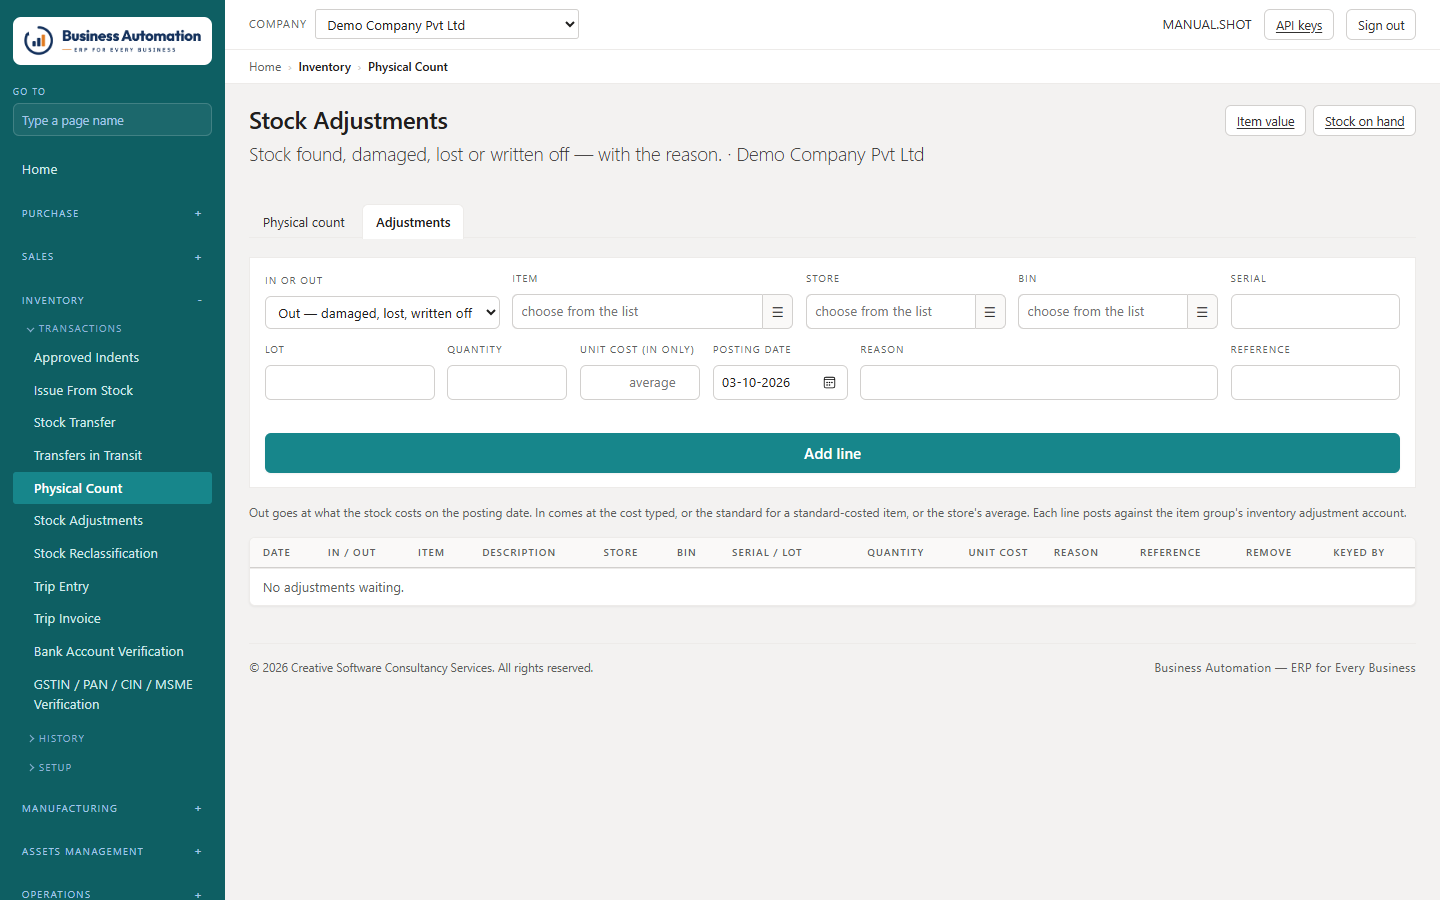
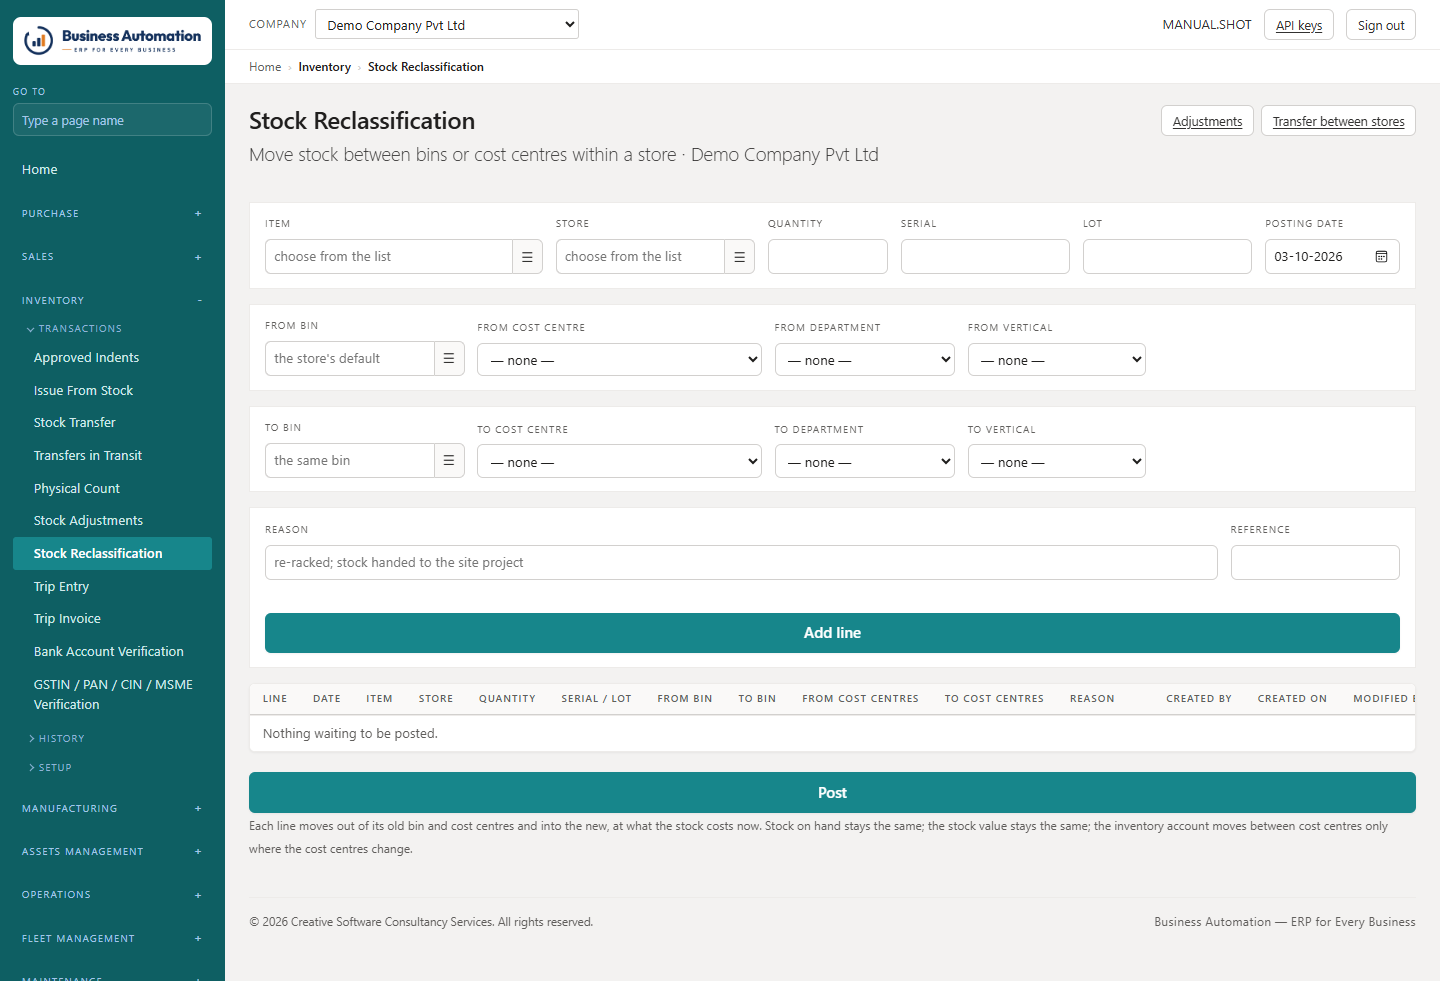
Stock adjustments and reclassification

Record stock that moves without a document, or move stock between bins or cost centres.

WhereInventory › Stock Adjustments (/inventory/stock-journal?batch=ADJUST) · Stock Reclassification (/inventory/reclass)
  1. 1
    For damaged, lost or written-off stock enter an Out line; for stock found or returned without a note, an In line.
  2. 2
    Enter the item, store, quantity and — always — the reason. Stock going in can take a unit cost (blank = the store's average).
  3. 3
    Press Post.
  4. 4
    To move stock between bins or cost centres without it leaving the store, use Stock Reclassification: enter the item, store, quantity, From bin/cost centres and To, the reason, and Post.
Business Automation
Stock adjustments
Figure 2.16 Stock adjustments
Business Automation
Stock reclassification
Figure 2.17 Stock reclassification

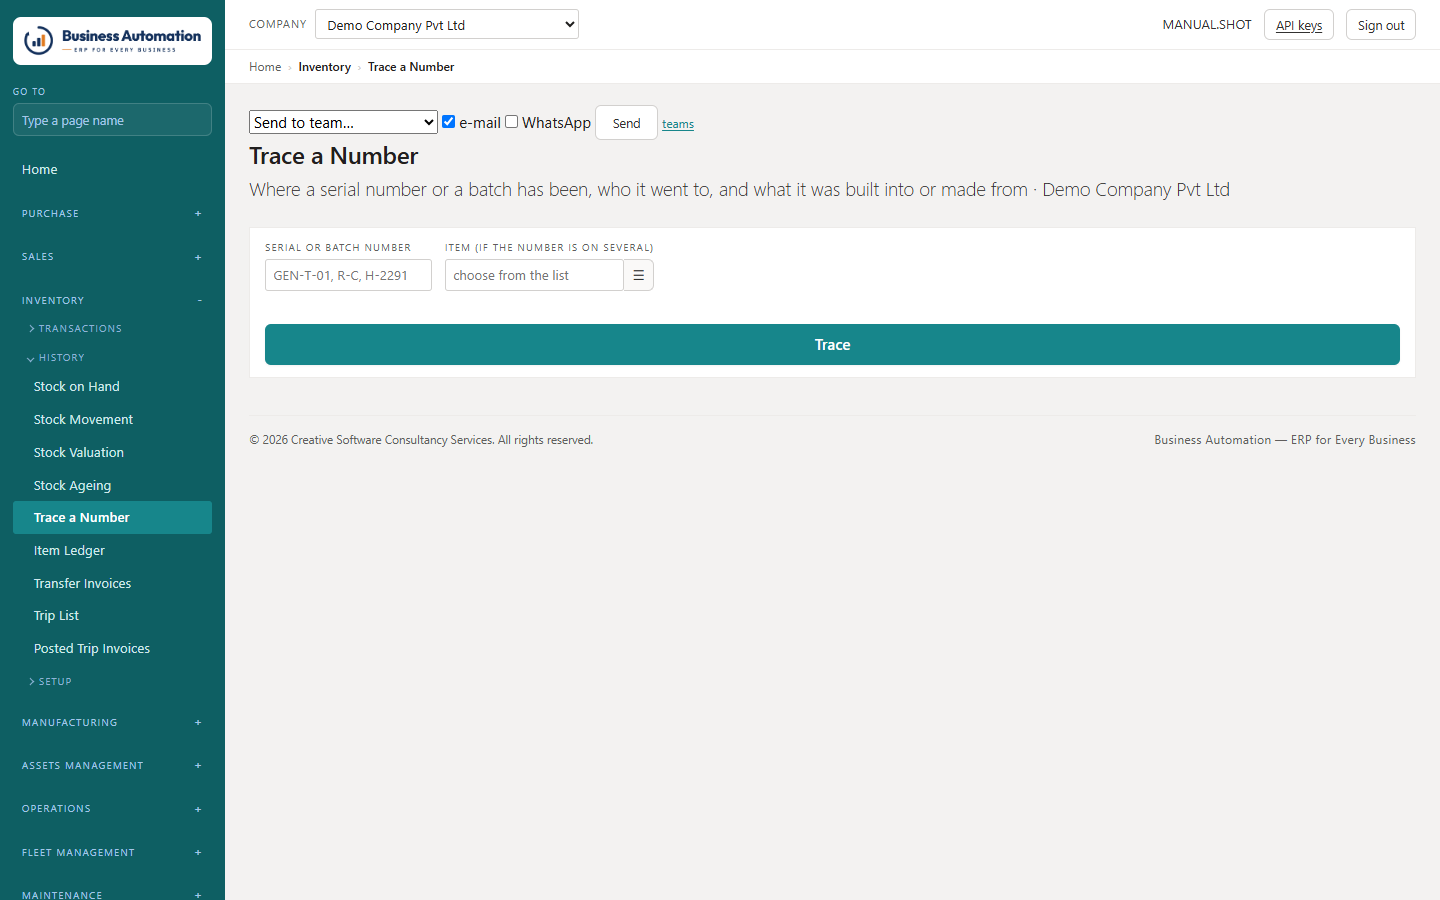
Where did it go? Tracing a number

Follow a serial or batch number through every movement.

WhereInventory › Trace a Number (/report/Trace)
  1. 1
    Type the serial or batch number and show it.
  2. 2
    Read every movement: received from whom, issued to which machine, used on which production order, sold to which customer, returned.
  3. 3
    Went into shows what it was built into; Made from shows the material in something made here. Click any number to follow it further.
Business Automation
Trace a number
Figure 2.18 Trace a number

How stock is costed and valued

Costing is set once; the value report and cost adjustment keep the stock account right.

WhereSetup › Inventory · Inventory › Item Value (/inventory/value)
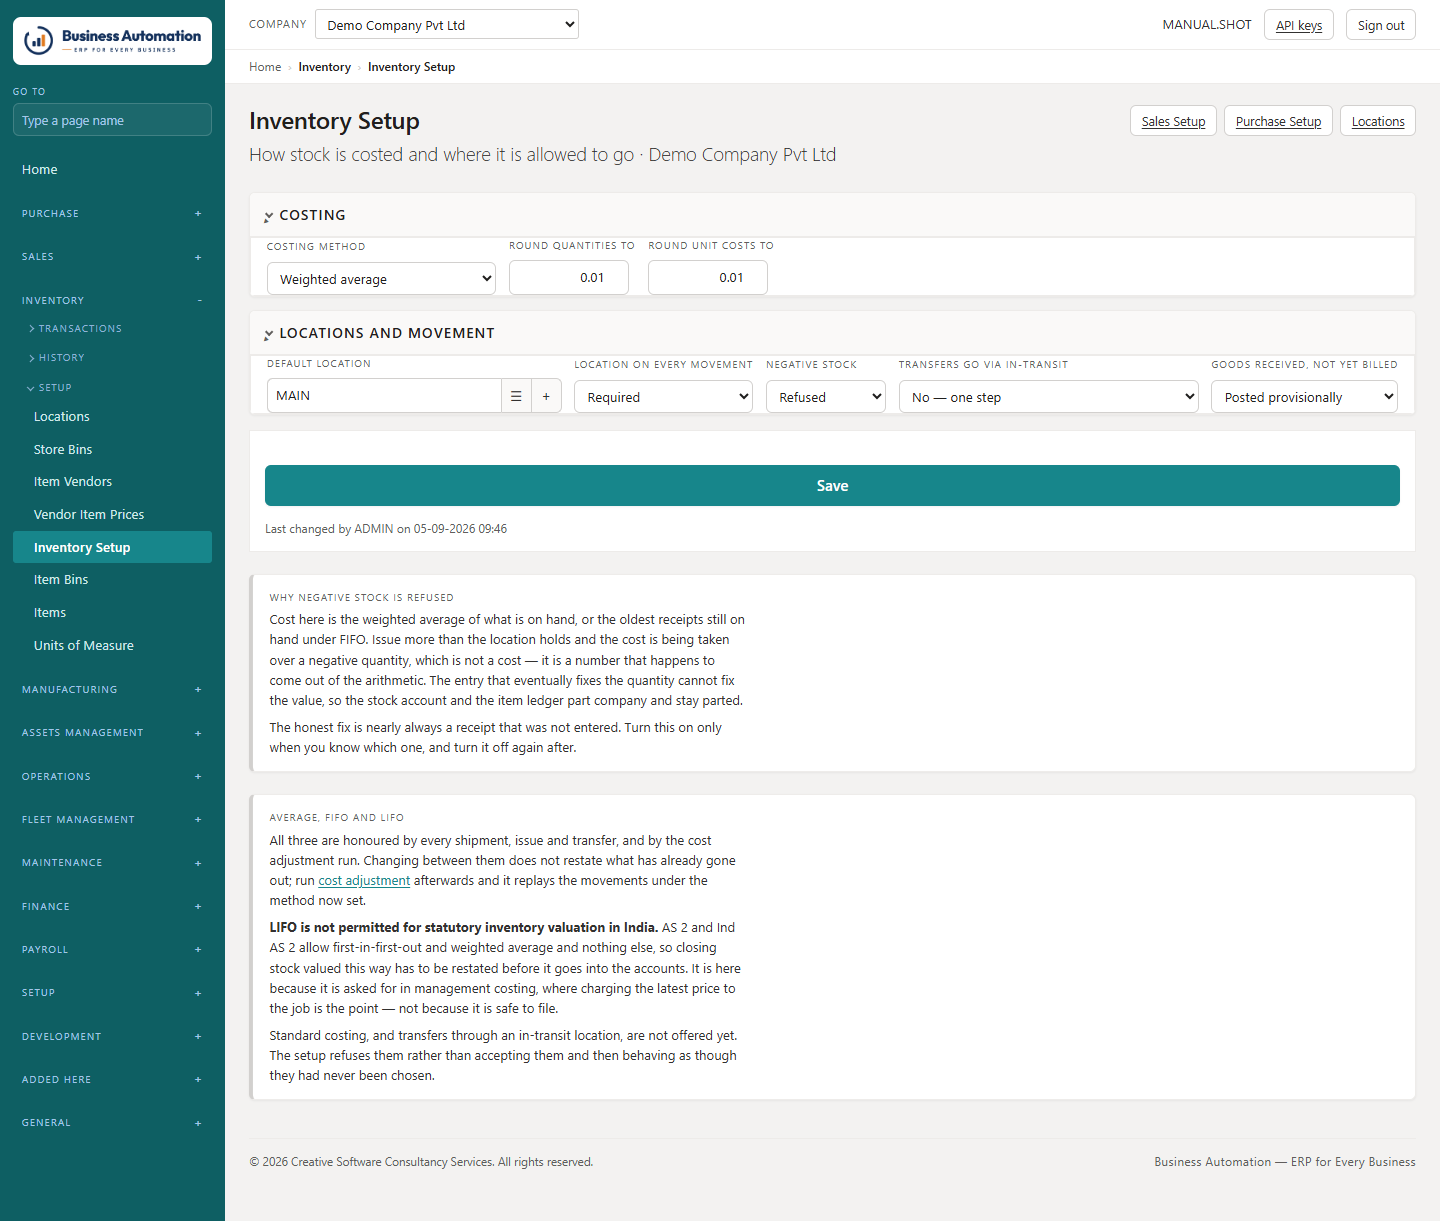
  1. 1
    In Inventory Setup, choose the company's costing method: Average or FIFO. One item can have its own method on its card (Average, FIFO, Standard or Specific).
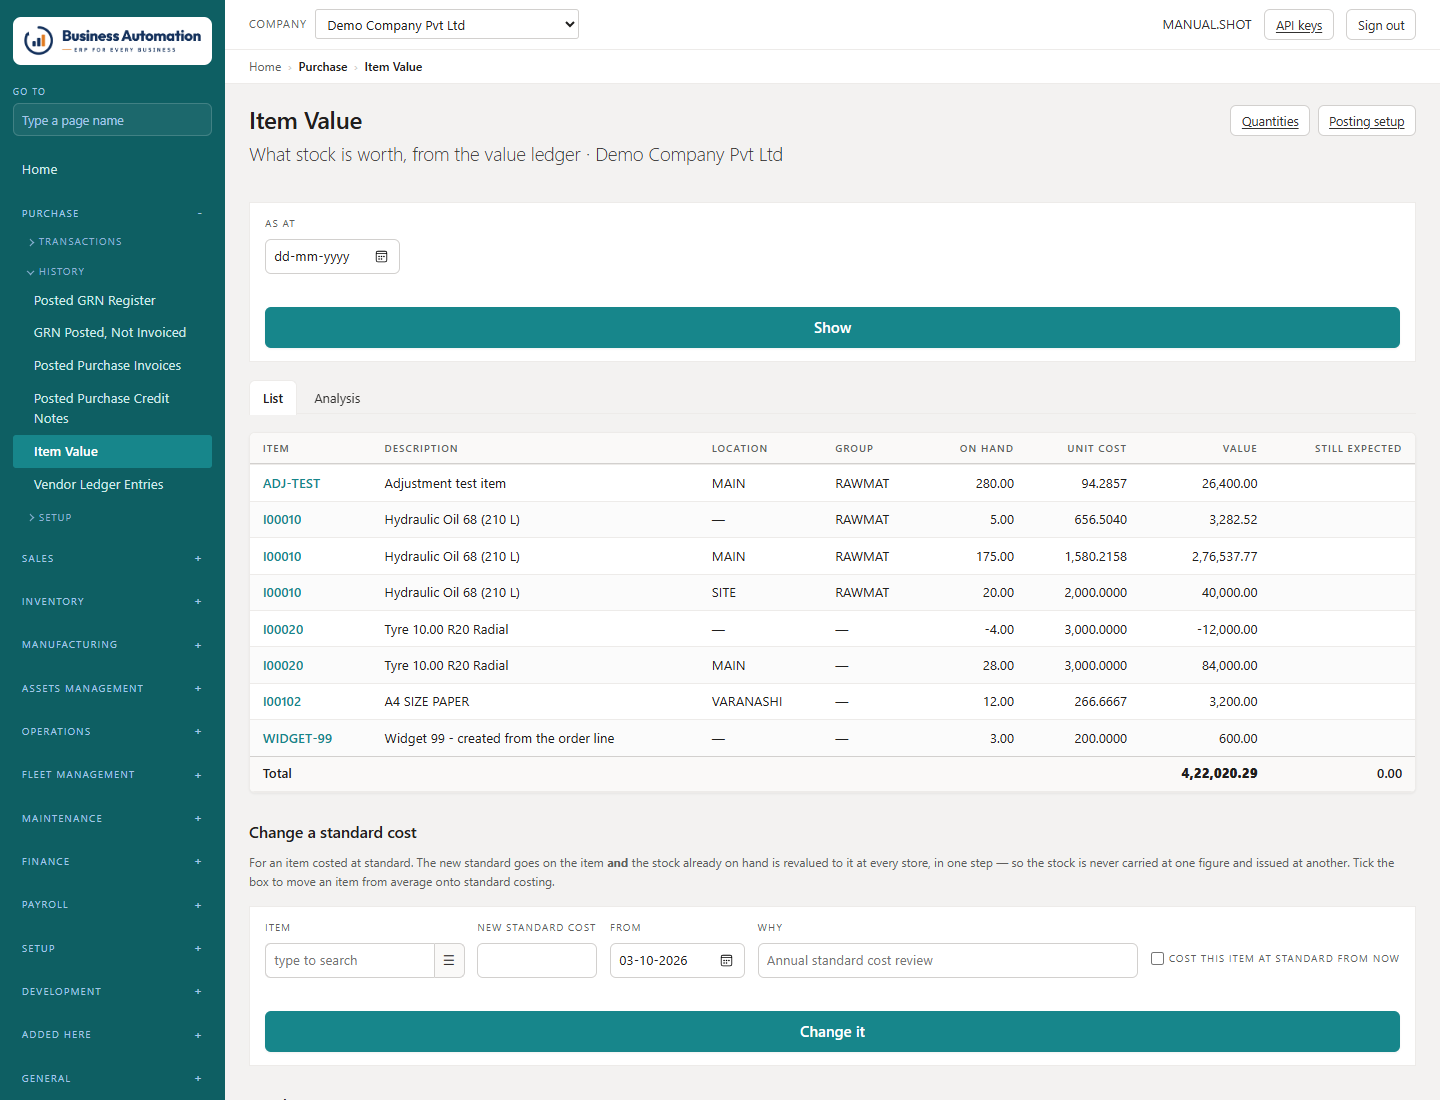
  2. 2
    Item Value shows what stock is worth, item by item and store by store.
  3. 3
    Change a standard cost (on Item Value): pick the item, type the new standard and the date, and press Change it. Stock on hand is revalued at every store in the same step.
  4. 4
    Run Cost Adjustment when a supplier's final price differs from what goods came in at, or after changing the method.
Business Automation
Inventory setup: costing method, default store and movement rules
Figure 2.19 Inventory setup: costing method, default store and movement rules
Business Automation
Item value
Figure 2.20 Item value
⚠
Important. Every stocked item should name a Stock Group; that decides which accounts its value posts to (Inventory › Inventory Posting Setup). Getting started counts the items with none.

The buying chain

Six documents, because six different people are answerable for six different things.

Indent➜Enquiry (RFQ)➜Comparative➜Purchase order➜Goods receipt➜Purchase invoice
  • The location, department, payment terms and cost centres you set on the indent or order follow it all the way to the posted invoice and credit note. Set them once, at the start.
  • Papers follow the purchase. A paper attached to the indent, order or goods note shows on every later document under Papers from earlier documents.

Setting up a vendor

Create the vendor with a GSTIN that is checked and verified.

WherePurchase › Vendors (/list/VendorList)
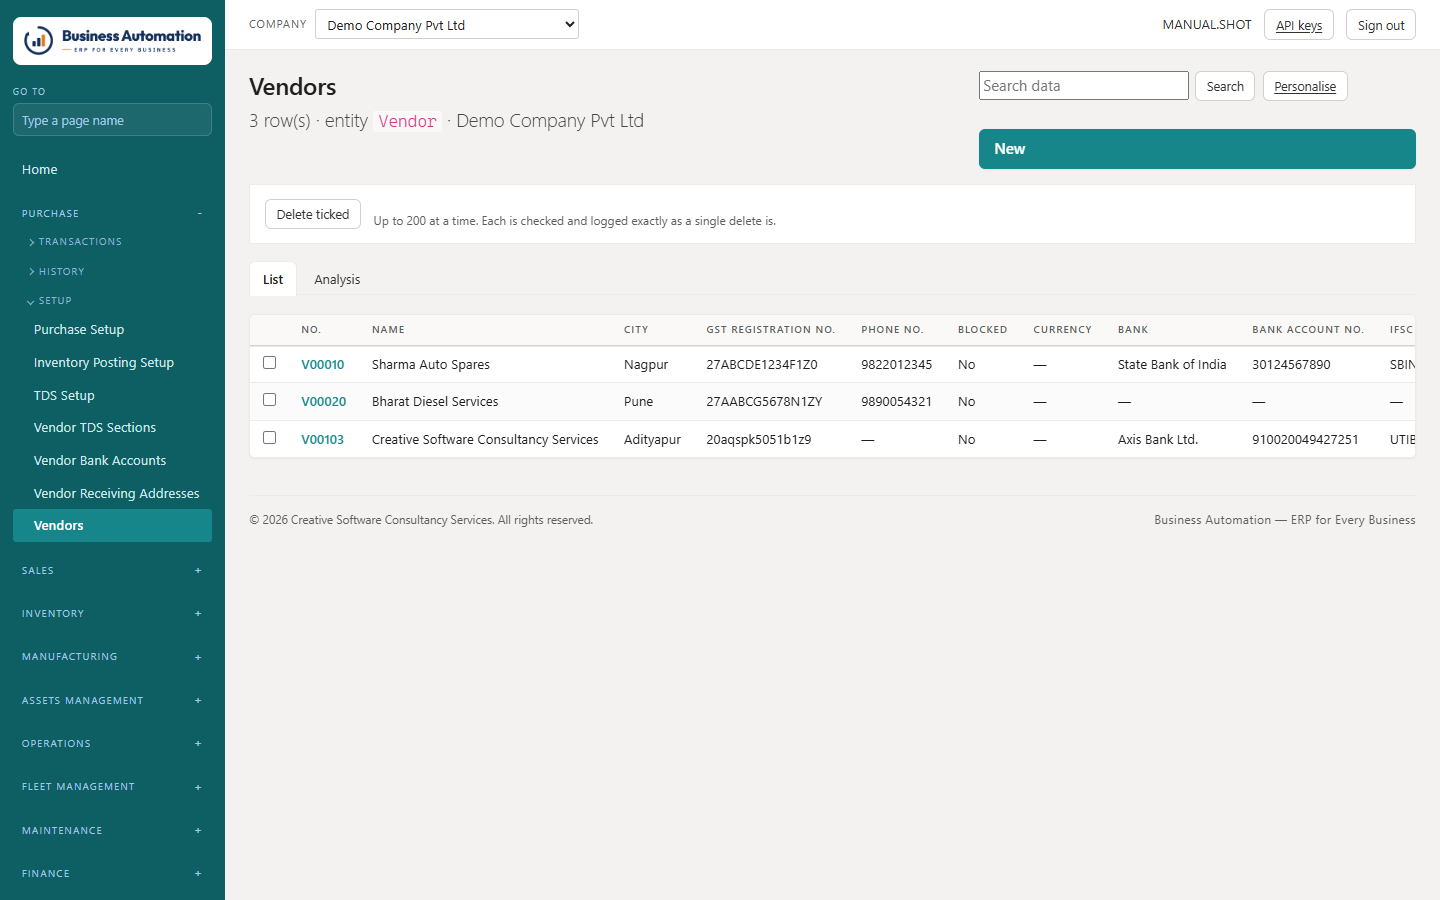
  1. 1
    Open Vendors and press New.
  2. 2
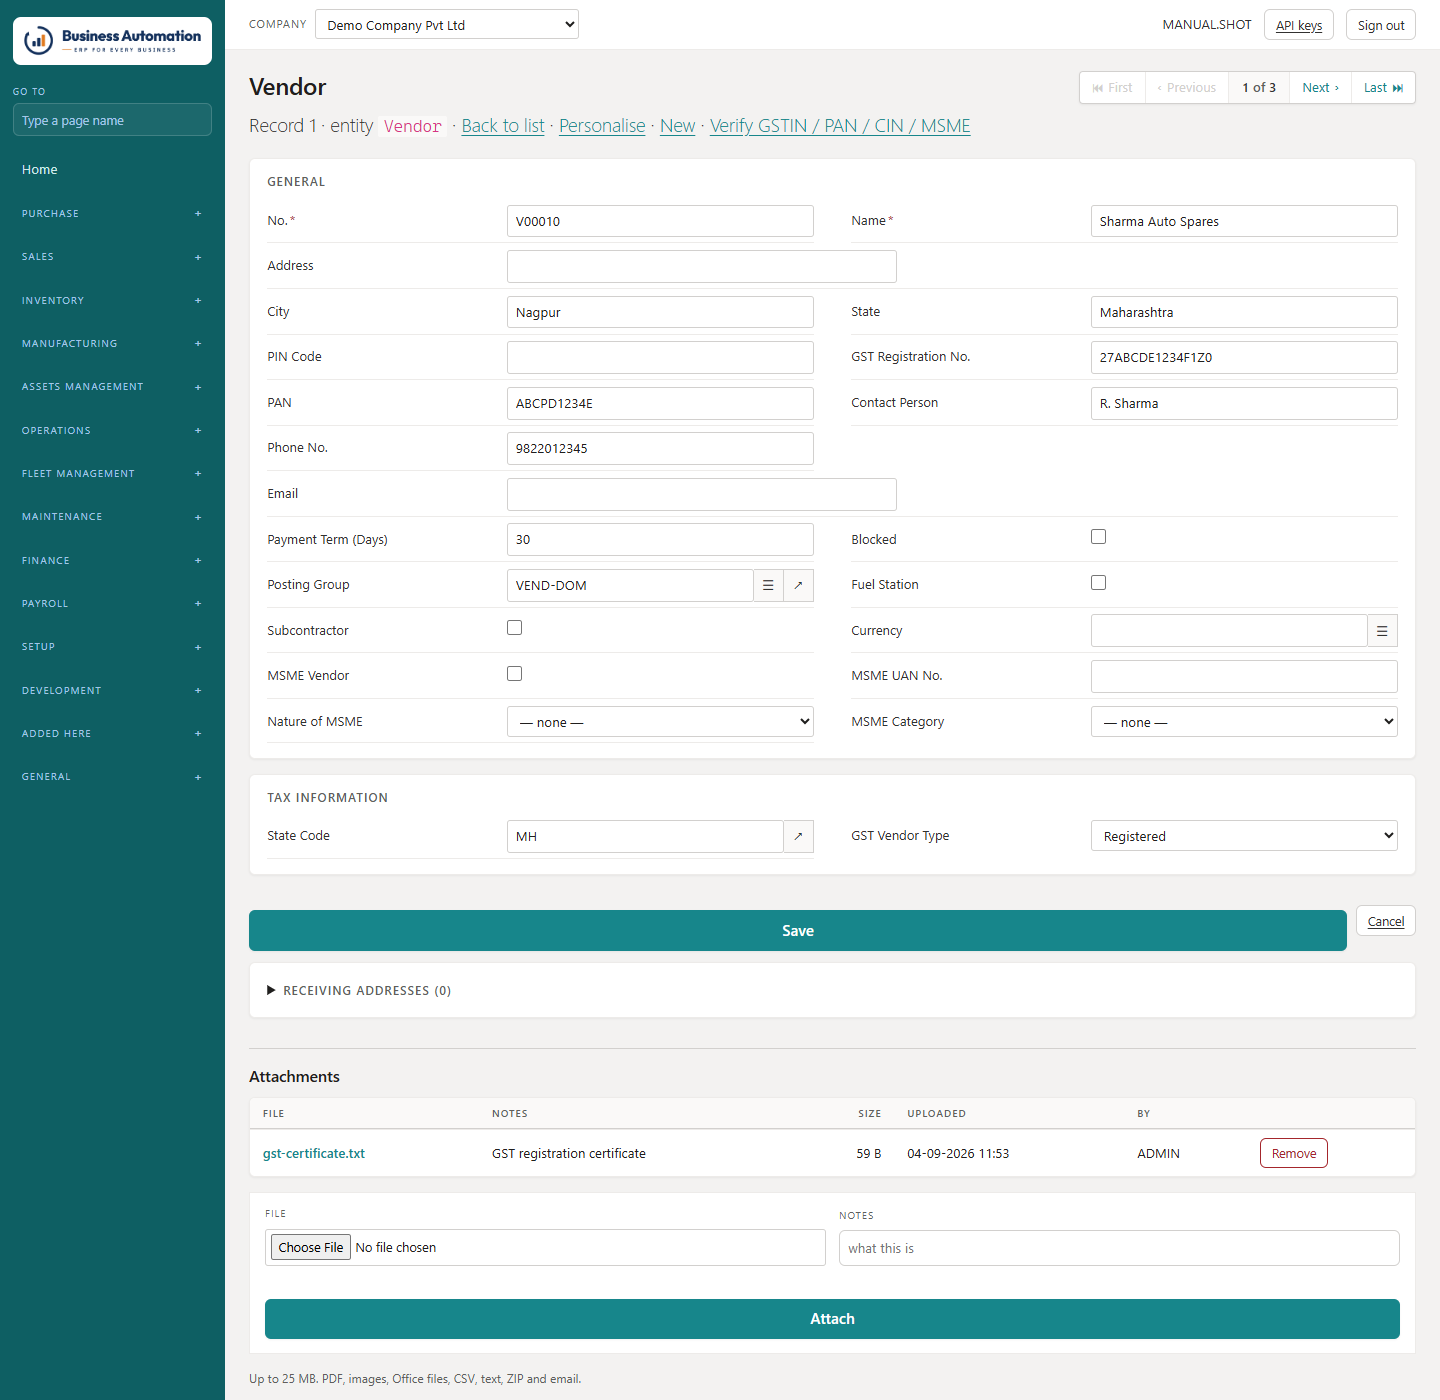
    Type the name and address, and the GST Registration No. Leave PAN and State Code blank — both are filled in from the GSTIN when you save.
  3. 3
    For an MSME, tick MSME Vendor and fill MSME UAN No. (UDYAM-XX-00-0000000), Nature of MSME and MSME Category — all three are then required.
  4. 4
    Choose the Posting Group (only creditor groups are offered) and payment terms, and save.
  5. 5
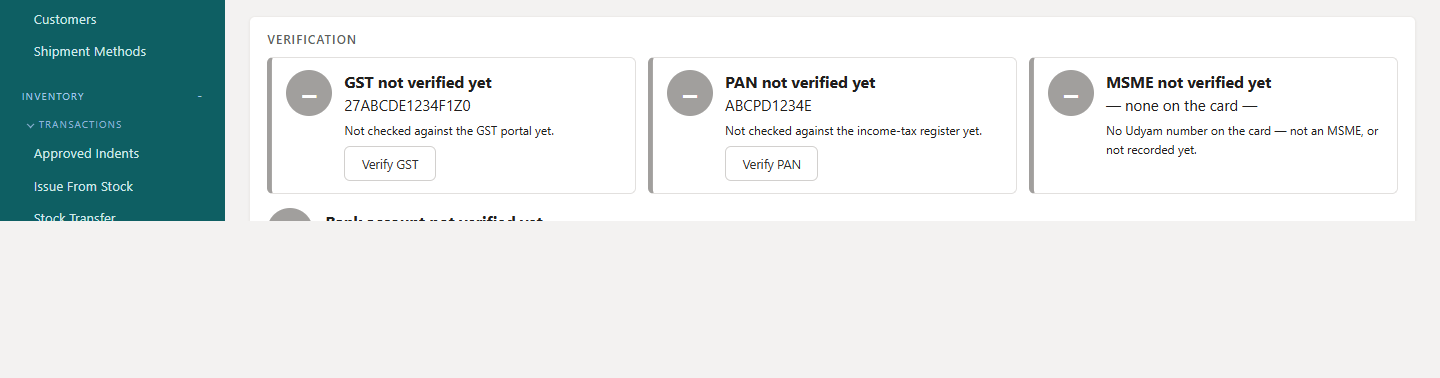
    Under Verification, press Verify GST, Verify PAN or Verify MSME. A green ✓ means the register confirms it; amber ! means see the remarks; red ✗ explains why it failed.
  6. 6
    Under Bank accounts, add the vendor's account and press Verify to have the bank confirm the name it is held in. Tick Default on the account the vendor is normally paid into.
Business Automation
The vendor list, with the verification columns
Figure 3.1 The vendor list, with the verification columns
Business Automation
The vendor card
Figure 3.2 The vendor card
Business Automation
Verification marks on the vendor card
Figure 3.3 Verification marks on the vendor card
ℹ
Note. A GSTIN with a wrong character, or one that disagrees with the PAN (characters 3–12) or the state (first two digits), is refused with the reason.

Vendor receiving addresses

A vendor with several branches or plants: record each, so the order uses the right GSTIN and state.

WhereVendor card › Receiving addresses (bottom of the card)
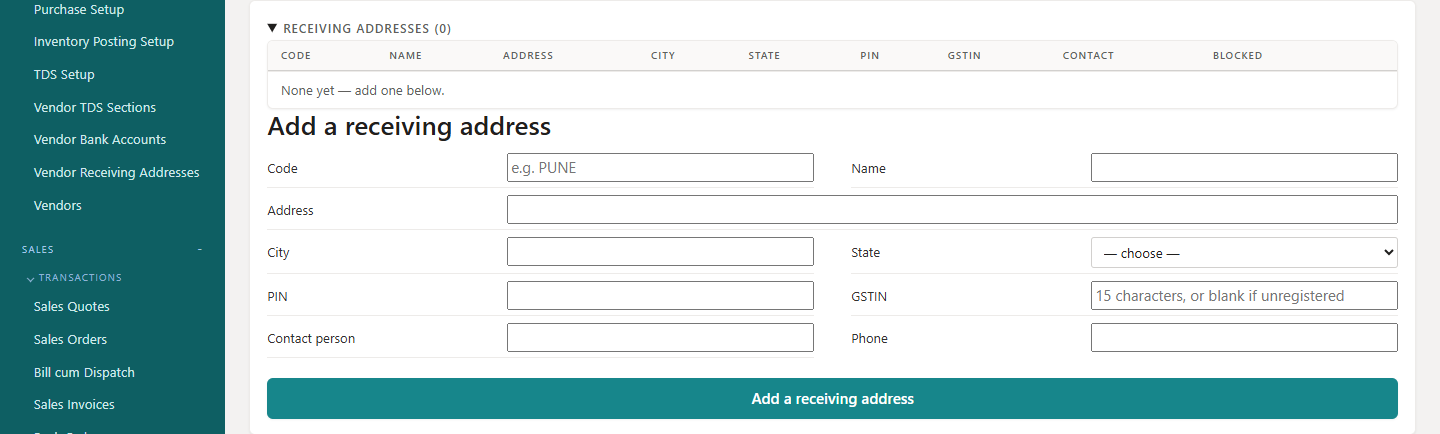
  1. 1
    Open the vendor card and scroll to Receiving addresses at the bottom.
  2. 2
    Add each branch with its address, state and GSTIN.
  3. 3
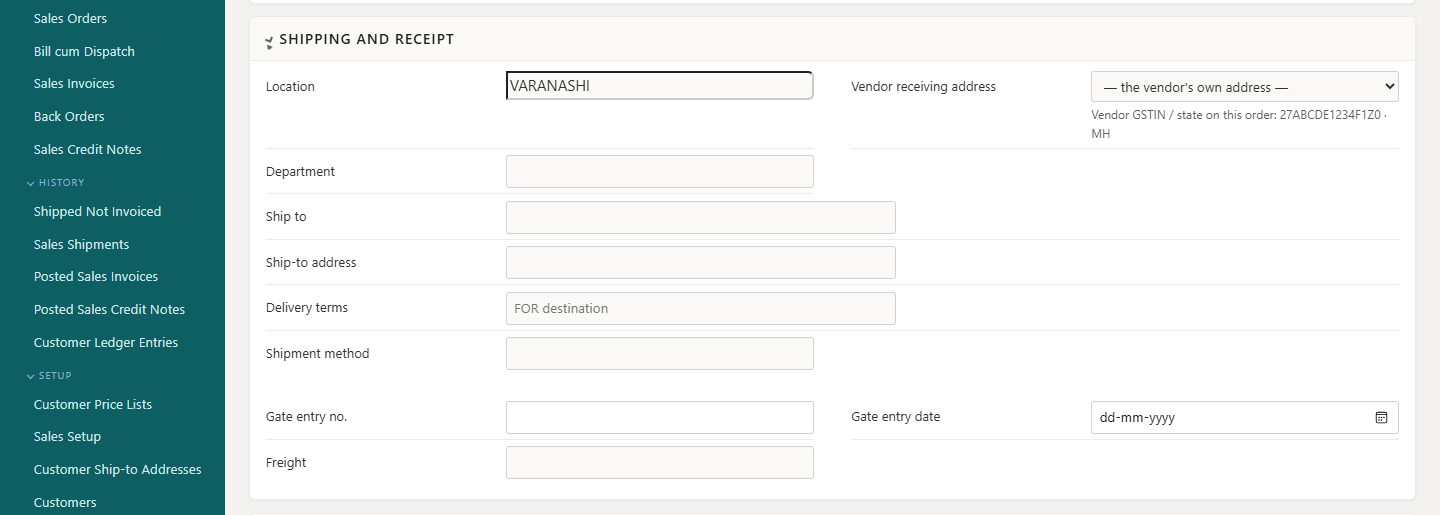
    On a purchase order, under Shipping and receipt, choose the branch in Vendor receiving address and save.
  4. 4
    The order now uses that branch's GSTIN and state, so CGST + SGST or IGST is worked out from where the goods come from.
Business Automation
Receiving addresses on the vendor card
Figure 3.4 Receiving addresses on the vendor card
Business Automation
Choosing the vendor receiving address on the purchase order
Figure 3.5 Choosing the vendor receiving address on the purchase order

Vendor prices by date

Keep what each vendor charges, so order lines price themselves.

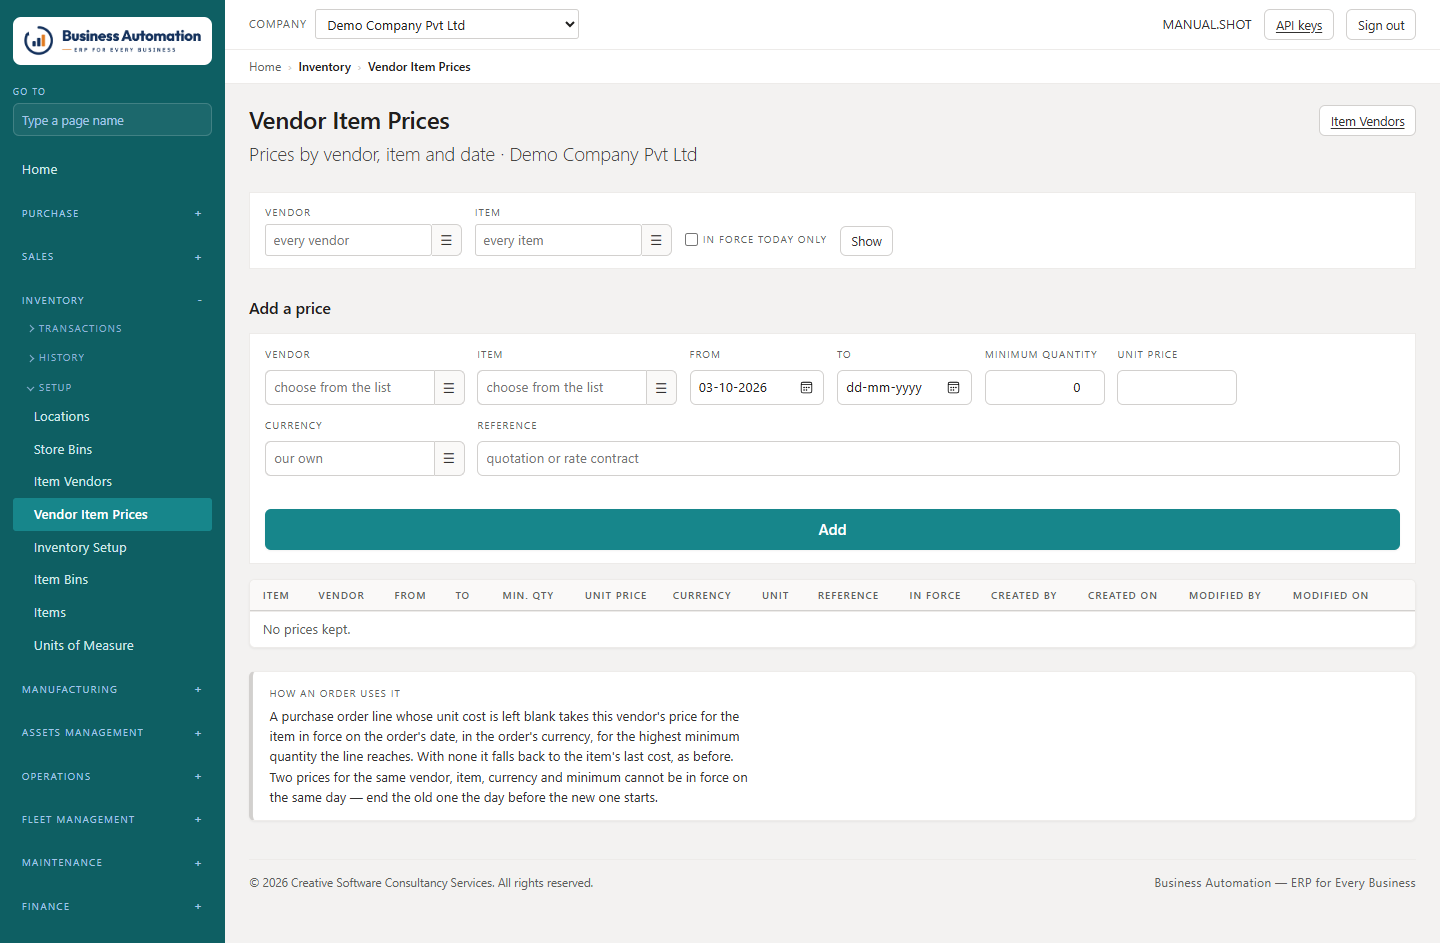
WherePurchase › Vendor Item Prices (/purchase/vendor-prices)
  1. 1
    Add the vendor, item, price, From date and (optionally) To date, minimum quantity and currency.
  2. 2
    To change a price, End the old one the day before and add the new one.
  3. 3
    On a purchase order, leave the unit cost blank and the line takes the price in force on the order's date.
Business Automation
Vendor item prices
Figure 3.6 Vendor item prices

Raising an indent

Ask for material to be bought or issued, and send it for approval.

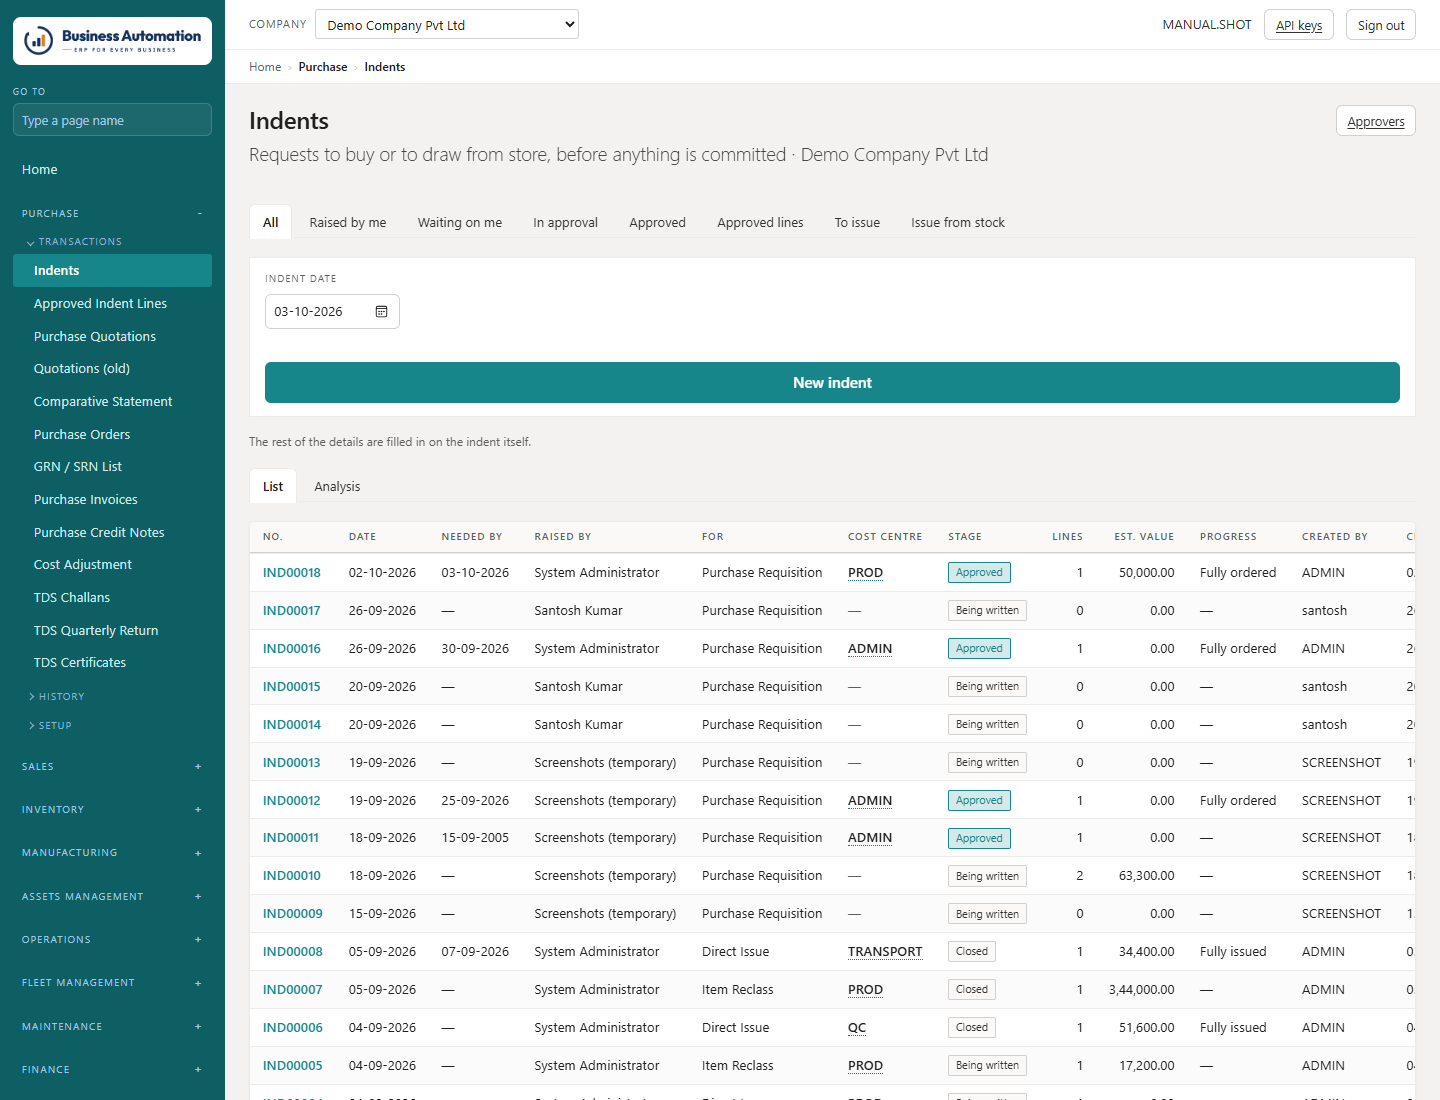
WherePurchase › Indents (/indents) → New
  1. 1
    Open Indents and press New.
  2. 2
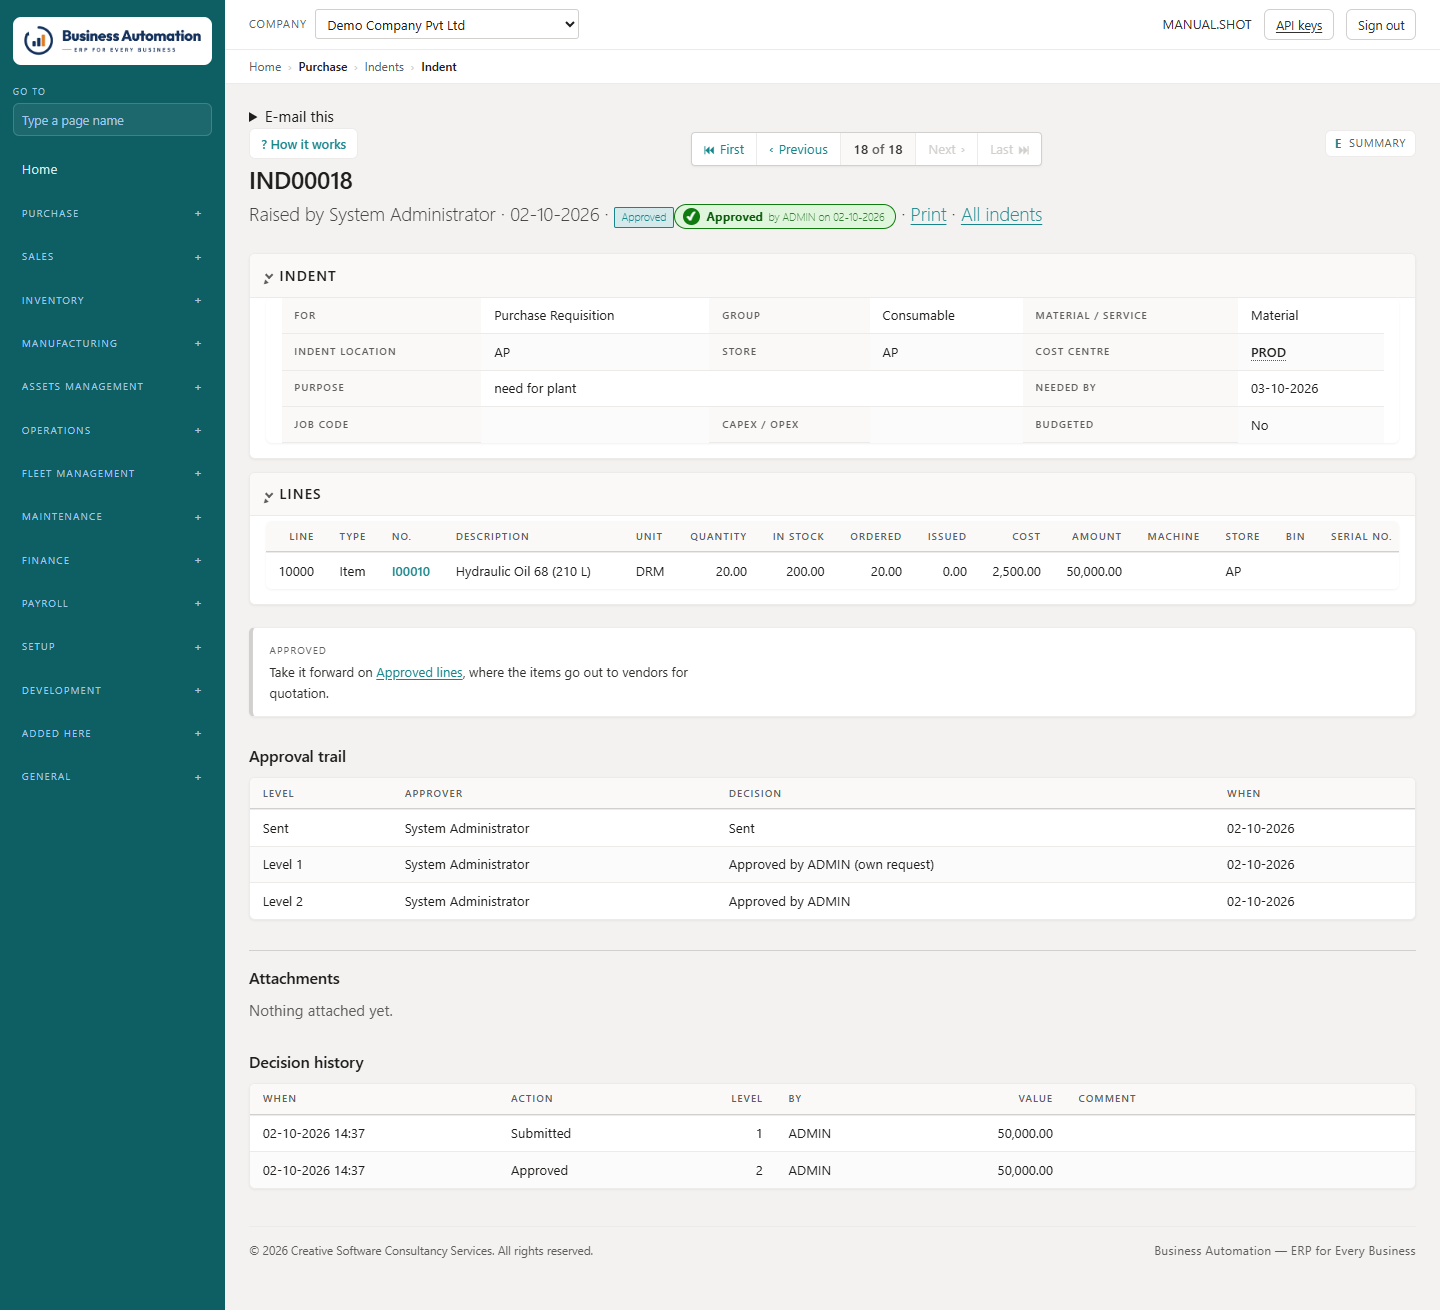
    Fill in the header: the Indent location and Store location, the cost centres, the purpose, and whether the lines are to be bought or issued from stock. Press Save.
  3. 3
    Type the lines straight into the grid. The last row is blank — put an item and a quantity in it. Change any row by typing over it, and tick Remove on any you do not want.
  4. 4
    Press Save the lines. Stock on hand is shown beside each line.
  5. 5
    Press Send for approval. Your manager signs first, then the owner of the cost centre.
Business Automation
The indent list — what has been asked for and how far each has got
Figure 3.7 The indent list — what has been asked for and how far each has got
Business Automation
An indent: header and lines
Figure 3.8 An indent: header and lines
ℹ
Note. Rejected ends the request. Clarification is a question: the indent becomes editable, you answer, and it goes round again.
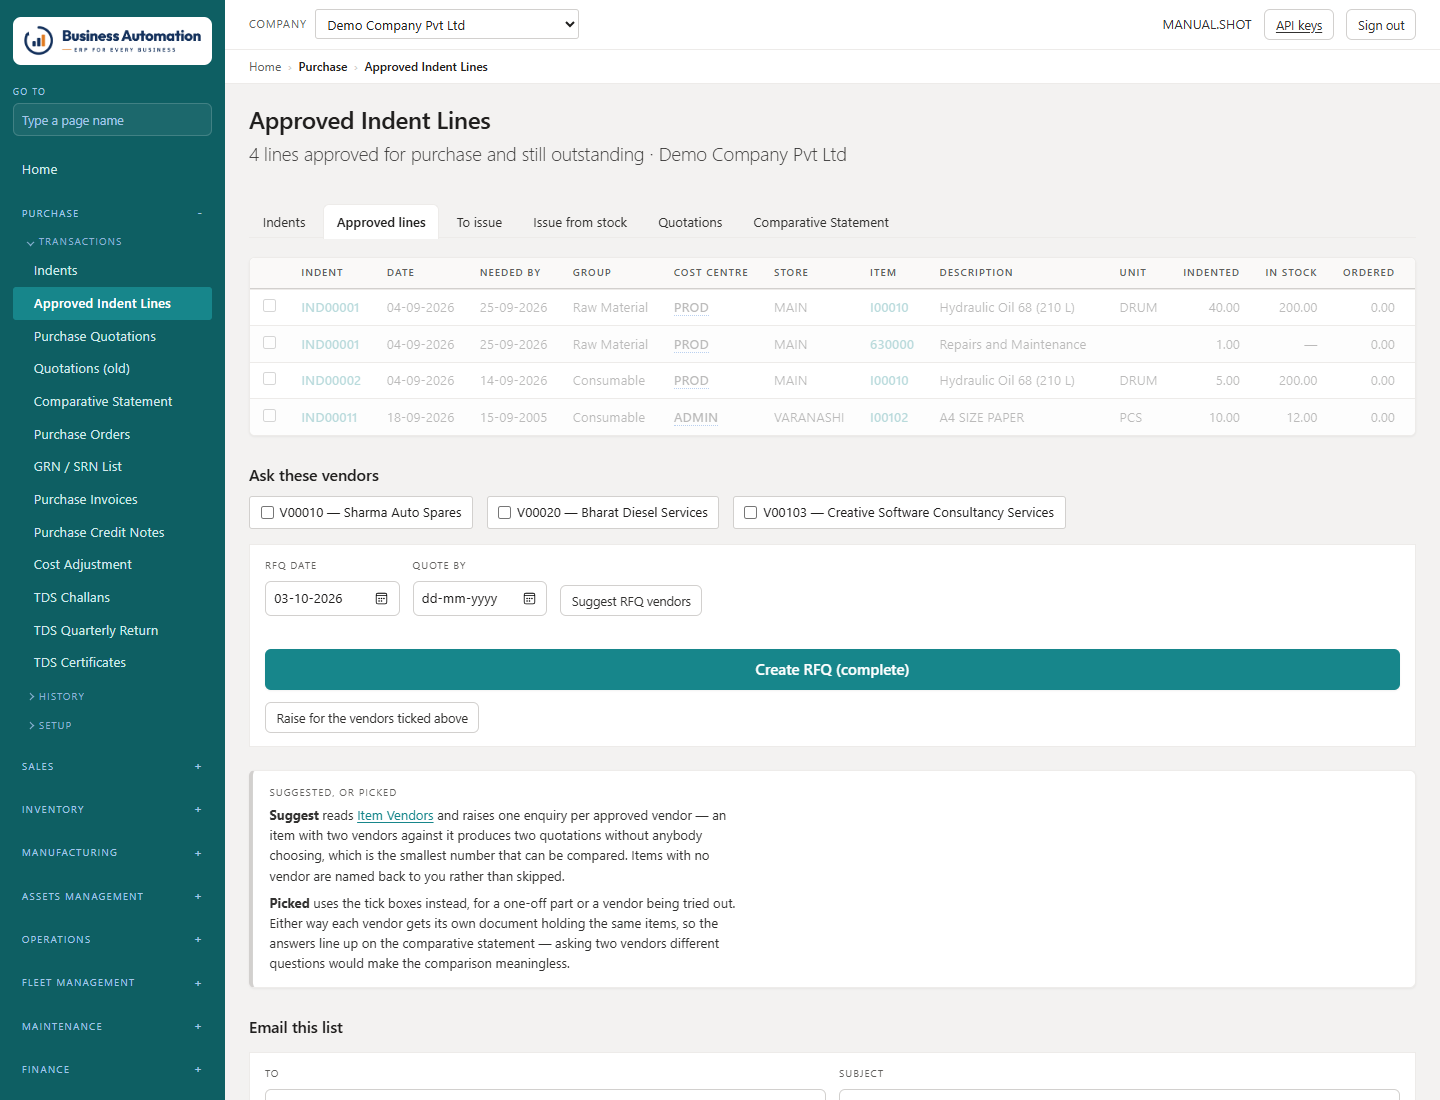
  • After approval, Purchase › Approved Indent Lines is the buyer's working list. Lines to be bought are worked by purchasing; lines to be issued go to the store. Email this list sends the filtered lines to a buyer.
Business Automation
Approved indent lines, waiting to be turned into enquiries
Figure 3.9 Approved indent lines, waiting to be turned into enquiries

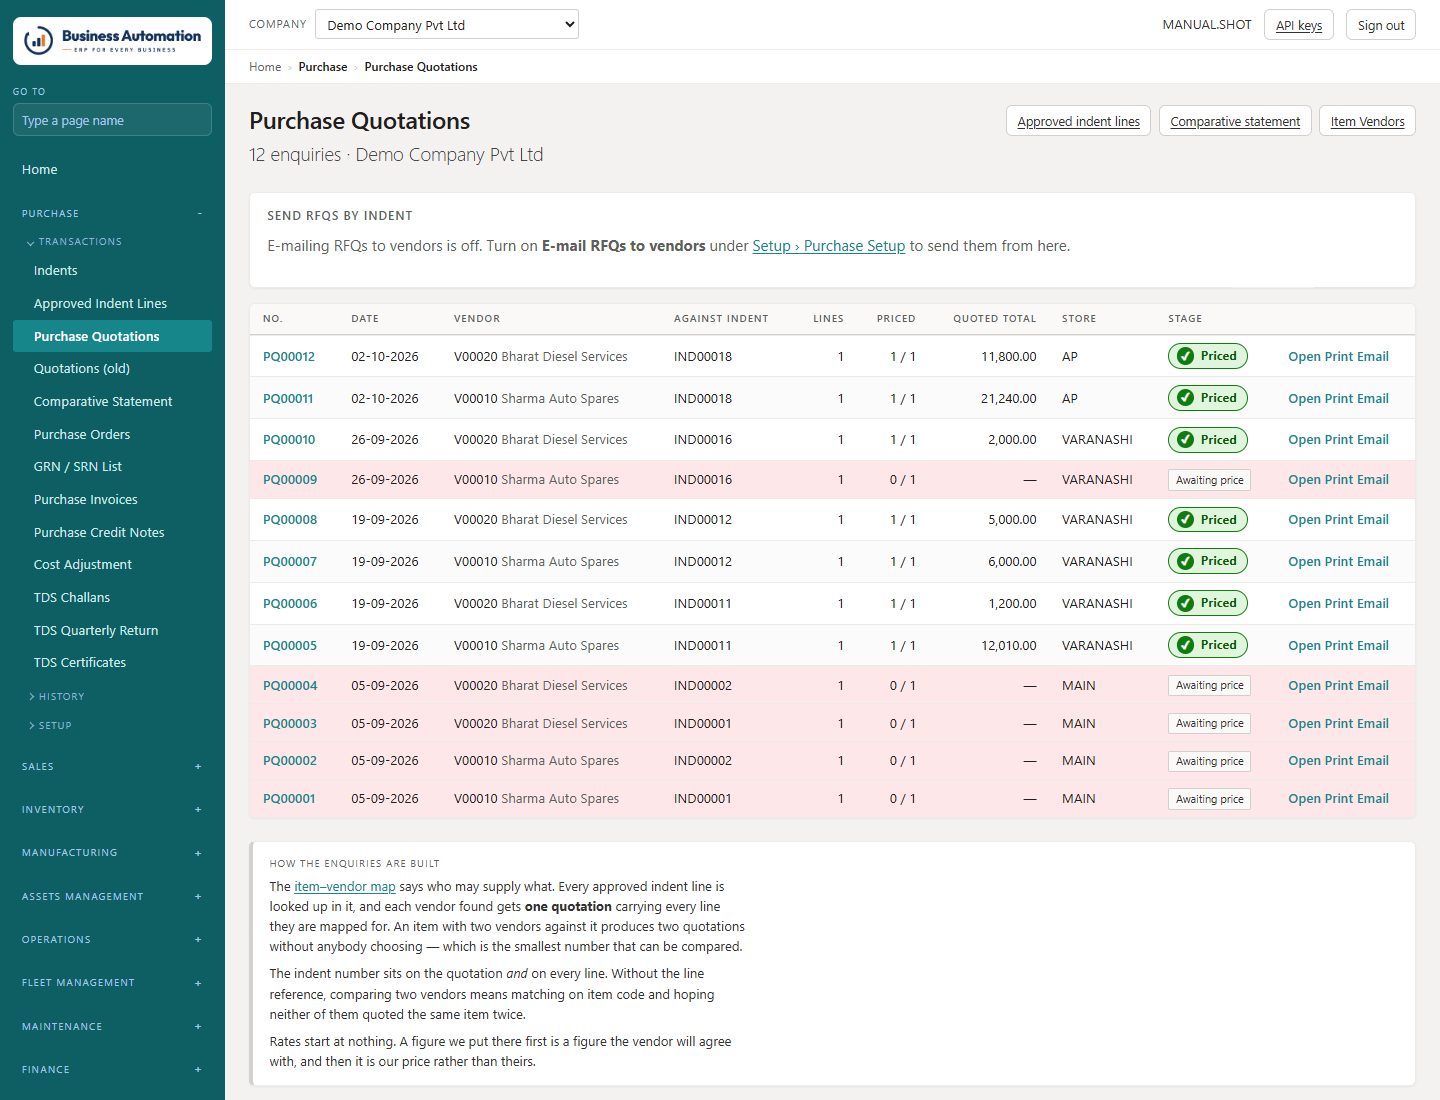
Asking suppliers: the enquiry (RFQ)

Raise one enquiry per approved supplier, straight from the item–vendor list.

WhereInventory › Item Vendors (/item-vendors) · Purchase › Purchase Quotations (/purchase/quotes)
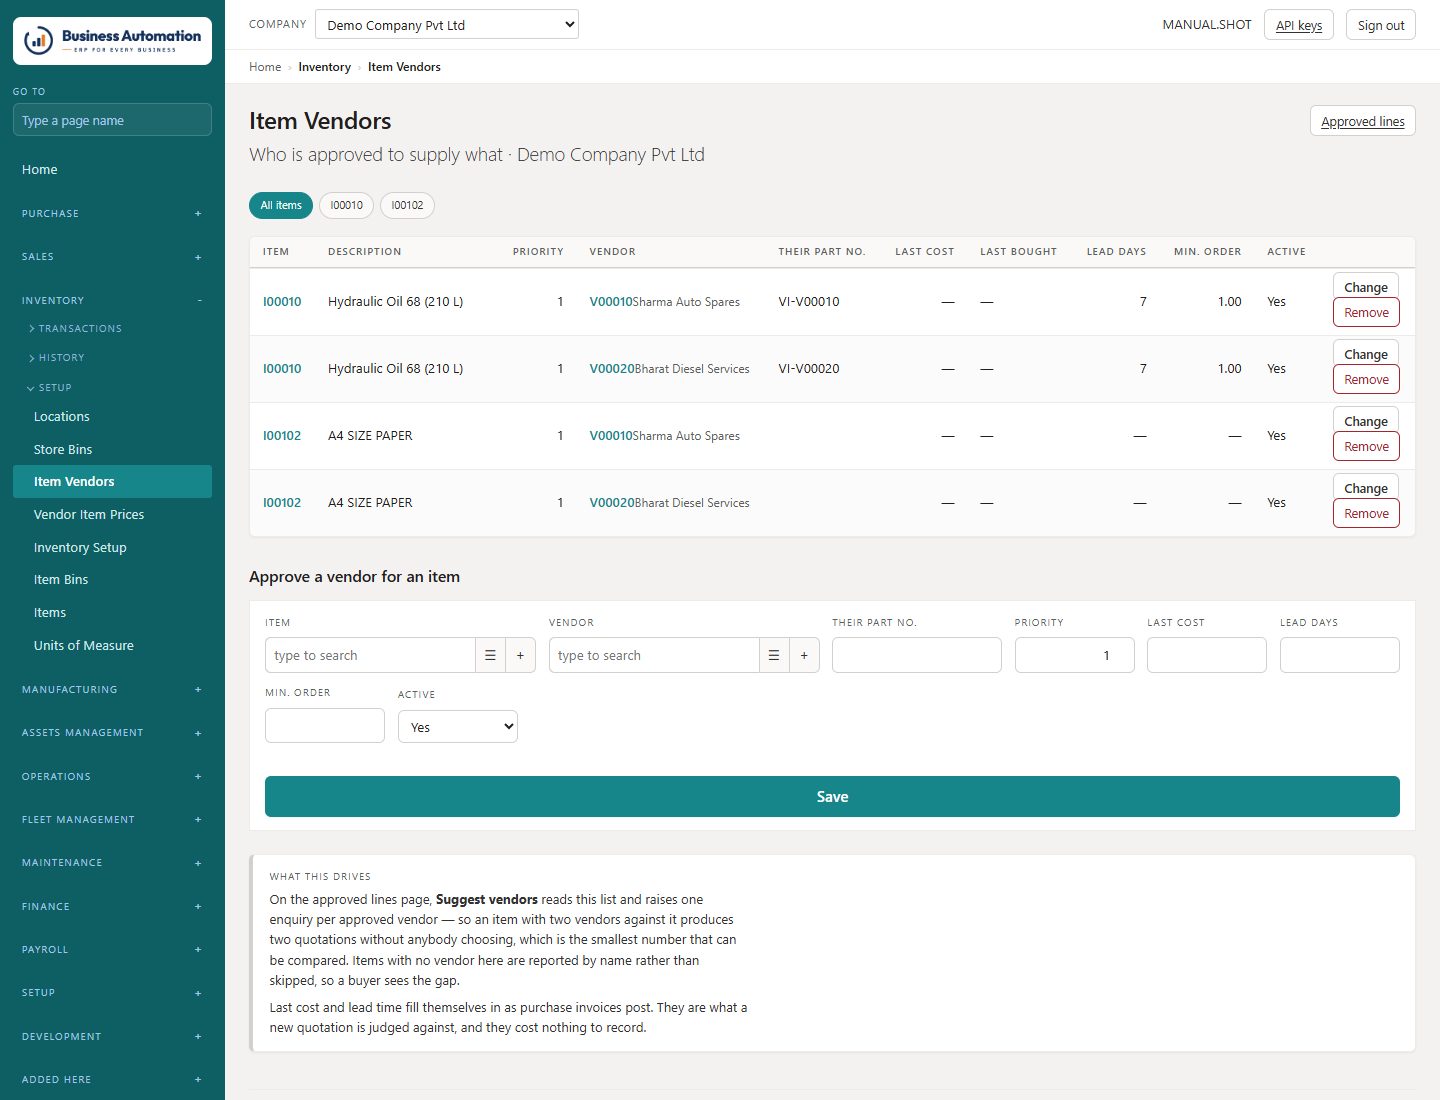
  1. 1
    Make sure Item Vendors says who may supply what (press Change on a row to correct a lead time or priority).
  2. 2
    On Purchase Quotations, press Suggest to see what would be raised: items nobody is mapped to supply, and suppliers who cannot be used.
  3. 3
    Press Generate. One quotation per supplier is made, carrying every line that supplier is approved for, with prices blank.
  4. 4
    Fill in payment terms, freight, delivery, insurance and dates on each enquiry.
  5. 5
    Press E-mail the vendor (or Send RFQ to all vendors on the indent's row, digitally signed where set up). Print gives a paper copy.
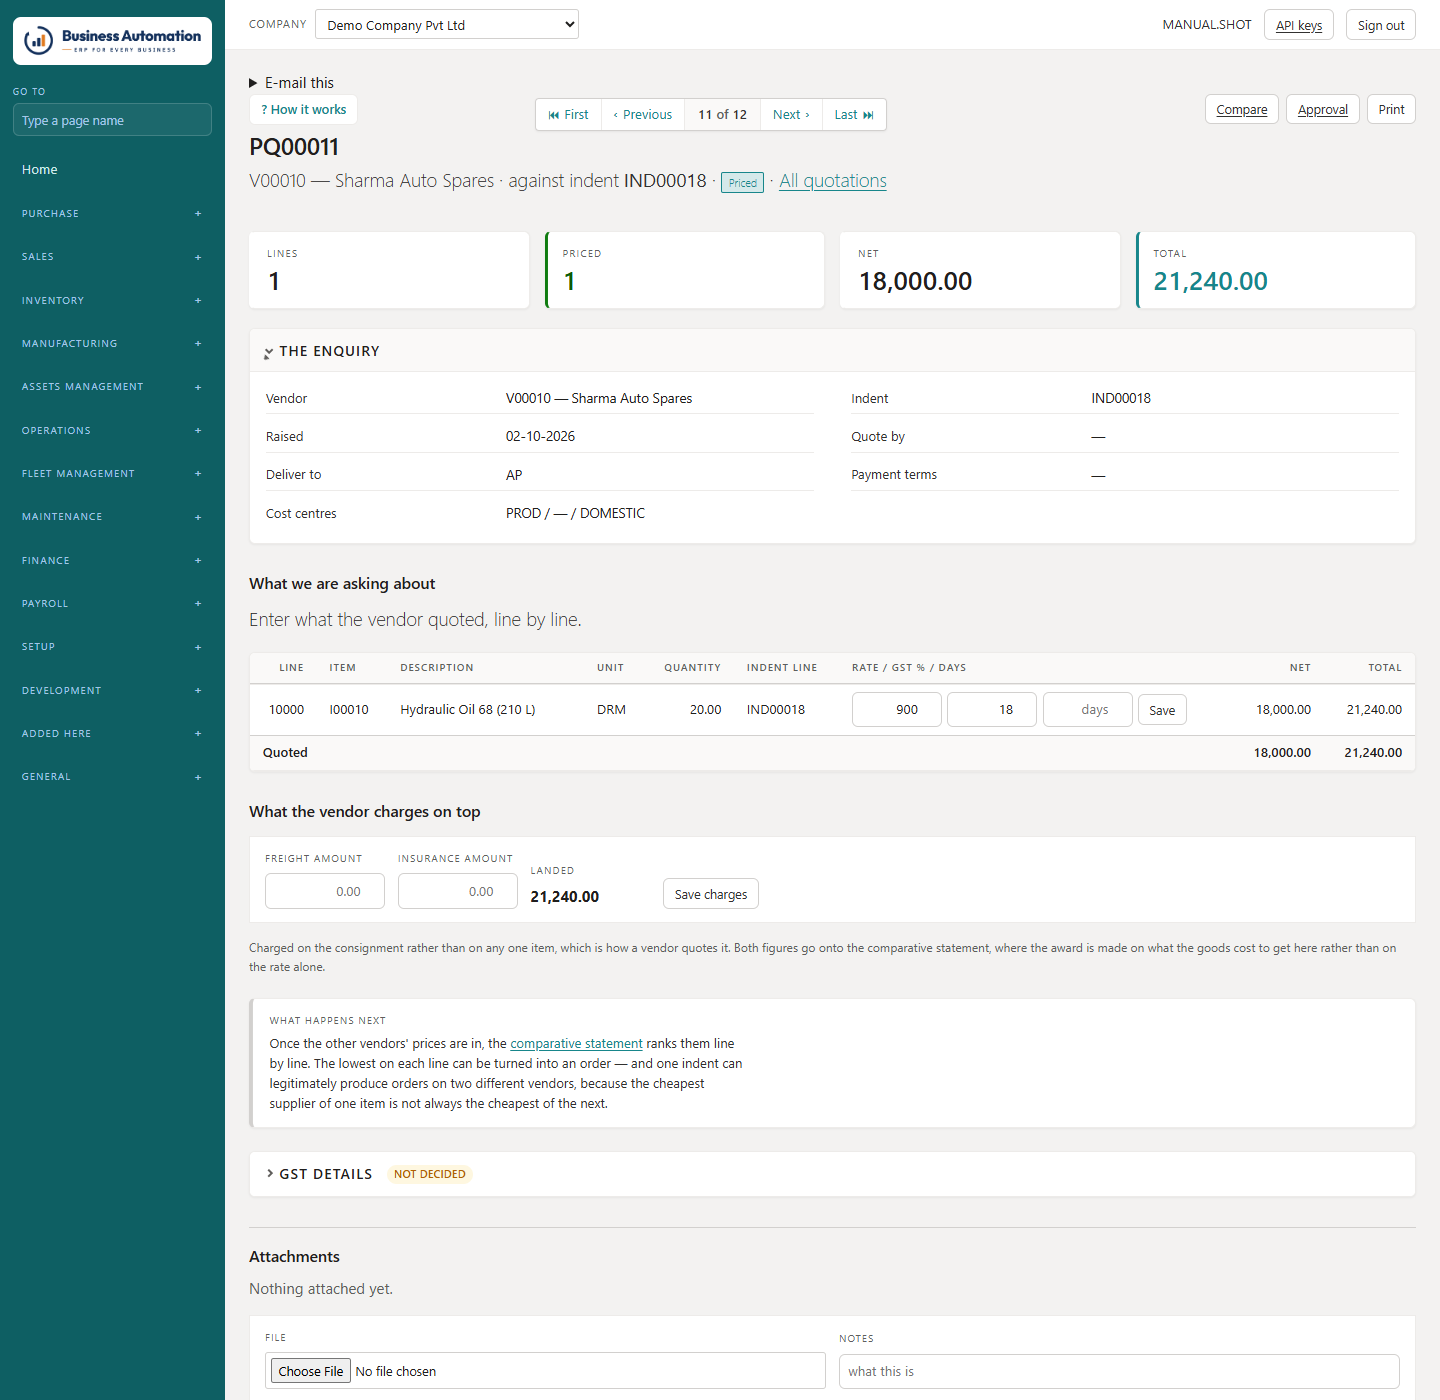
  6. 6
    When the vendor replies, type the rates on the quotation card, and freight and insurance under What the vendor charges on top.
Business Automation
Item vendors: who may supply what
Figure 3.10 Item vendors: who may supply what
Business Automation
Purchase quotations
Figure 3.11 Purchase quotations
Business Automation
A quotation card
Figure 3.12 A quotation card
💡
Tip. Running Generate again is safe: an existing quotation is added to, not duplicated, and a rate already given is never overwritten.

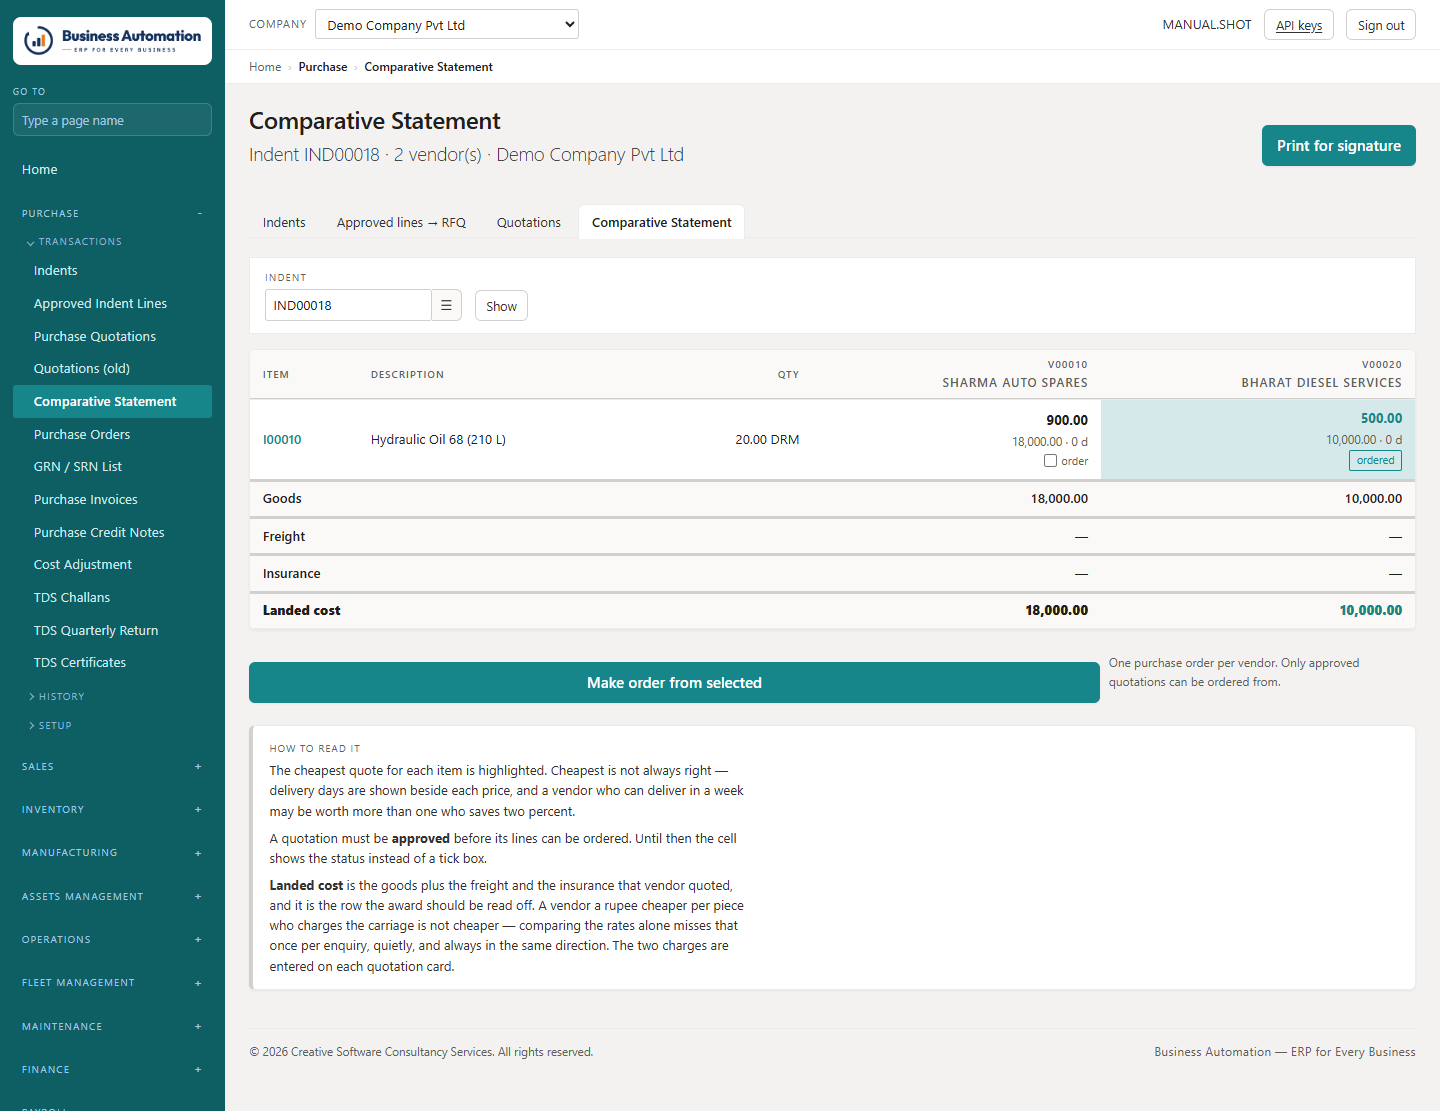
Choosing: the comparative statement

Compare every quotation against an indent and make the orders.

WherePurchase › Comparative Statement (/comparative)
  1. 1
    Choose the indent. Every item is down the side, every supplier across, the lowest rate marked.
  2. 2
    Read the Landed cost row — goods + freight + insurance. That is the row to award on.
  3. 3
    Tick the rate you want against each item.
  4. 4
    Press Make order. One purchase order per vendor is created with the quoted rate and terms.
  5. 5
    Print for signature gives the formal statement — rate, GST and rank (L1, L2) for every vendor, their terms, and lines for the signatures.
  6. 6
    To send it to the purchase head or management, open E-mail this at the top of the statement, put in the addresses (or choose a team) and press Send. The printed statement goes as the attachment.
Business Automation
The comparative statement
Figure 3.13 The comparative statement
💡
Tip. Each statement has its own address — /comparative/IND00018 for indent IND00018 — so it can be bookmarked or sent as a link.
ℹ
Note. A supplier who did not quote reads not quoted. A vendor who did not price every item shows partial and is never marked the cheapest.

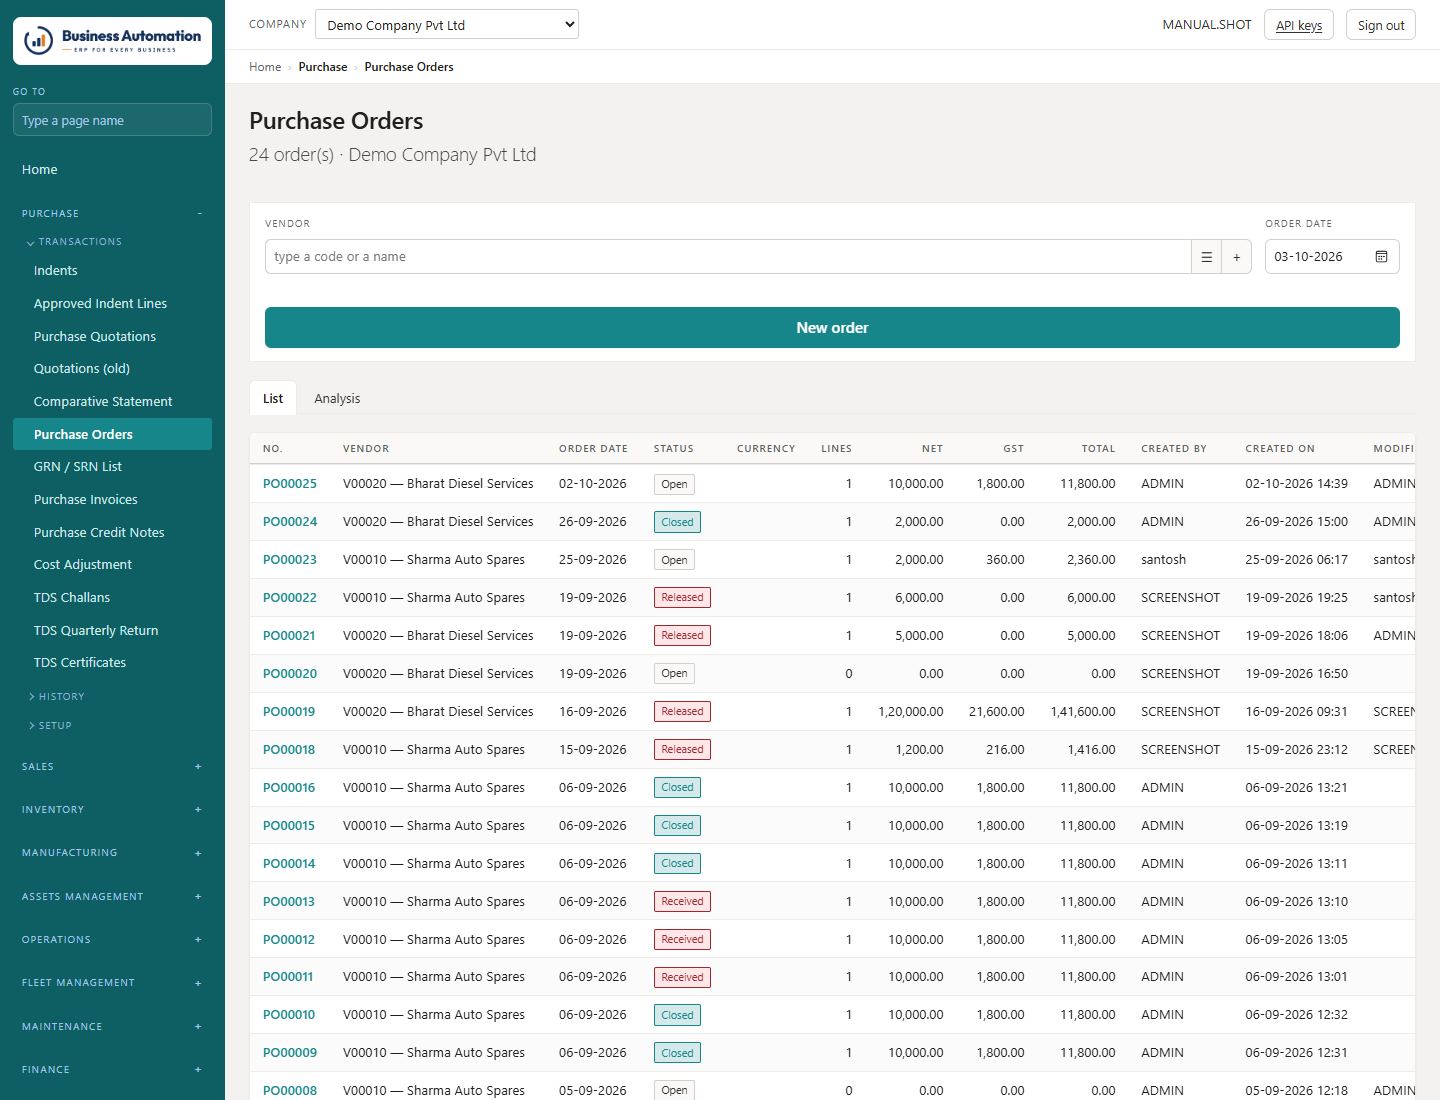
The purchase order

Check, release and send the order to the vendor.

WherePurchase › Purchase Orders (/purchase/orders)
  1. 1
    Open the order. Check the store (it decides intra- or inter-state GST), the cost centres, and TDS on each line.
  2. 2
    To bring freight and insurance in as lines, press Insert freight and insurance lines (once only), then set the GST rate on those lines.
  3. 3
    If orders are approved in your company, press Approval › Send for approval.
  4. 4
    Press Release. Released means the supplier has it; the order is locked.
  5. 5
    Press E-mail to vendor, choose the Purchaser and confirm. The printed order with its terms goes to the vendor's e-mail, with a copy to the purchaser.
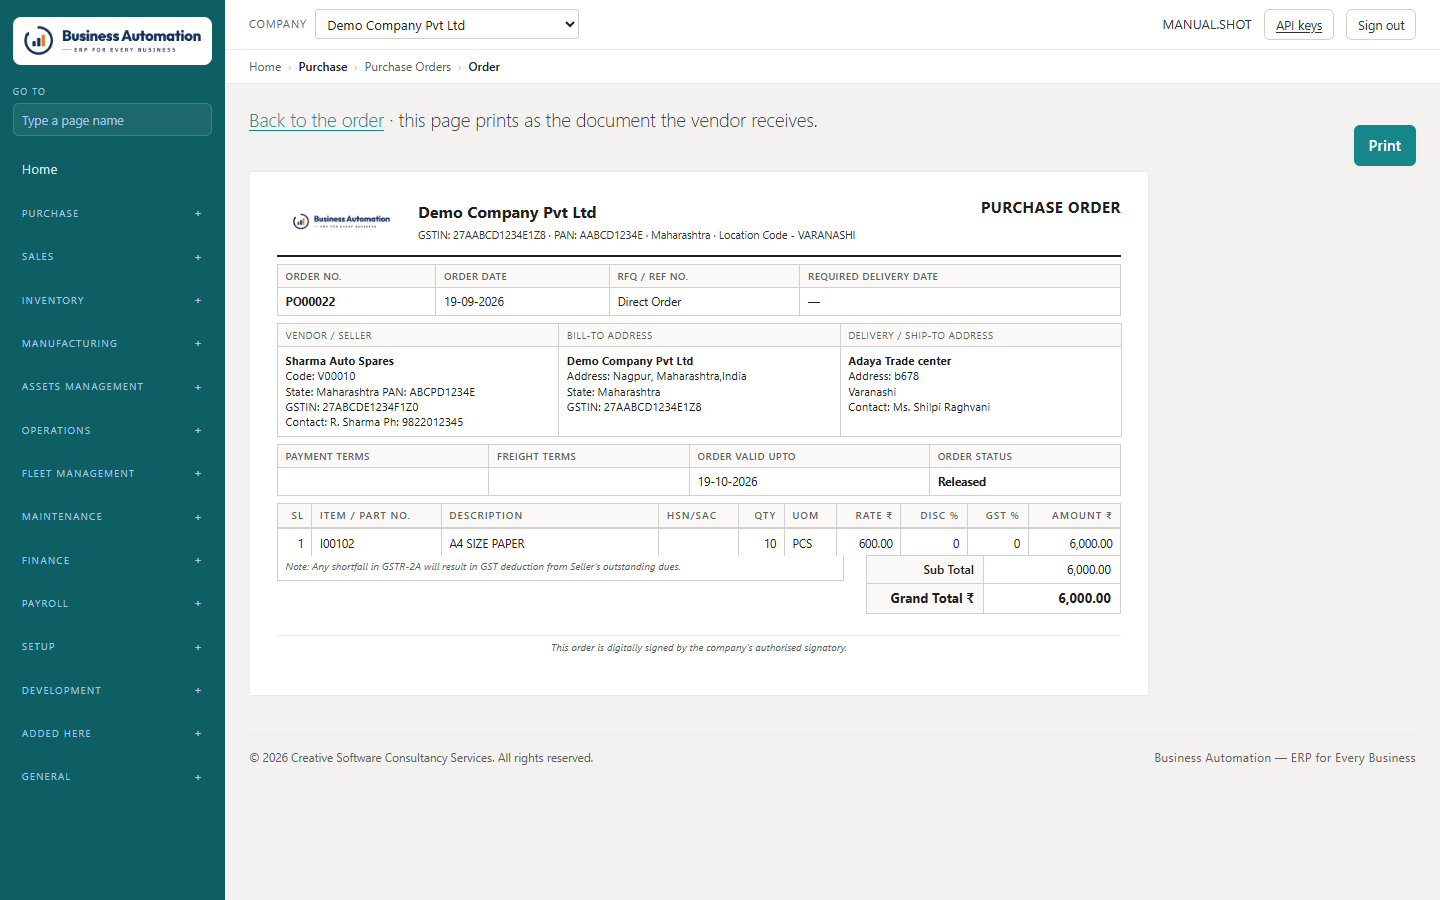
  6. 6
    Print view shows the order exactly as the vendor receives it.
Business Automation
The purchase order list
Figure 3.14 The purchase order list
Business Automation
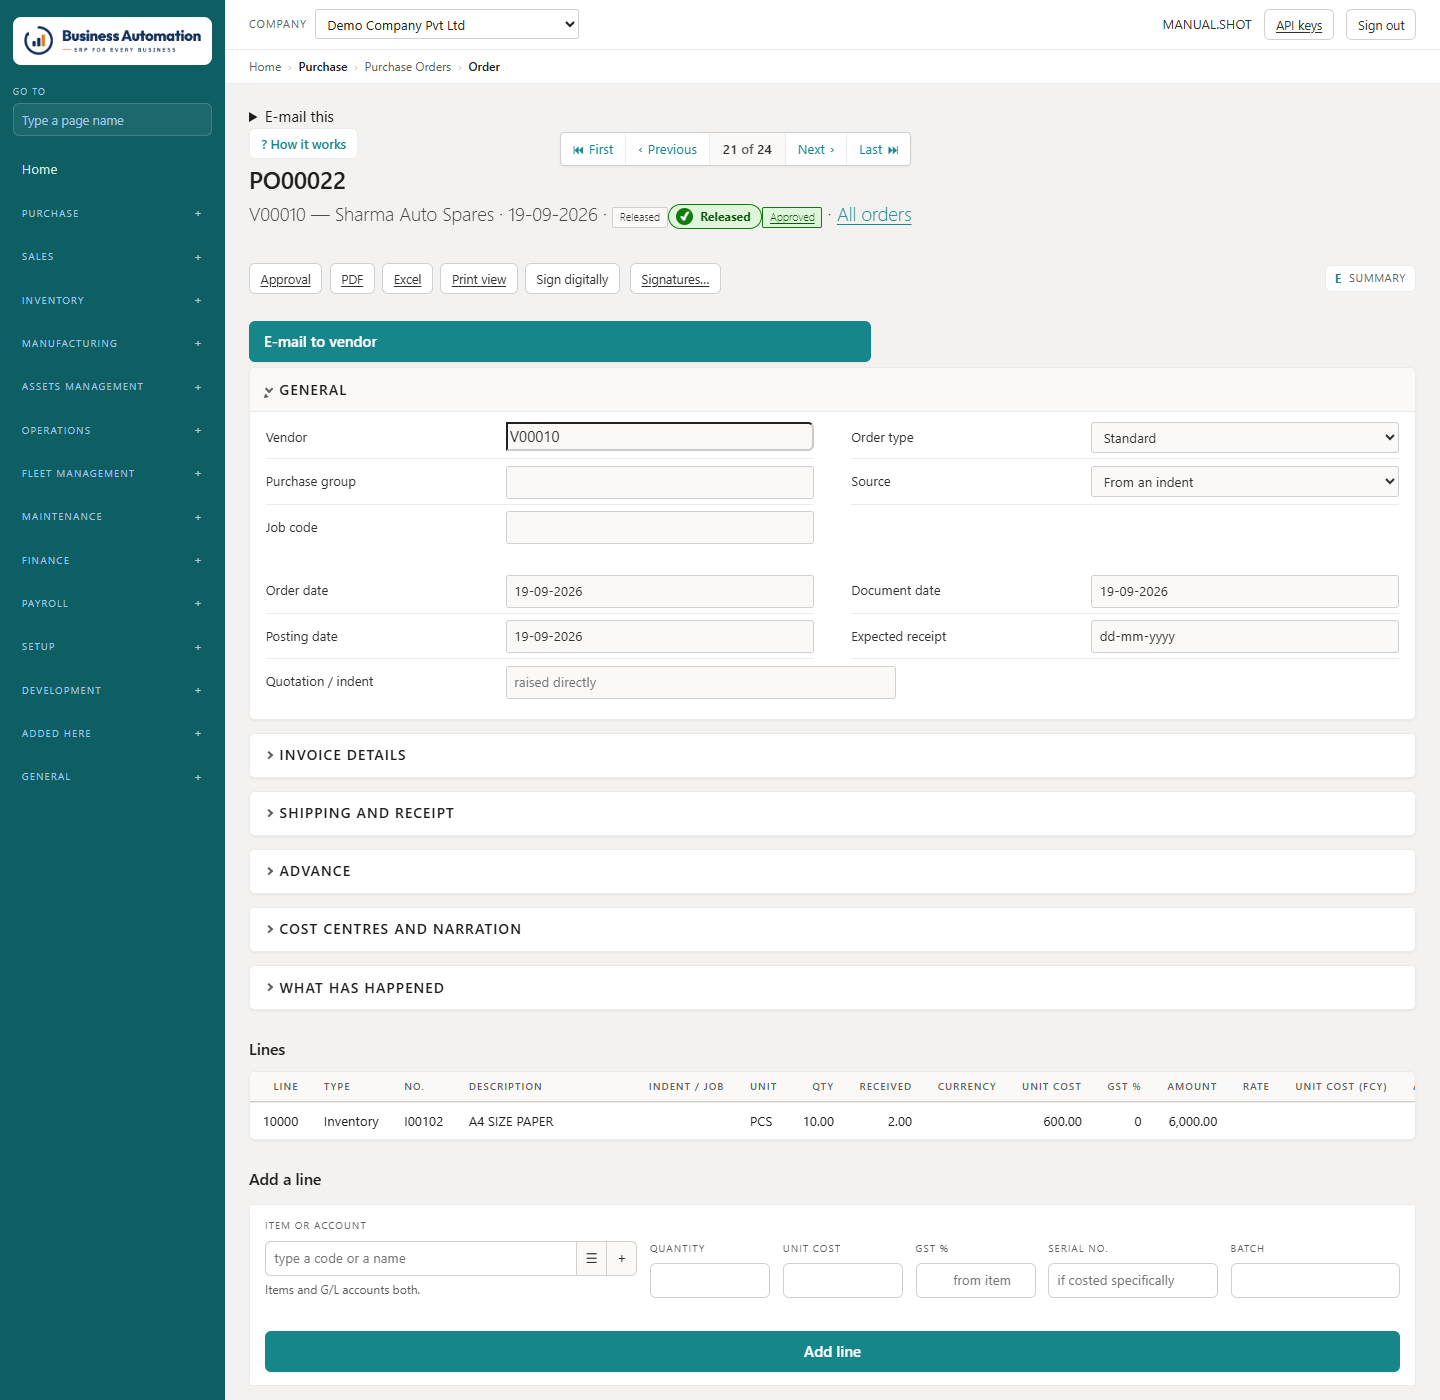
A purchase order
Figure 3.15 A purchase order
Business Automation
The same order as the vendor receives it
Figure 3.16 The same order as the vendor receives it
⚠
Important. Reopen to change it is there only while nothing has been received. After that, change the receipt or raise a separate order for the difference. Changing a released order means approving it again.

Receiving against the order

That is the store's job — see Chapter 2. What arrives is what the storekeeper counted, not what the order said.

  • Taking a receipt line back: on Purchase › Goods Receipts, open the receipt and press Undo on the wrong line. Stock goes out again, the accounting is reversed and the order is outstanding again. You cannot undo a line already billed, or one whose stock has moved on.

The bill: purchase invoice

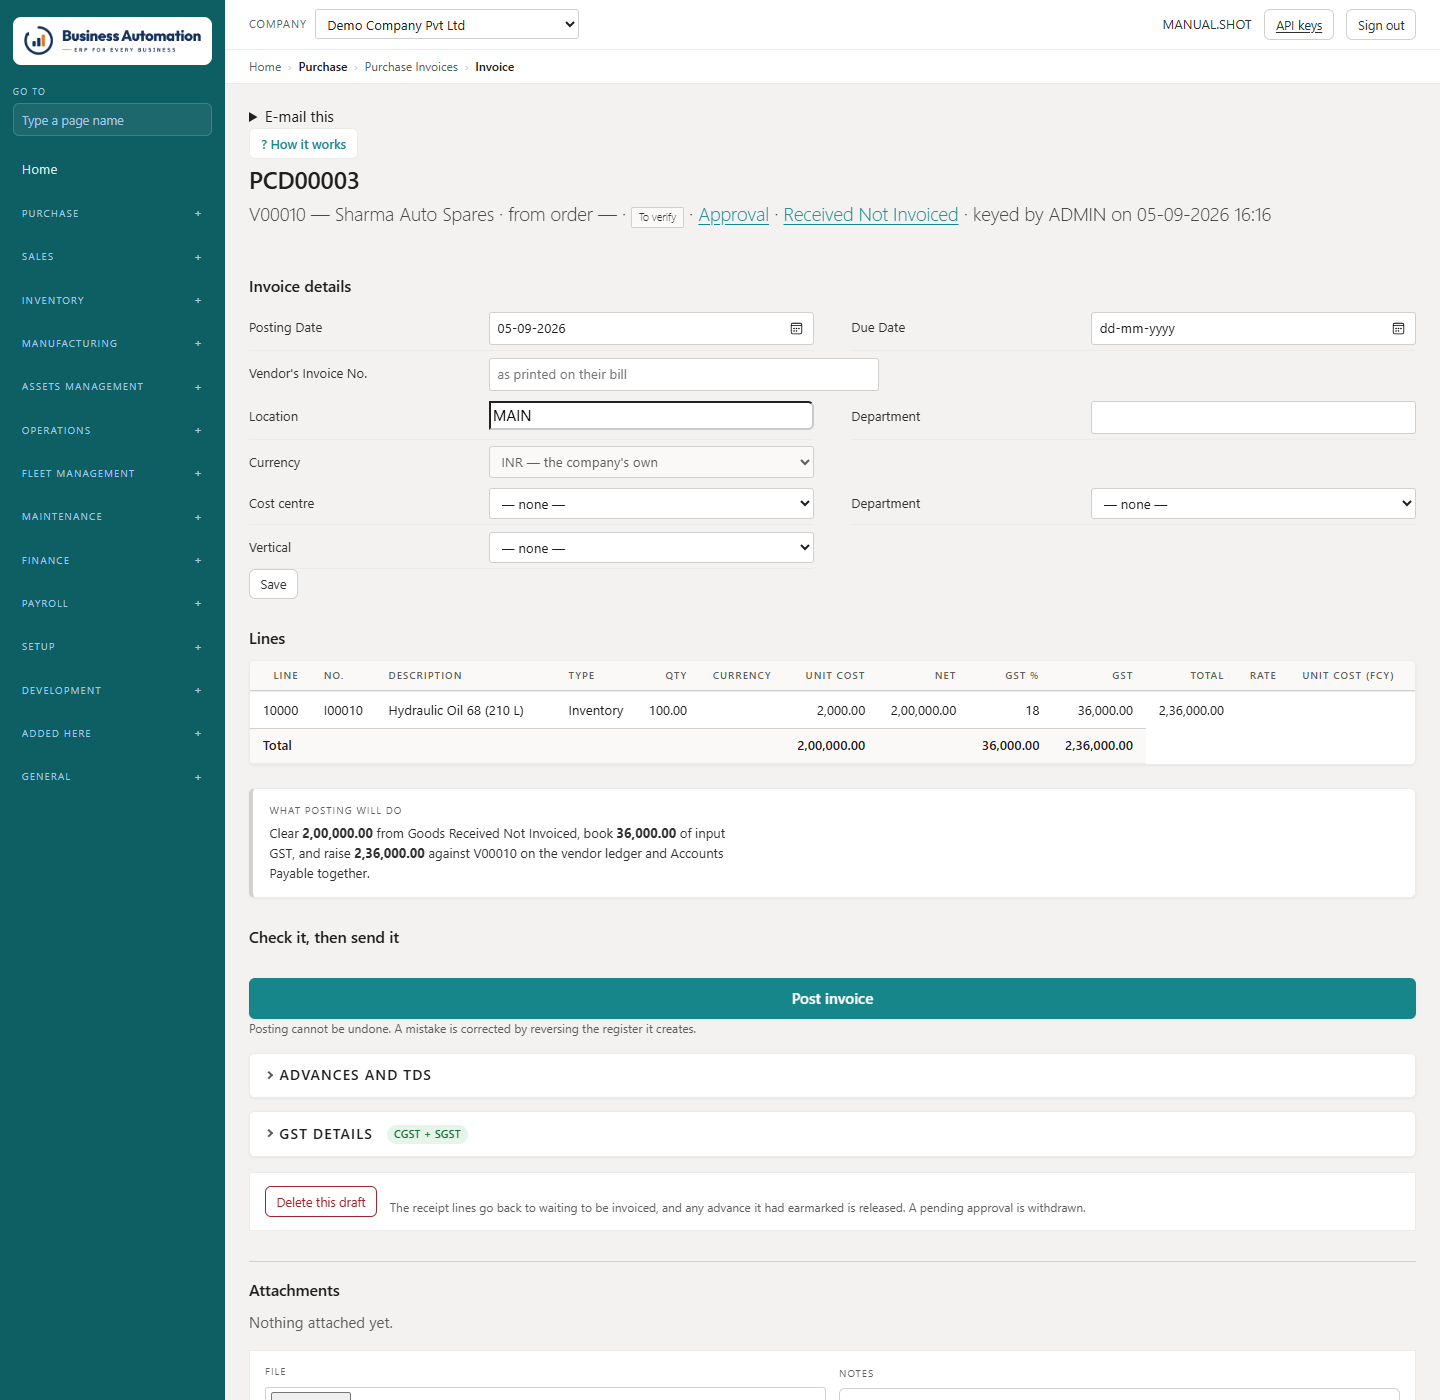
Turn the received lines the supplier has billed into a purchase invoice, check it and post it.

WherePurchase › GRN Posted, Not Invoiced (/purchase/not-invoiced) · Purchase Invoices (/purchase/invoice-list)
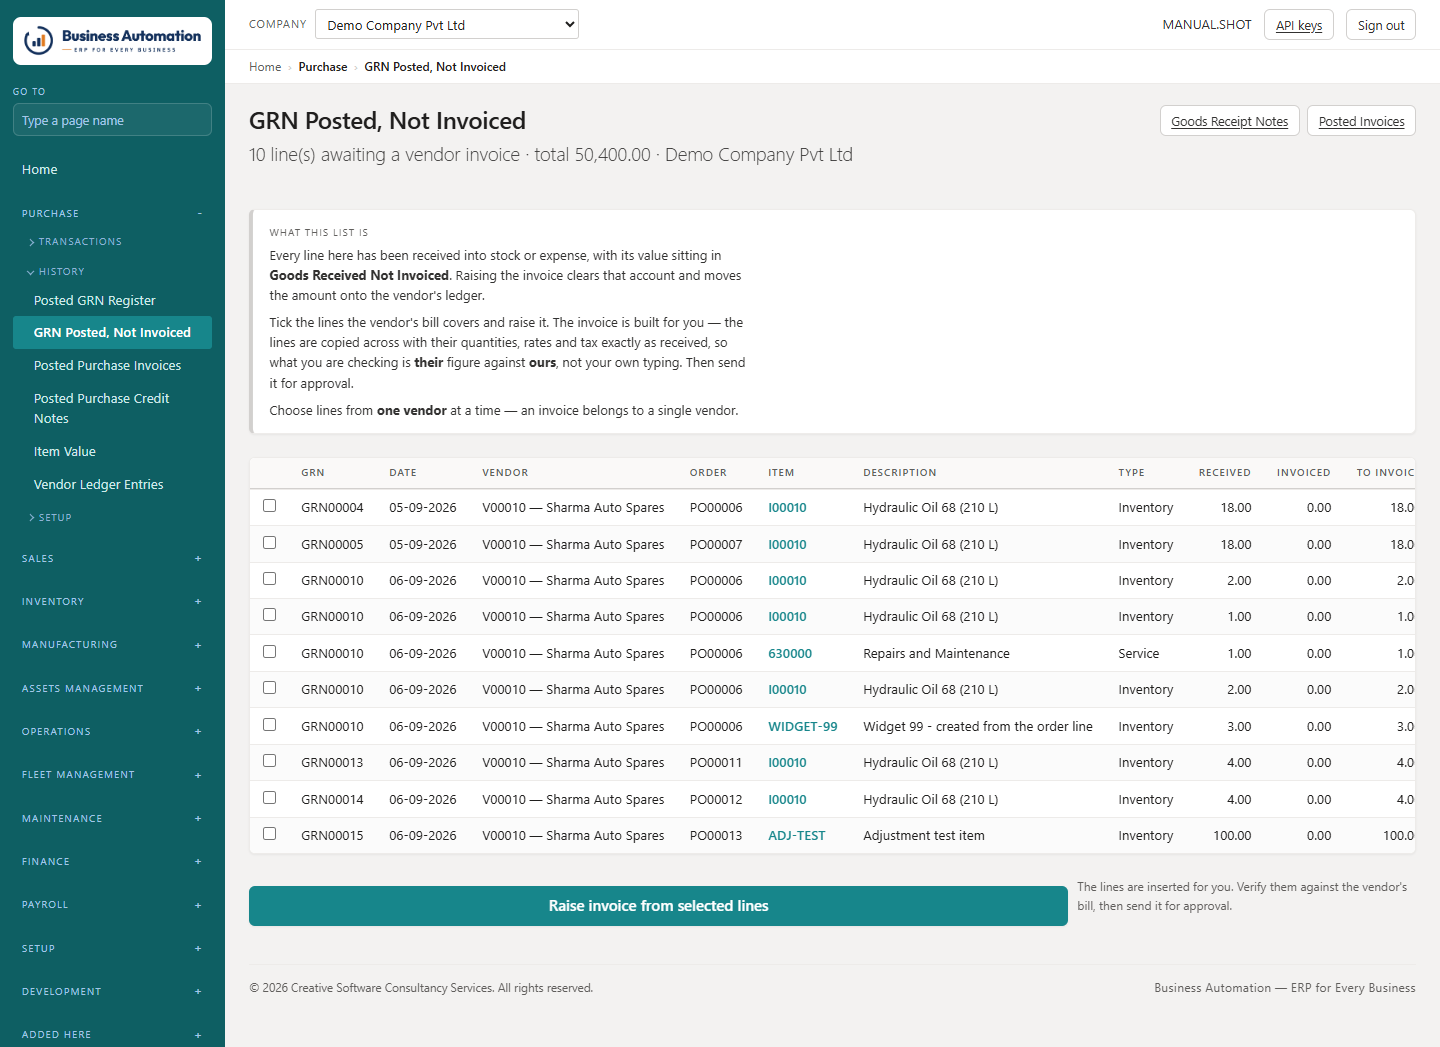
  1. 1
    Open GRN Posted, Not Invoiced. Tick the receipt lines the supplier has invoiced and raise the invoice.
  2. 2
    On the invoice, type the supplier's own invoice number — it cannot go for approval without it.
  3. 3
    Check the tax, the TDS section and amount. If the supplier billed only part of a delivery, lower the quantity on the line.
  4. 4
    If the supplier was paid in advance, tick the advance to adjust (it is matched when the invoice posts).
  5. 5
    Send it for approval if your company requires it.
  6. 6
    Press Post. Goods Received Not Invoiced clears, input GST is booked, and the supplier is credited.
Business Automation
Received but not invoiced — what the vendor still owes us a bill for
Figure 3.17 Received but not invoiced — what the vendor still owes us a bill for
Business Automation
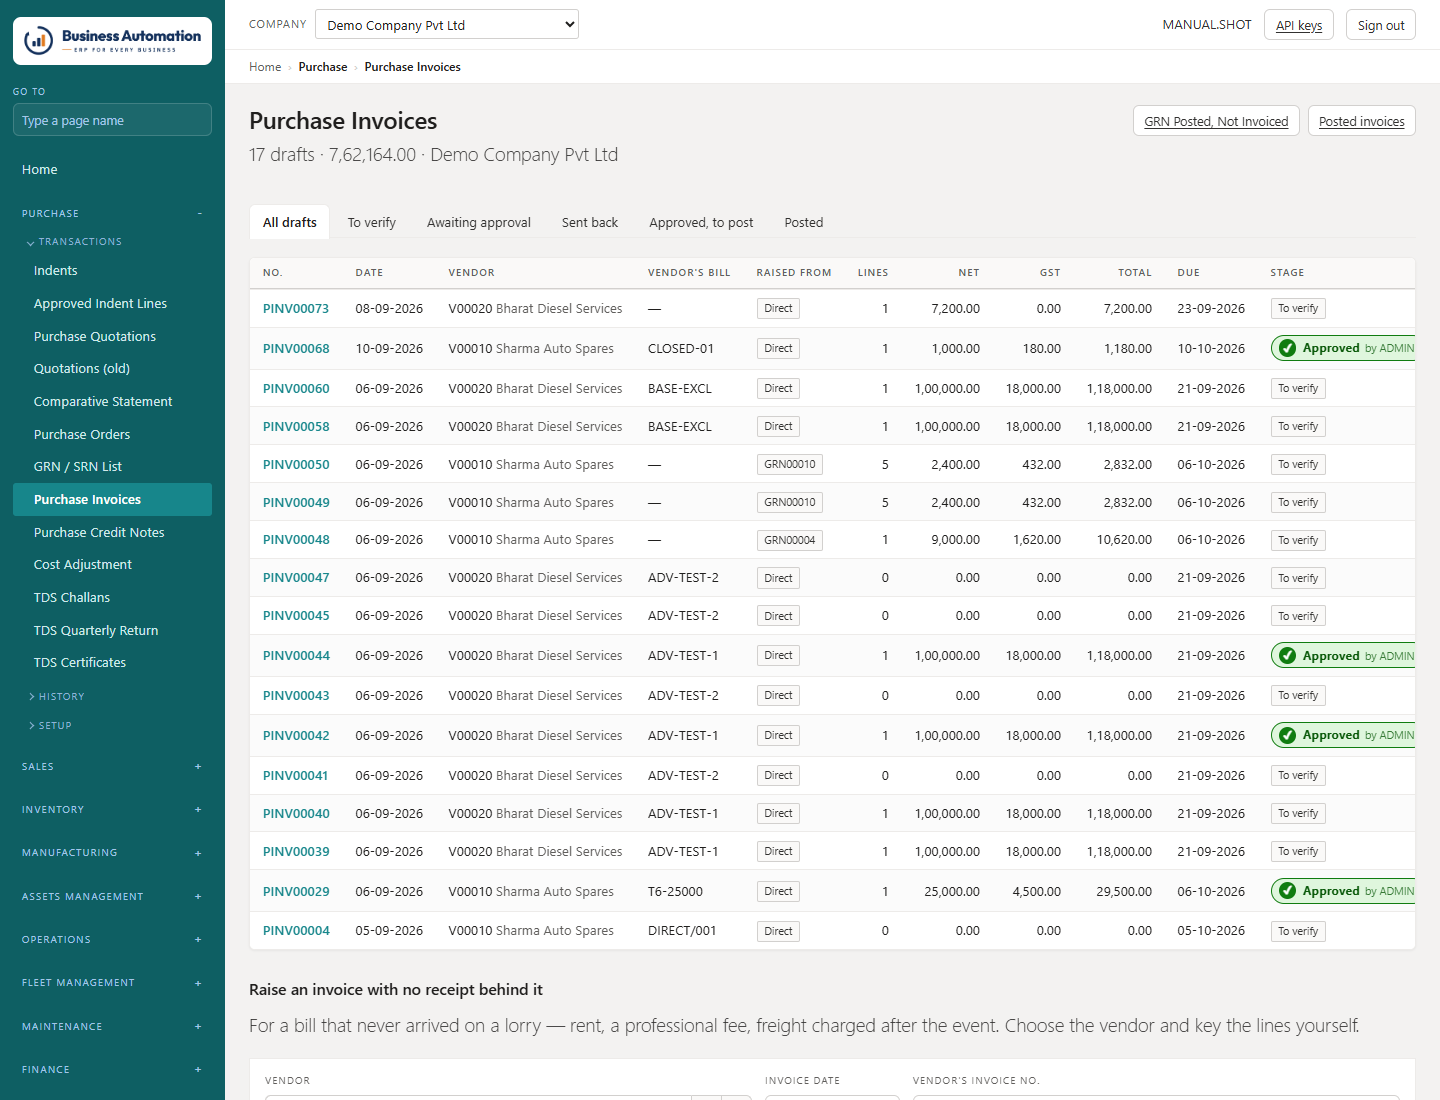
Purchase invoices, drafted and waiting
Figure 3.18 Purchase invoices, drafted and waiting
Business Automation
The purchase invoice card
Figure 3.19 The purchase invoice card
💡
Tip. Raised from the wrong lines? Delete this draft at the foot of the card returns its lines to waiting. Once posted, a bill is corrected with a credit note.

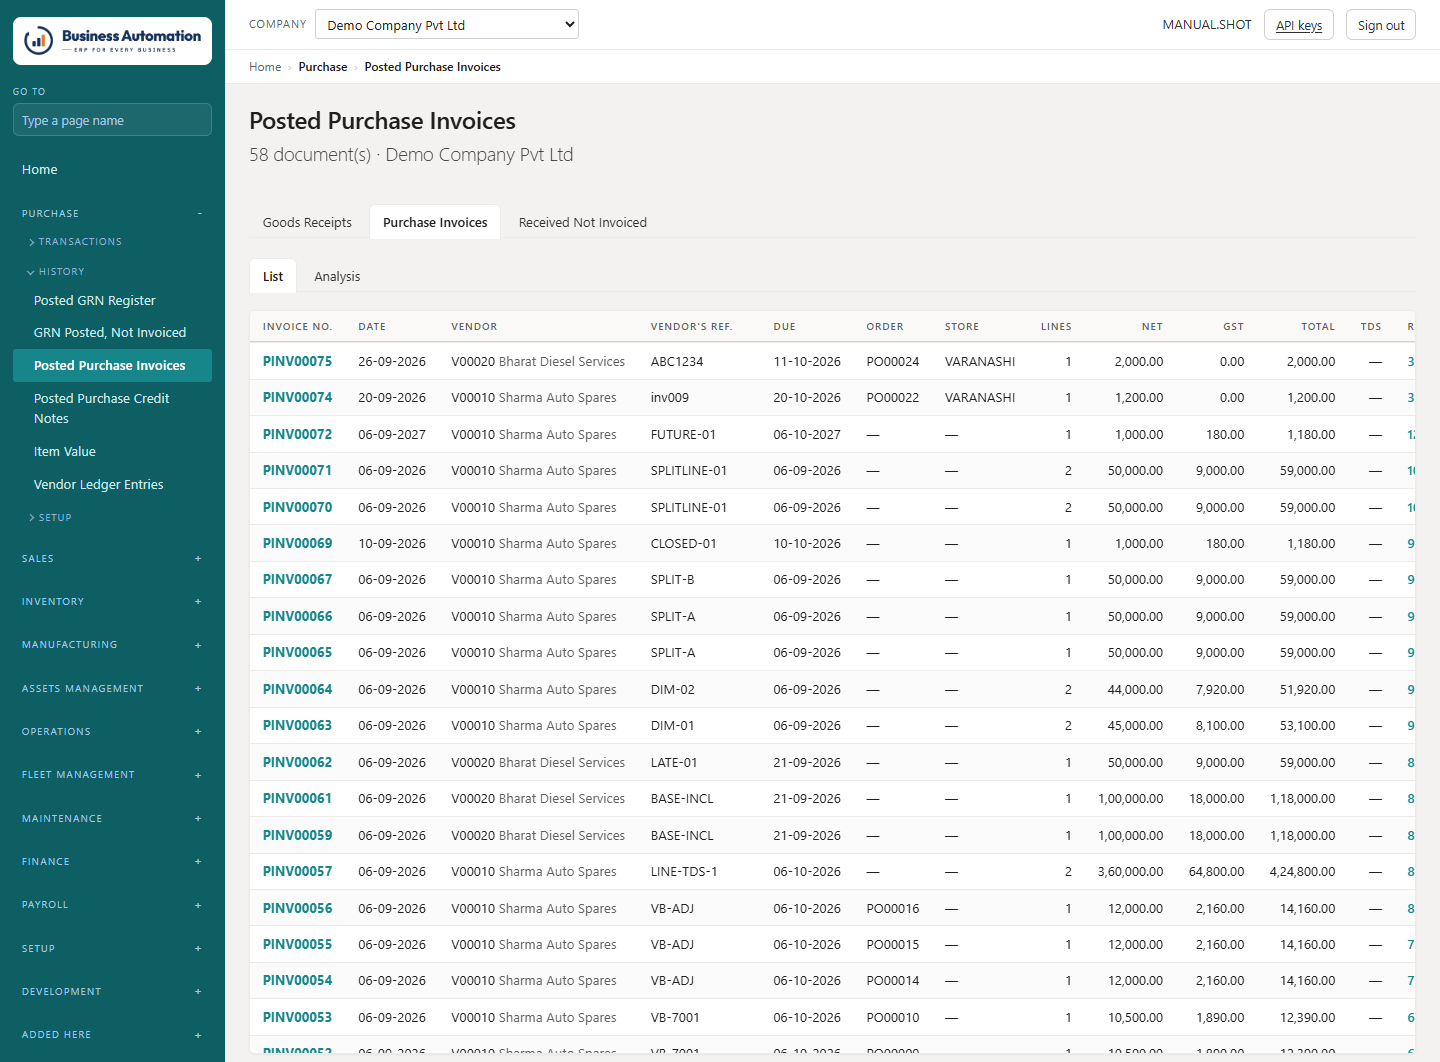
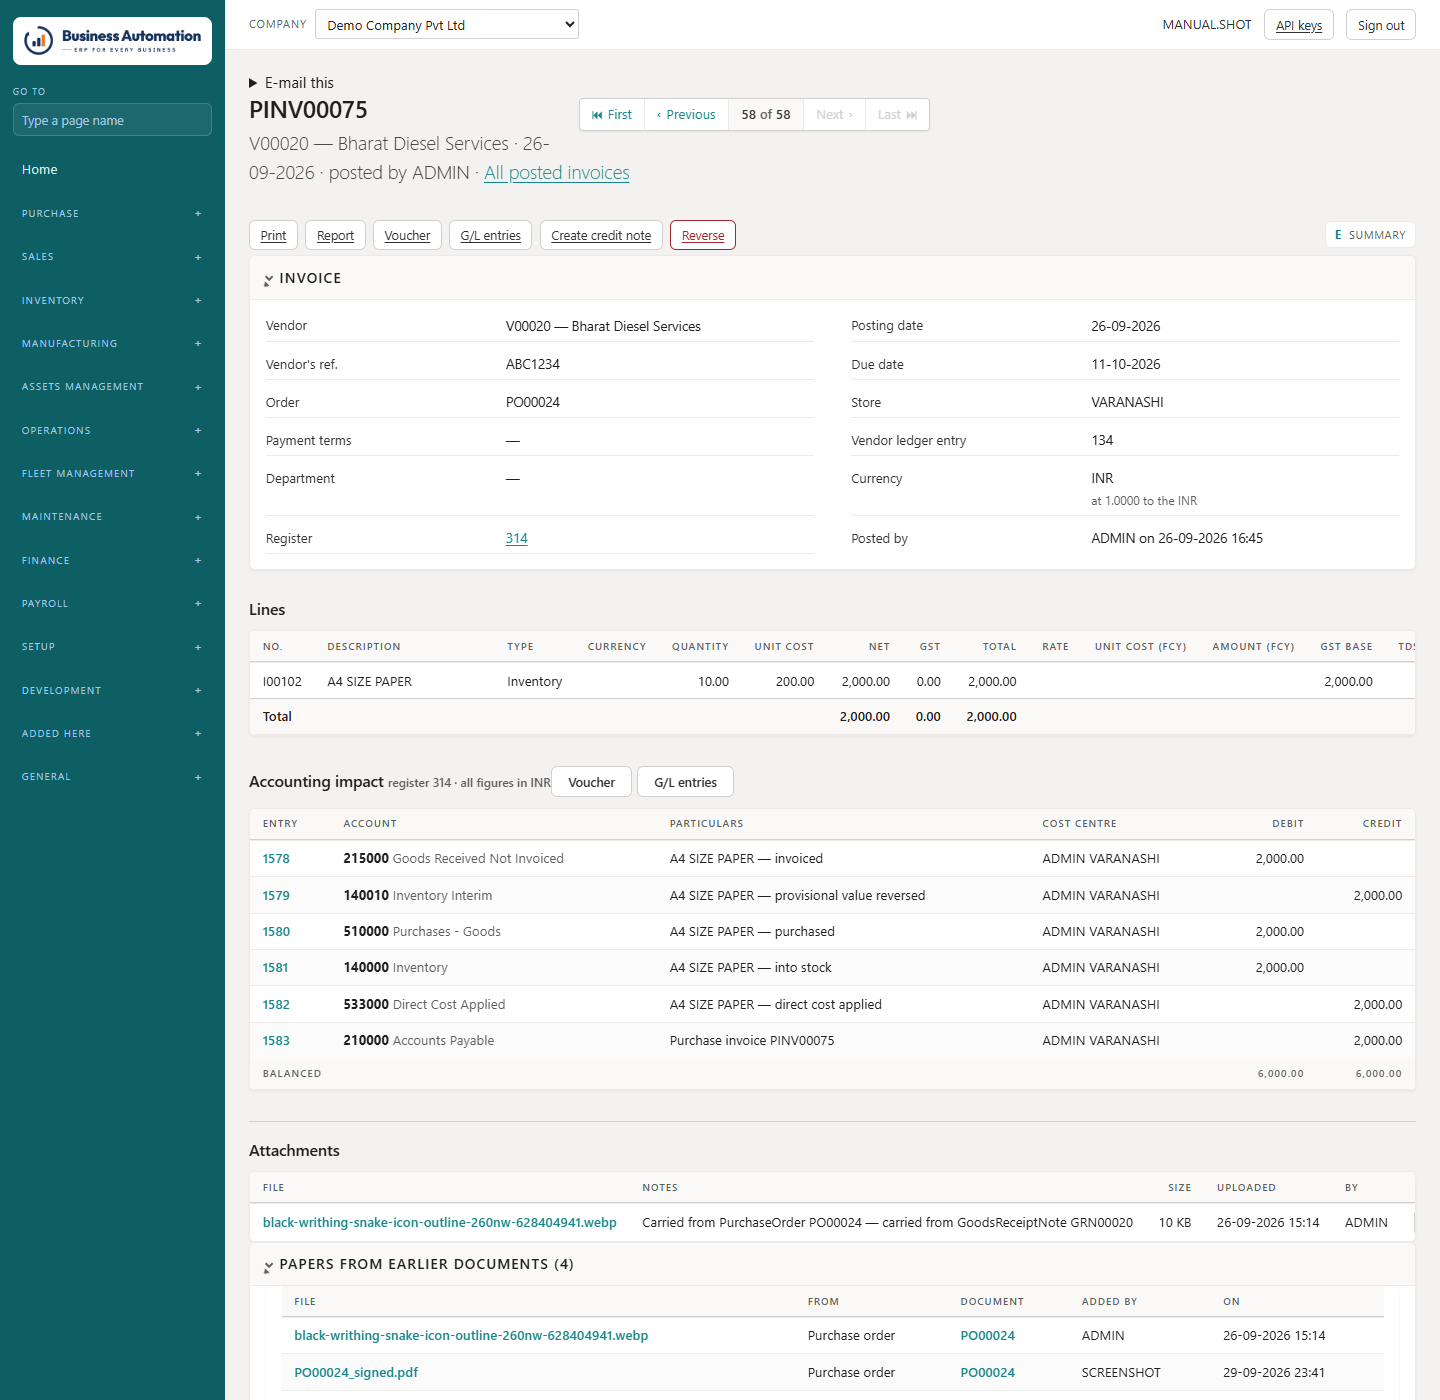
Looking up posted purchase documents

Every register: one row per document, and the number is a link.

WherePurchase › Posted Purchase Invoices (/purchase/invoices) · Posted GRN Register (/purchase/grns)
  1. 1
    Open the register and click the document number. The header shows first, then lines and totals, with the attached papers.
  2. 2
    What it did to the books lists every G/L entry. Voucher and G/L entries are beside it; Report prints the invoice with its accounting.
  3. 3
    To reverse a posted invoice, open it and press Reverse (it is deliberately not on the list).
Business Automation
Posted purchase invoices
Figure 3.20 Posted purchase invoices
Business Automation
A posted purchase invoice, read-only
Figure 3.21 A posted purchase invoice, read-only

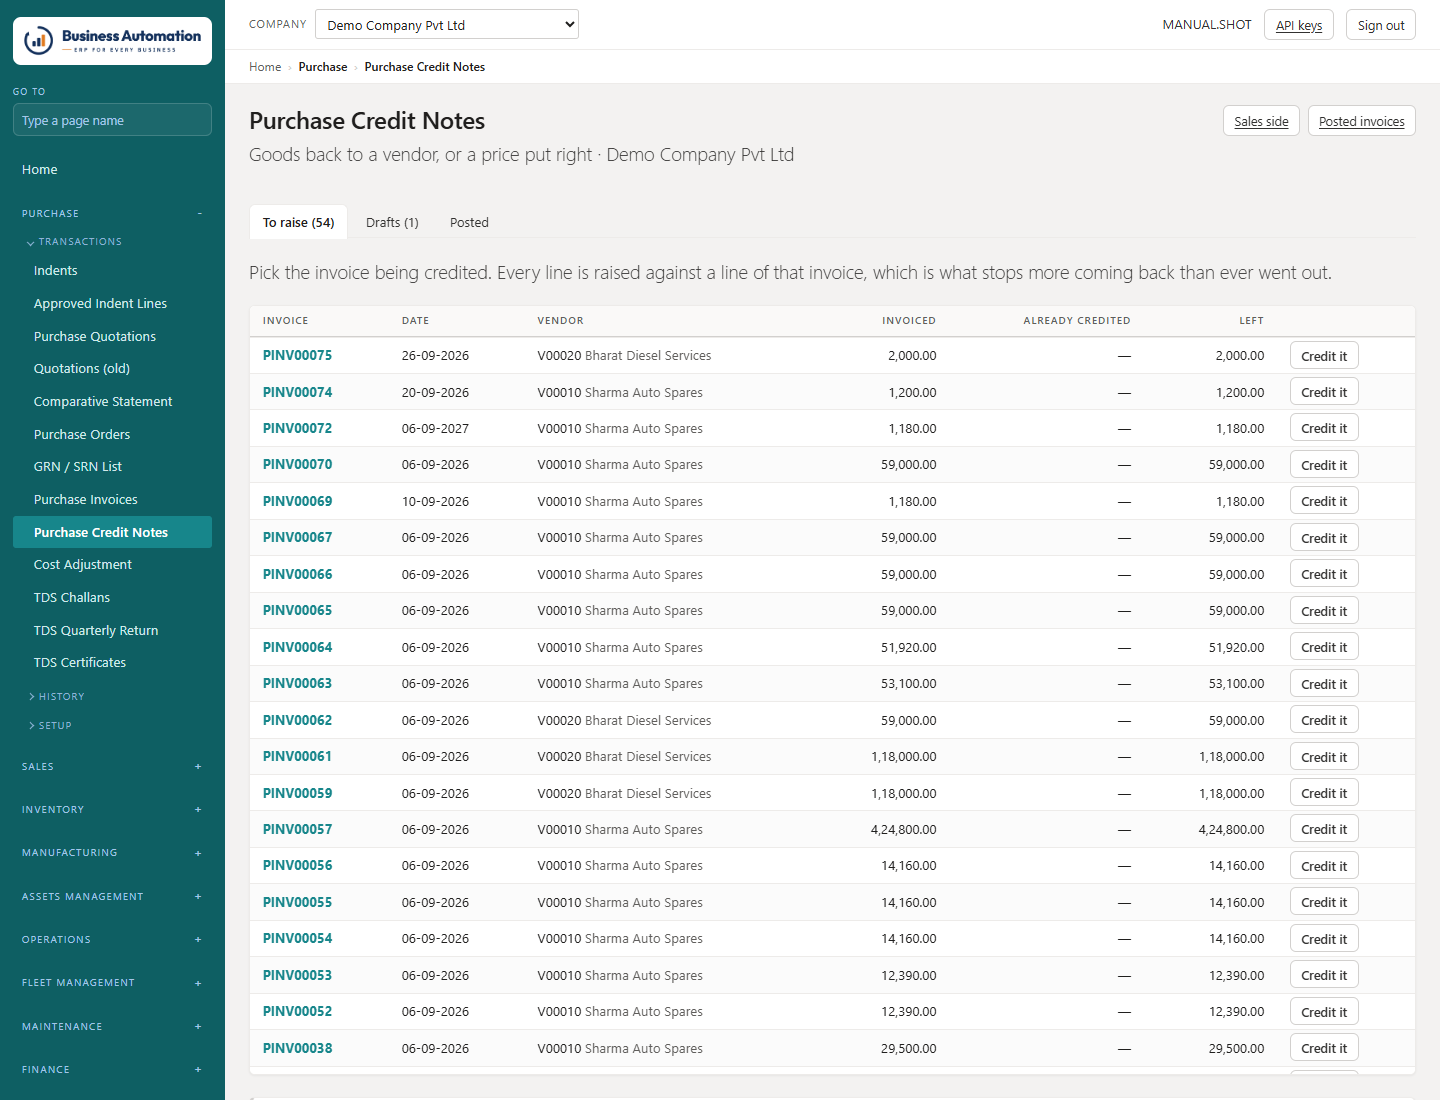
Sending goods back: purchase credit note

Credit a posted invoice, with the supplier's own credit note number.

WherePurchase › Purchase Credit Notes (/purchase/credits)
  1. 1
    Start the credit note from the posted invoice. Every creditable line comes on at the quantity left.
  2. 2
    Record the supplier's own credit note number (not the invoice number).
  3. 3
    Post. Returned goods leave the shelf at what they cost when they arrived.
Business Automation
Purchase credit notes
Figure 3.22 Purchase credit notes

Approvals for purchase documents

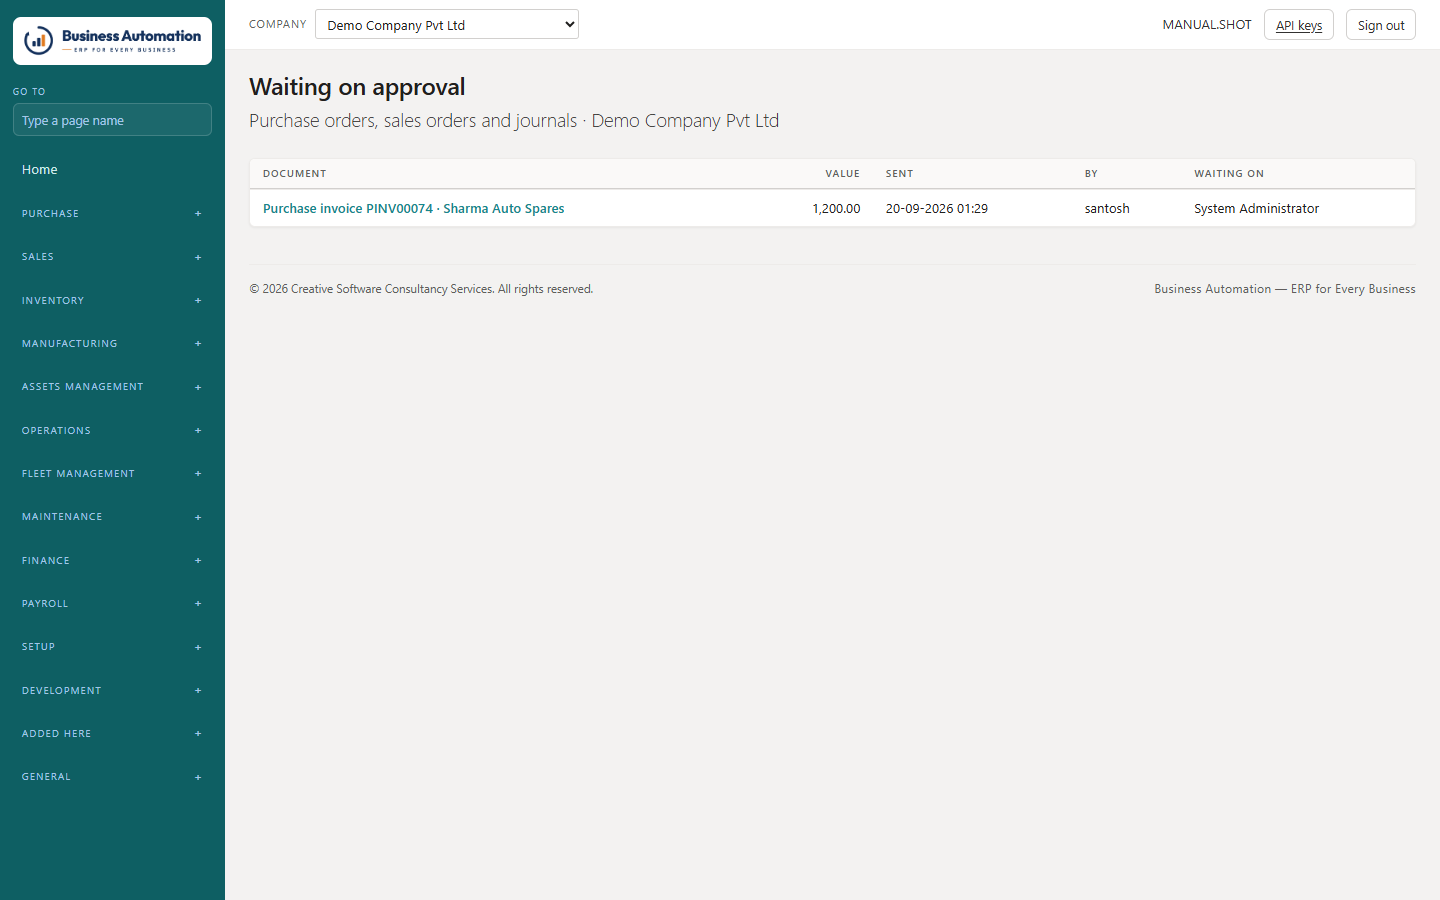
Quotations, orders, goods receipts and invoices can go through approval.

WhereApproval link on each card · Waiting on approval (/approvals/documents)
  1. 1
    Open the document and click Approval.
  2. 2
    Press Send for approval. It goes to the first approver for that document kind, cost centre and value.
  3. 3
    The approver opens the same page and presses Approve or Send back (with a reason).
  4. 4
    It passes up the levels until the last level (or a final authority) approves. Each level leaves its own entry.
Business Automation
Everything waiting on approval
Figure 3.23 Everything waiting on approval
⚠
Important. If the document is changed after it was sent, the next approval refuses it and it must be sent again.

Verifying vendors and bank accounts

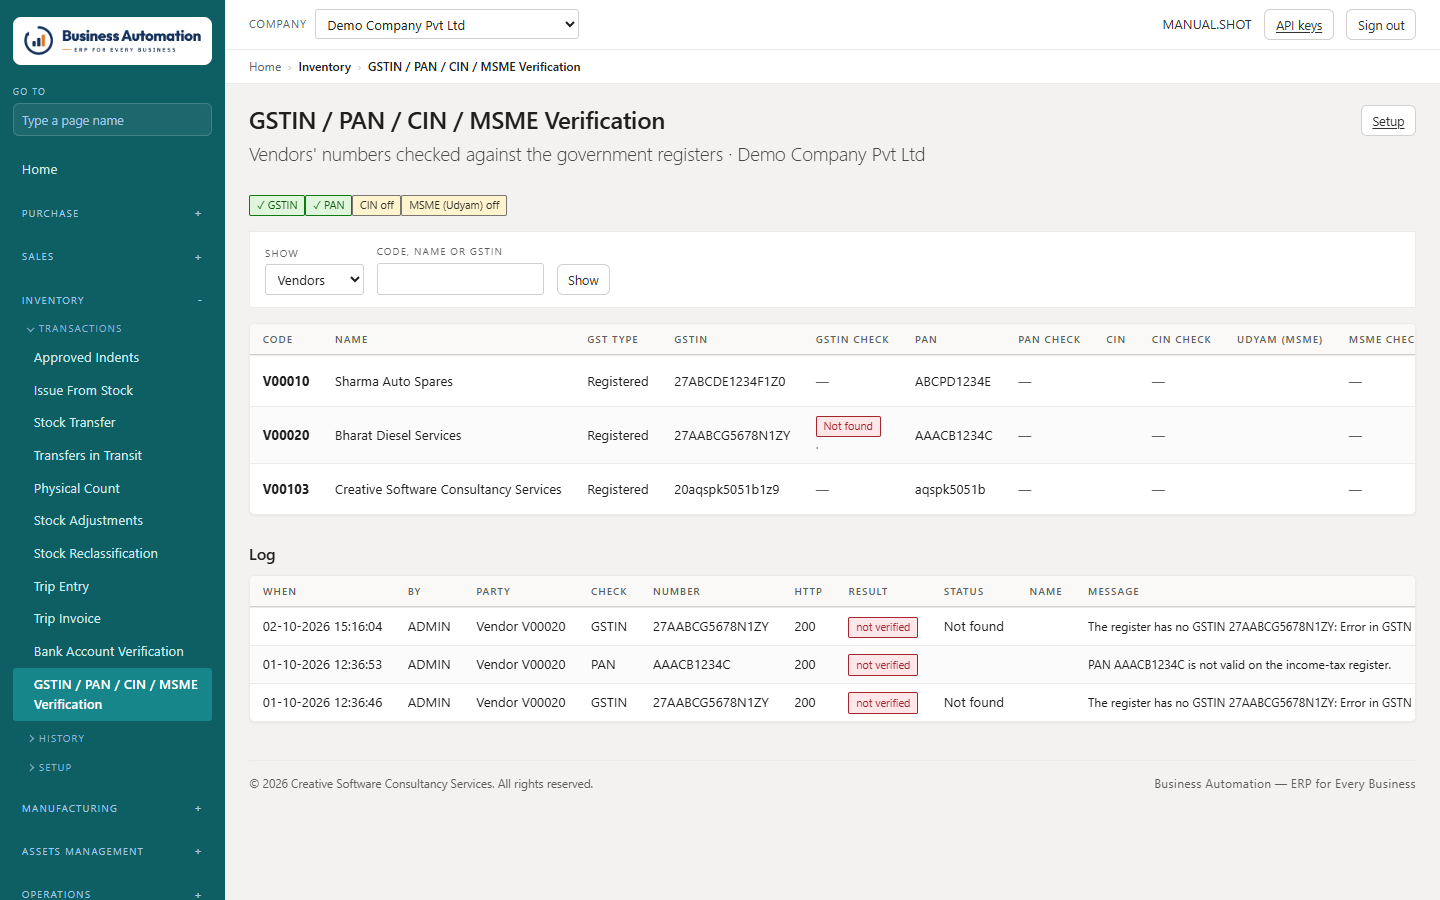
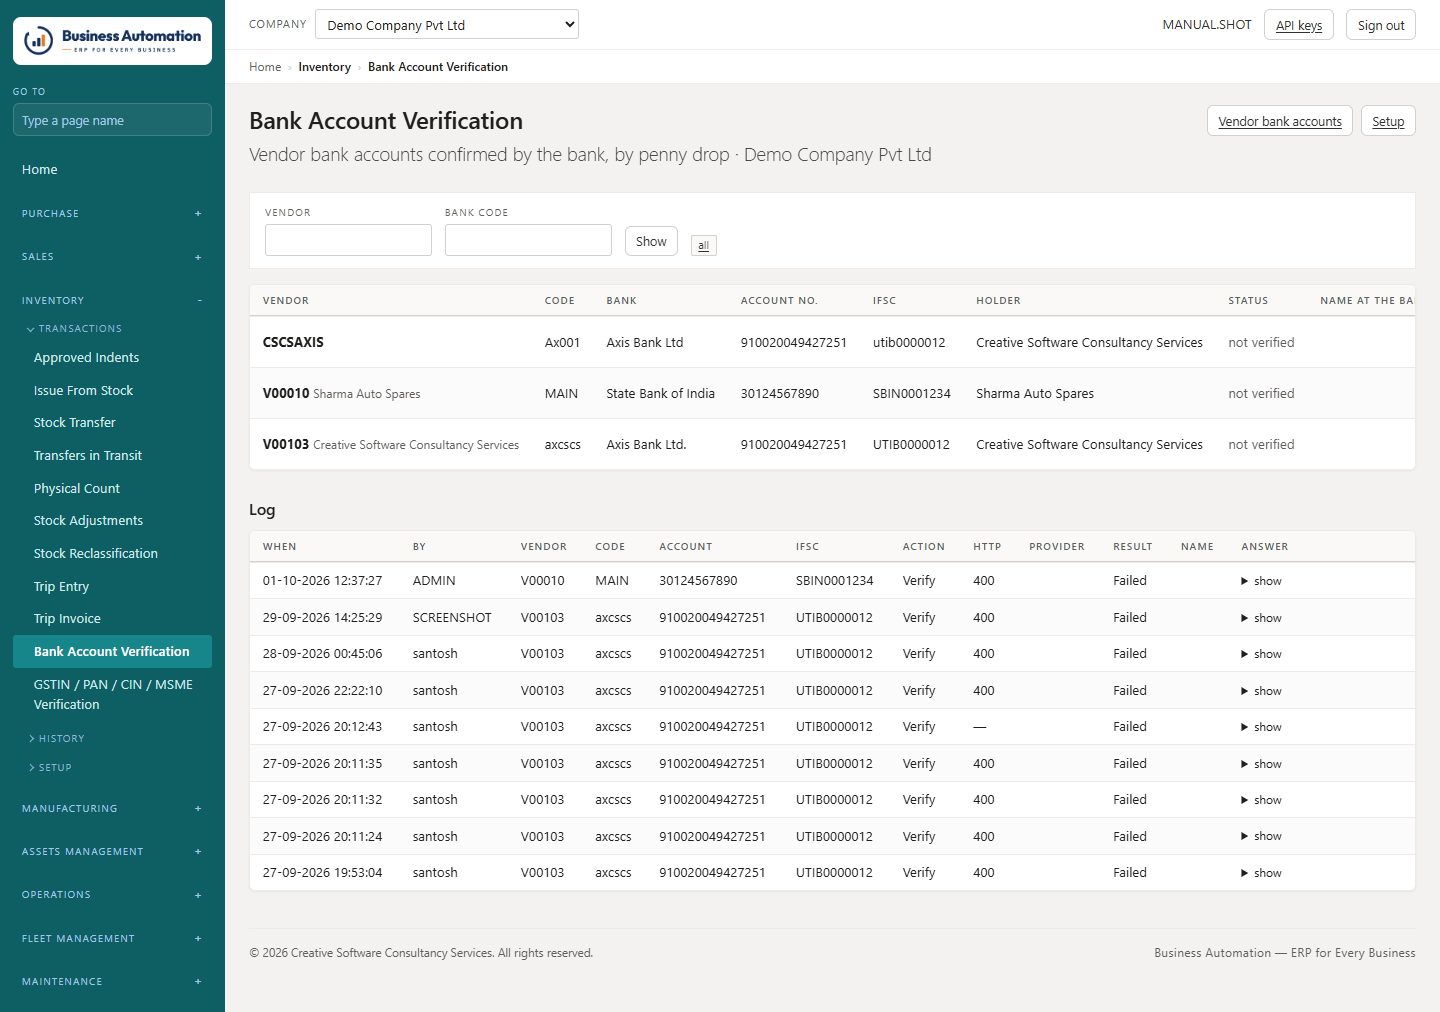
Have the registers and the bank confirm a vendor before you pay.

WherePurchase › GSTIN / PAN / CIN / MSME Verification (/verification/parties) · Bank Account Verification (/purchase/bank-verification)
  1. 1
    On GSTIN / PAN / CIN / MSME Verification, choose Vendors or Customers, find the party and press GSTIN, PAN, CIN or MSME on its line.
  2. 2
    On Bank Account Verification, press Verify on an account. A small credit is sent and the bank answers with the account holder's name. Pending — press Refresh later.
Business Automation
GSTIN / PAN / CIN / MSME verification
Figure 3.24 GSTIN / PAN / CIN / MSME verification
Business Automation
Bank account verification
Figure 3.25 Bank account verification

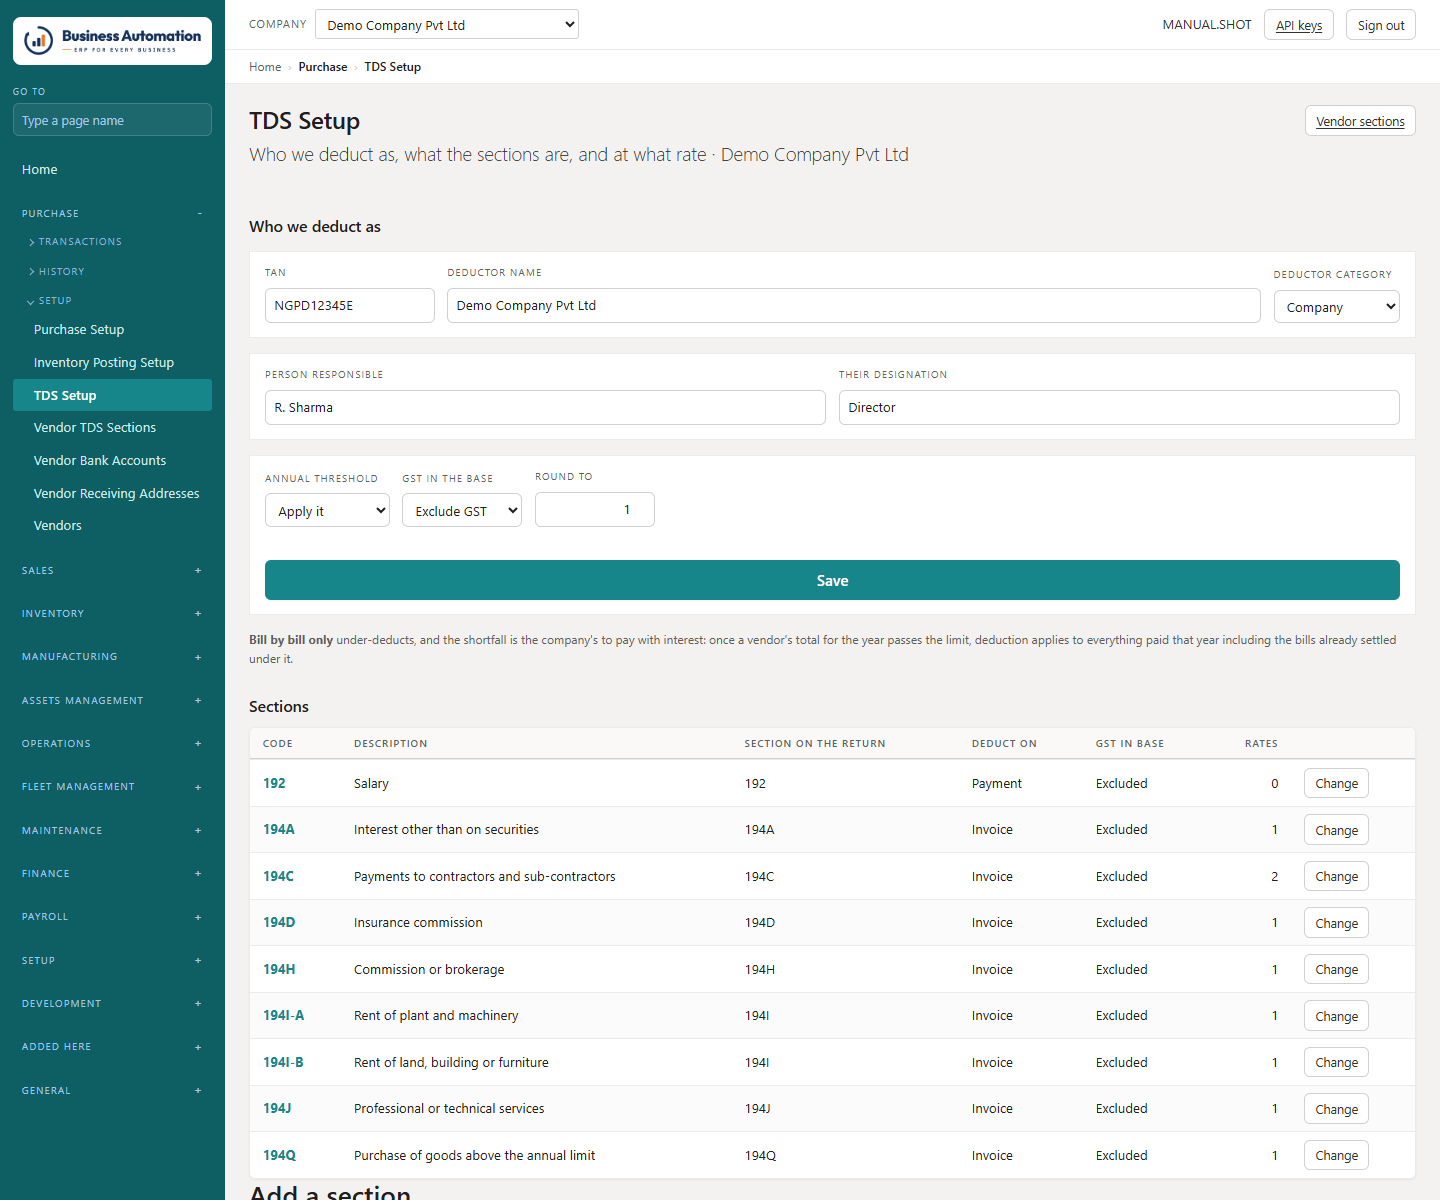
TDS

Set up sections and rates, map vendors, and deposit and return the tax.

WhereSetup › TDS Setup (/setup/tds)
  1. 1
    In TDS Setup, enter your TAN and deductor details, the sections and their rates. Press Change on a section to correct it.
  2. 2
    In Purchase › Vendor TDS Sections, map each supplier to their section with their PAN.
  3. 3
    Deposit the tax under TDS Challans, prepare the 26Q under TDS Quarterly Return, and issue Form 16A from TDS Certificates.
Business Automation
TDS setup
Figure 3.26 TDS setup
ℹ
Note. A section's code cannot be changed once it exists. Block the old one and add a new one.
What this chapter covers. Price lists, quotes and orders, delivery addresses and GST, Bill cum Dispatch, invoicing several challans together, credit notes, e-invoices and e-way bills.

The selling chain

Nobody approves a sale before it leaves — the customer has already been told.

Quote➜Sales order➜Bill cum Dispatch (challan)➜Sales invoice➜Receipt

Customers and their ship-to addresses

Record each delivery address with its own state and GSTIN, so the tax follows where the goods go.

WhereSales › Customers · Customer card › Ship-to addresses
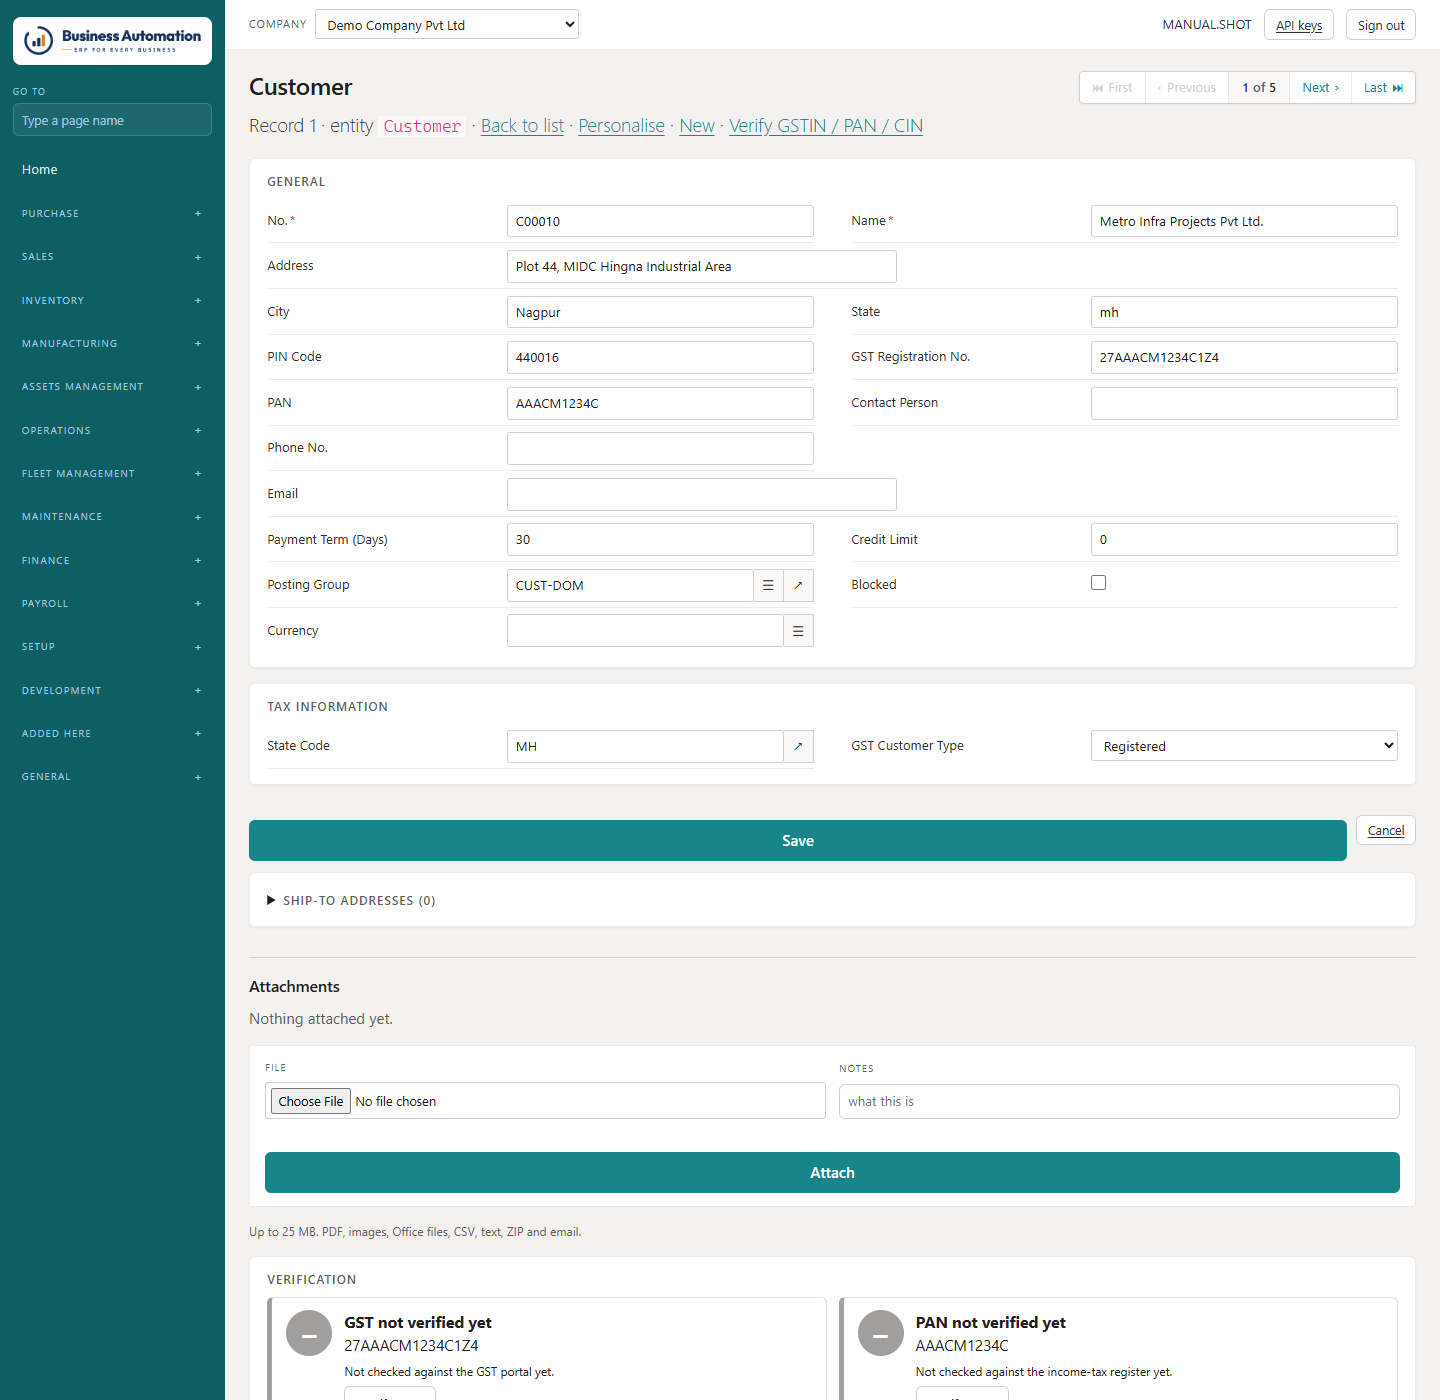
  1. 1
    Open the customer card and fill in the GSTIN — PAN and state fill in from it.
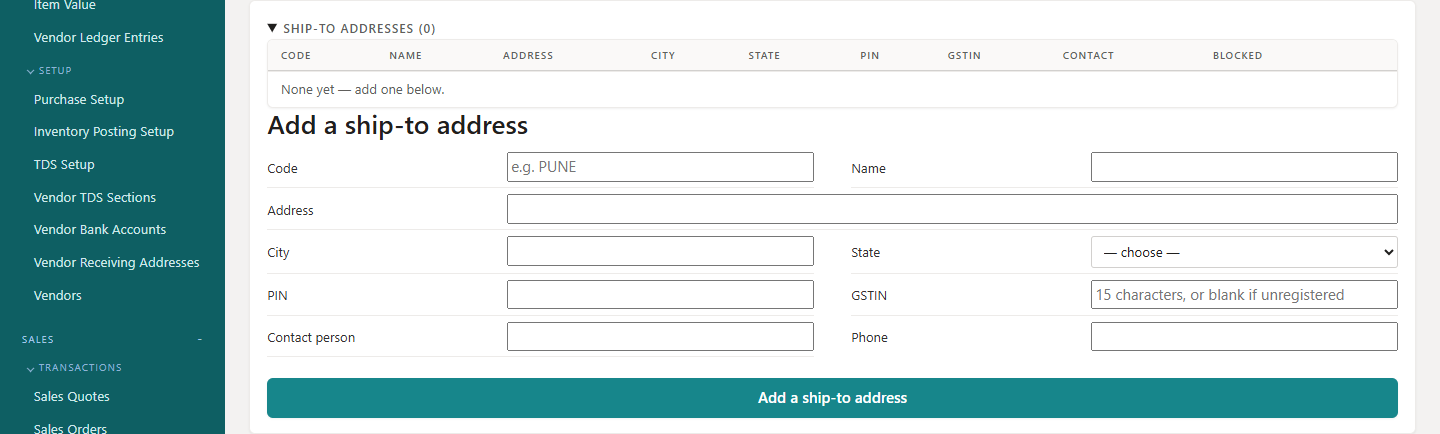
  2. 2
    Scroll to Ship-to addresses at the bottom and add each delivery address with a code, its state and GSTIN. The GSTIN must start with the state's code.
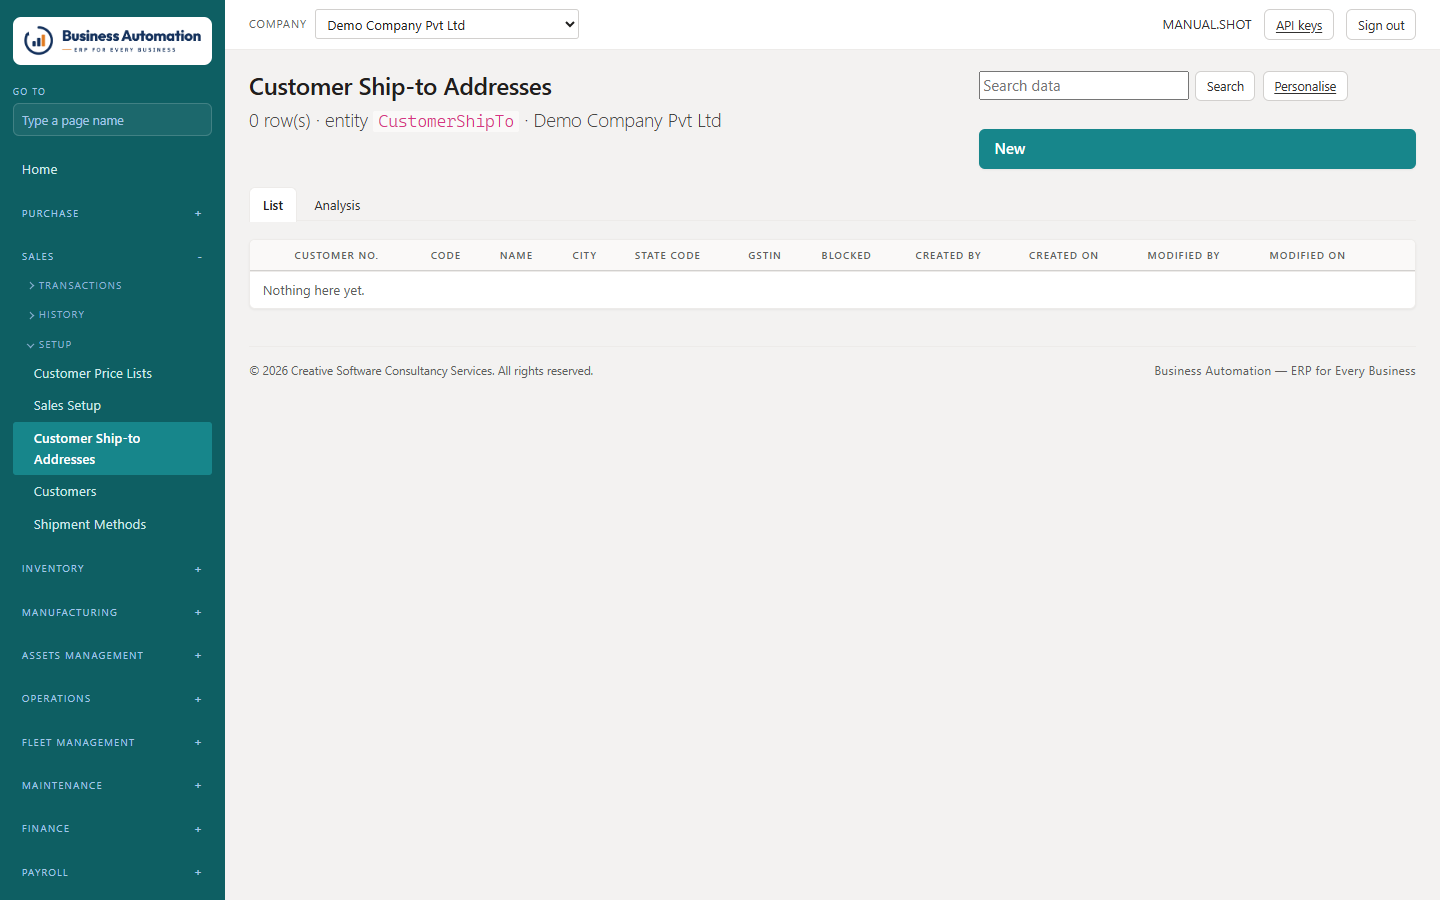
  3. 3
    The same addresses are listed under Sales › Customer Ship-to Addresses.
Business Automation
The customer card
Figure 4.1 The customer card
Business Automation
Ship-to addresses at the bottom of the customer card
Figure 4.2 Ship-to addresses at the bottom of the customer card
Business Automation
Customer ship-to addresses
Figure 4.3 Customer ship-to addresses

Customer price lists

Prices for one customer, or for everybody, valid between dates.

WhereSales › Customer Price Lists (/sales/price-lists)
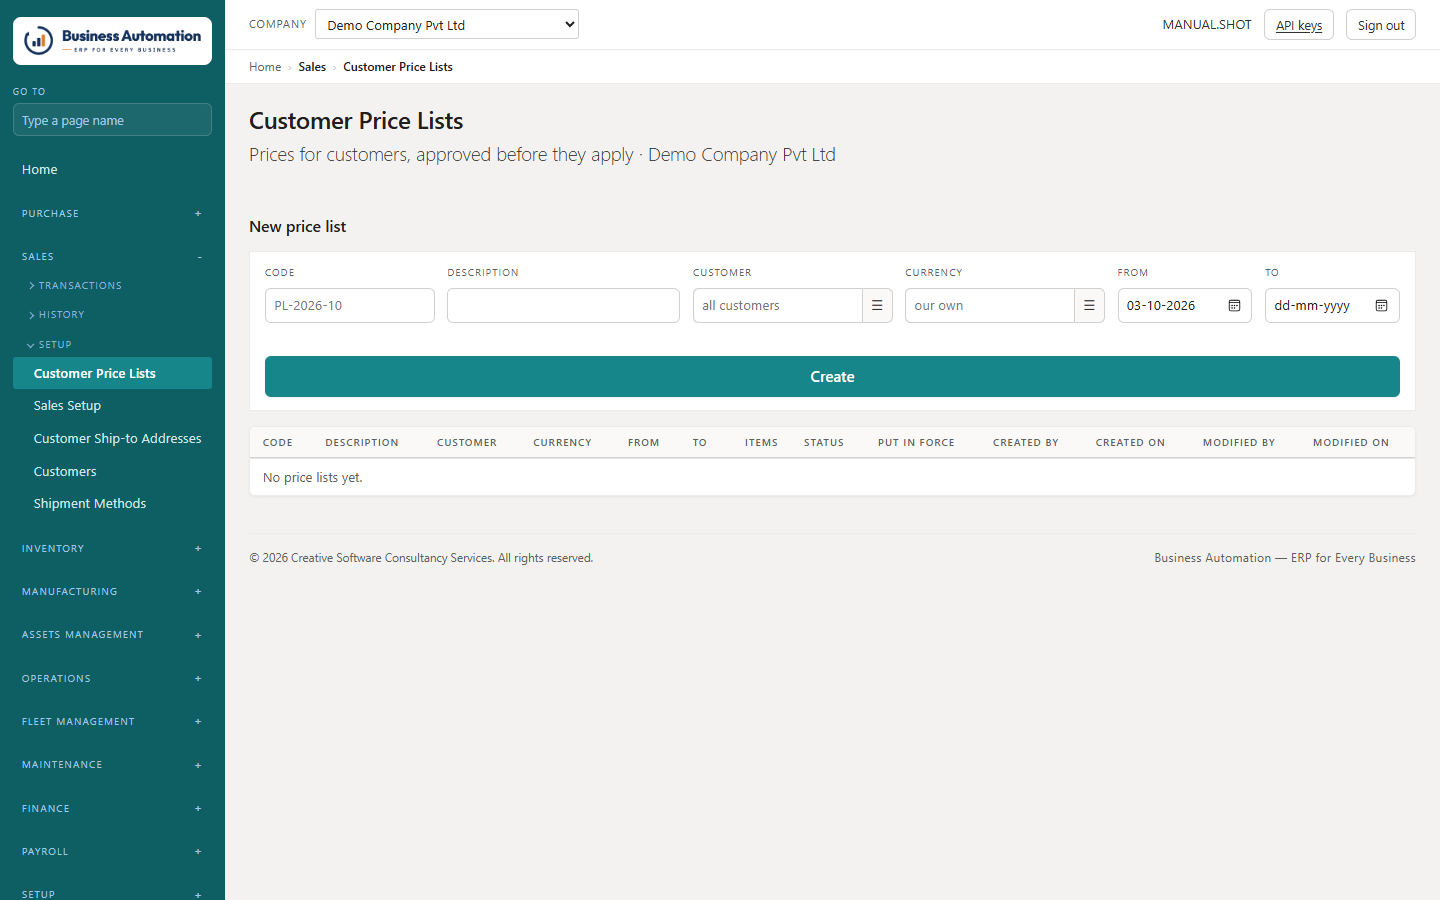
  1. 1
    Make a list: choose the Customer (blank = every customer), the currency and the From / To dates.
  2. 2
    Add each item with its price, and a lower price from a quantity if there is one.
  3. 3
    Send it for approval on the list card; the last approver's signature puts it in force (or Put in force where no approvers are set up).
  4. 4
    On a sales order, leave the price blank and the line takes the price in force: the customer's list first, then the list for everyone, then the item's own price.
Business Automation
Customer price lists
Figure 4.4 Customer price lists

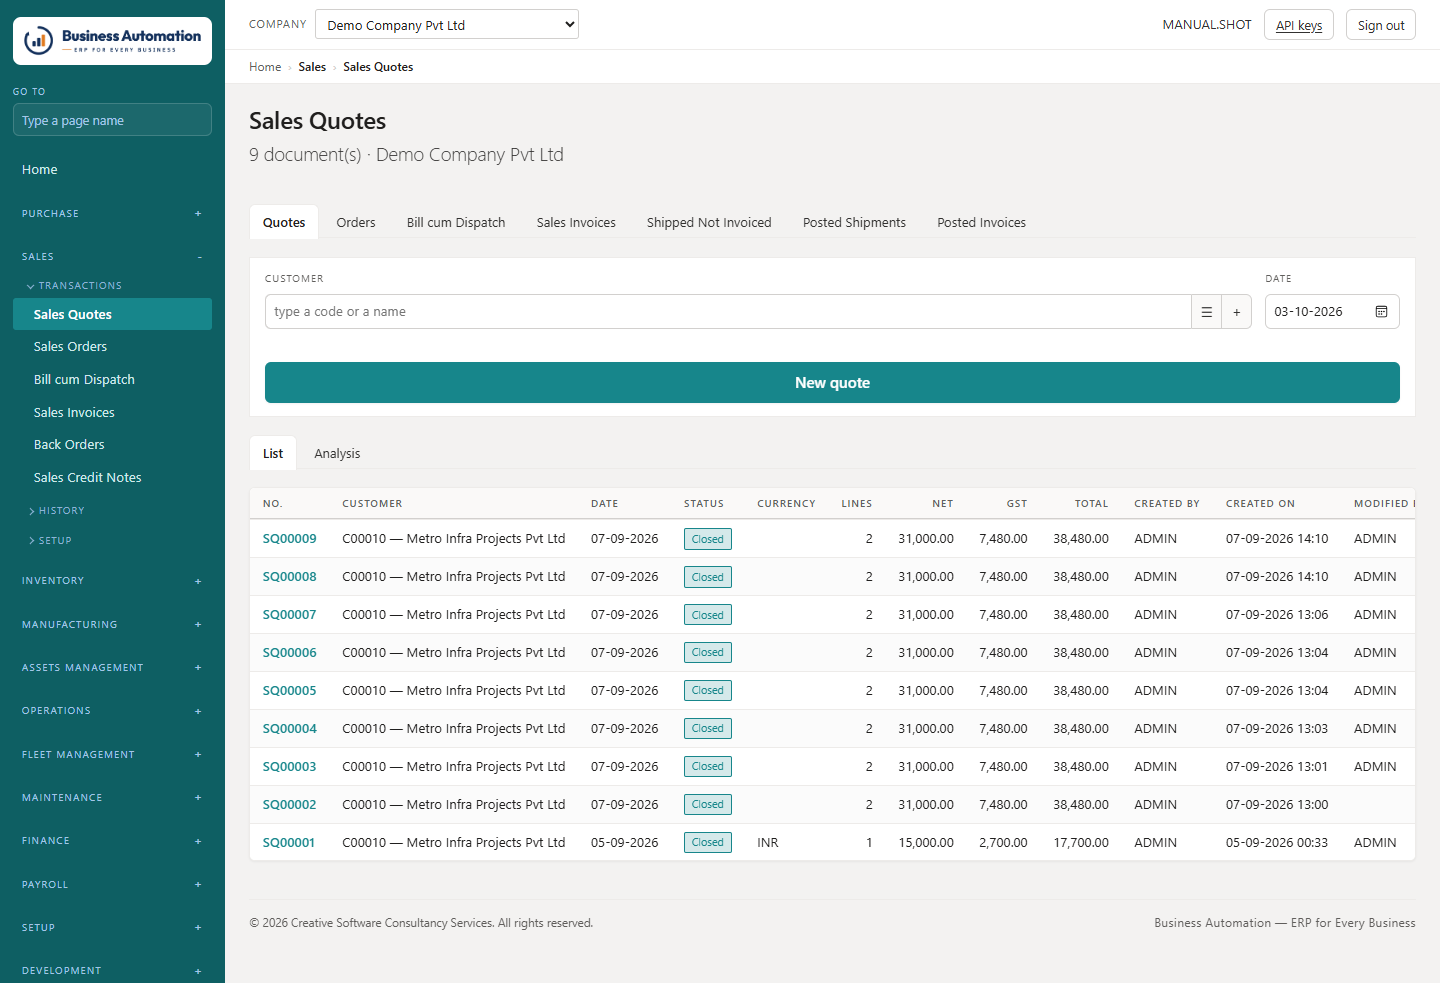
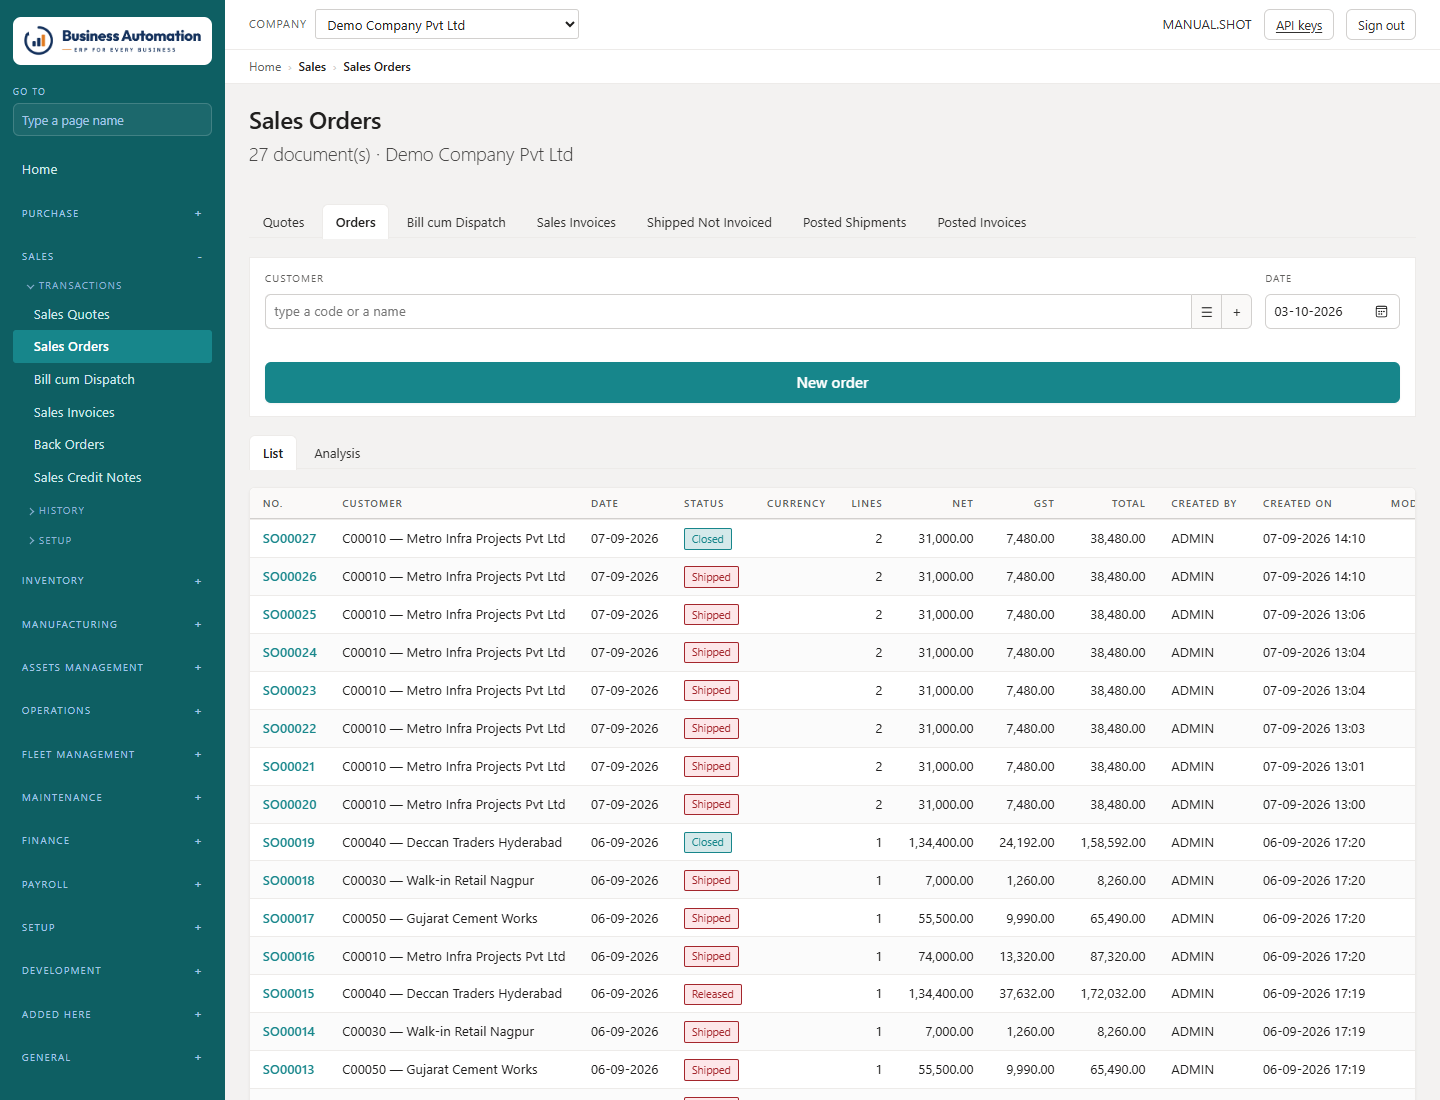
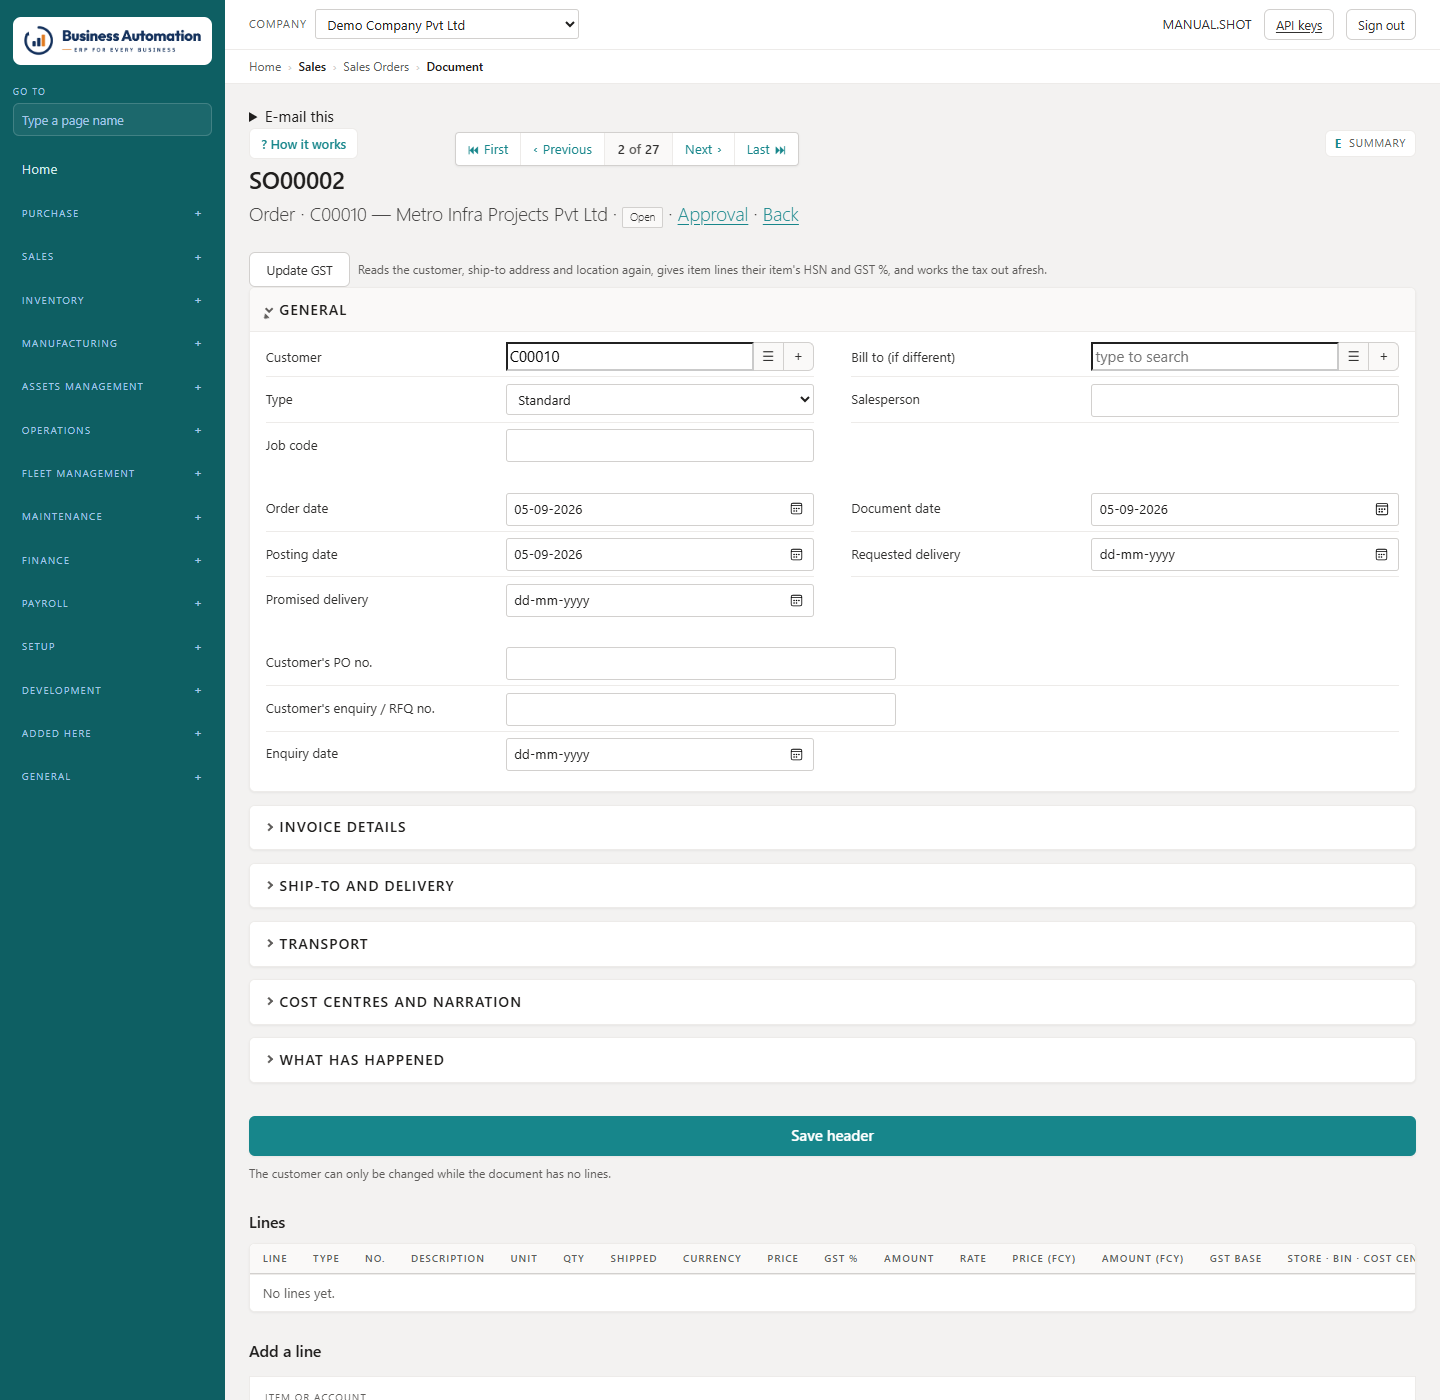
Taking the order

Enter the sales order, check the tax and release it.

WhereSales › Sales Quotes (/sales/quotes) · Sales Orders (/sales/orders)
  1. 1
    Open Sales Orders and press New (an accepted quote becomes the order with its lines).
  2. 2
    Choose the customer. Choose Ship from (the store) and, if it goes to a branch, the Ship-to code. Save.
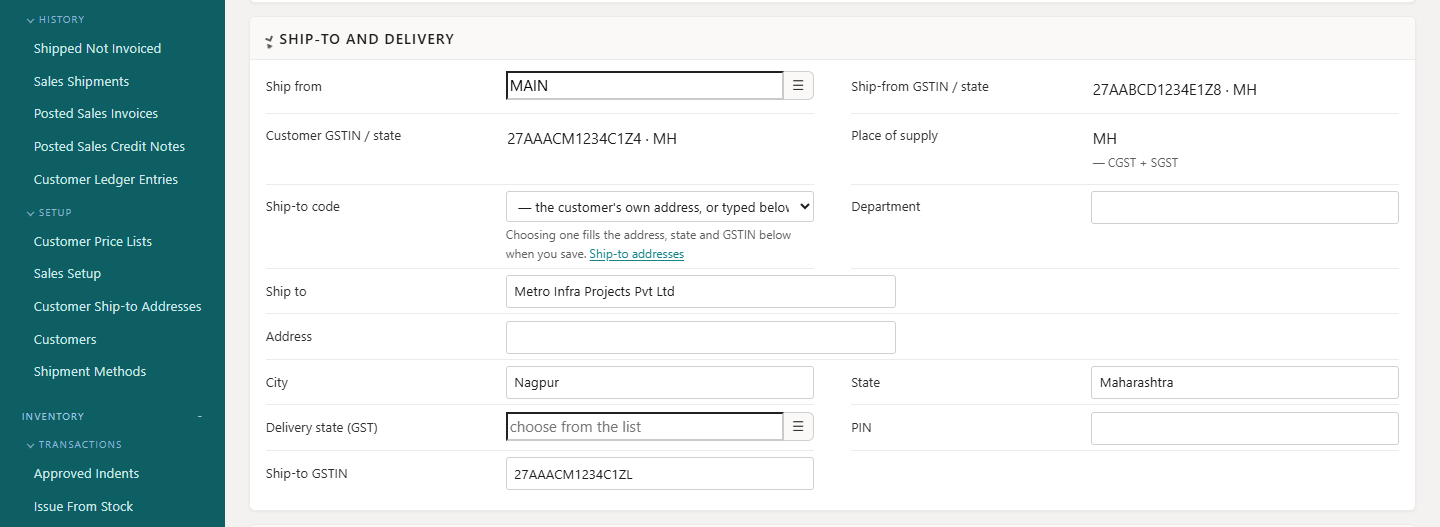
  3. 3
    Check What the tax is worked out from: the ship-from store's GSTIN and state, the customer's GSTIN and state, and the place of supply with CGST + SGST or IGST beside it.
  4. 4
    Add the lines: item, quantity and price. Each stock line shows its store and, where the store keeps bins, a Bin (press Set after changing them).
  5. 5
    Press Release. If the customer is over the credit limit you see the figures and Release anyway — use it only with authority.
Business Automation
Sales quotes
Figure 4.5 Sales quotes
Business Automation
Sales orders
Figure 4.6 Sales orders
Business Automation
A sales order
Figure 4.7 A sales order
Business Automation
Ship-to and delivery: ship-from and customer GSTIN, place of supply (CGST + SGST or IGST) and the ship-to code
Figure 4.8 Ship-to and delivery: ship-from and customer GSTIN, place of supply (CGST + SGST or IGST) and the ship-to code
⚠
Important. Delivery wins. Where the billing and delivery addresses differ, the delivery state decides the tax. Getting it wrong is silent: the invoice prints and the return is filed against the wrong state.
💡
Tip. Update GST (under the heading) re-reads the customer, ship-to and store, and gives every item line its HSN and GST %. Use it on an order brought in from another system or made before the masters were complete. It works on open documents only.
  • A released order is locked. To change a line, press Reopen, change it and Release again.
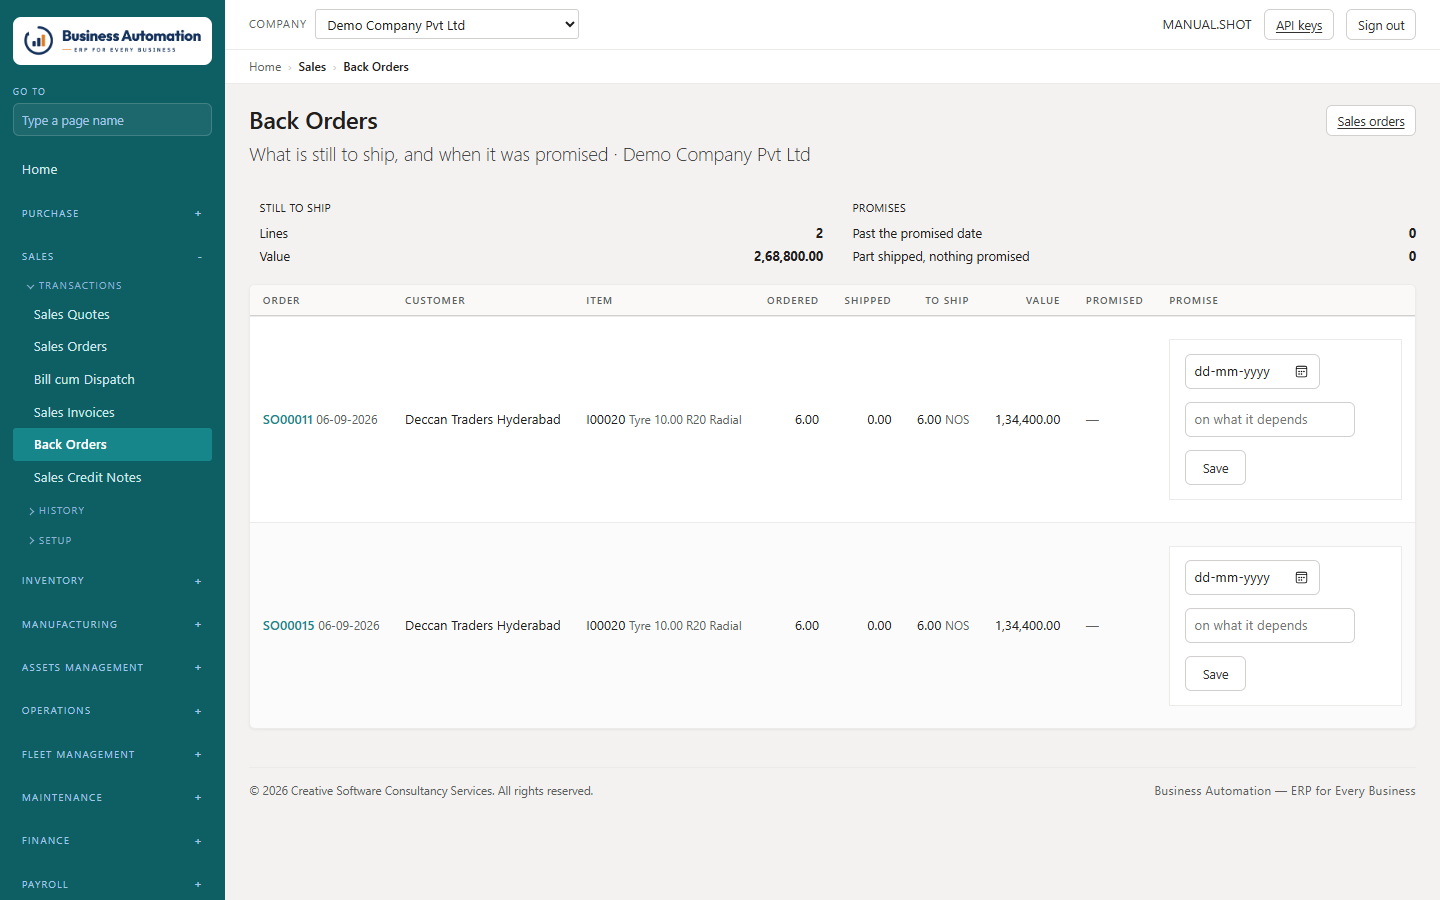
  • Back orders: Sales › Back Orders lists what is ordered and not yet shipped; put a promised date against a line.
Business Automation
Back orders
Figure 4.9 Back orders

Bill cum Dispatch

Send the goods: pick serial numbers, fill the dispatch details and post the challan — or the challan and invoice together.

WhereSales › Bill cum Dispatch (/sales/dispatch), or Dispatch on the released order
  1. 1
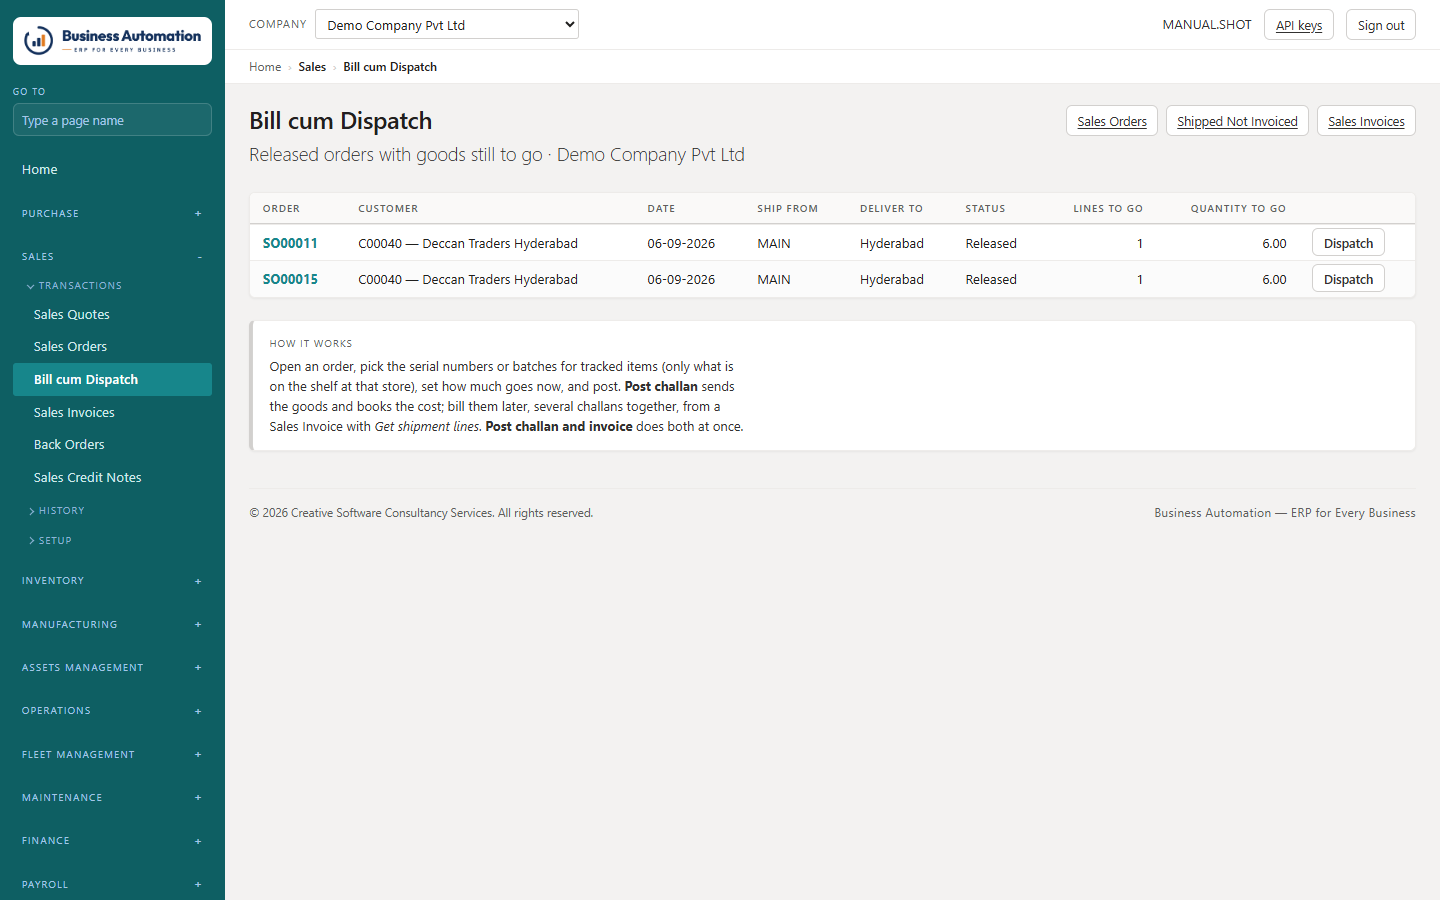
    Open Bill cum Dispatch. Every released order with goods still to go is listed. Open the order.
  2. 2
    Serial-numbered items: tick the numbers going and press Save the numbers. Only numbers in stock at that store are offered.
  3. 3
    Batch items: type how much of each batch goes and press Save the batches.
  4. 4
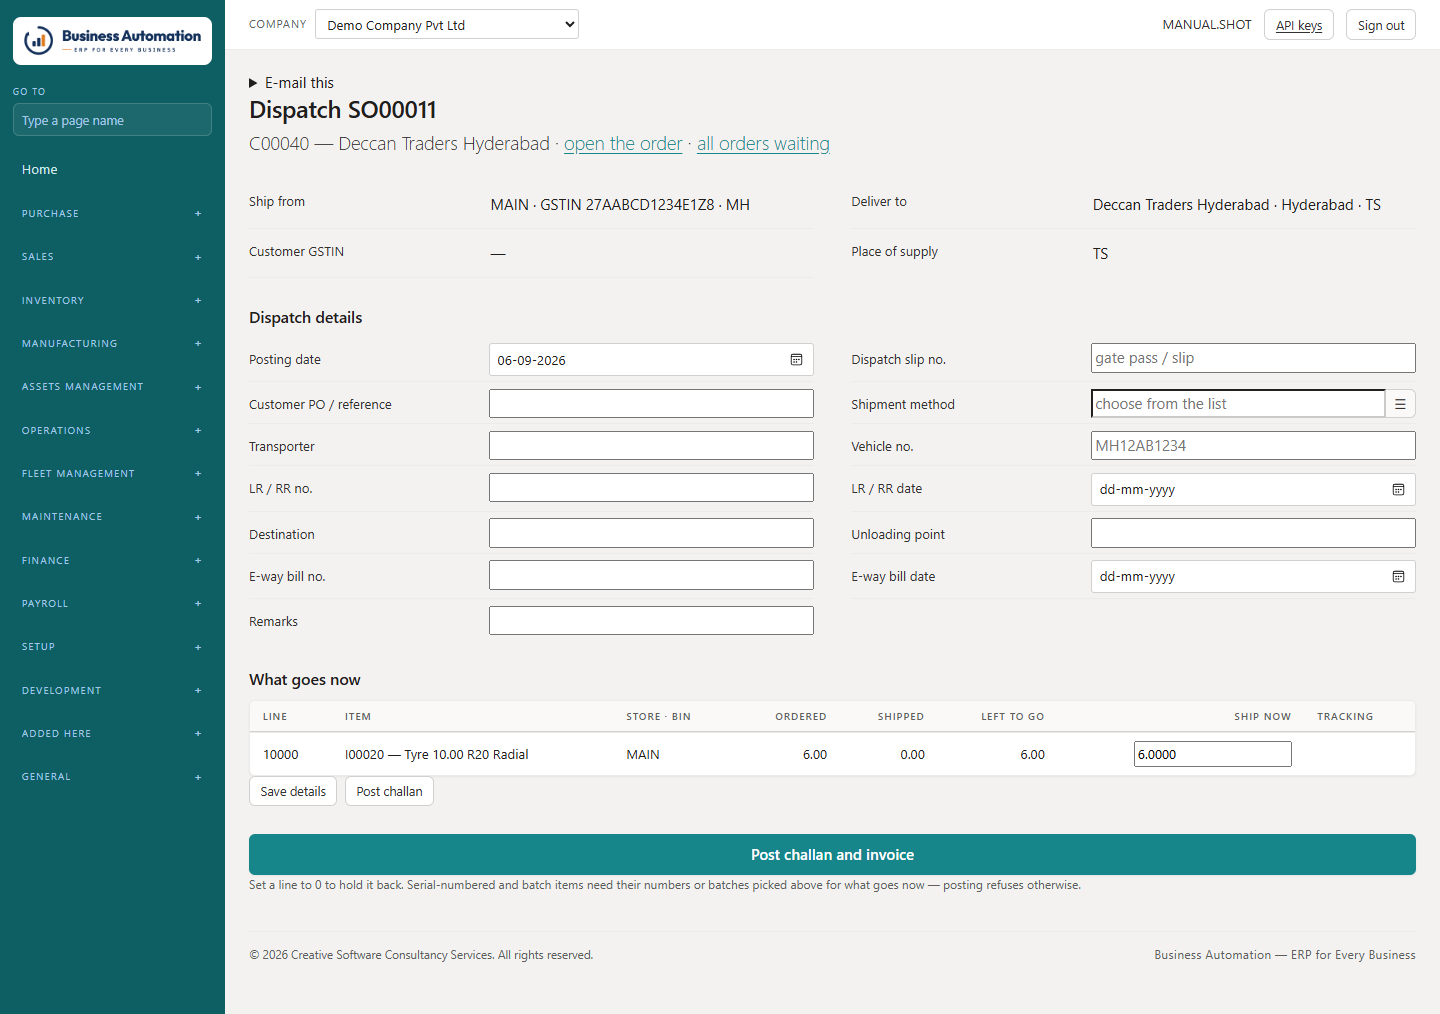
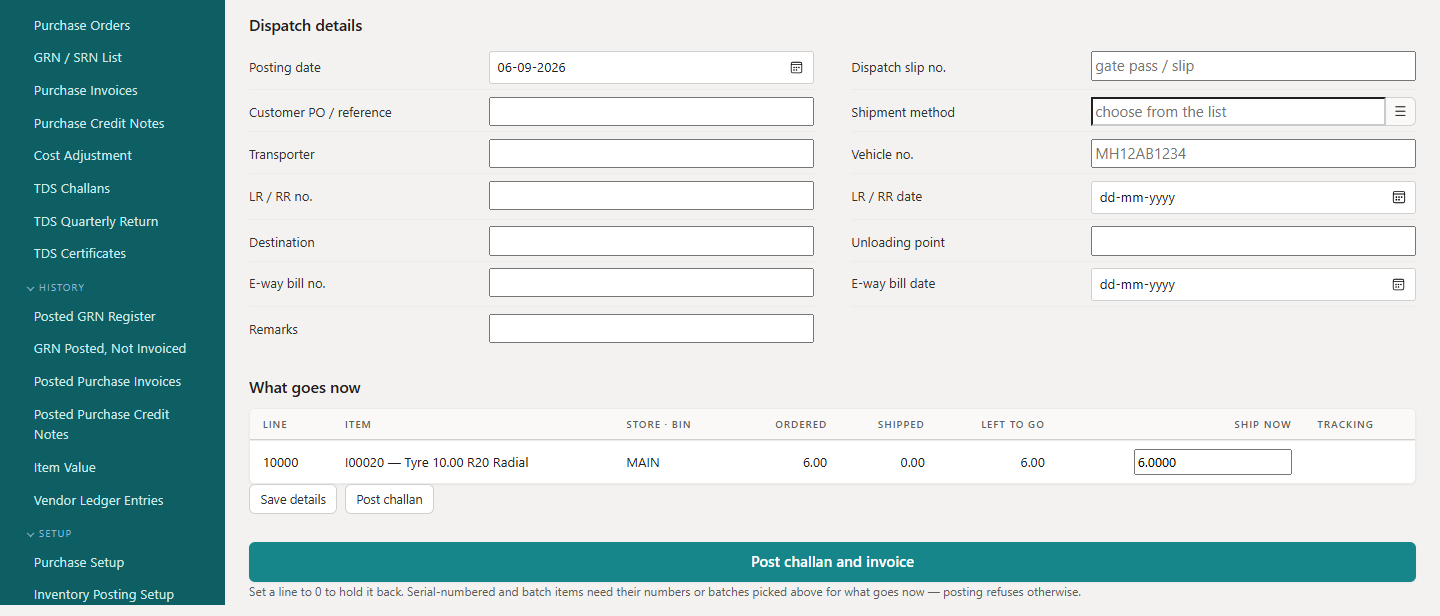
    Under What goes now, lower a quantity to send part, or set 0 to hold a line back.
  5. 5
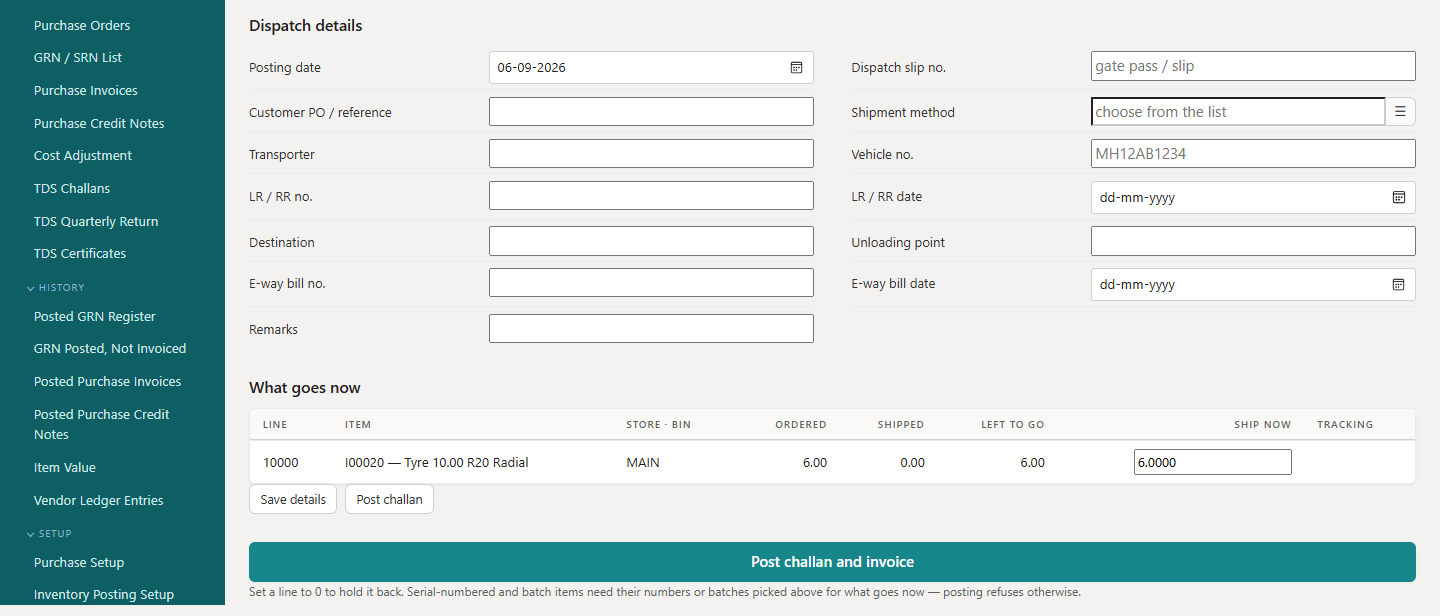
    Fill Dispatch details: posting date, dispatch slip no., customer PO, Shipment method (picked from the list), transporter, vehicle, LR/RR, e-way bill and remarks. Save details keeps them without posting.
  6. 6
    Press Post challan to post the delivery challan and bill it later — or Post challan and invoice to post the challan and the tax invoice together.
Business Automation
Bill cum Dispatch: released orders with goods still to go
Figure 4.10 Bill cum Dispatch: released orders with goods still to go
Business Automation
The dispatch page for one order
Figure 4.11 The dispatch page for one order
Business Automation
Dispatch details — printed on the delivery challan
Figure 4.12 Dispatch details — printed on the delivery challan
Business Automation
What goes now, and the two posting buttons
Figure 4.13 What goes now, and the two posting buttons
⚠
Important. Posting is refused when a serial-numbered item does not have enough numbers ticked, or a number is no longer in stock. You cannot ship stock that is not there.
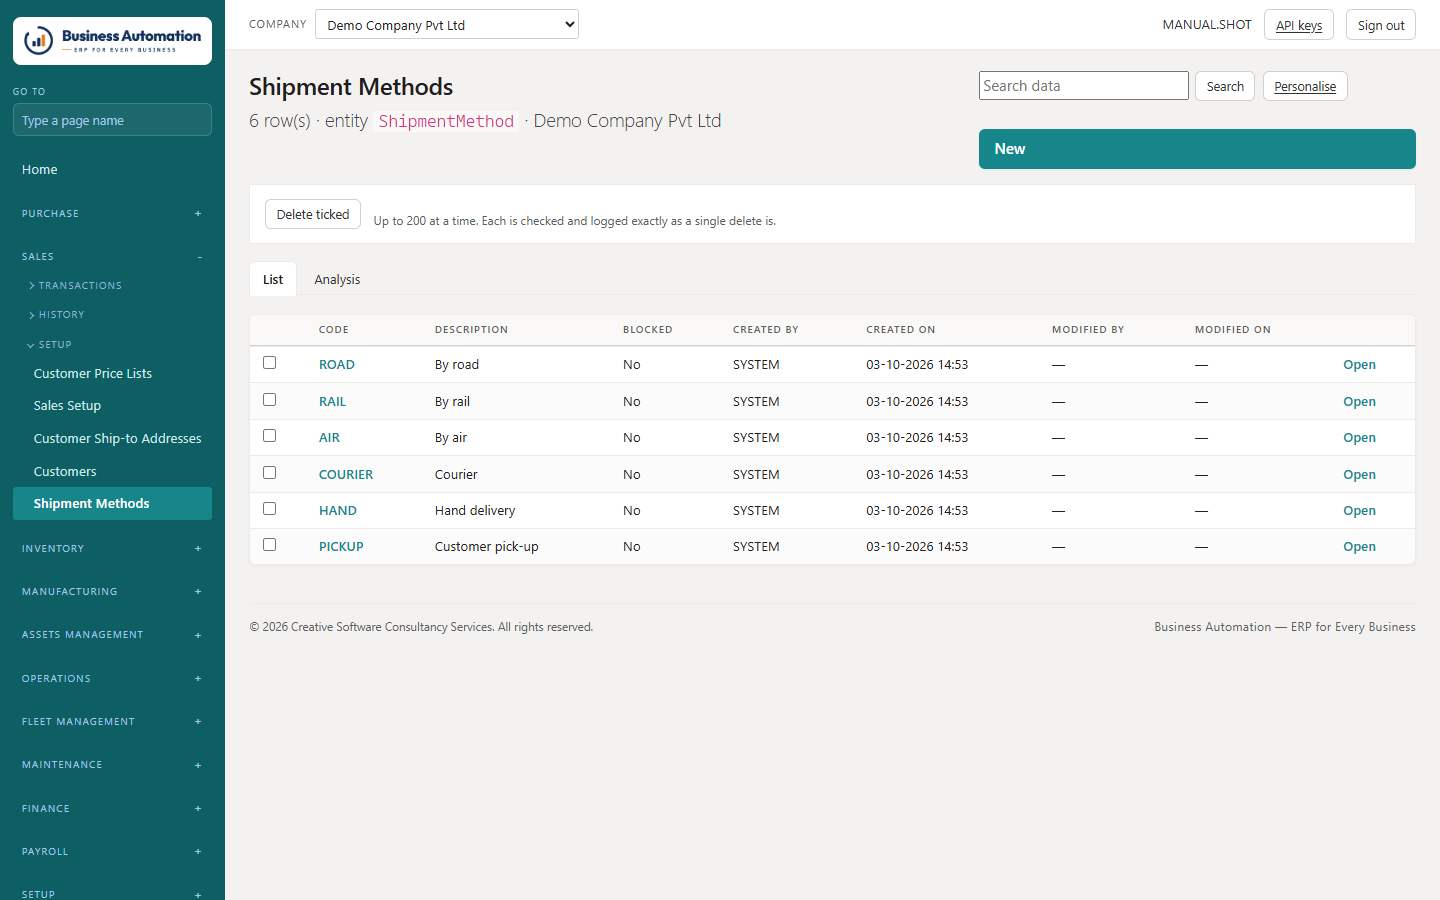
  • Shipment methods (road, rail, air, courier, hand delivery, customer pick-up) are kept under Sales › Shipment Methods. Add your own there.
Business Automation
Shipment methods
Figure 4.14 Shipment methods

One invoice for several challans

Bill a customer's challans together with Get shipment lines.

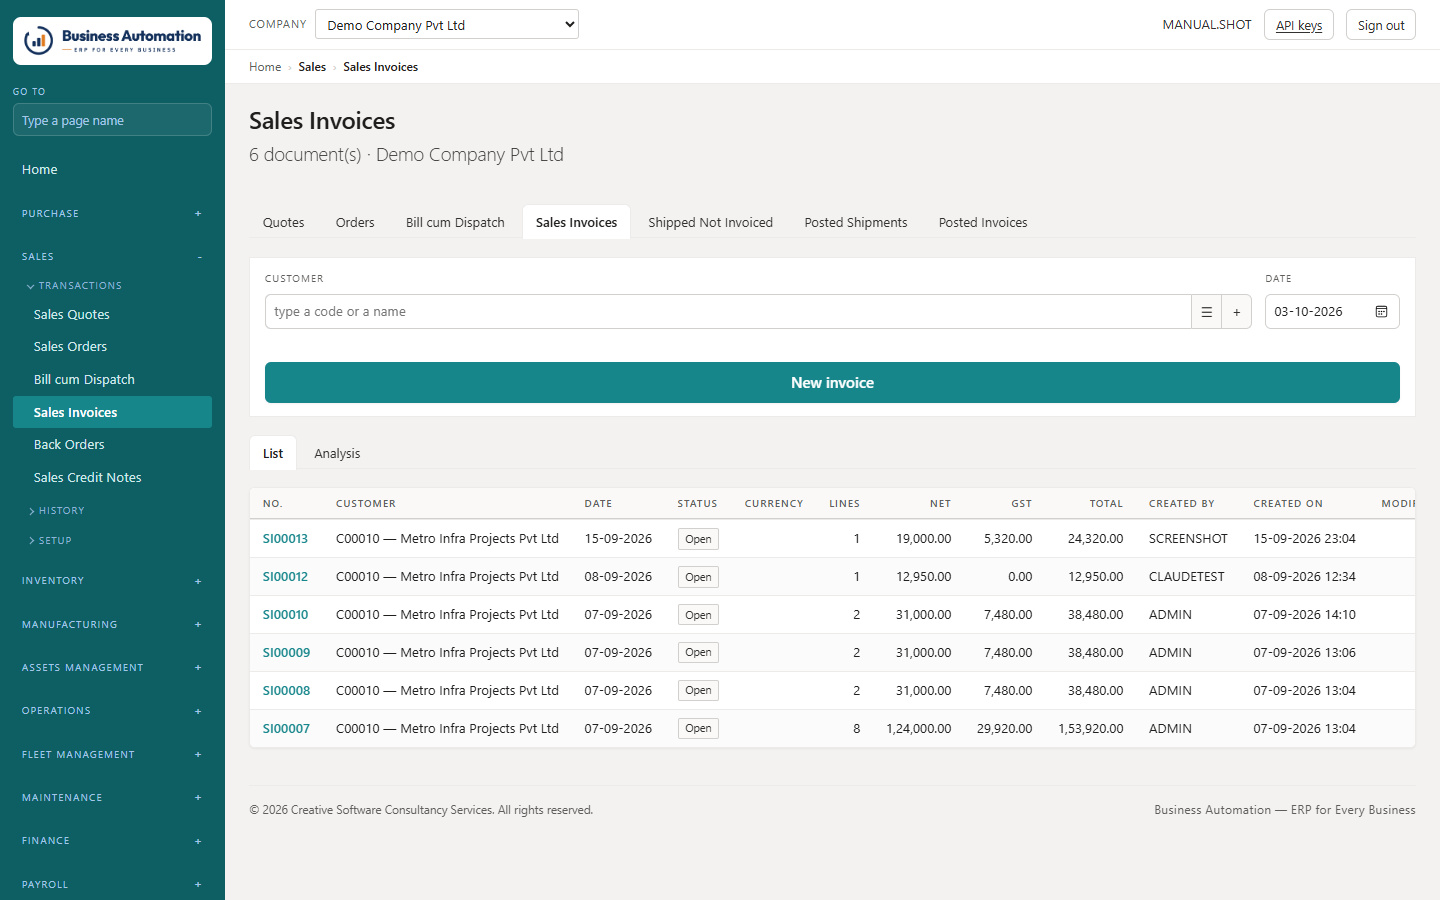
WhereSales › Sales Invoices (/sales/open-invoices)
  1. 1
    Open Sales Invoices, choose the customer and press New invoice.
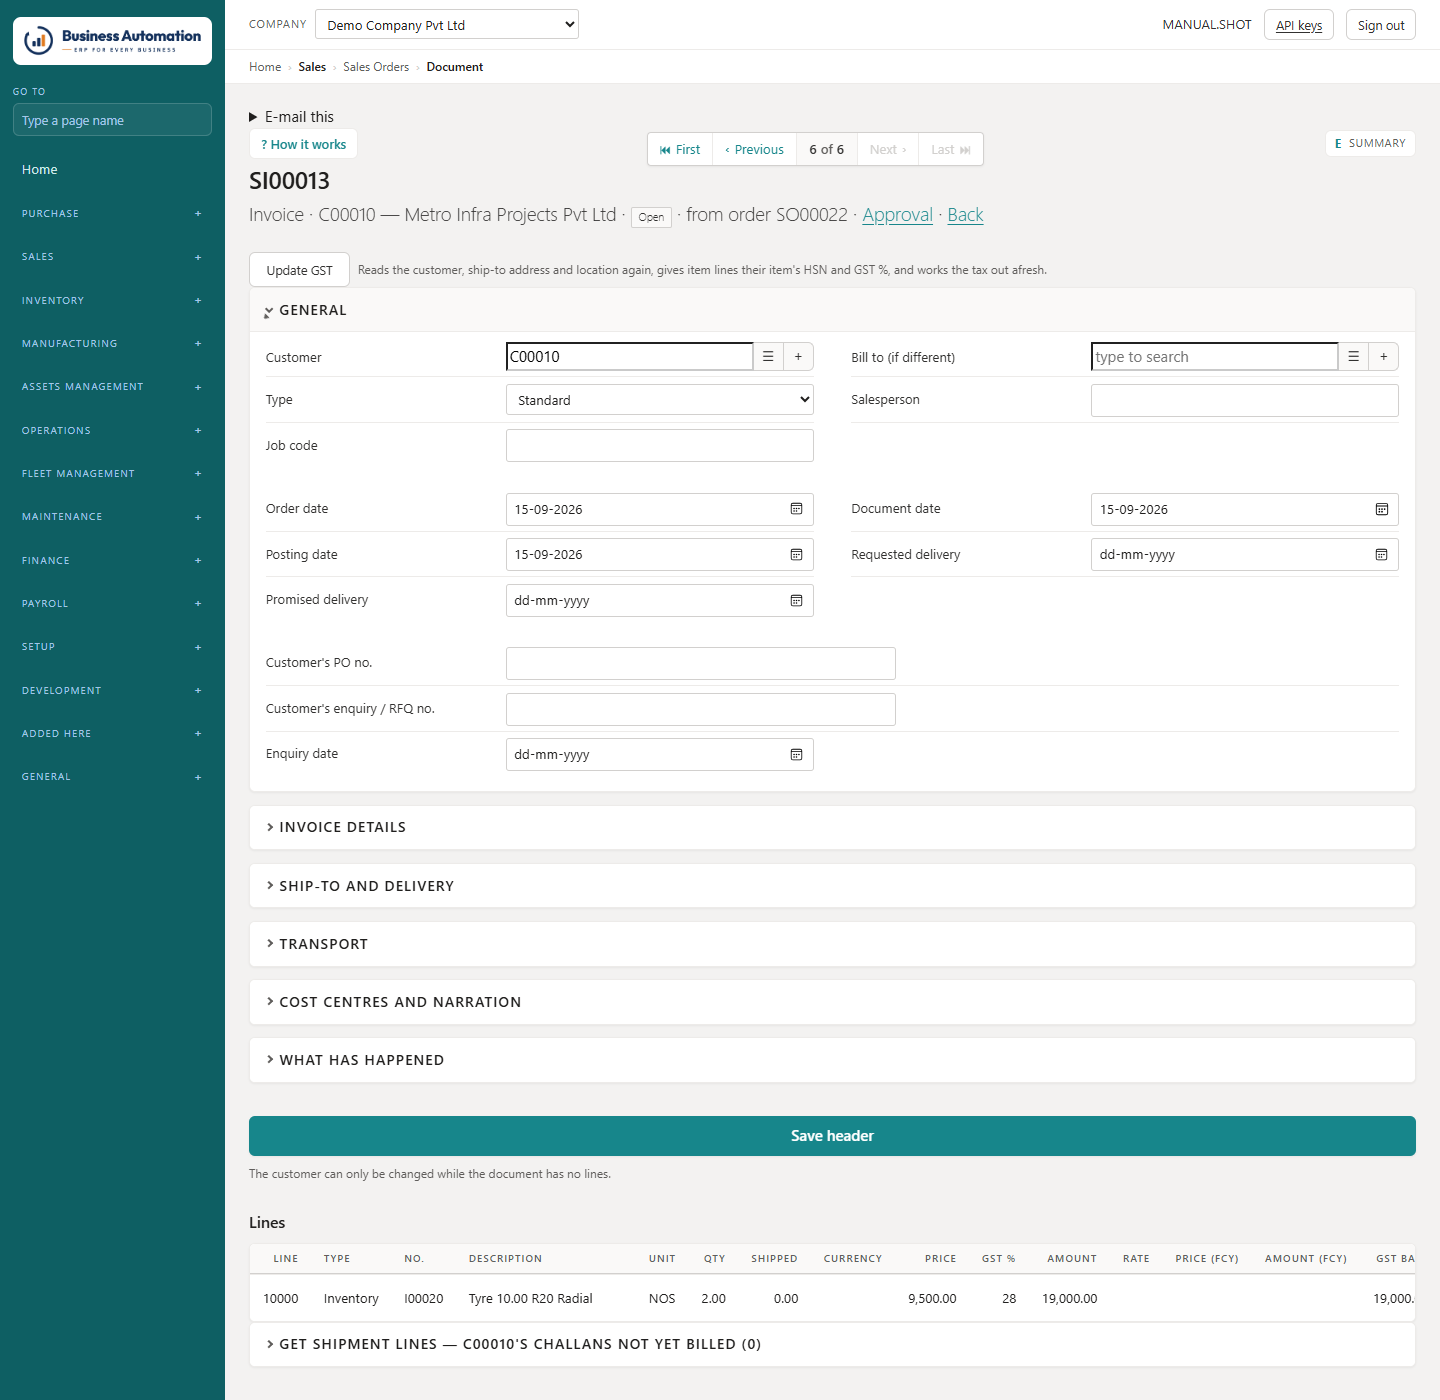
  2. 2
    Open Get shipment lines. It lists every challan line of that customer not yet billed.
  3. 3
    Tick the lines (the box in the heading ticks all) and press Add the ticked lines.
  4. 4
    Check the invoice, then press Post invoice.
Business Automation
Sales invoices being prepared
Figure 4.15 Sales invoices being prepared
Business Automation
A draft sales invoice
Figure 4.16 A draft sales invoice
Business Automation
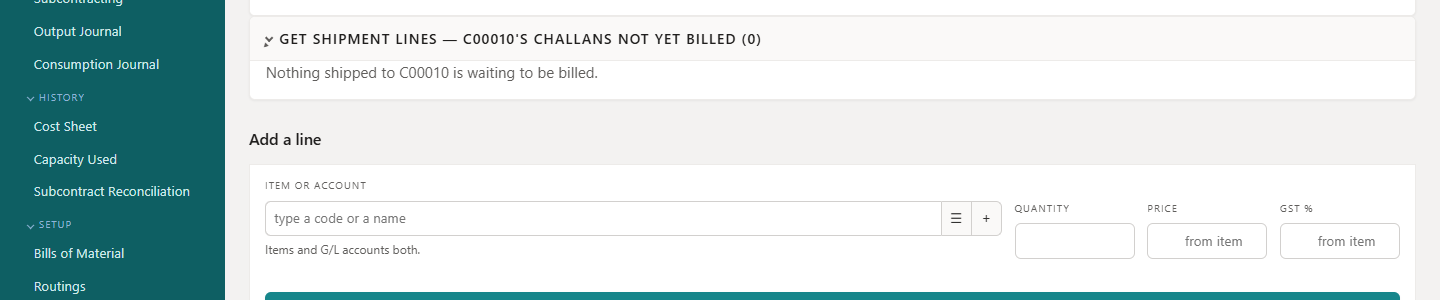
Get shipment lines: the customer's challans not yet billed
Figure 4.17 Get shipment lines: the customer's challans not yet billed
ℹ
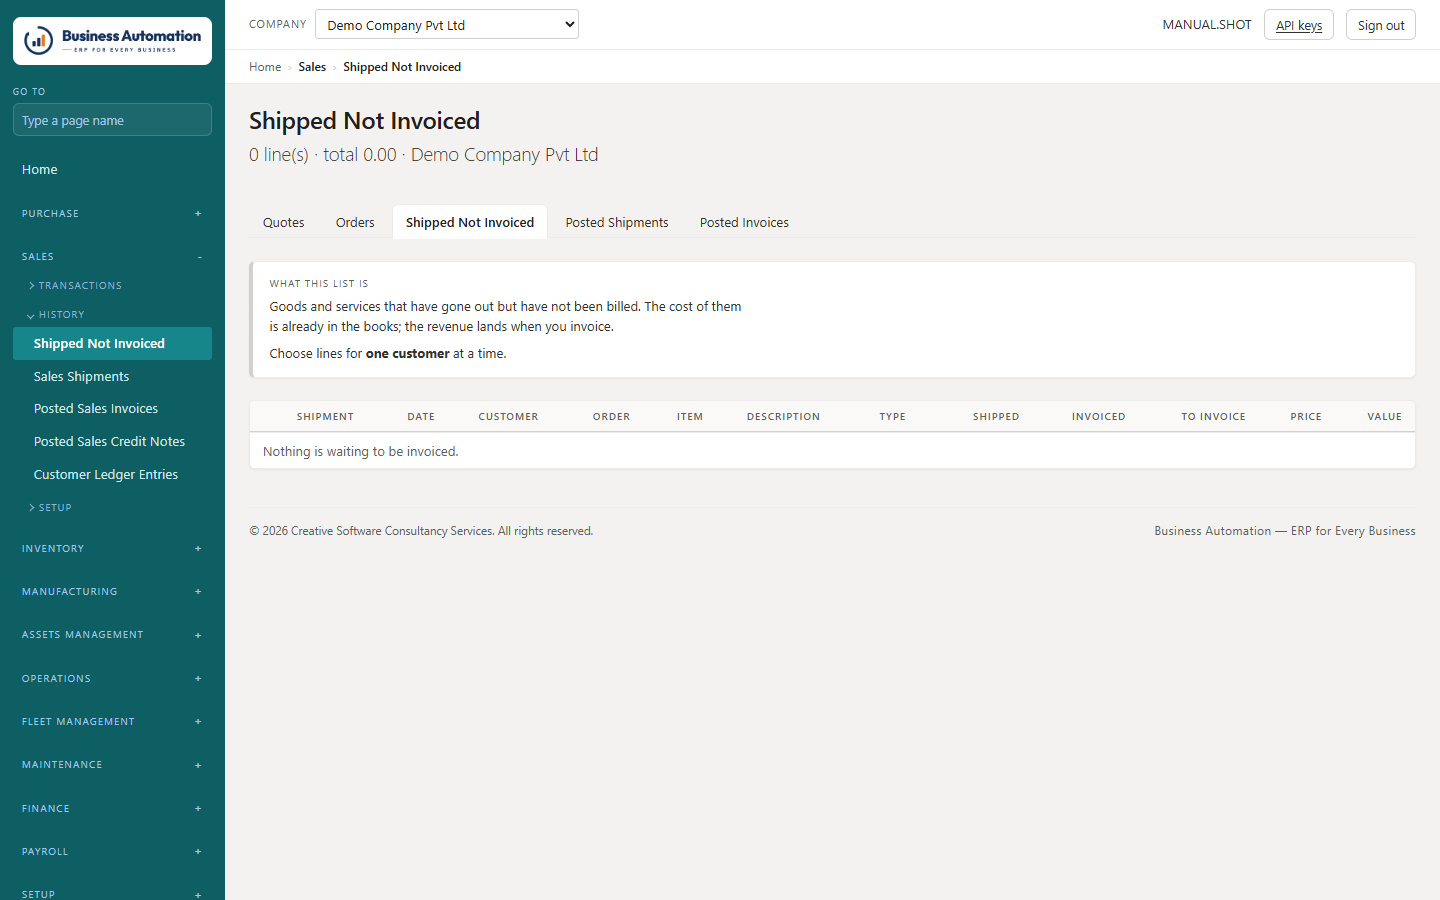
Note. A challan line already on another draft invoice is not offered again, so nothing is billed twice. Shipped Not Invoiced (/sales/unbilled) lists everything that has left and not been billed — work done and not charged for.
Business Automation
Shipped, not invoiced
Figure 4.18 Shipped, not invoiced

Posted shipments and invoices

Look up what went out and what was billed, and print for the customer.

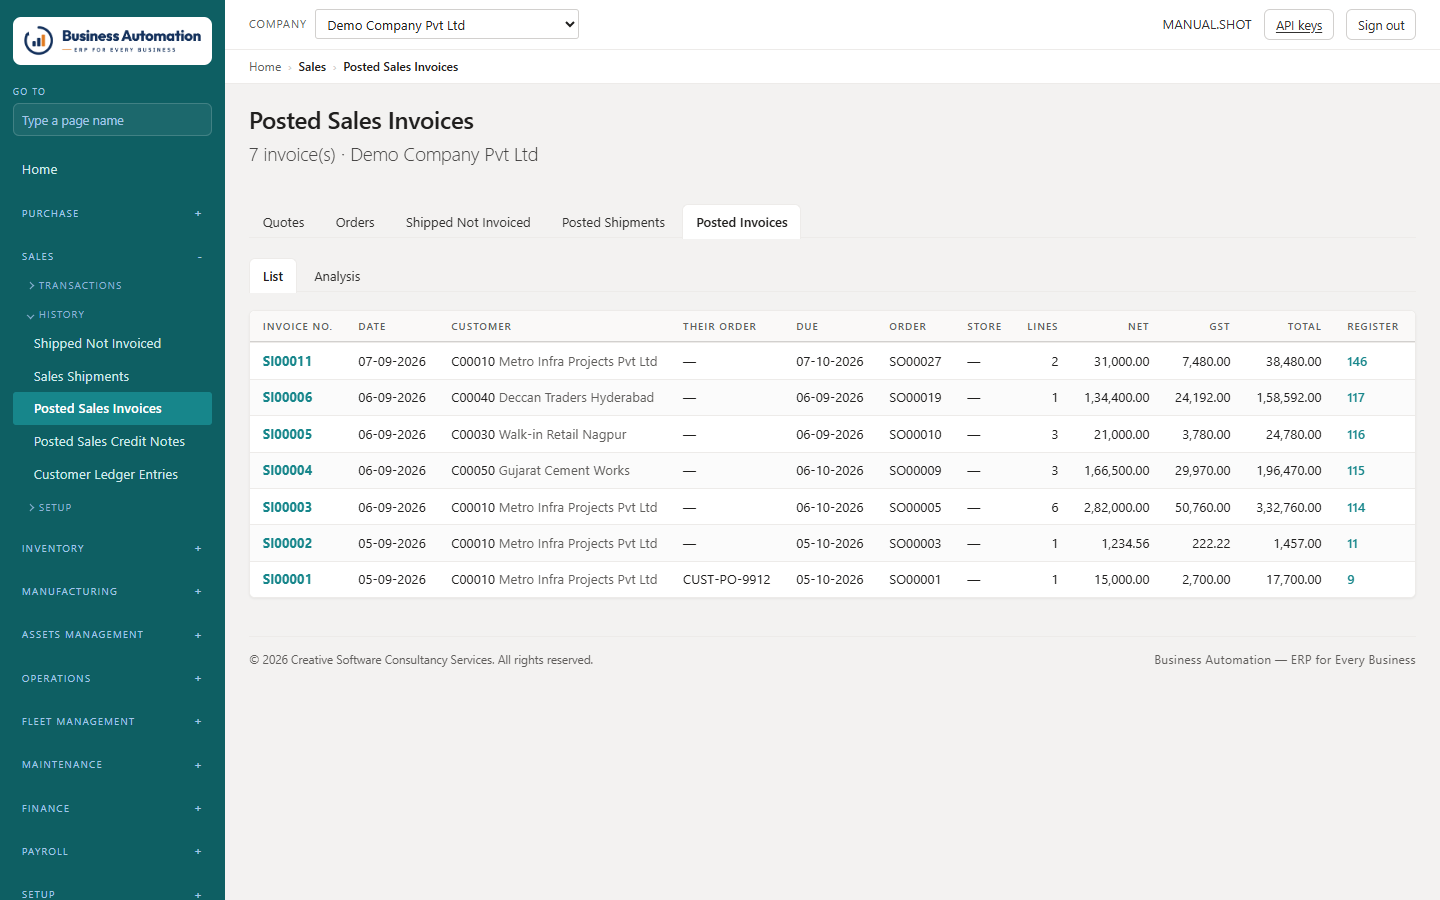
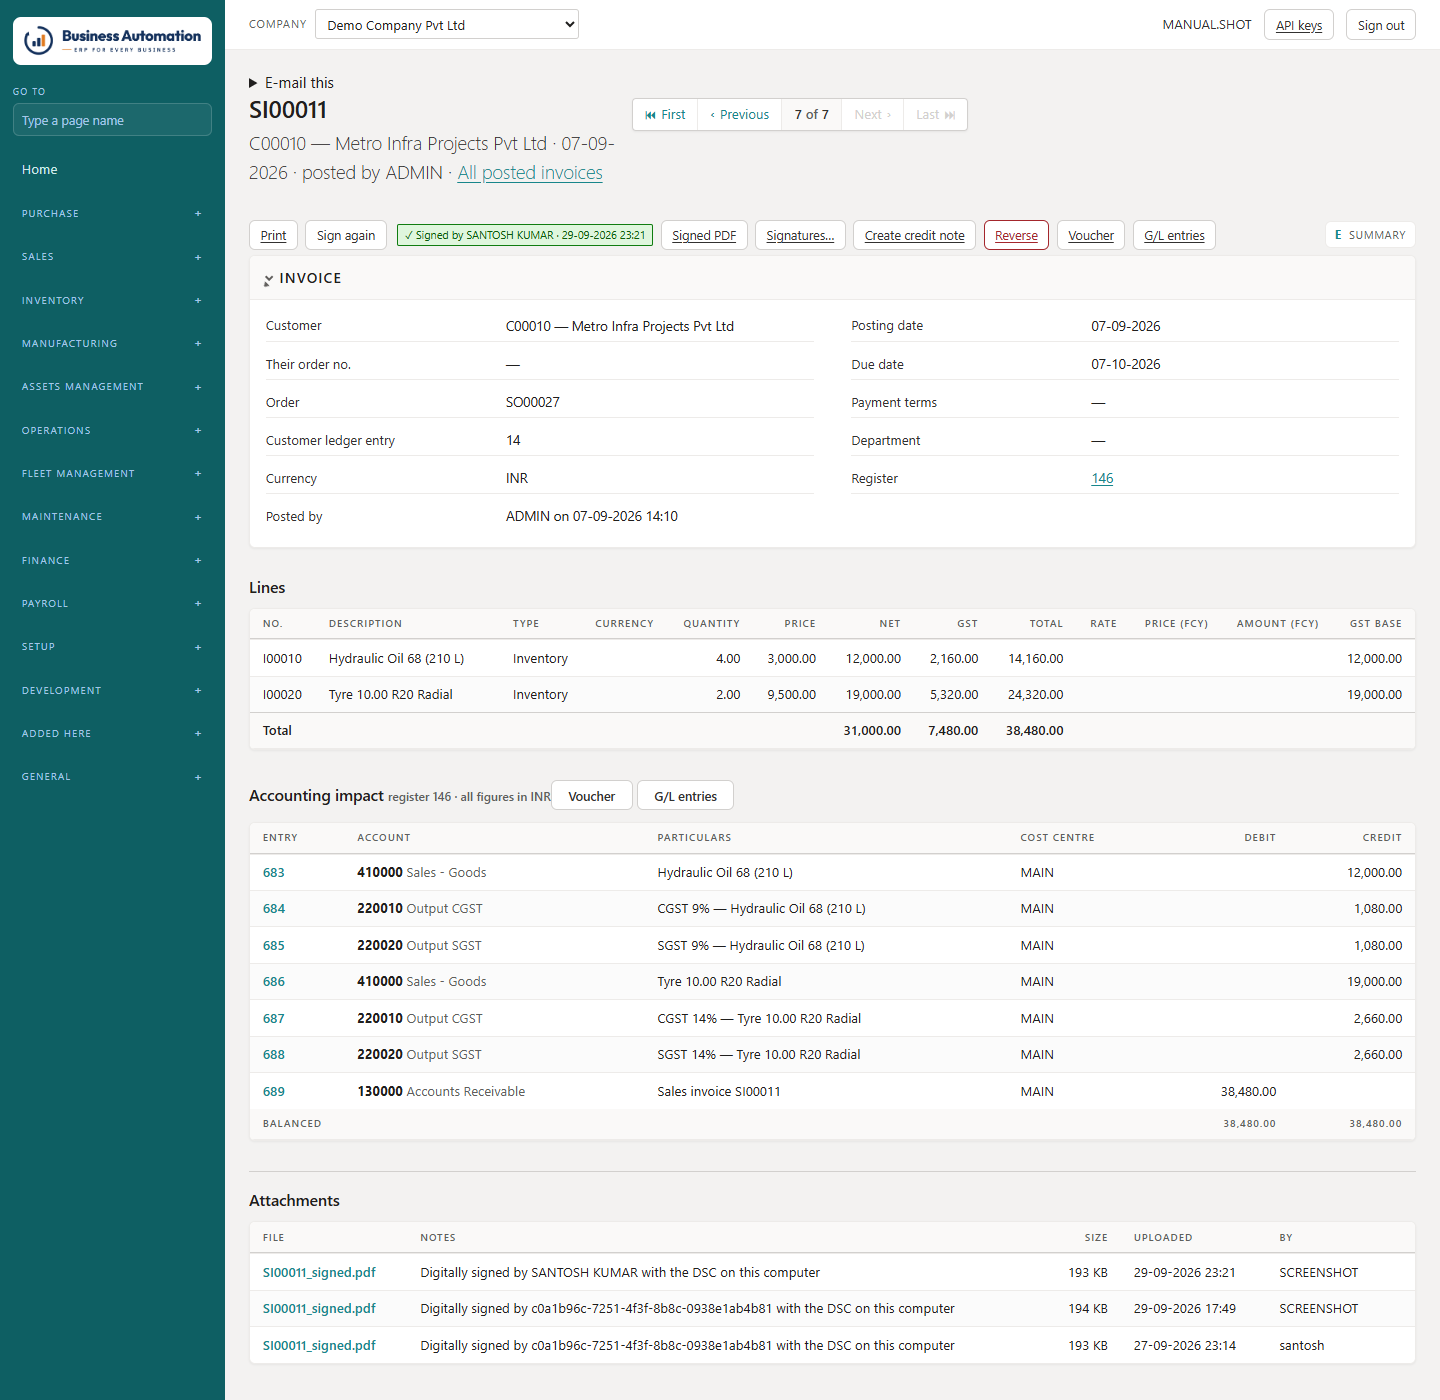
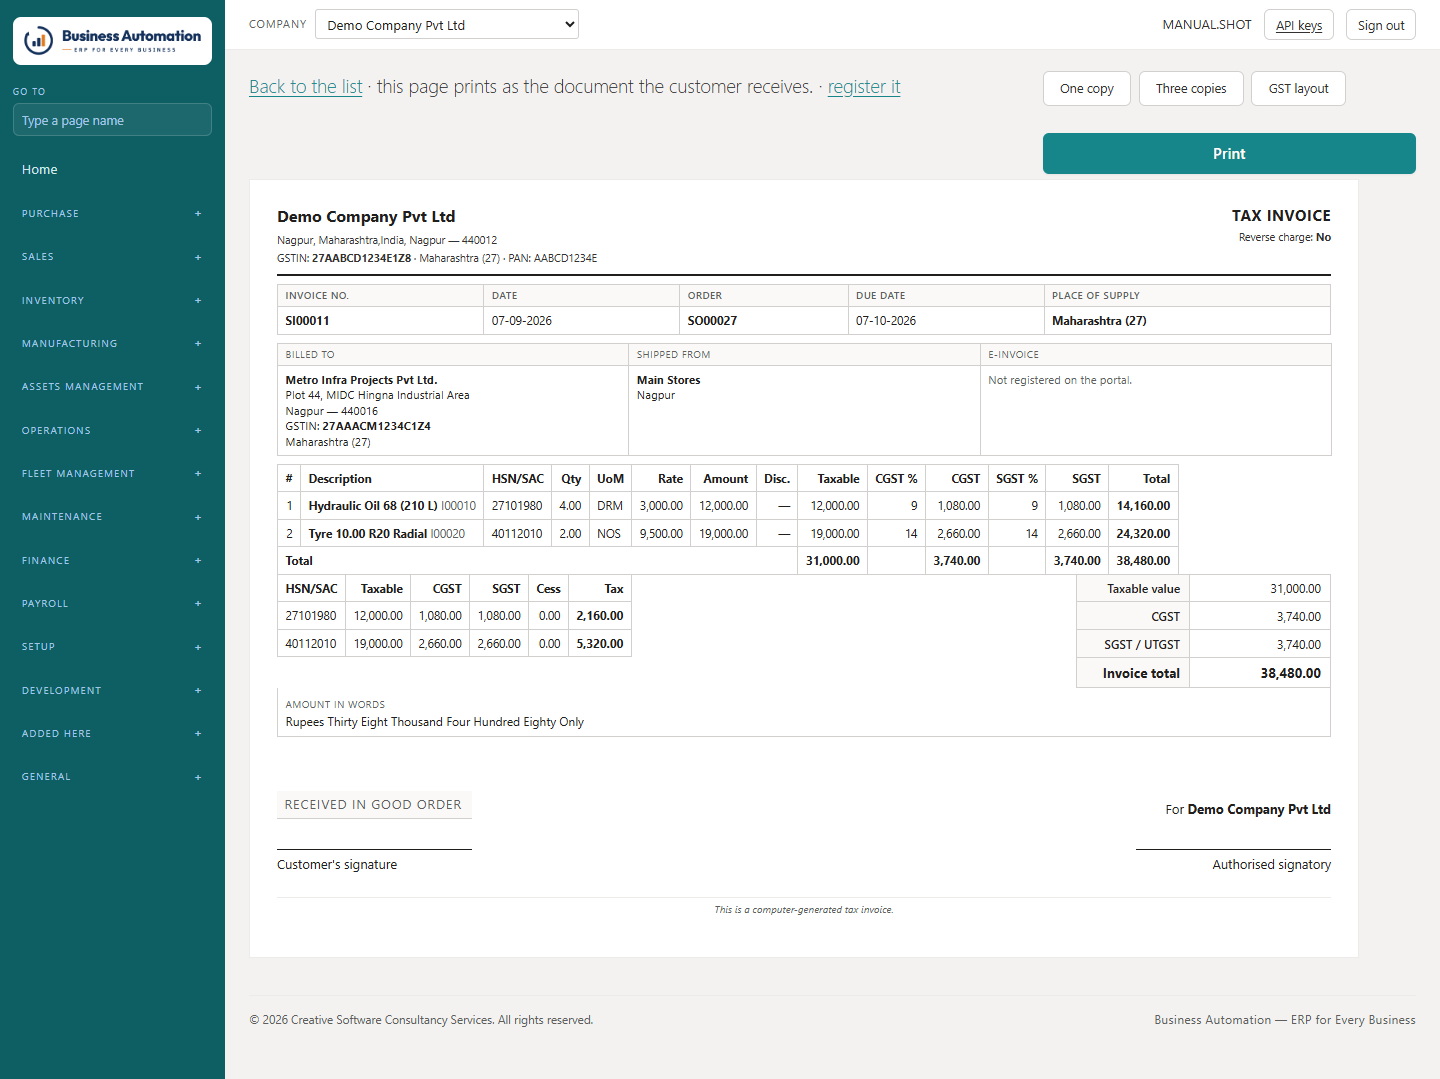
WhereSales › Sales Shipments (/sales/shipments) · Posted Sales Invoices (/sales/invoices)
  1. 1
    Open the register and click the number. The header shows first — customer, dates, references, who posted it — then the lines and totals.
  2. 2
    Press Print for the tax invoice (with HSN summary, amount in words and the signed QR where registered). Three copies prints original, duplicate and triplicate; GST layout gives the customer's own format.
  3. 3
    Create credit note and Reverse are on the document's own heading.
Business Automation
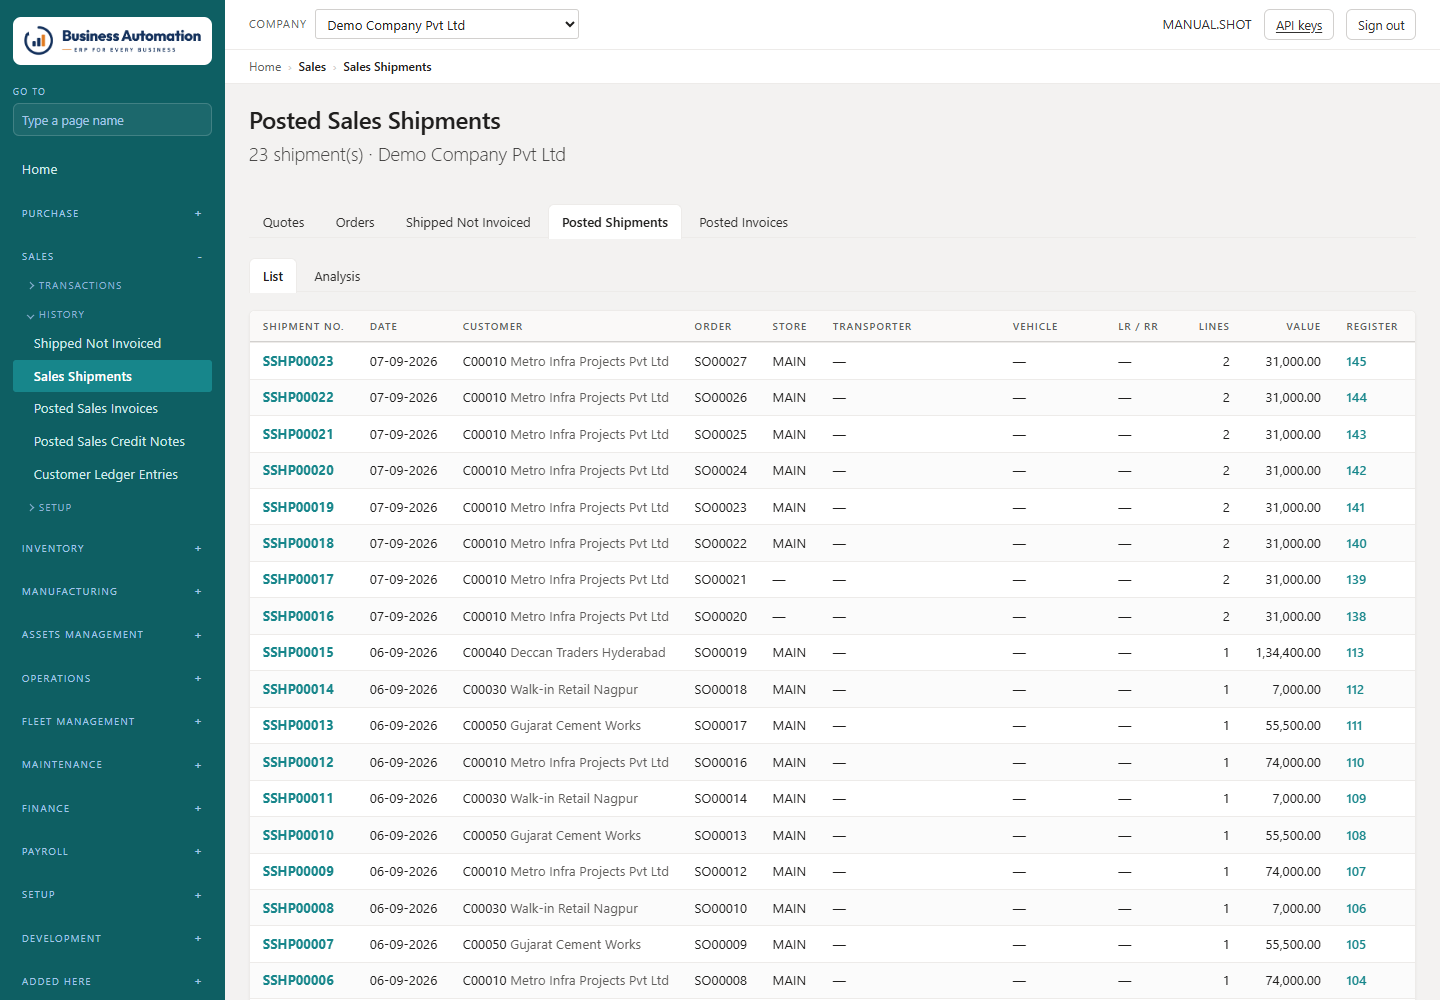
Sales shipments (delivery challans)
Figure 4.19 Sales shipments (delivery challans)
Business Automation
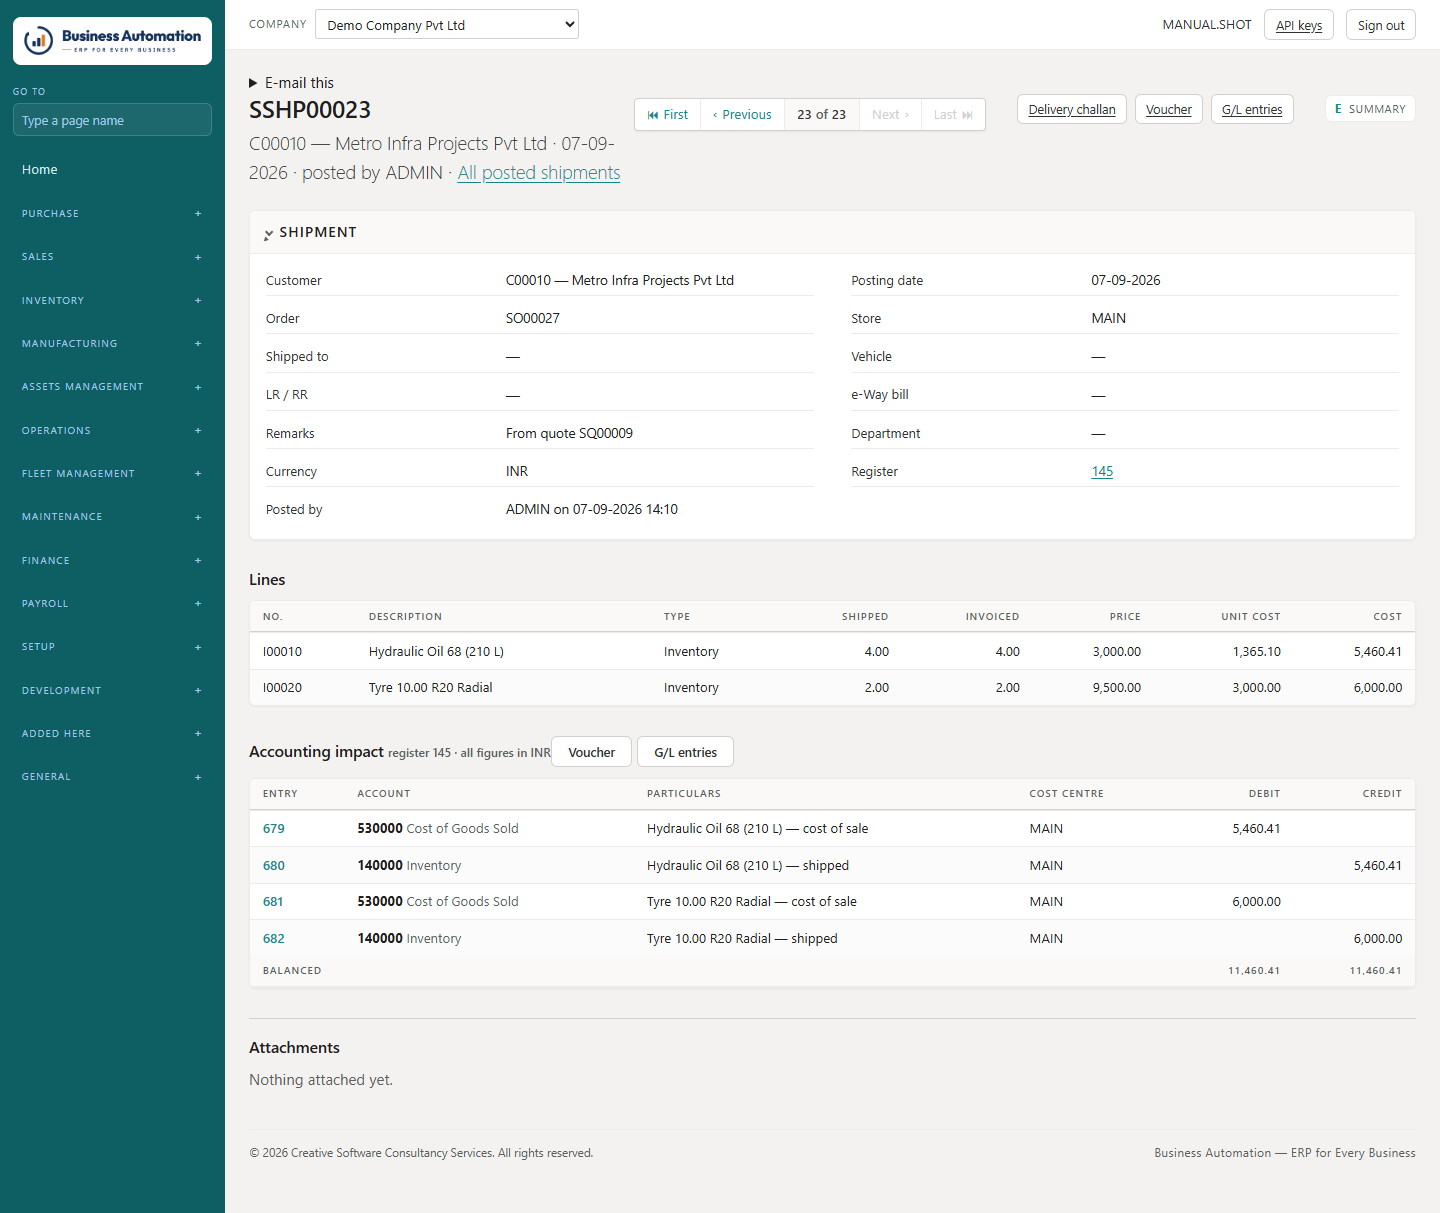
A posted shipment
Figure 4.20 A posted shipment
Business Automation
Posted sales invoices
Figure 4.21 Posted sales invoices
Business Automation
A posted sales invoice
Figure 4.22 A posted sales invoice
Business Automation
The tax invoice as the customer receives it
Figure 4.23 The tax invoice as the customer receives it

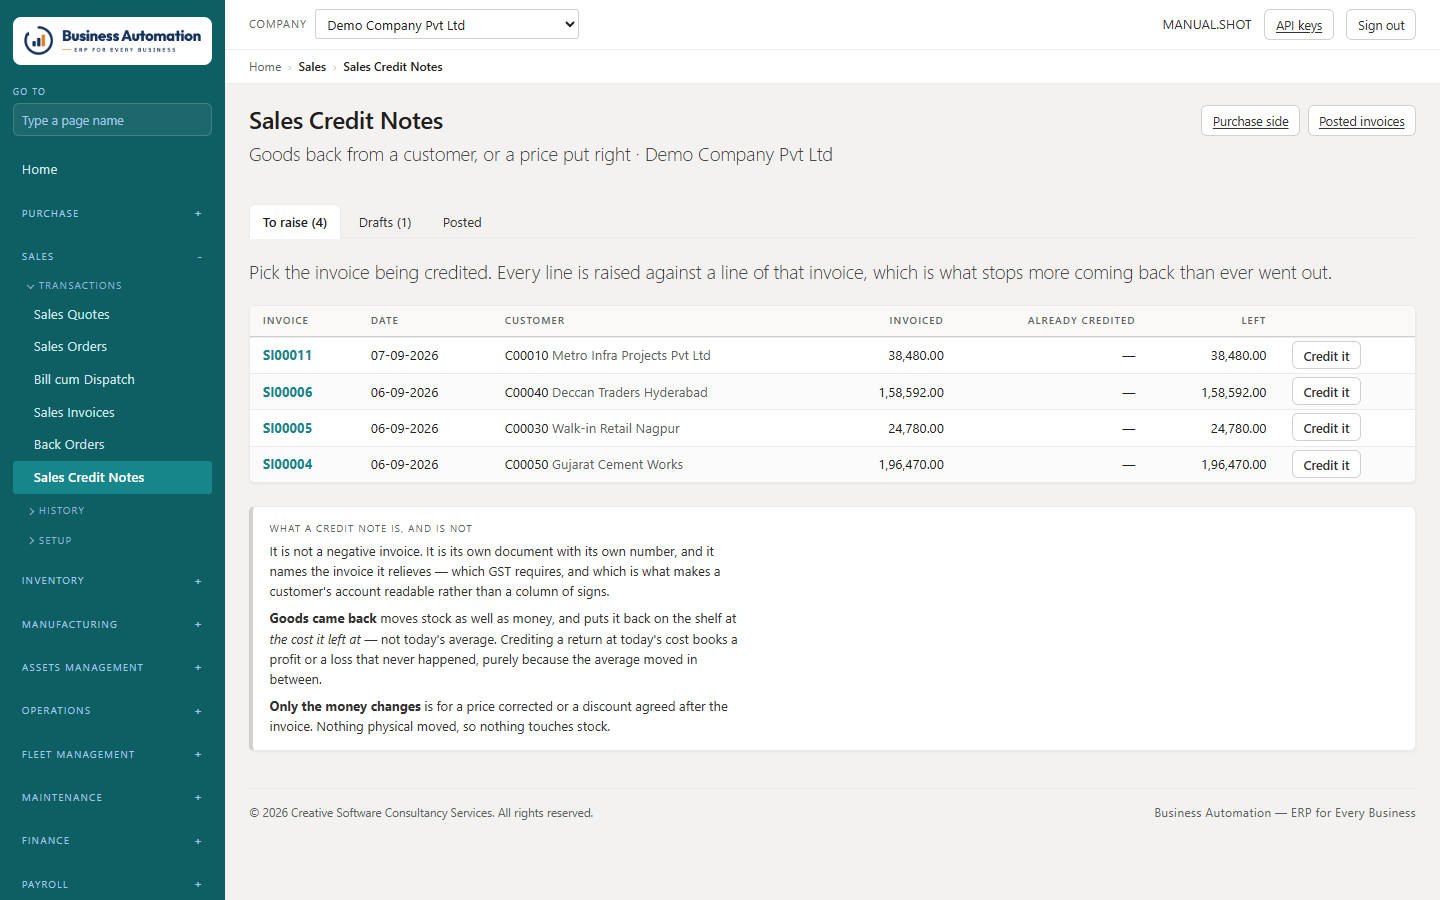
Credit notes

A credit note is its own document with its own number — not a negative invoice.

WhereSales › Sales Credit Notes (/sales/credits)
  1. 1
    Start it from the posted invoice. Every still-creditable line comes on at the quantity left.
  2. 2
    Set the Posting date (not before the invoice) and post. Goods that came back go on the shelf at the cost they left at.
  3. 3
    If the invoice was simply wrong, use reverse and settle on the posted invoice: it raises, posts and settles the credit note in one step.
Business Automation
Sales credit notes
Figure 4.24 Sales credit notes

E-invoice and e-way bill

Register invoices on the portal and raise the e-way bill for the lorry.

WhereFinance › E-Invoices (/gst/e-invoice) · E-Way Bills (/gst/e-way-bill)
  1. 1
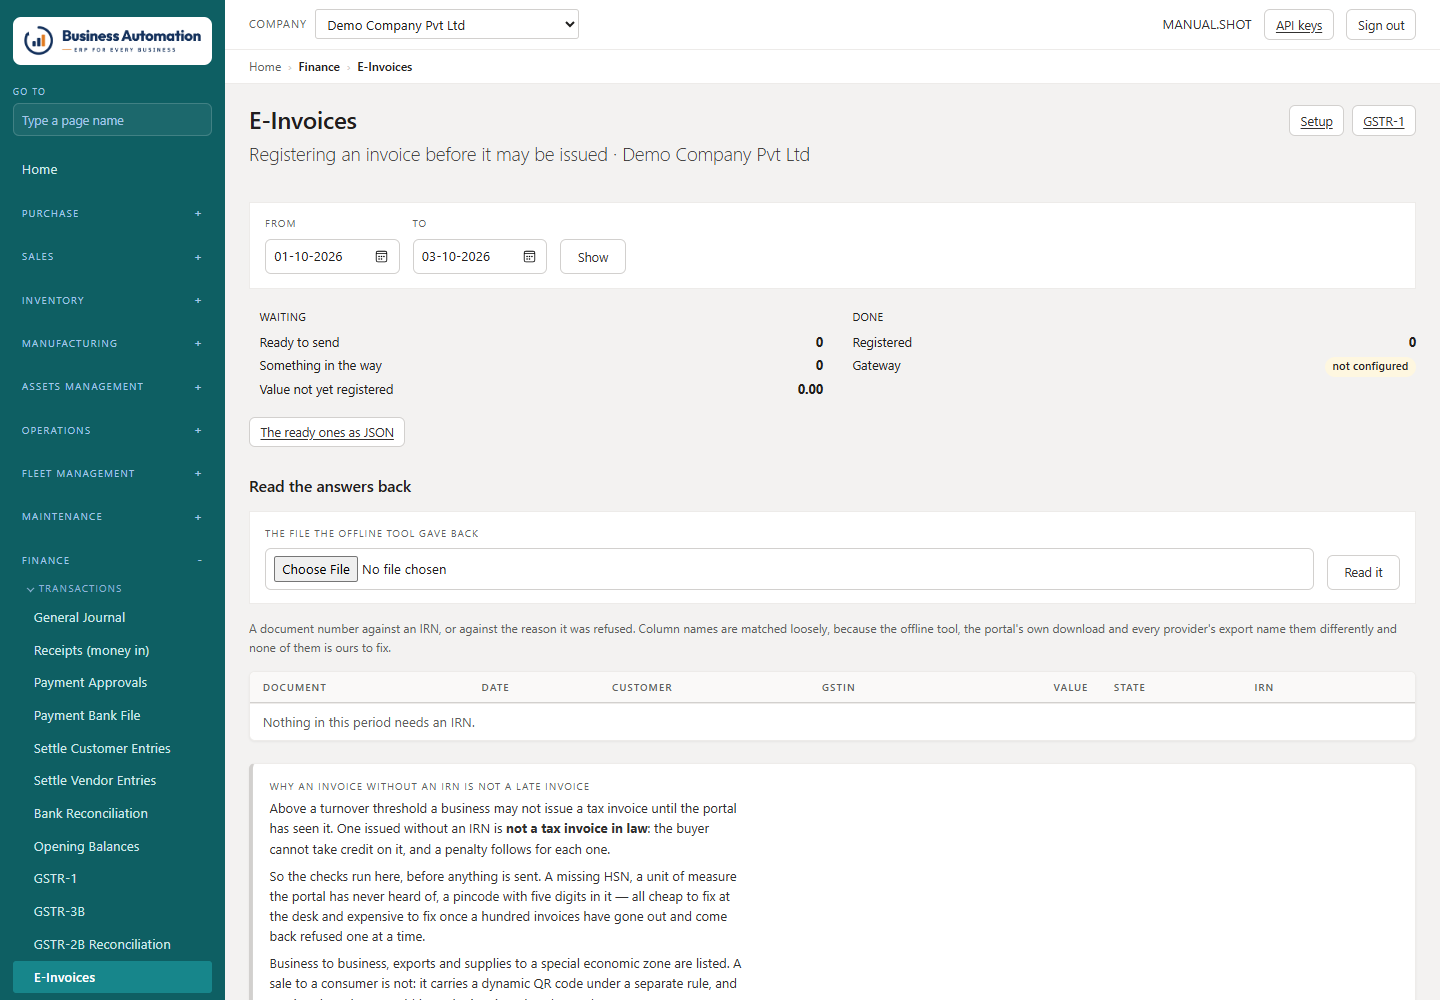
    On E-Invoices, register the invoice before it is issued. The screen first checks for what the portal refuses (missing GSTIN, bad PIN, state mismatch).
  2. 2
    If Generate on is on posting, posting registers it straight away. Red means posted but not registered — fix it and send it again before giving it to the customer.
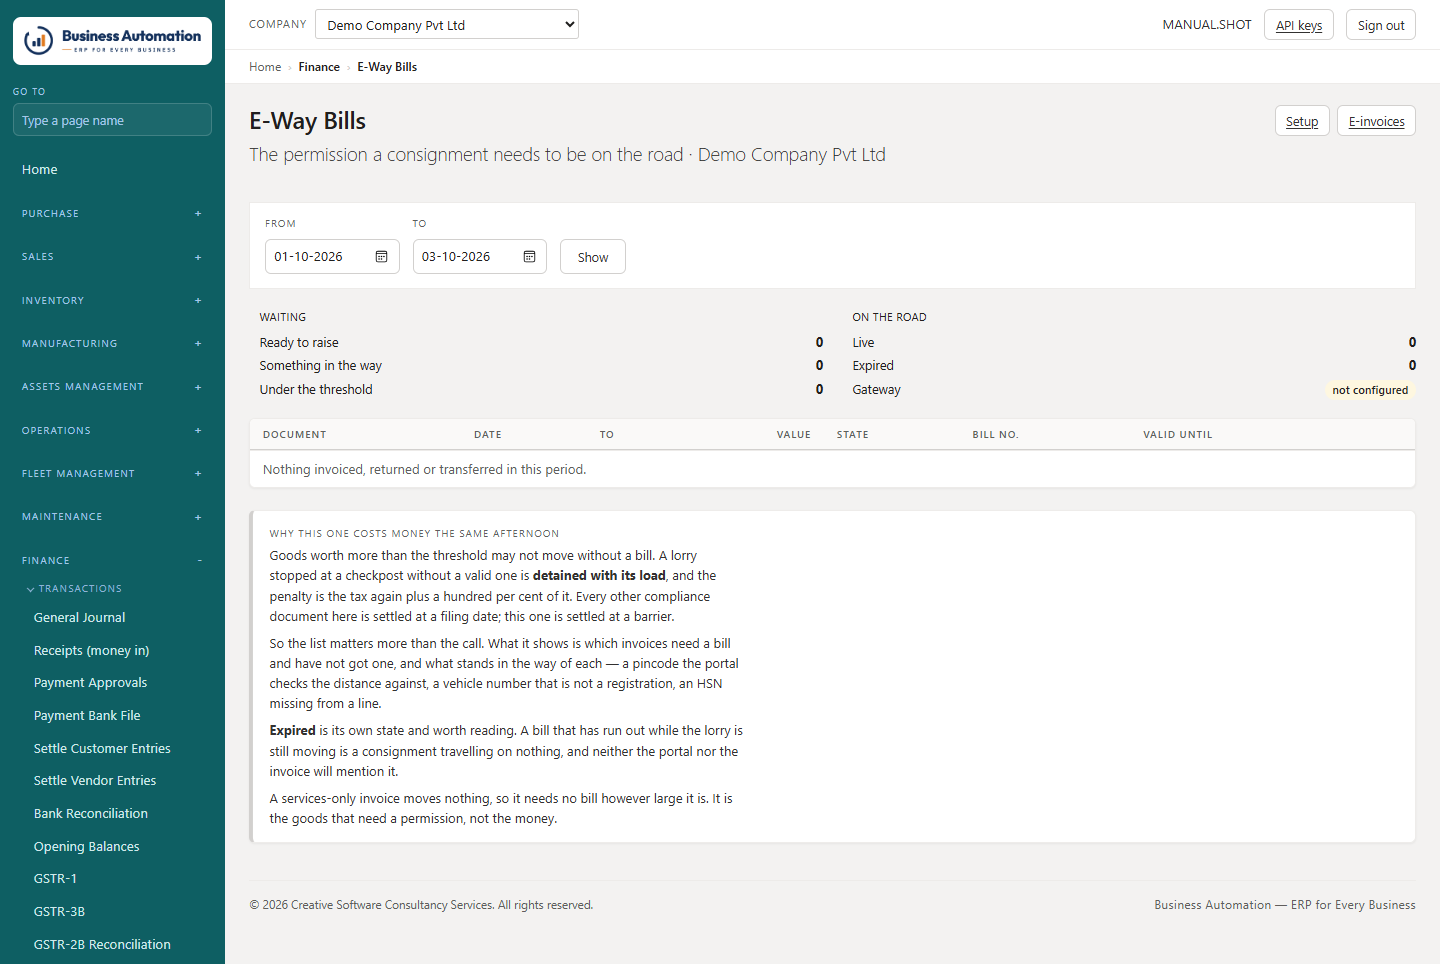
  3. 3
    On E-Way Bills, open the invoice, enter the vehicle (pick from your own vehicles) and distance, and generate. Print gives the driver's copy with its QR code.
Business Automation
E-invoices
Figure 4.25 E-invoices
Business Automation
E-way bills
Figure 4.26 E-way bills
  • Extend the bill within eight hours of expiry; Raise a consolidated bill for several consignments on one lorry.

Collecting tax at source (TCS)

Section 206C(1H) is set up for you; two things must be done before anything is collected.

WhereFinance › TCS Sections, TCS Rates, Customer TCS Sections
  1. 1
    Set the payable account on the section.
  2. 2
    Map the customers you collect from under Customer TCS Sections (none are mapped to begin with).
  3. 3
    The invoice then adds TCS after GST, only on the part above the buyer's yearly threshold. Credit notes collect nothing.
What this chapter covers. Money in and out, payment approval, journals, bank reconciliation, settling entries, statements, GST returns, closing periods and years, opening balances and fixed assets.

Money in: receipts

Record money received and allocate it to the customer's invoices.

WhereFinance › Receipts (money in) (/receipts)
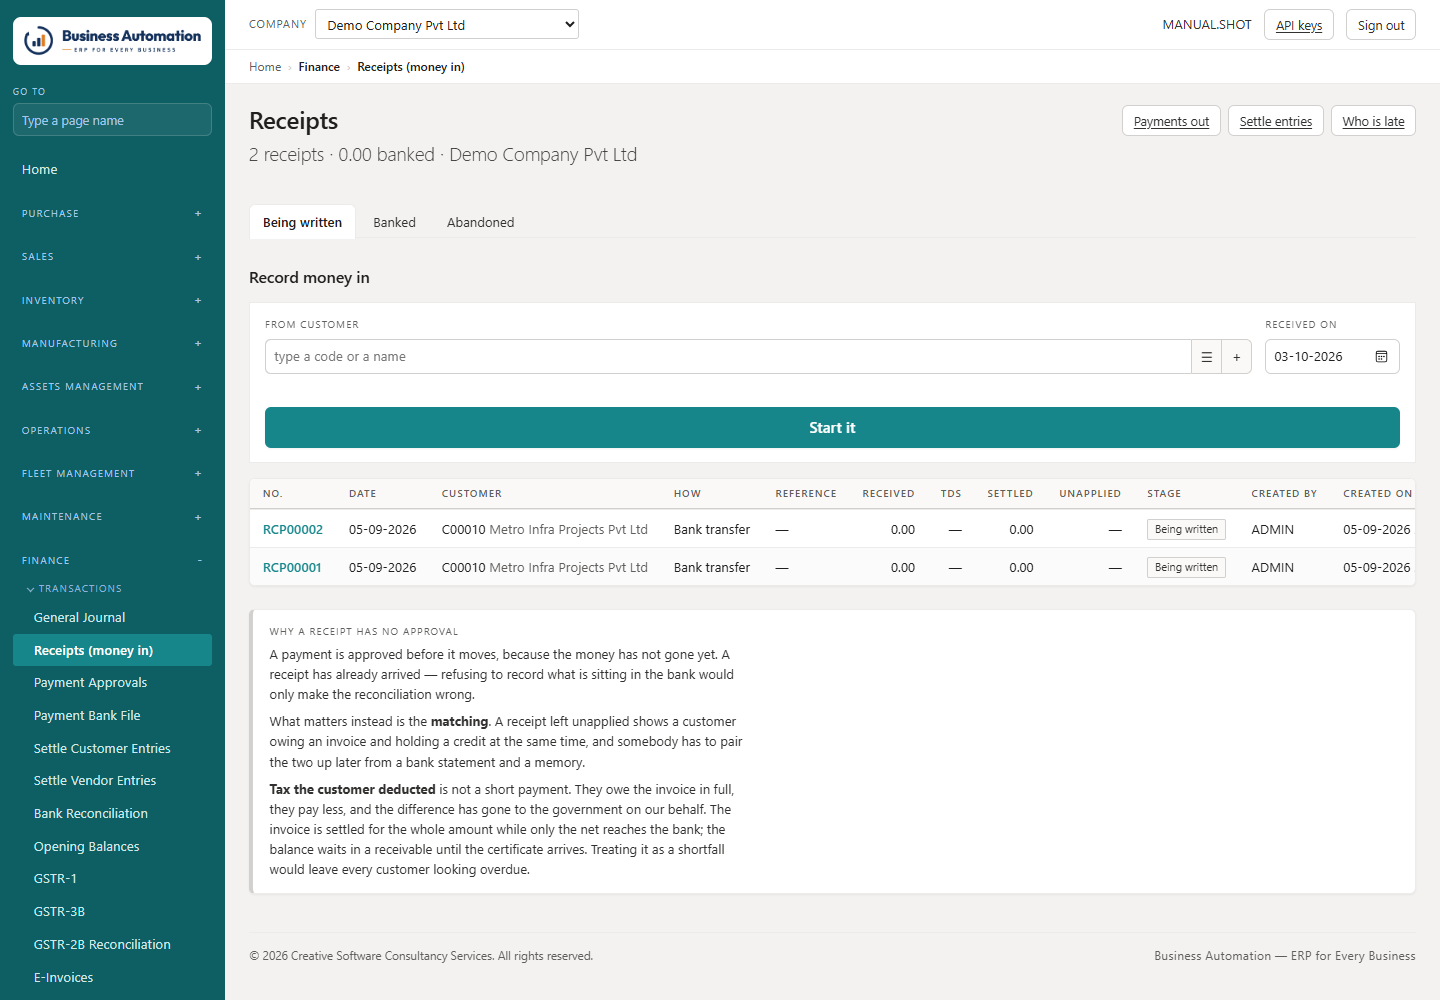
  1. 1
    Press New receipt: the customer, the date, the bank, the amount.
  2. 2
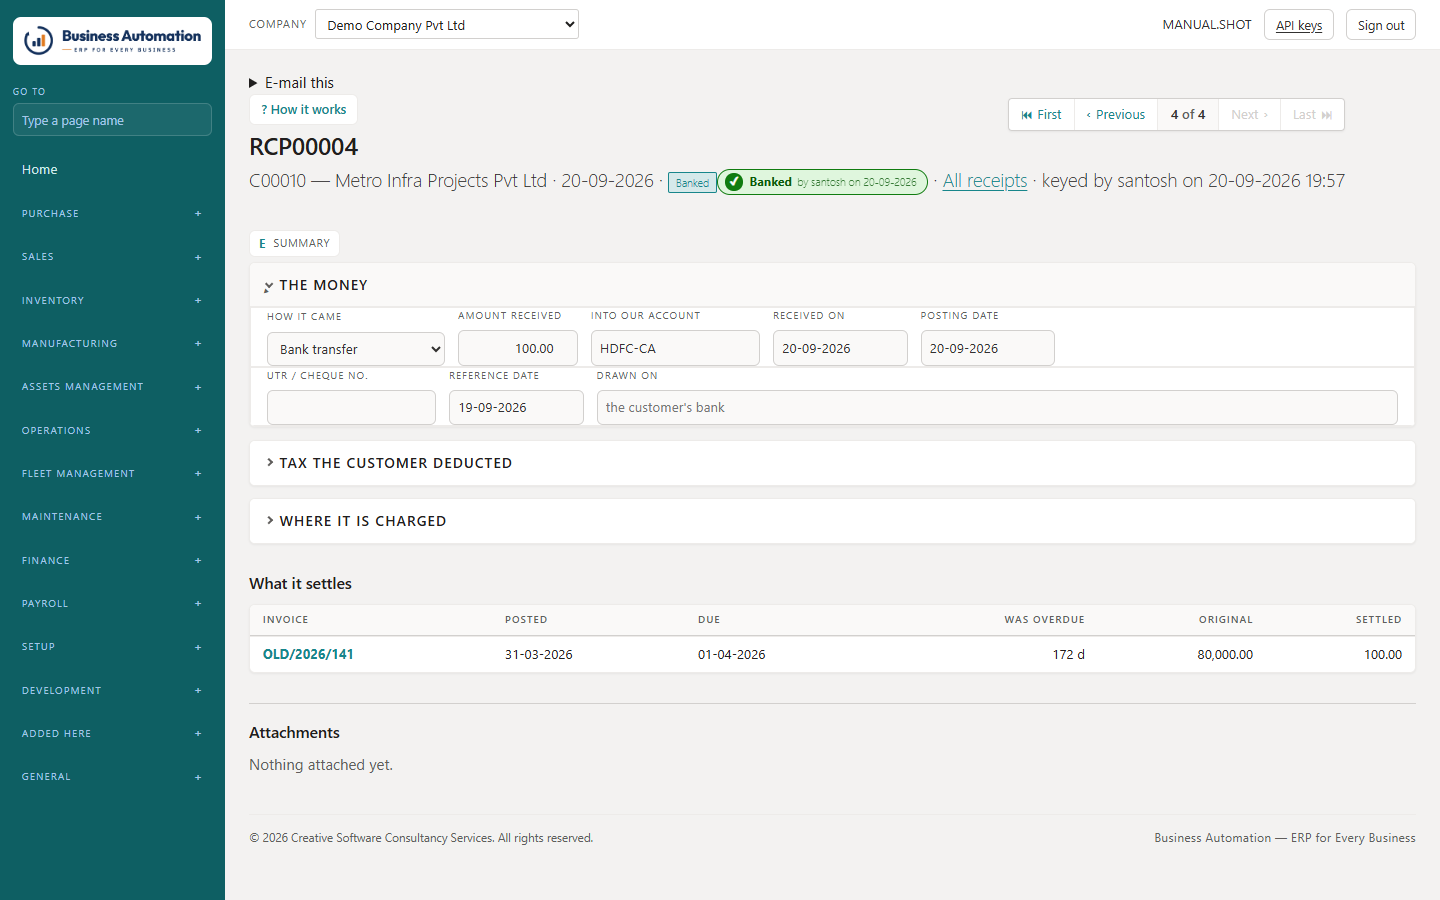
    Record any tax the customer deducted — it goes to your TDS receivable account and waits for their certificate.
  3. 3
    Allocate it. Open invoices are offered oldest first.
  4. 4
    Press Post.
Business Automation
Receipts
Figure 5.1 Receipts
Business Automation
A receipt being allocated
Figure 5.2 A receipt being allocated
⚠
Important. Allocating is not optional. An unallocated receipt leaves the customer showing an unpaid invoice and an unexplained credit, and the ageing is wrong both ways.

Money out: payment approval

Decide what to pay, get it signed, and post it.

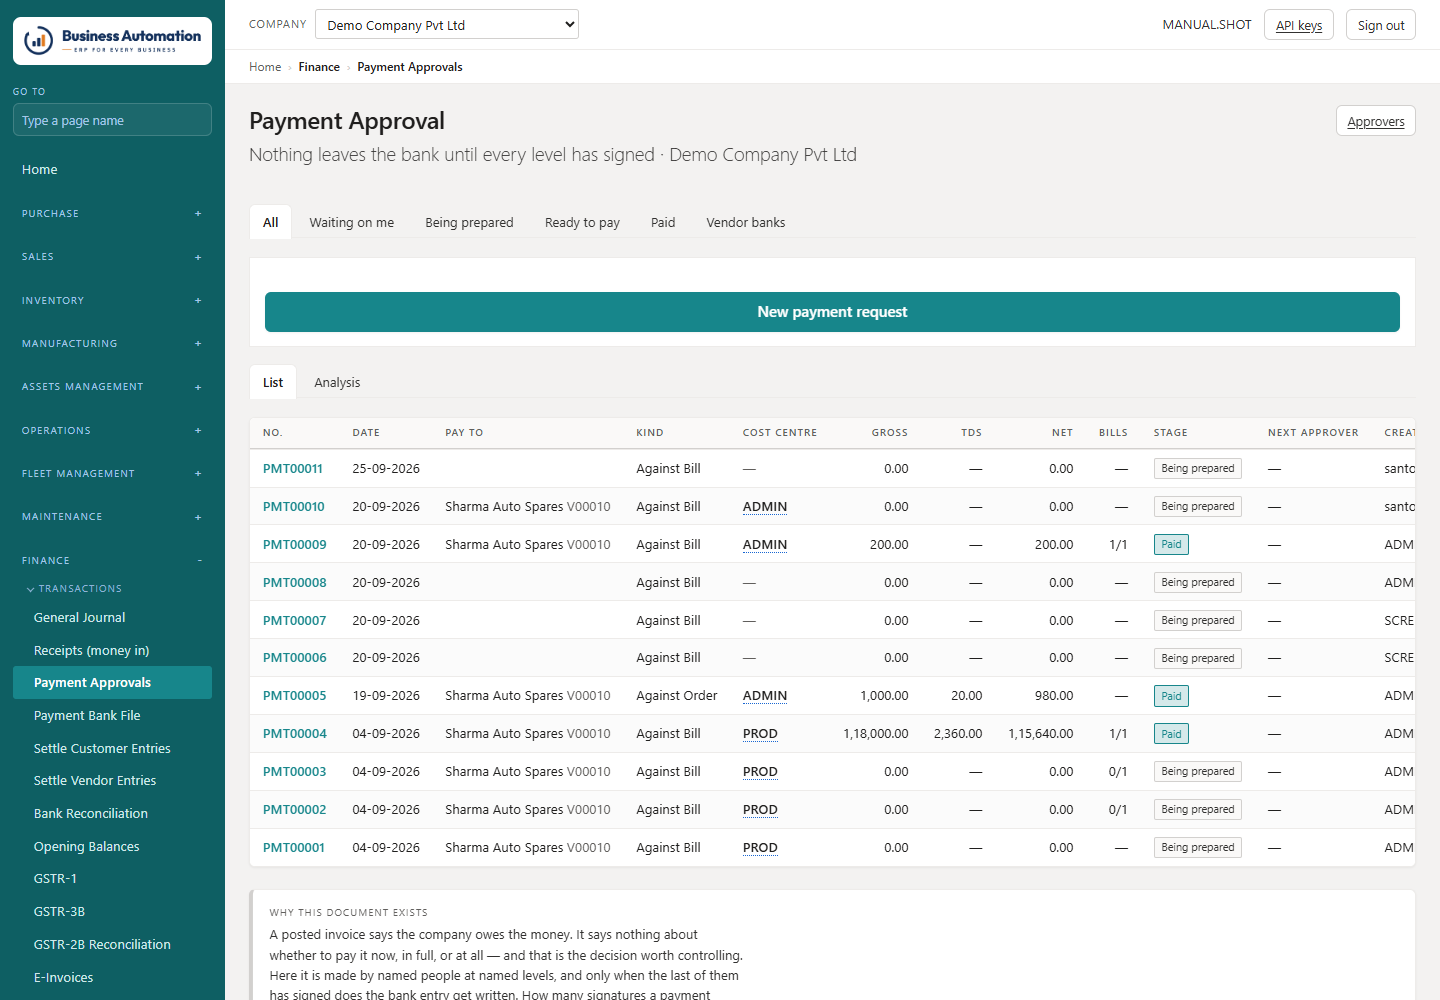
WhereFinance › Payment Approvals (/payments)
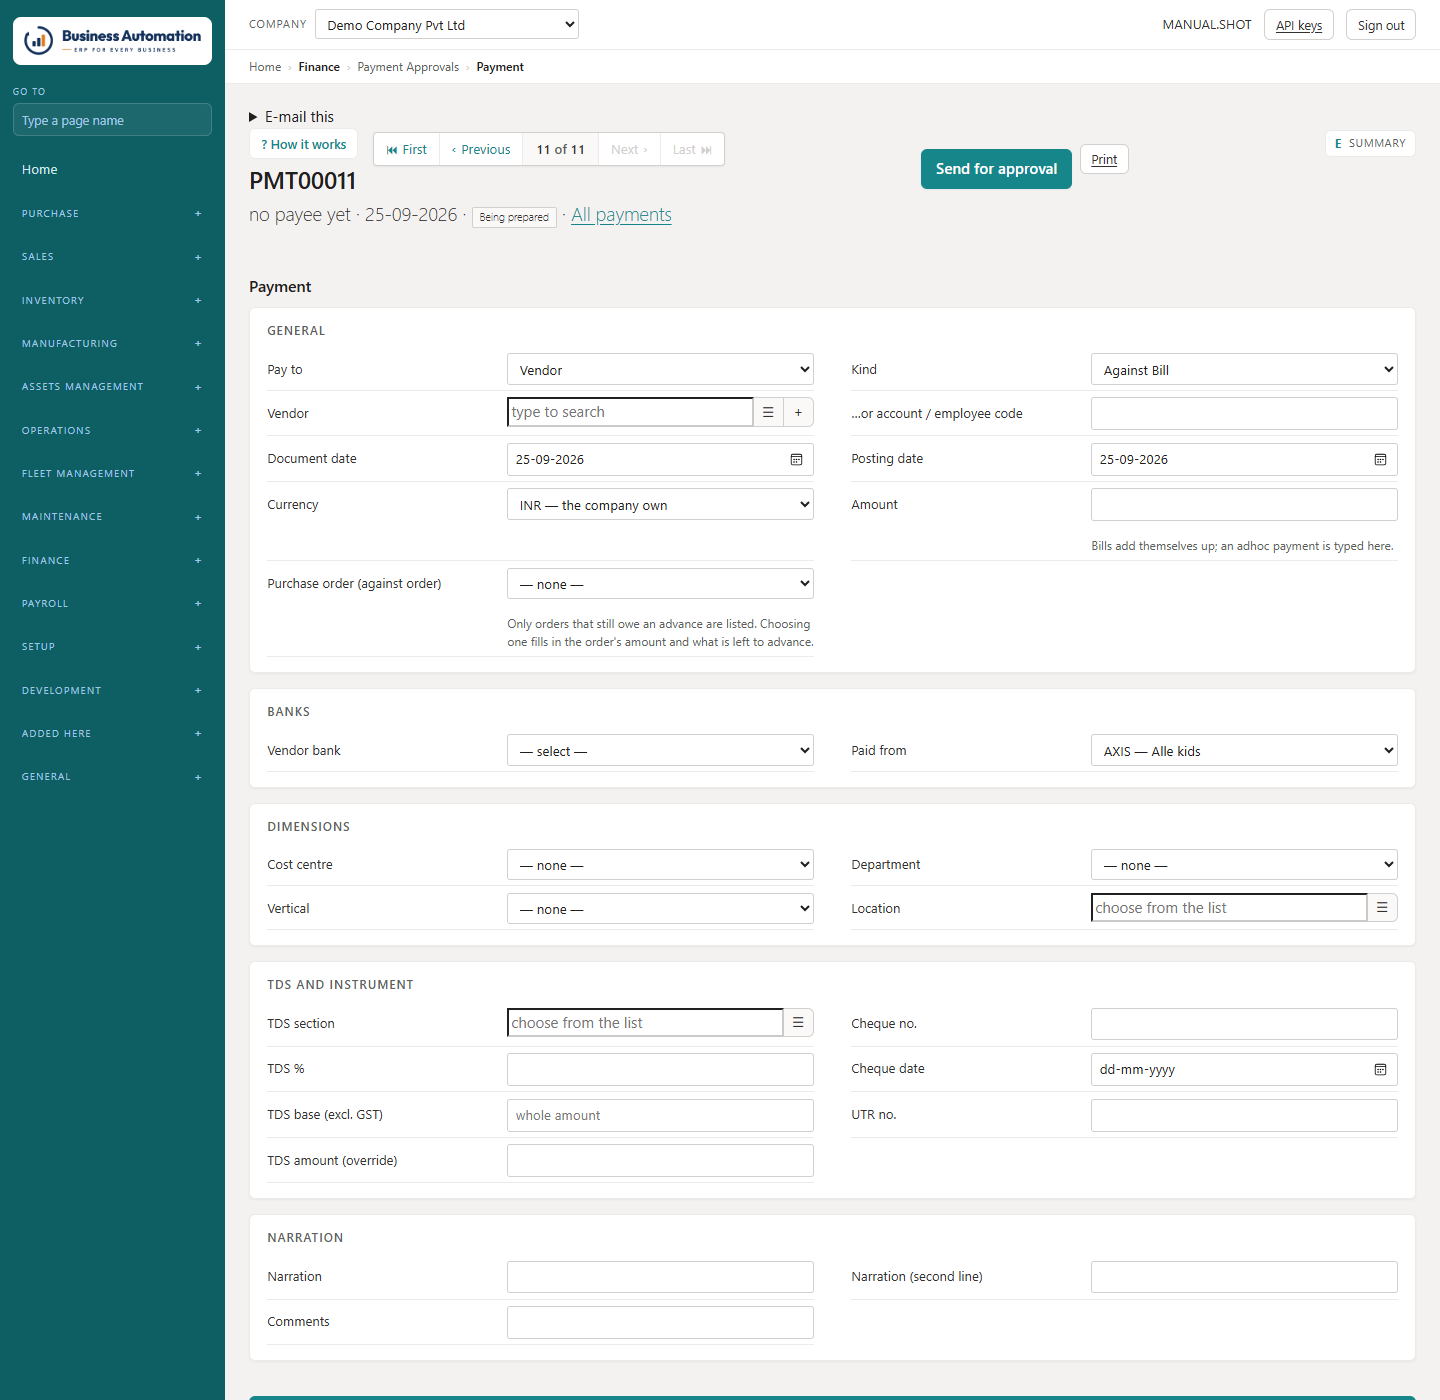
  1. 1
    Press New: the payee, the kind of payment (against bills, against order, …), the bank it goes from, the cost centre and place.
  2. 2
    Press Get pending bills. Only bills of that supplier, cost centre and place come back.
  3. 3
    Tick each bill you are paying. Ticking fills the whole outstanding amount; change it to part-pay.
  4. 4
    Press Save amounts.
  5. 5
    Press Send for approval. The number of signatures is fixed now, from the matrix.
  6. 6
    Once fully approved, press Post. The supplier is debited, the bank credited, TDS held back and the bills settled.
Business Automation
Payment approvals
Figure 5.3 Payment approvals
Business Automation
A payment request with its bills
Figure 5.4 A payment request with its bills
💡
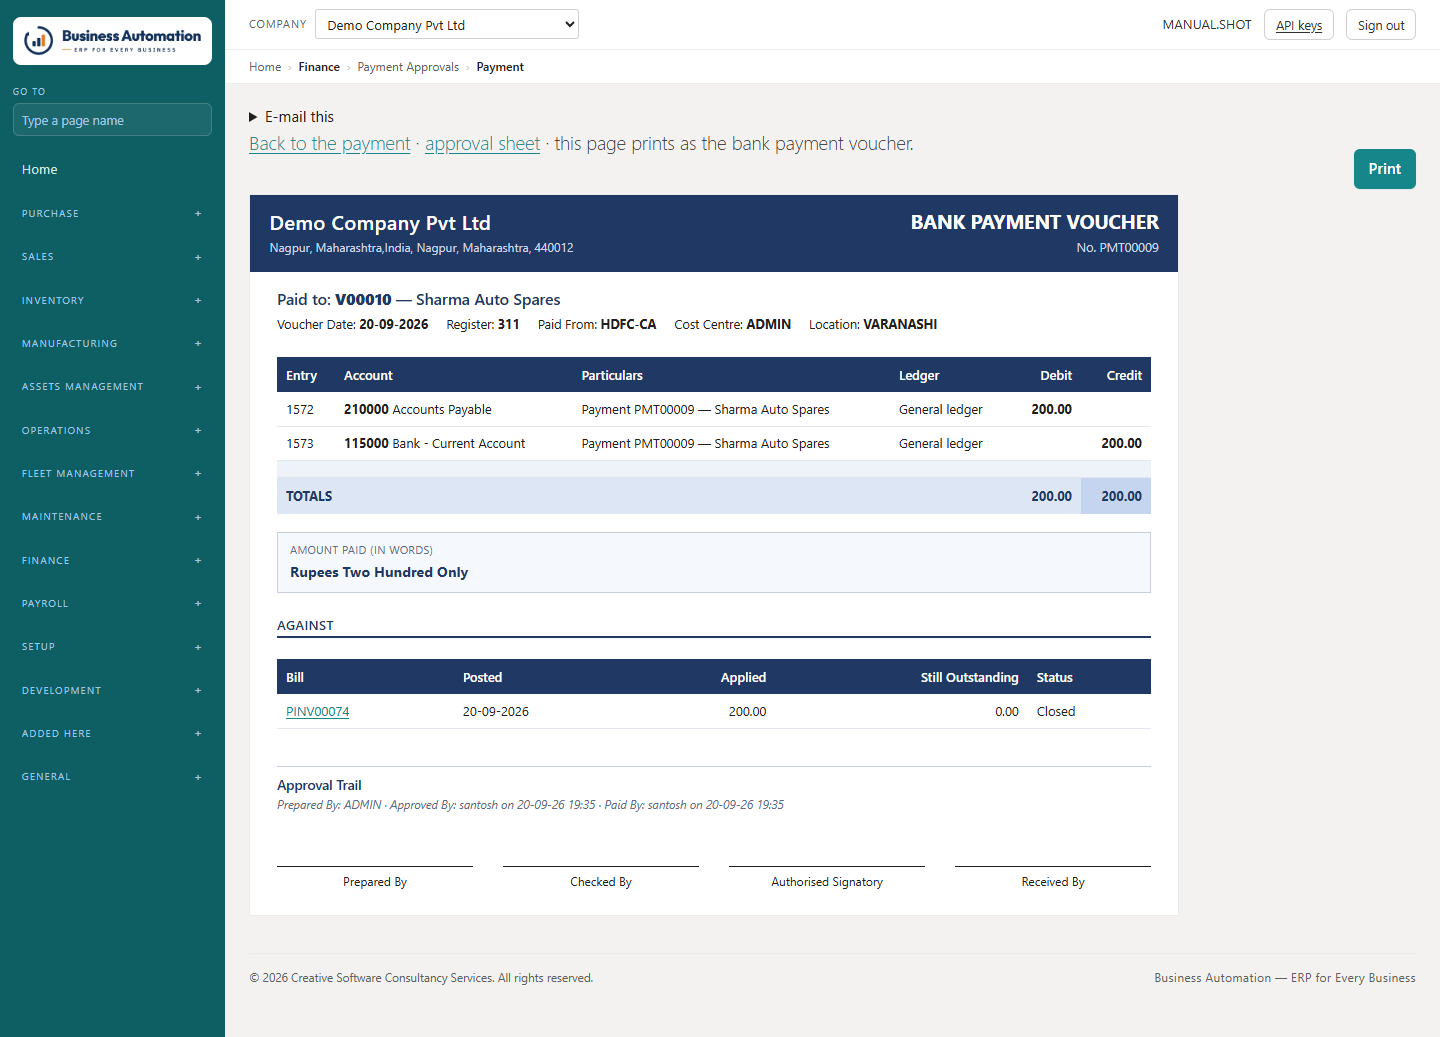
Tip. Approvers can reject one bill without refusing the whole request. Print gives the approval sheet; Payment voucher on a posted payment gives the voucher with four signature lines.
Business Automation
The payment voucher
Figure 5.5 The payment voucher
  • An advance against a purchase order: set the kind to Against order and pick the order. Only orders still owing an advance are listed, and the total of all requests can never pass the advance agreed.
  • Paying through the bank: Finance › Payment Bank File gives the bank's upload file for a posting date.

Following a figure: chart of accounts

Every figure is clickable and opens the entries behind it.

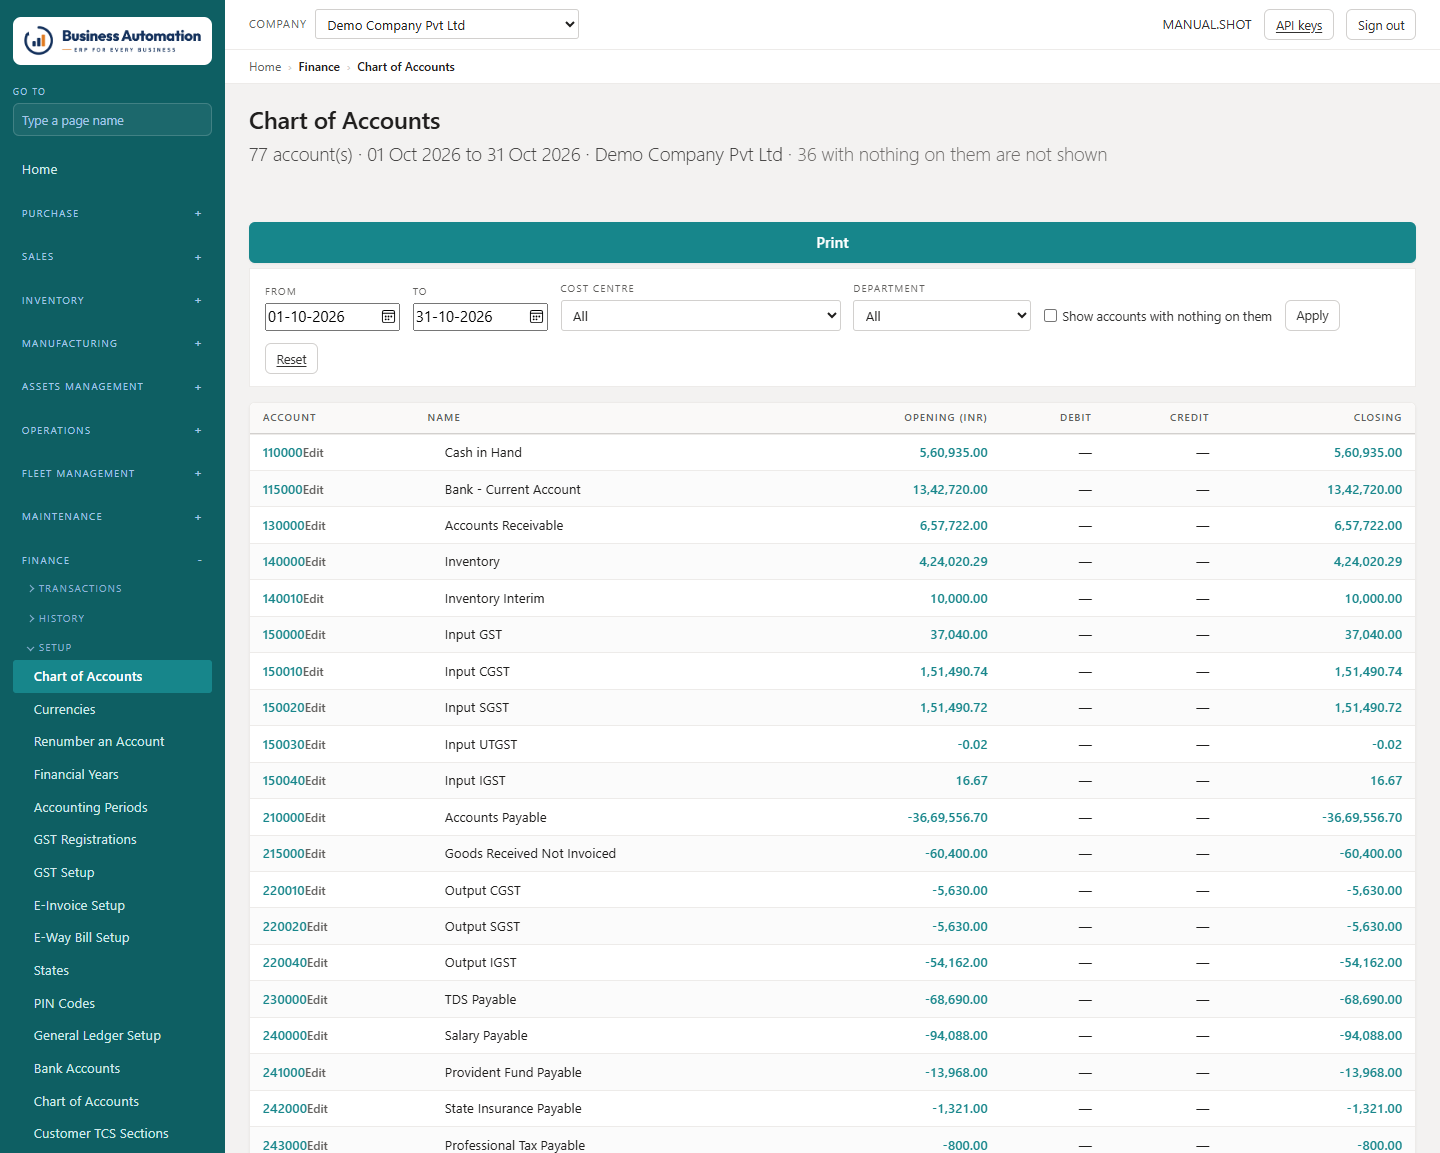
WhereFinance › Chart of Accounts (/chart-of-accounts)
  1. 1
    Set the period and, if needed, the cost centres.
  2. 2
    Click Opening, Debit, Credit or Closing for the entries behind that figure.
  3. 3
    Press Edit beside an account number to change the account card (name, Direct Posting, posting type, Ledger To Be Used).
Business Automation
The chart of accounts: opening, debit, credit, closing
Figure 5.6 The chart of accounts: opening, debit, credit, closing
💡
Tip. A G/L account marked Bank shows Create Bank from Ledger; an expense ledger shows Create Service Item from Ledger.

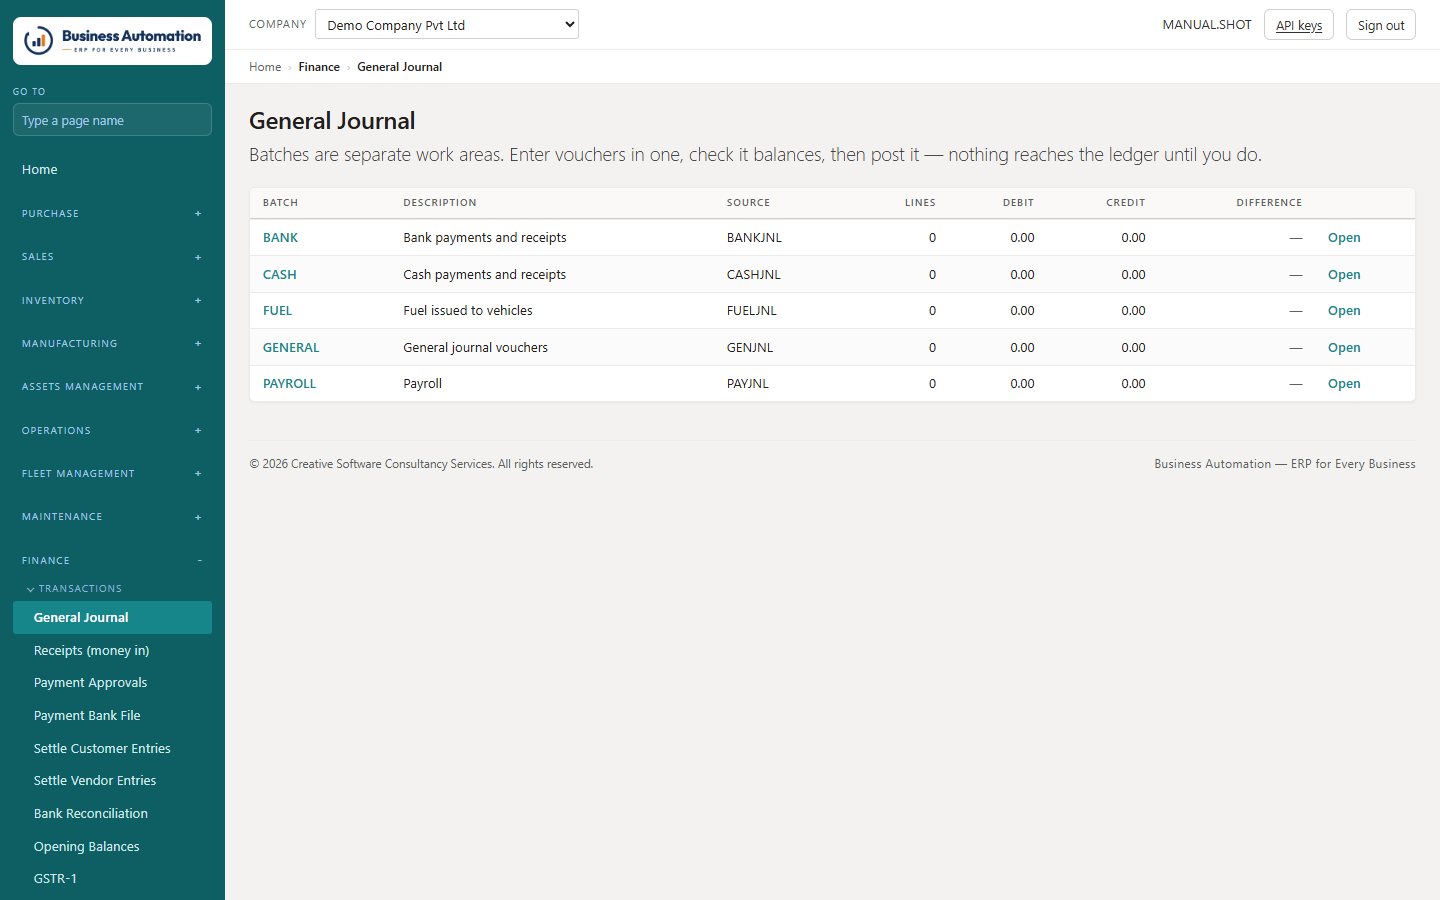
The general journal

For adjustments, provisions and contra entries — everything that is not a document.

WhereFinance › General Journal (/journal)
  1. 1
    Open the batch and add lines. A line points at a G/L account or at a customer, supplier, bank or employee — one picker covers them all.
  2. 2
    Press Check to see what is wrong before posting. The batch must balance on every posting date.
  3. 3
    If journals are approved, press Approval and send it.
  4. 4
    Press Post batch.
Business Automation
The general journal
Figure 5.7 The general journal
ℹ
Note. Control accounts are not offered as plain G/L accounts — name the party instead, so its ledger is written too.

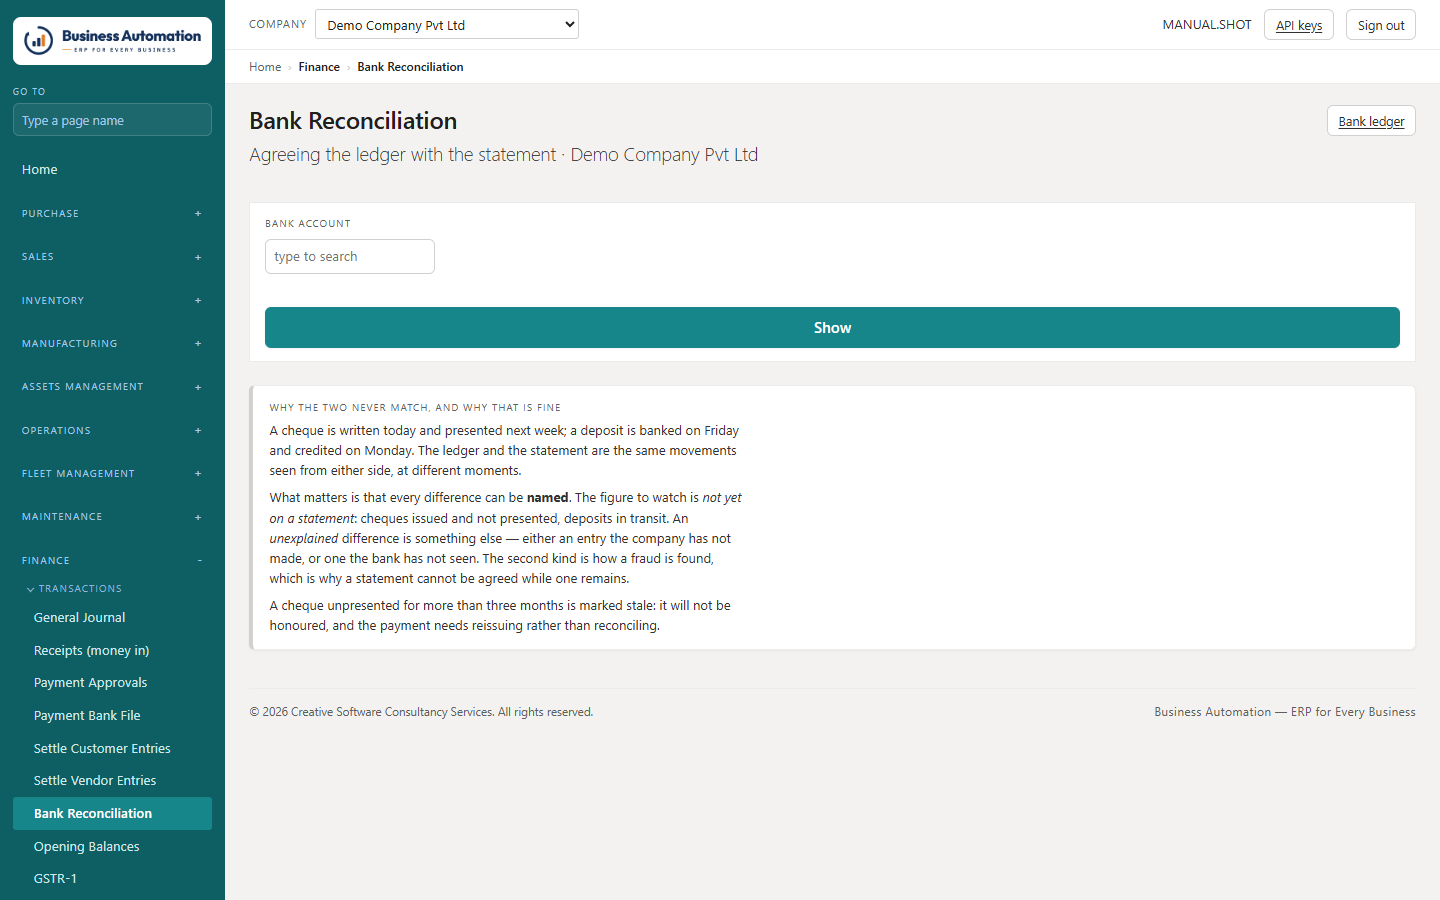
Bank reconciliation

Match the bank statement against the ledger.

WhereFinance › Bank Reconciliation (/bank/reconcile)
  1. 1
    Choose the bank and statement date and balance.
  2. 2
    Quick way: download the statement as CSV and use Read and match. Check the pairs and press Tick the paired entries.
  3. 3
    Tick by hand any lines marked choose.
  4. 4
    For a charge or interest not in the ledger, open On the statement, not in the ledger, pick the account and amount — it is posted and ticked in one step.
  5. 5
    Agree the reconciliation. It can be reopened if you agreed it too early.
Business Automation
Bank reconciliation
Figure 5.8 Bank reconciliation

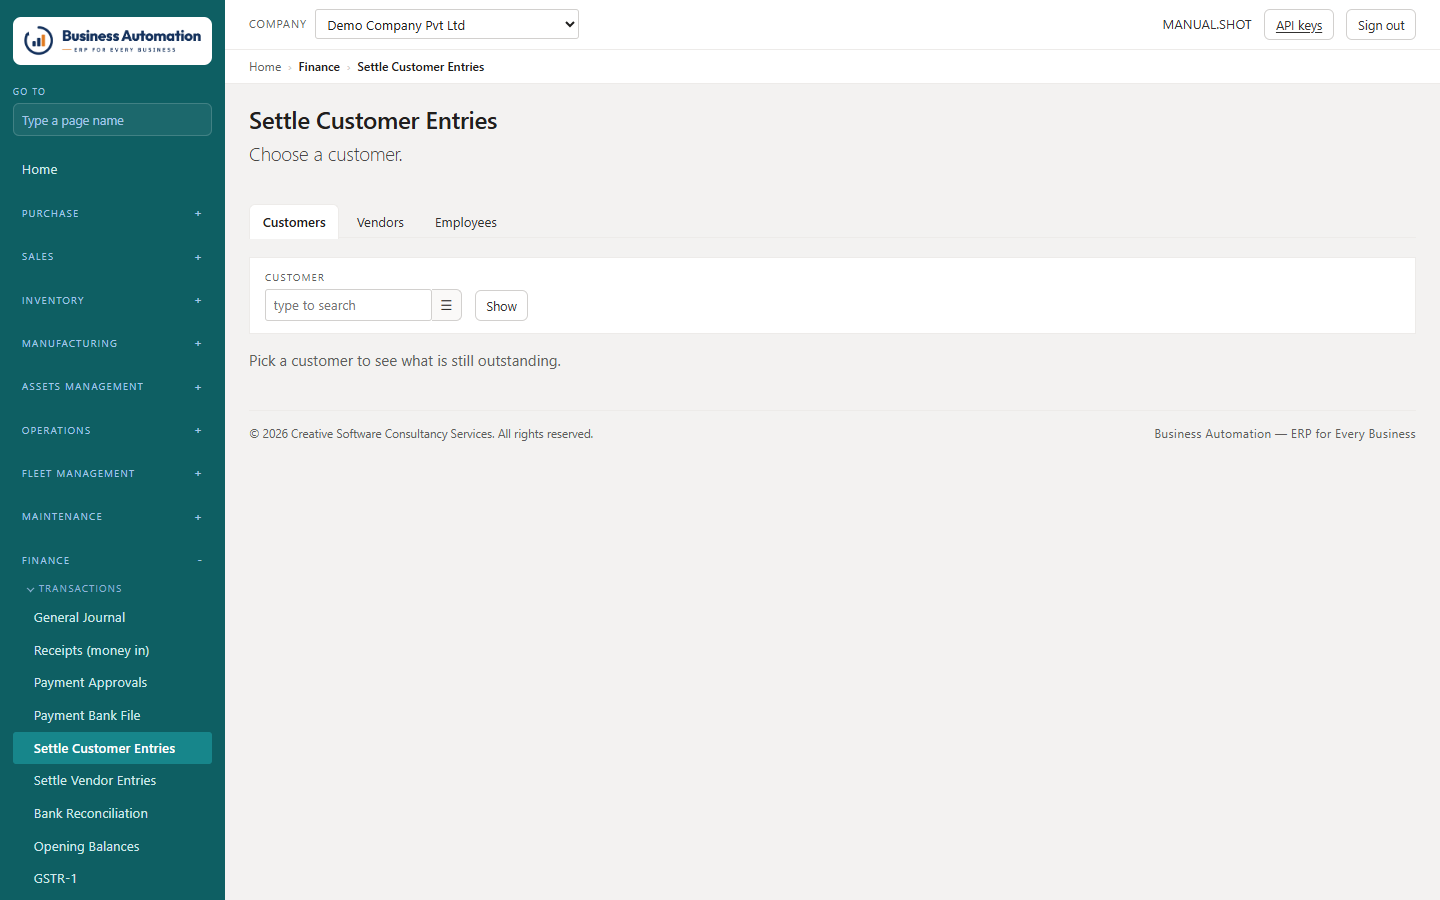
Settling entries

Match payments against bills, oldest first.

WhereFinance › Settle Entries (/settle/Customer, /settle/Vendor)
  1. 1
    Choose the customer or supplier.
  2. 2
    Pick the payment and the entries it settles; partial settlement is normal.
  3. 3
    Post the settlement. Take back reopens both entries and records the undo.
Business Automation
Settle customer entries
Figure 5.9 Settle customer entries
  • Applications on any customer, vendor or employee ledger row shows every movement on that entry with the running remainder.

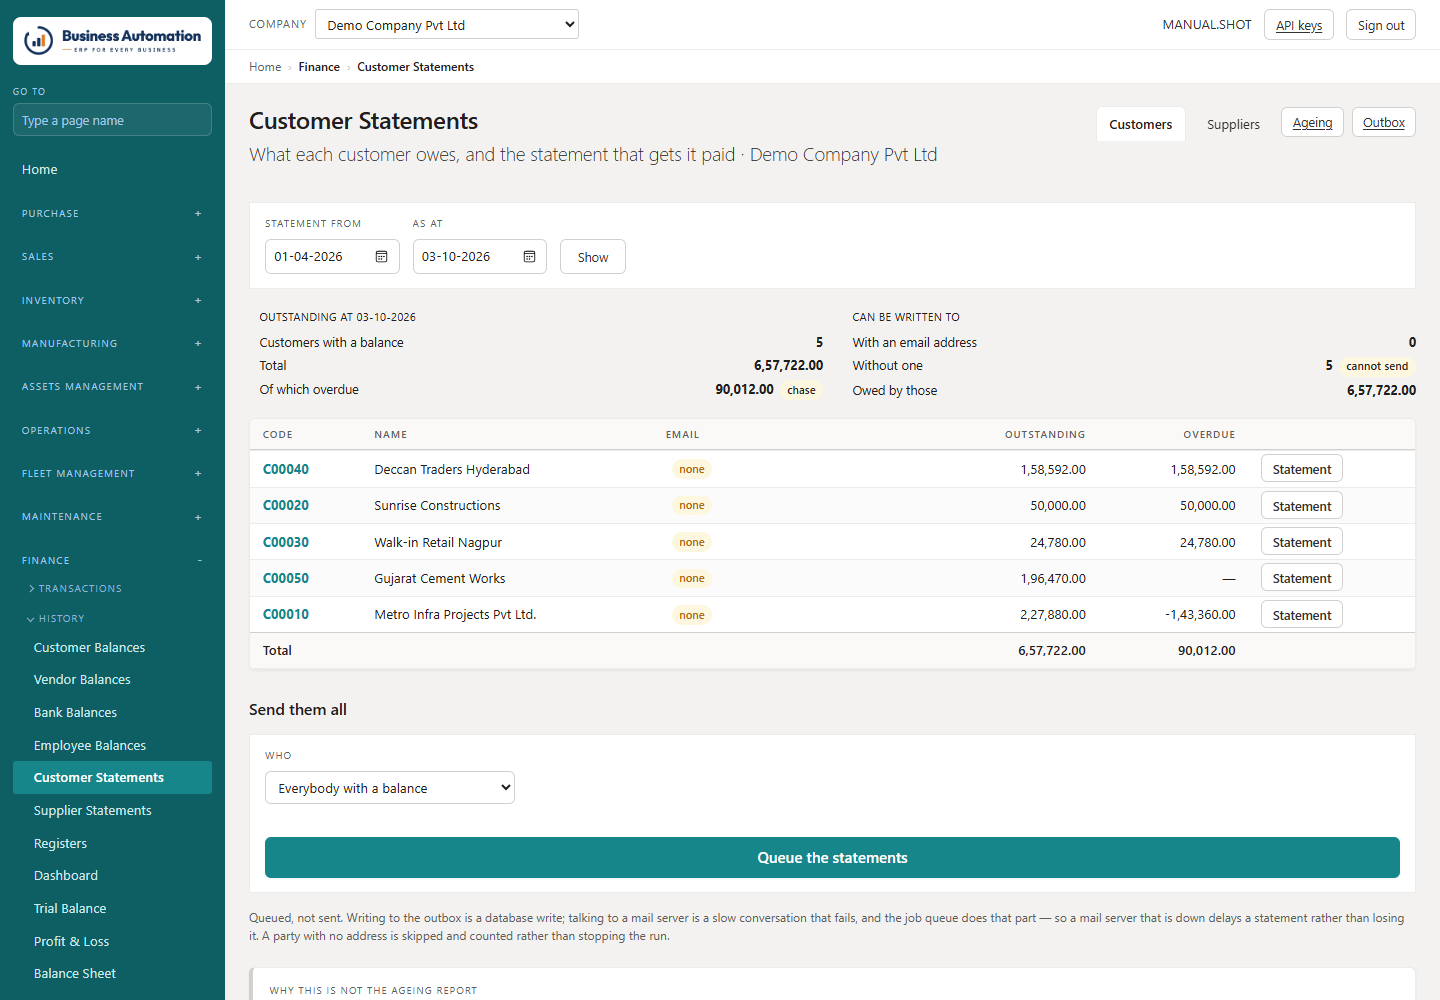
Statements

What a customer owes you, or you owe a supplier, as a running account.

WhereFinance › Customer Statements (/statements/customer) · Supplier Statements (/statements/vendor)
  1. 1
    Choose the party and the period.
  2. 2
    Press PDF to download, or e-mail it — the PDF goes as an attachment.
Business Automation
Customer statements
Figure 5.10 Customer statements
ℹ
Note. A customer's statement becomes a payment reminder and then a final notice by itself once the oldest unpaid invoice is late enough (days and interest set in Sales Setup).

GST returns

GSTR-1, GSTR-3B and the 2B reconciliation, per registration.

WhereFinance › GSTR-1 (/gst/gstr1) · GSTR-3B (/gst/gstr3b) · GSTR-2B Reconciliation (/gst/gstr2b)
  1. 1
    Choose the Registration and the month, and press Show.
  2. 2
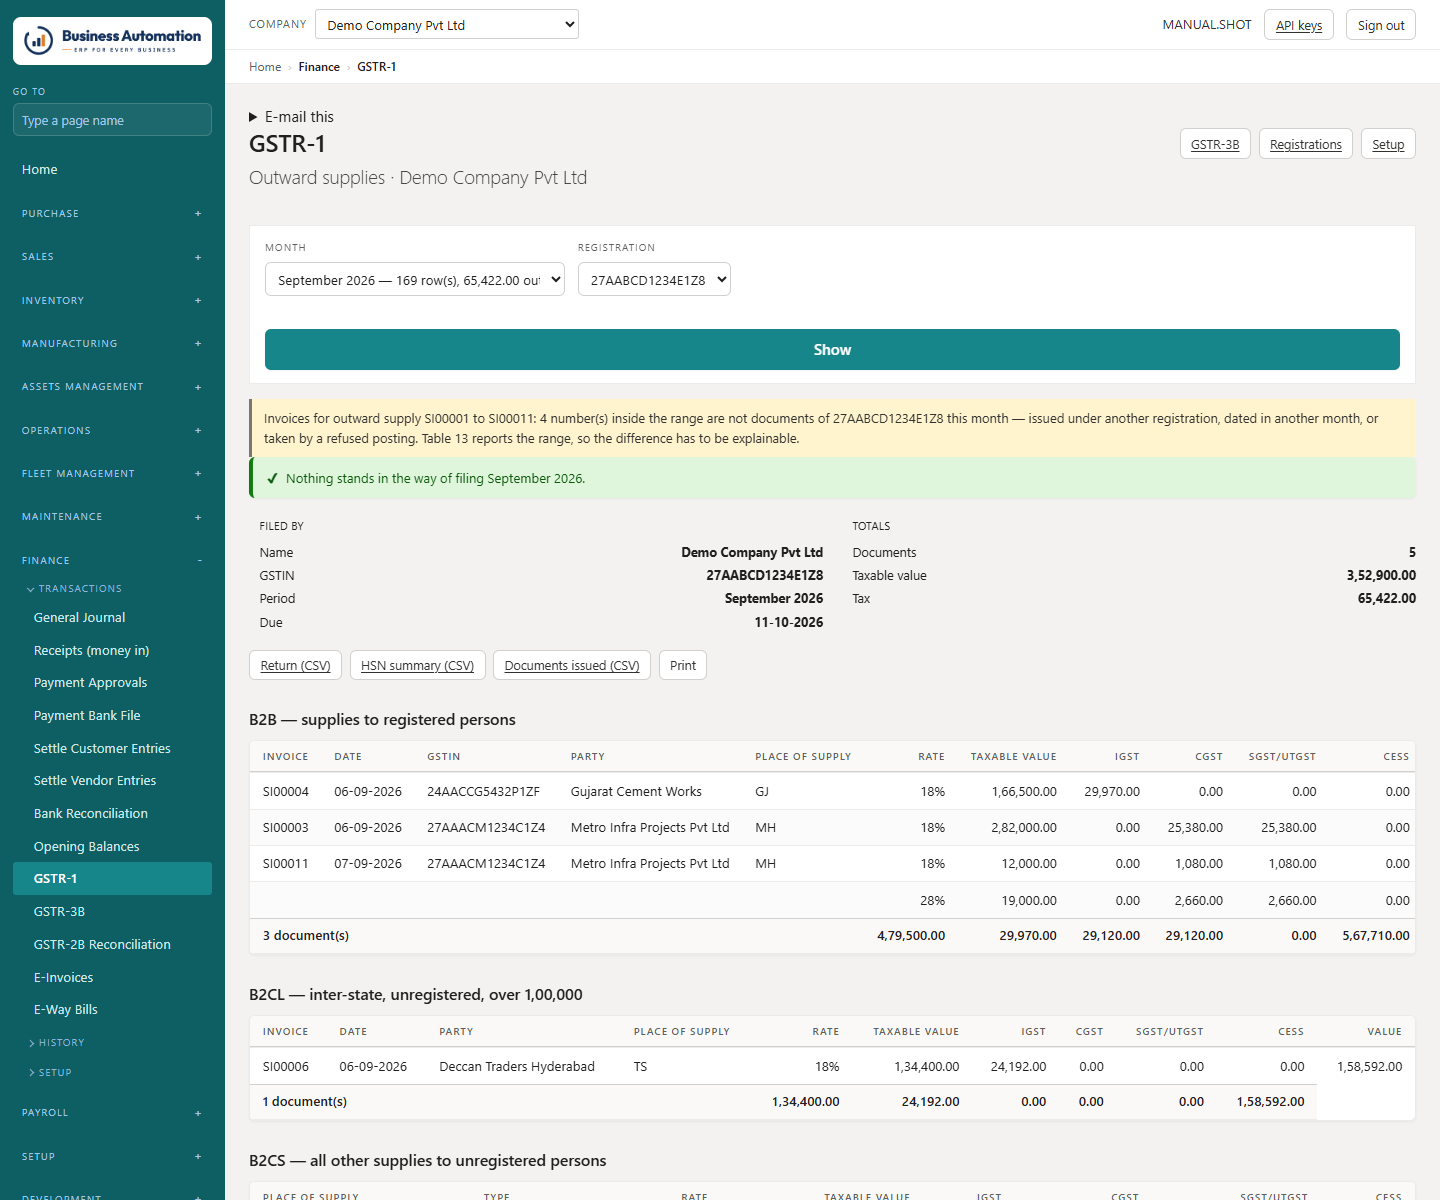
    On GSTR-1, check the HSN summary units (NOS, KGS, LTR…) and 13 — Documents issued. Export with Documents issued (CSV).
  3. 3
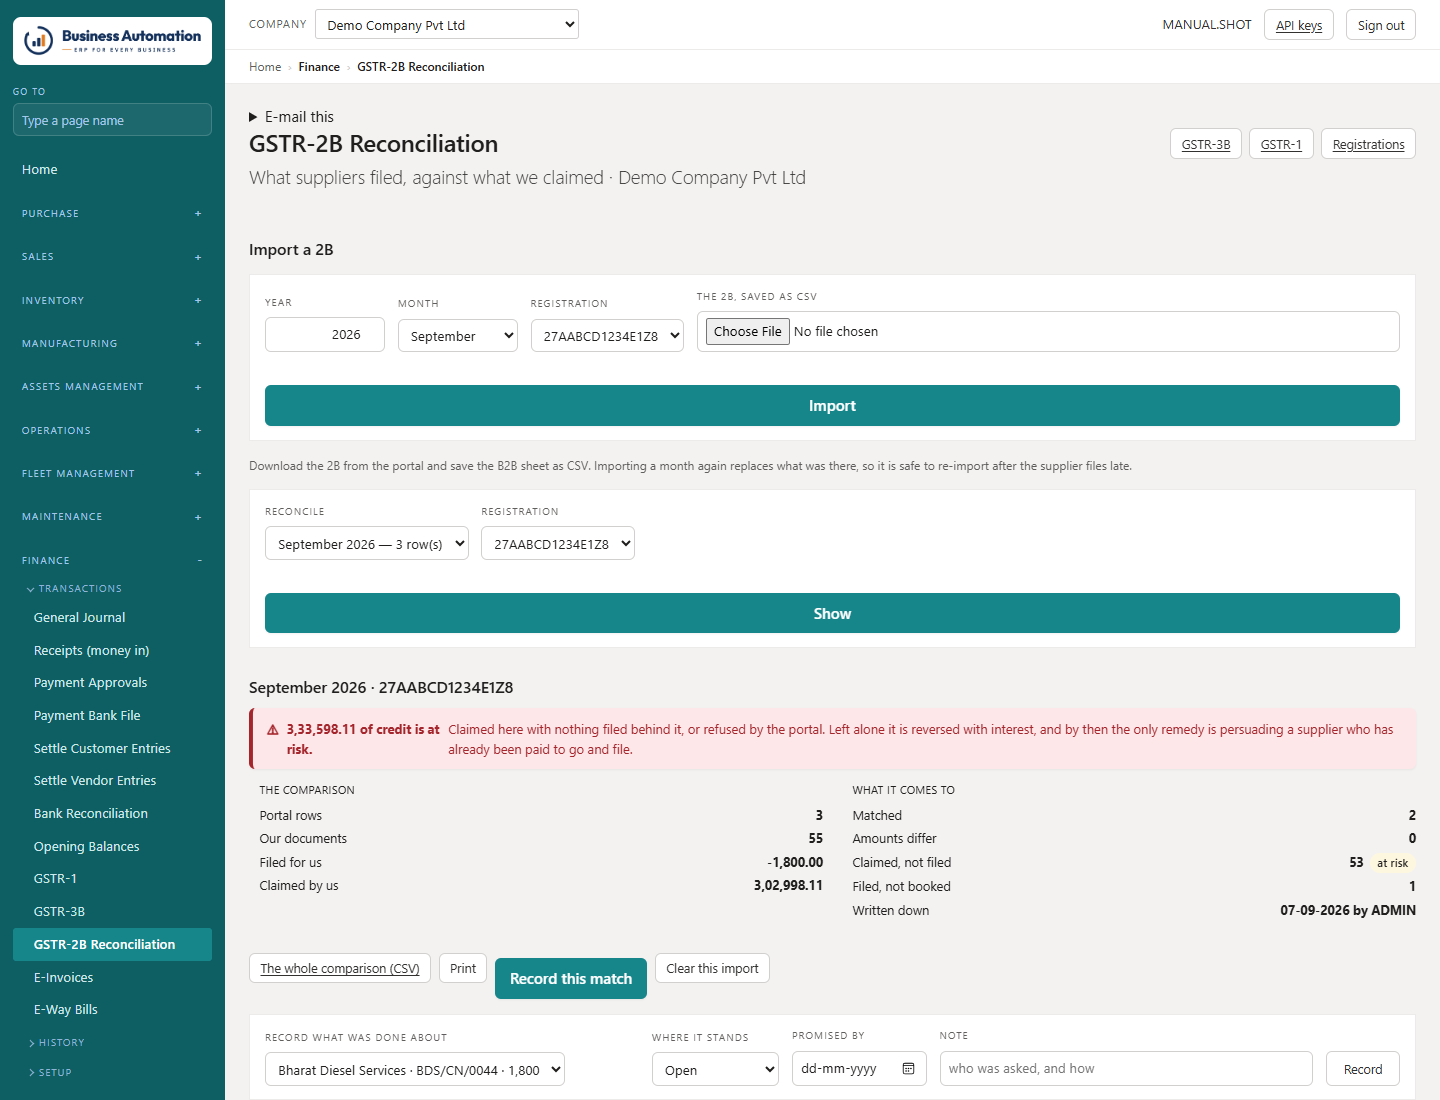
    On GSTR-2B Reconciliation, import the month's 2B and work the differences. For each, Record what was done — chased, promised, resolved, or credit reversed.
Business Automation
GSTR-1
Figure 5.11 GSTR-1
Business Automation
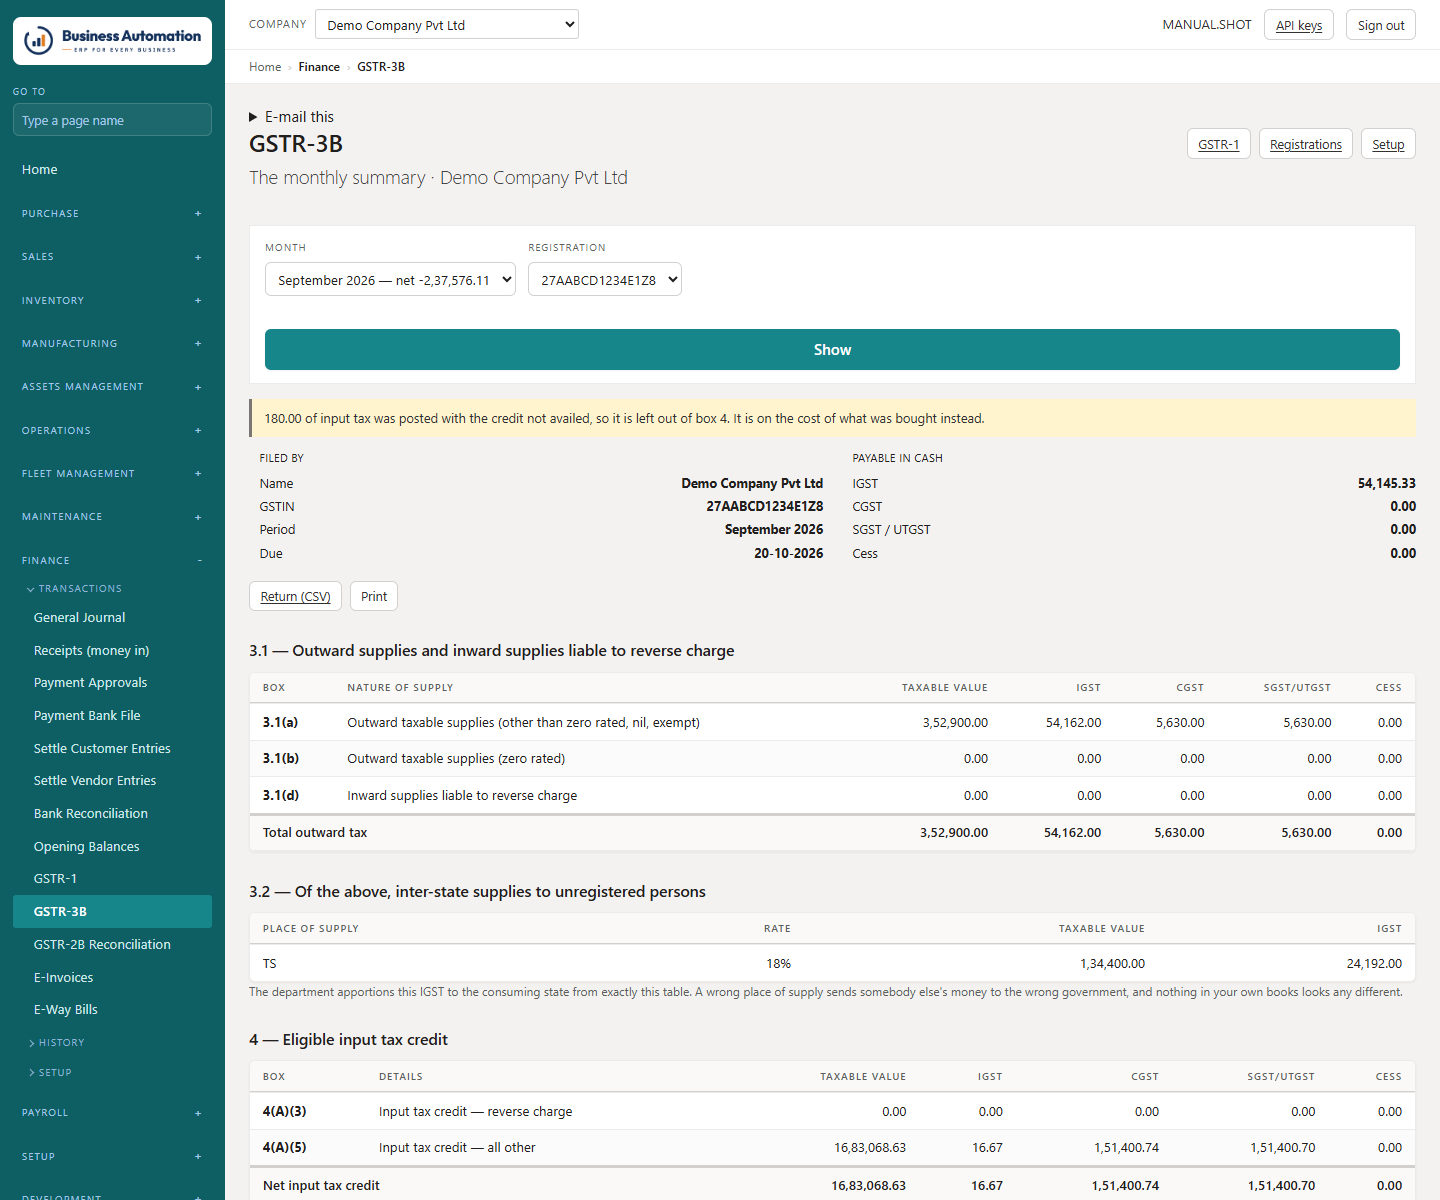
GSTR-3B
Figure 5.12 GSTR-3B
Business Automation
GSTR-2B reconciliation
Figure 5.13 GSTR-2B reconciliation
💡
Tip. A bill you took credit for that the supplier never filed is credit you will lose. Work the 2B differences monthly, not at year end.

Closing a period and a year

Stop further posting into an agreed month, and carry the year's profit to equity.

WhereFinance › Accounting Periods (/accounting/periods) · Financial Years (/accounting/years)
  1. 1
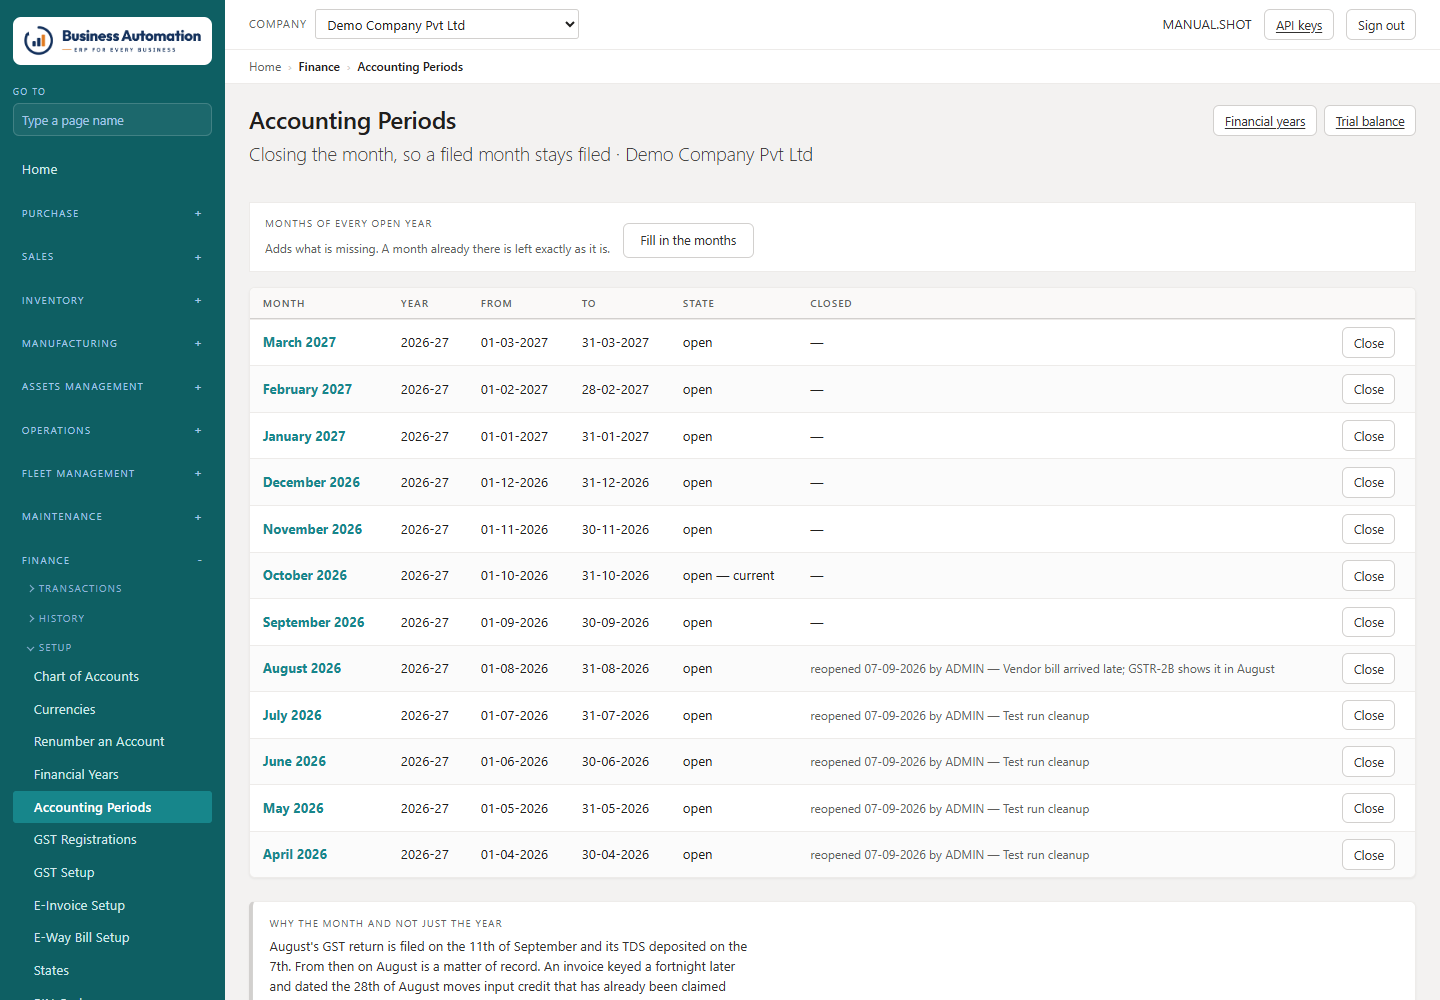
    On Accounting Periods, close a month once it is agreed. Click a month's name to see its trial balance. It can be reopened, deliberately.
  2. 2
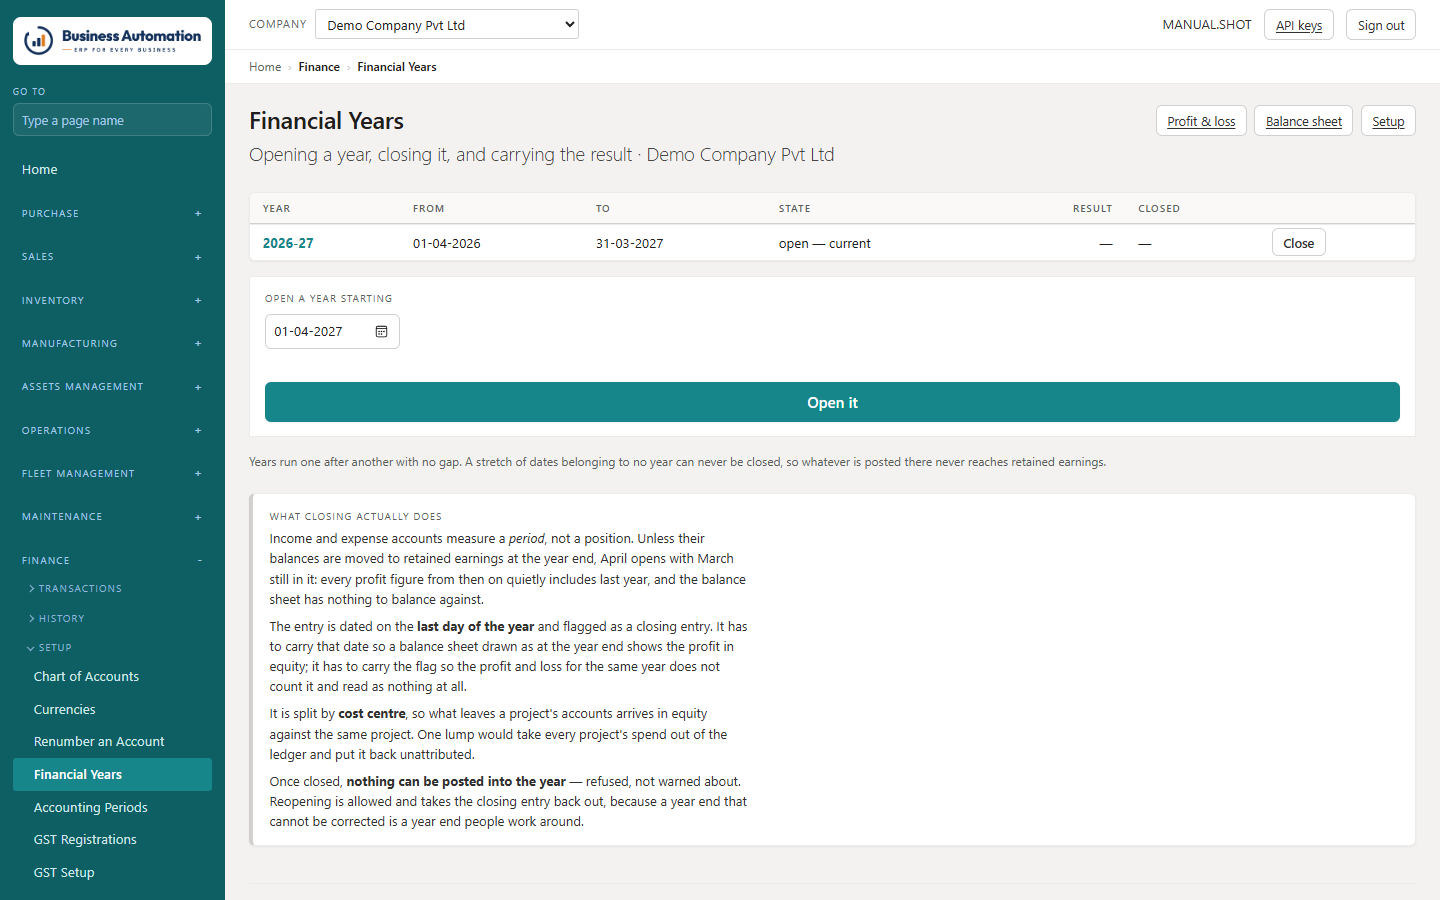
    On Financial Years, close the year. The closing entry is dated on the last day of the year and carries income and expense to retained earnings.
Business Automation
Accounting periods
Figure 5.14 Accounting periods
Business Automation
Financial years
Figure 5.15 Financial years
⚠
Important. After a year is closed, nothing may be posted into it.

Opening a new company's books

Bring in the trial balance, open invoices, open bills, stock and assets.

WhereFinance › Opening Balances (/opening)
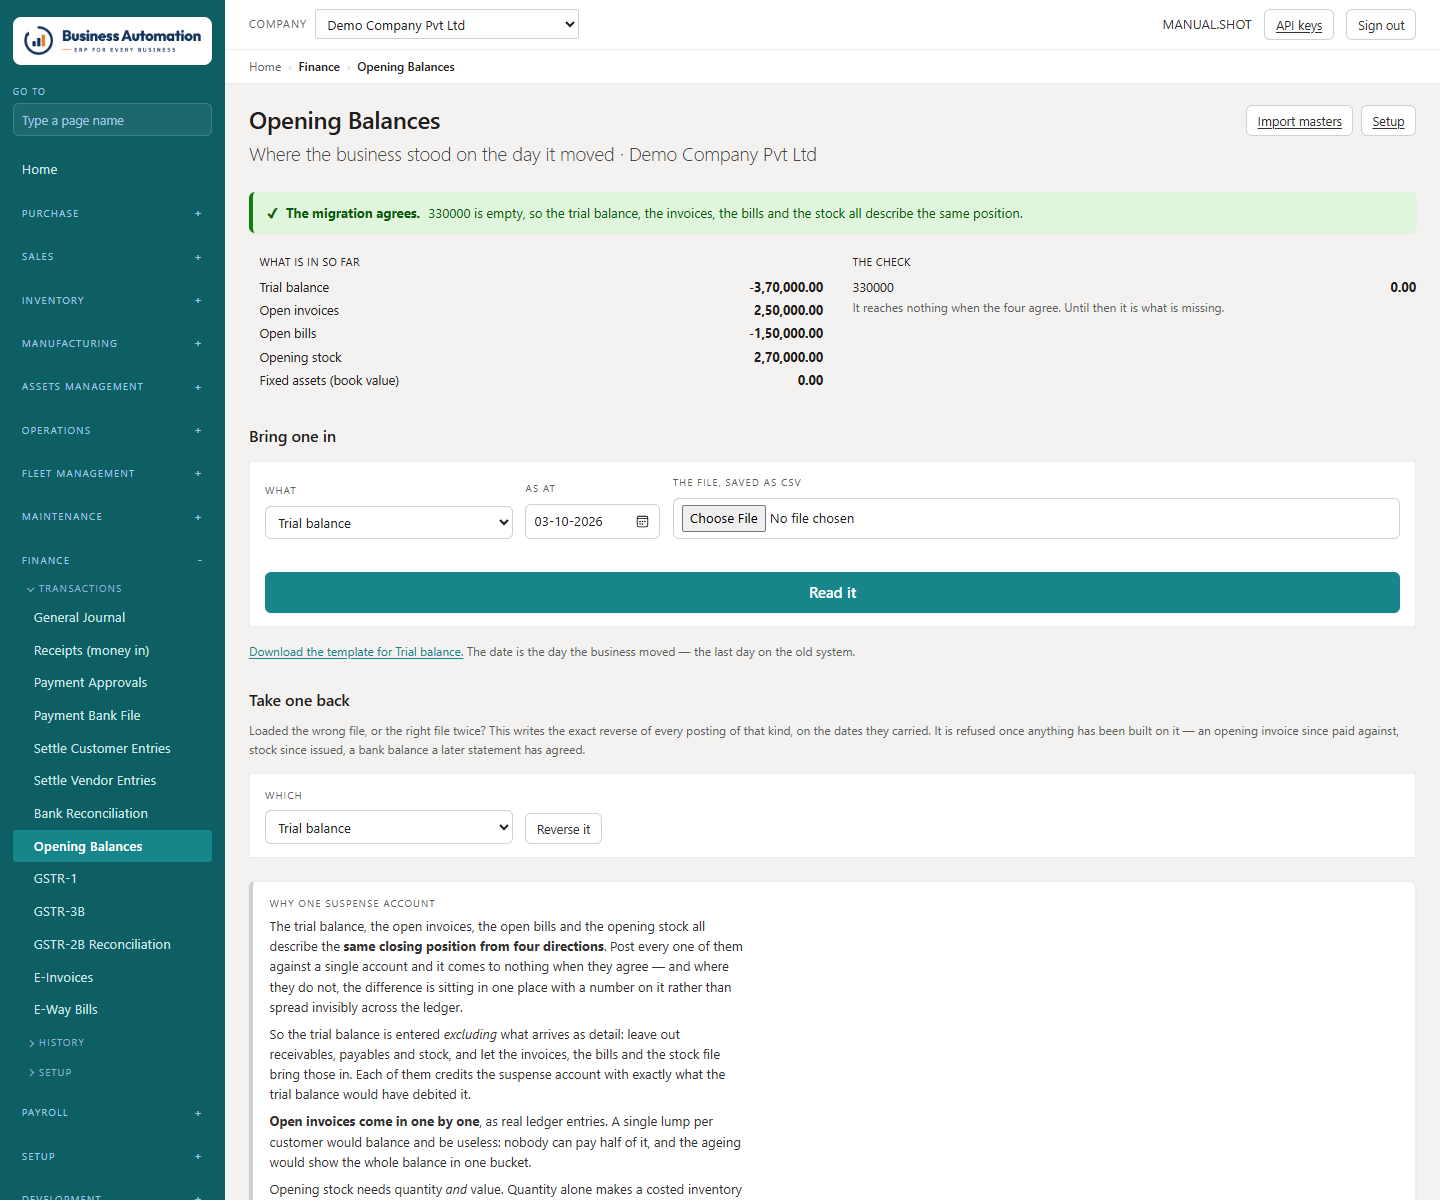
  1. 1
    Load each file: trial balance, receivables, payables, stock, fixed assets.
  2. 2
    Check the preview and post. One suspense account proves the lot agrees — while it holds a balance, something is missing.
  3. 3
    Loaded the wrong file? Take one back reverses every posting of that kind (refused once used).
Business Automation
Opening balances
Figure 5.16 Opening balances

Fixed assets

The asset register, depreciation, covers and the annual schedule.

WhereAssets Management › Fixed Assets (/list/AssetList)
  1. 1
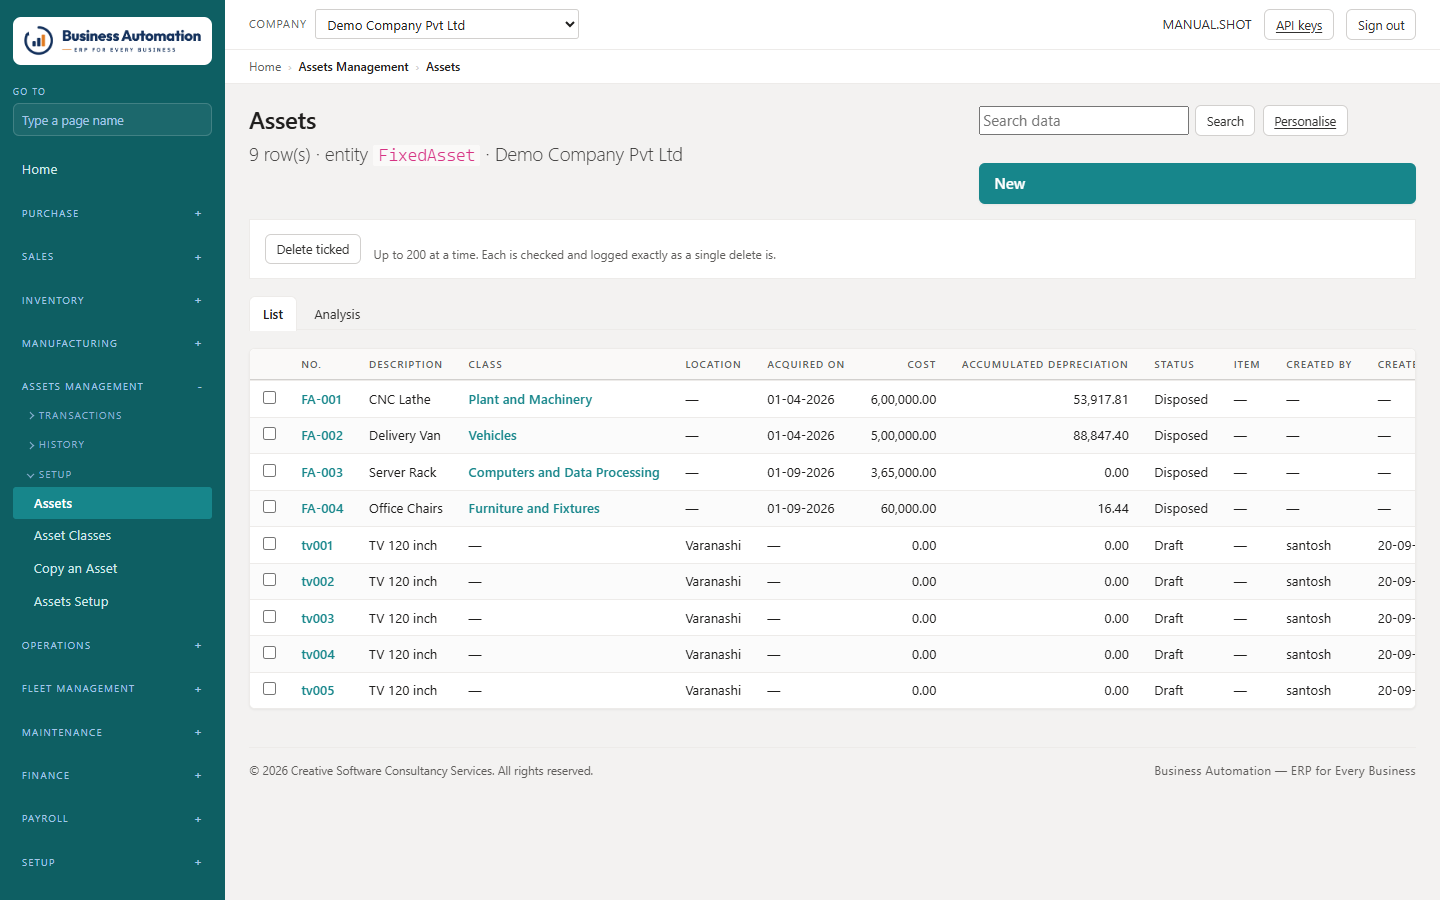
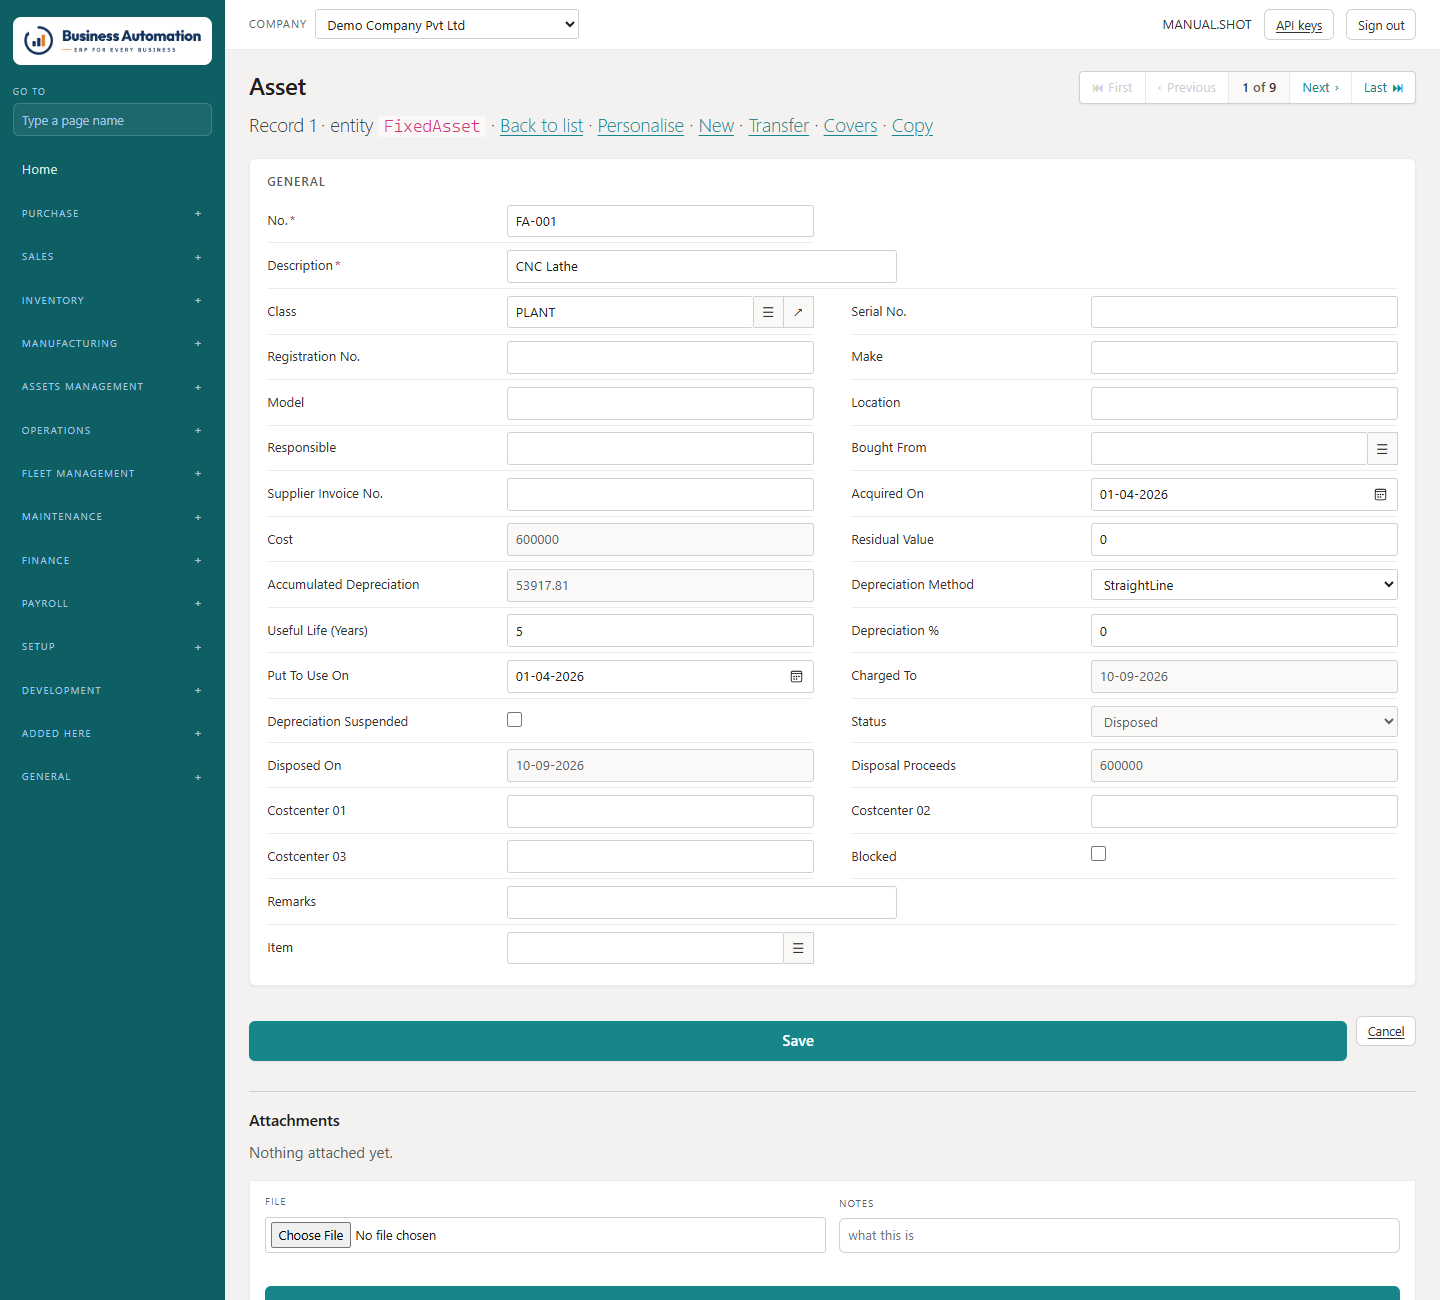
    Create the asset (leave No. blank for the next number), with its class, depreciation method, life, location and cost centres.
  2. 2
    Acquire it through the asset journal — that is where its cost is posted.
  3. 3
    Fifty of the same? Set one up and use Copy an Asset: say how many, type the serial numbers, Create them.
  4. 4
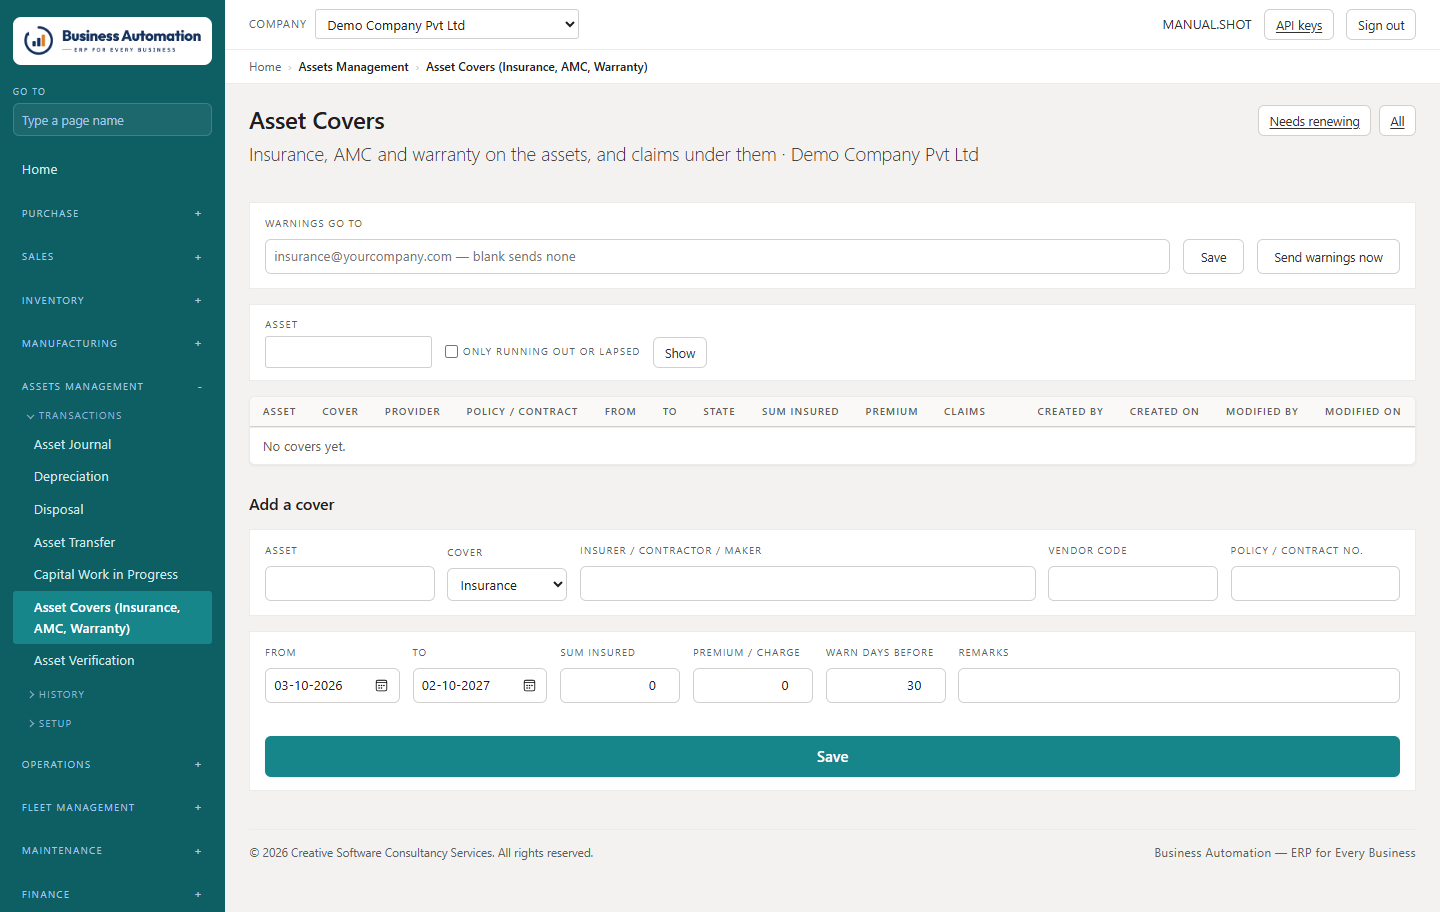
    Move it with Asset Transfer; insure it under Asset Covers (green in force, amber running out, red lapsed).
  5. 5
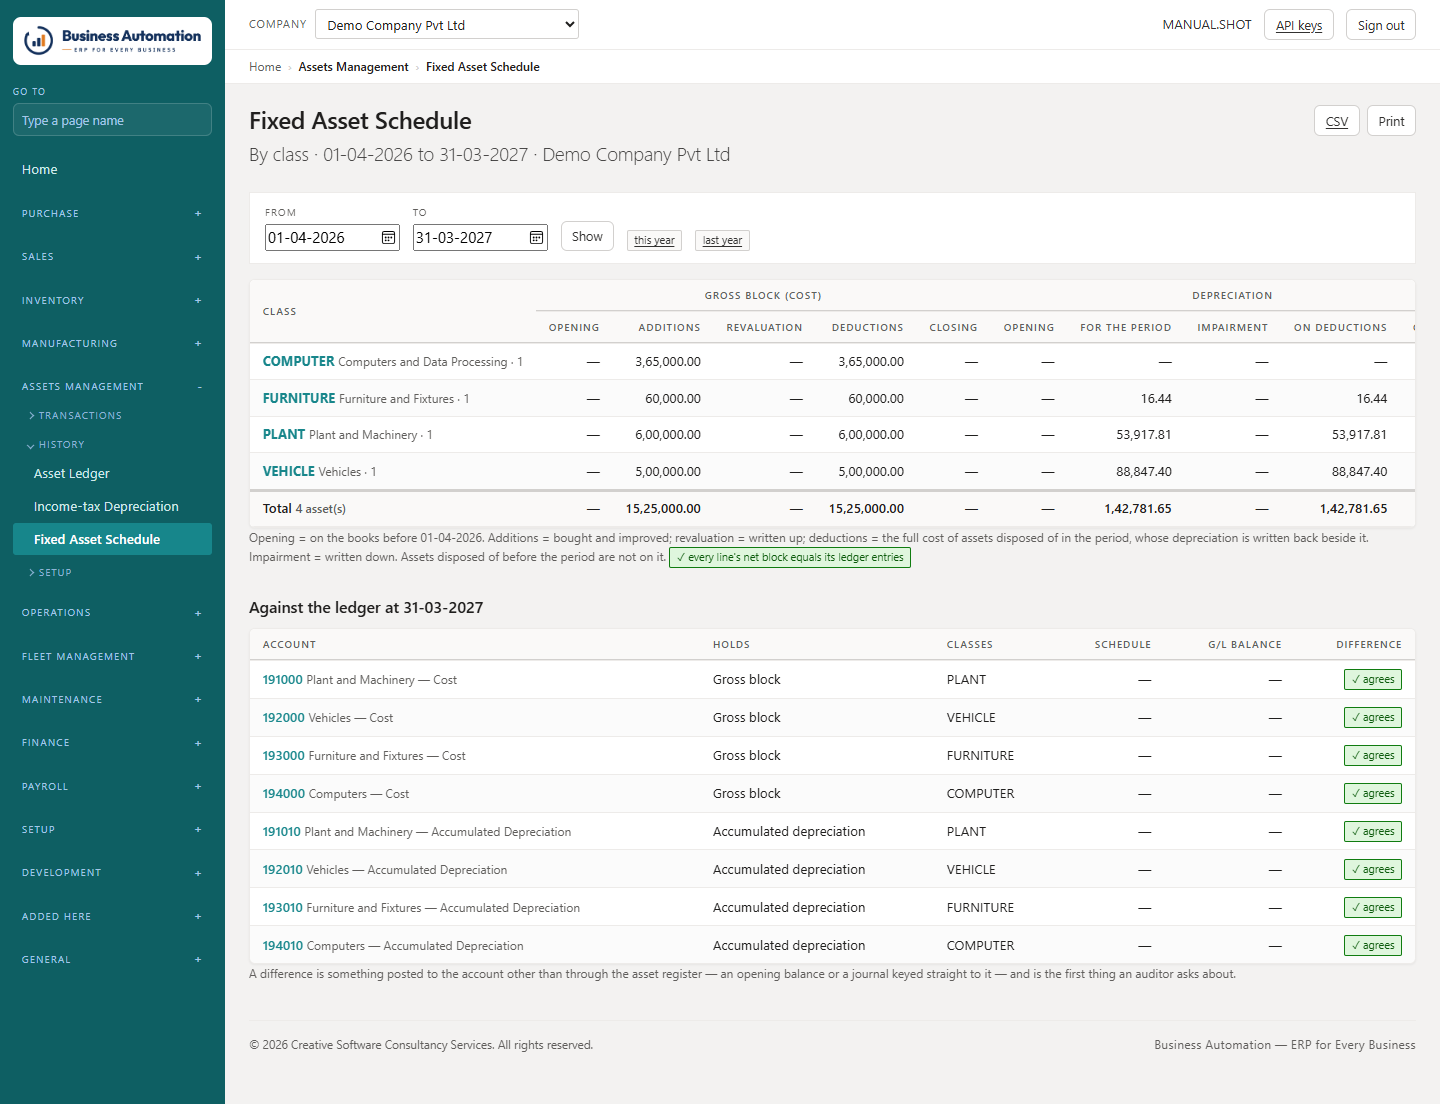
    At year end, Fixed Asset Schedule gives the note for the accounts, with Against the ledger checking each class.
Business Automation
The fixed asset register
Figure 5.17 The fixed asset register
Business Automation
An asset card
Figure 5.18 An asset card
Business Automation
The fixed asset schedule
Figure 5.19 The fixed asset schedule
Business Automation
Insurance, AMC and warranty covers
Figure 5.20 Insurance, AMC and warranty covers
  • An item that is really an asset: tick Assets on the item card (it becomes a Service), set Book Value and Asset Group, and press Create assets.

Where stock posts to

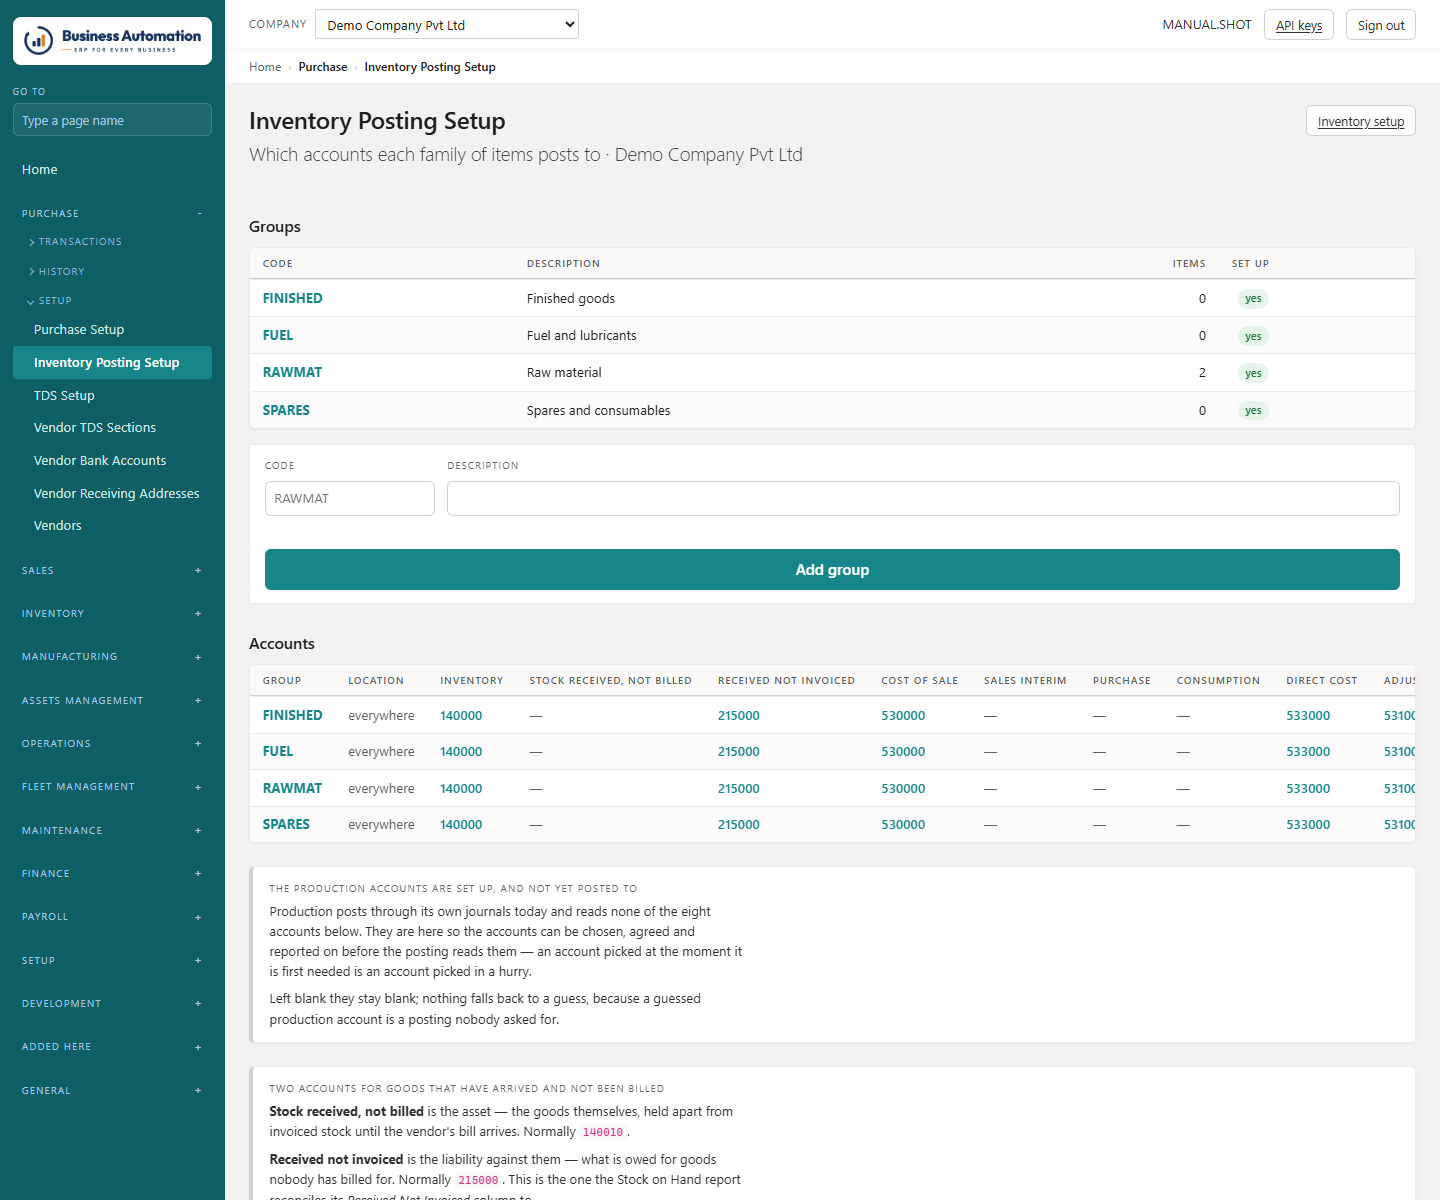
One row per stock group (and optionally per store) naming the accounts stock movements post to.

WhereSetup › Inventory Posting Setup (/setup/inventory-posting)
  1. 1
    Click a row's code to load it into the form, or fill in a new row.
  2. 2
    Fill in every account. Stock received, not billed is the asset; Received not invoiced is the liability.
  3. 3
    Save.
Business Automation
Inventory posting setup
Figure 5.21 Inventory posting setup
What this chapter covers. Setting payroll up, the muster roll, leave, wages and revisions, monthly amounts, salary tax, running and posting the month, and the files for the bank and returns.

The month, in order

The order matters.

Attendance➜Wages➜Run➜Post➜Payslips

Before the first month

Set up the payroll accounts, pay elements and employees.

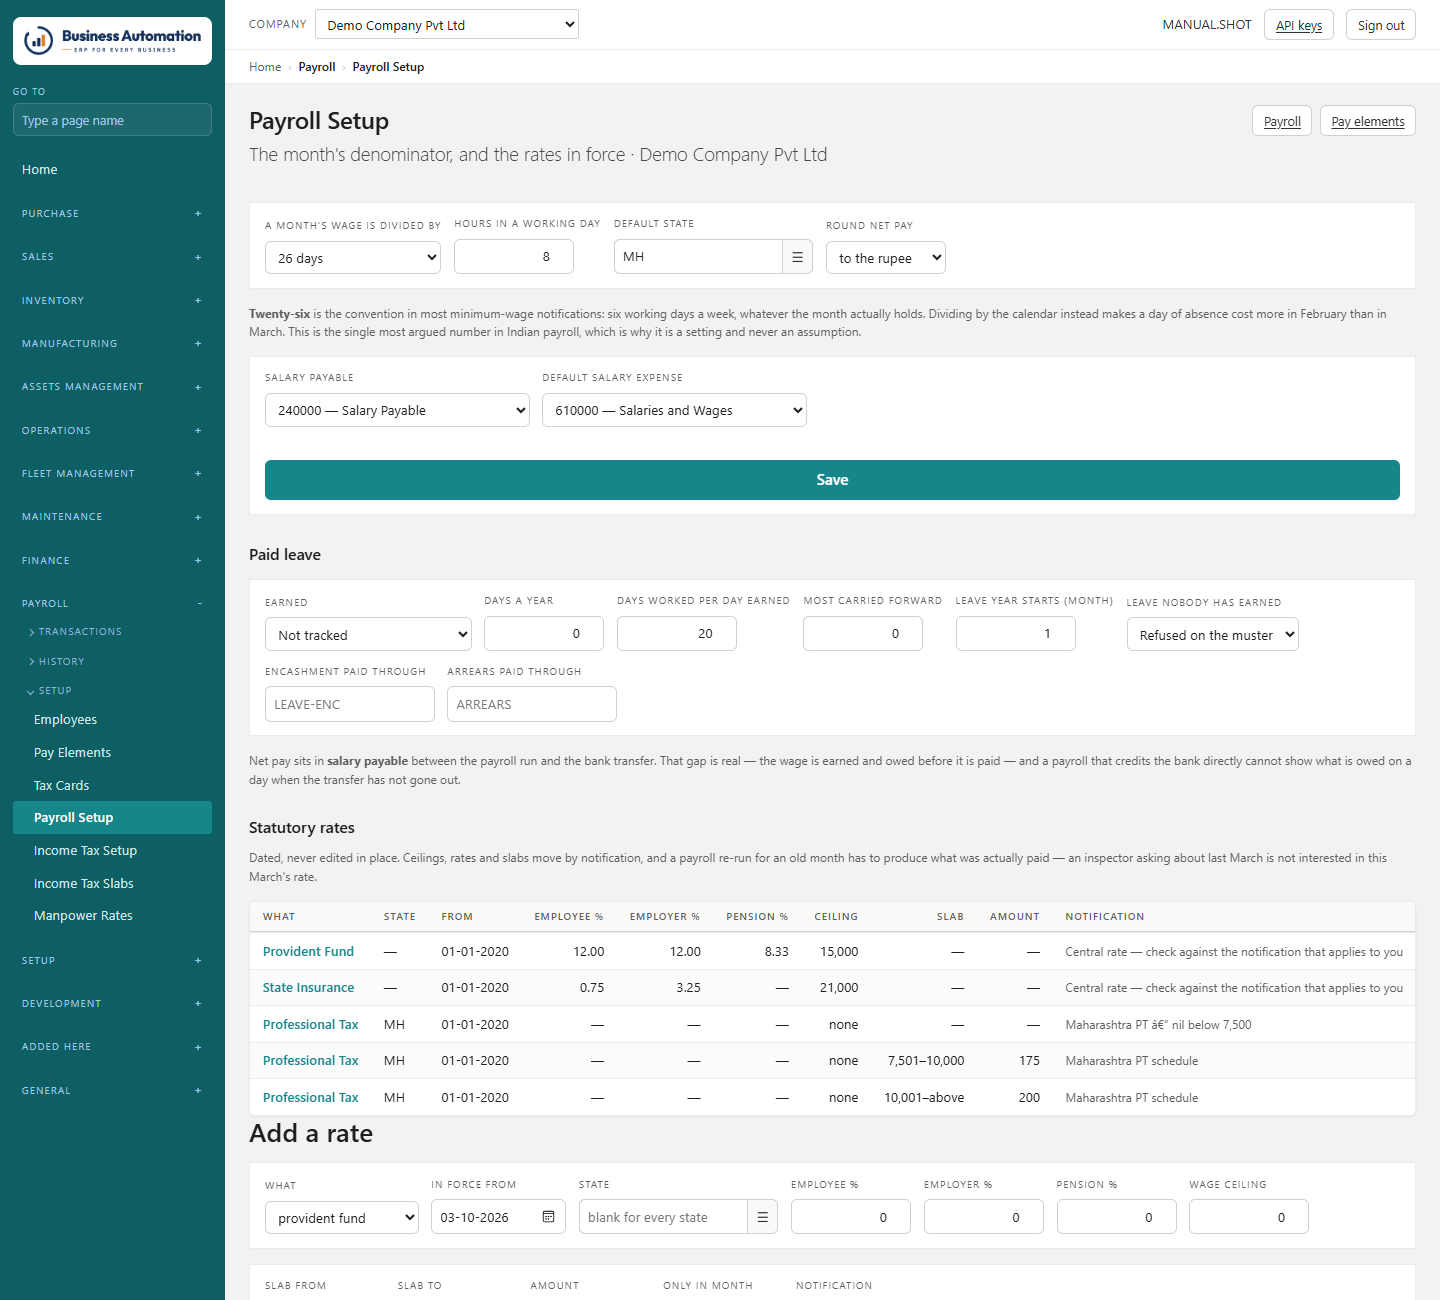
WherePayroll › Payroll Setup (/payroll/setup)
  1. 1
    In Payroll Setup, set the salaries payable and cost accounts, what a month is divided by (calendar days or a fixed number such as 26), hours in a day, the state for professional tax, and how paid leave is earned.
  2. 2
    Check the PF and ESI rates against the current notification (seeded at PF 12%, pension 8.33%, ceiling 15,000; ESI 0.75% / 3.25%, ceiling 21,000).
  3. 3
    Enter professional tax slabs for your state — they are not seeded.
  4. 4
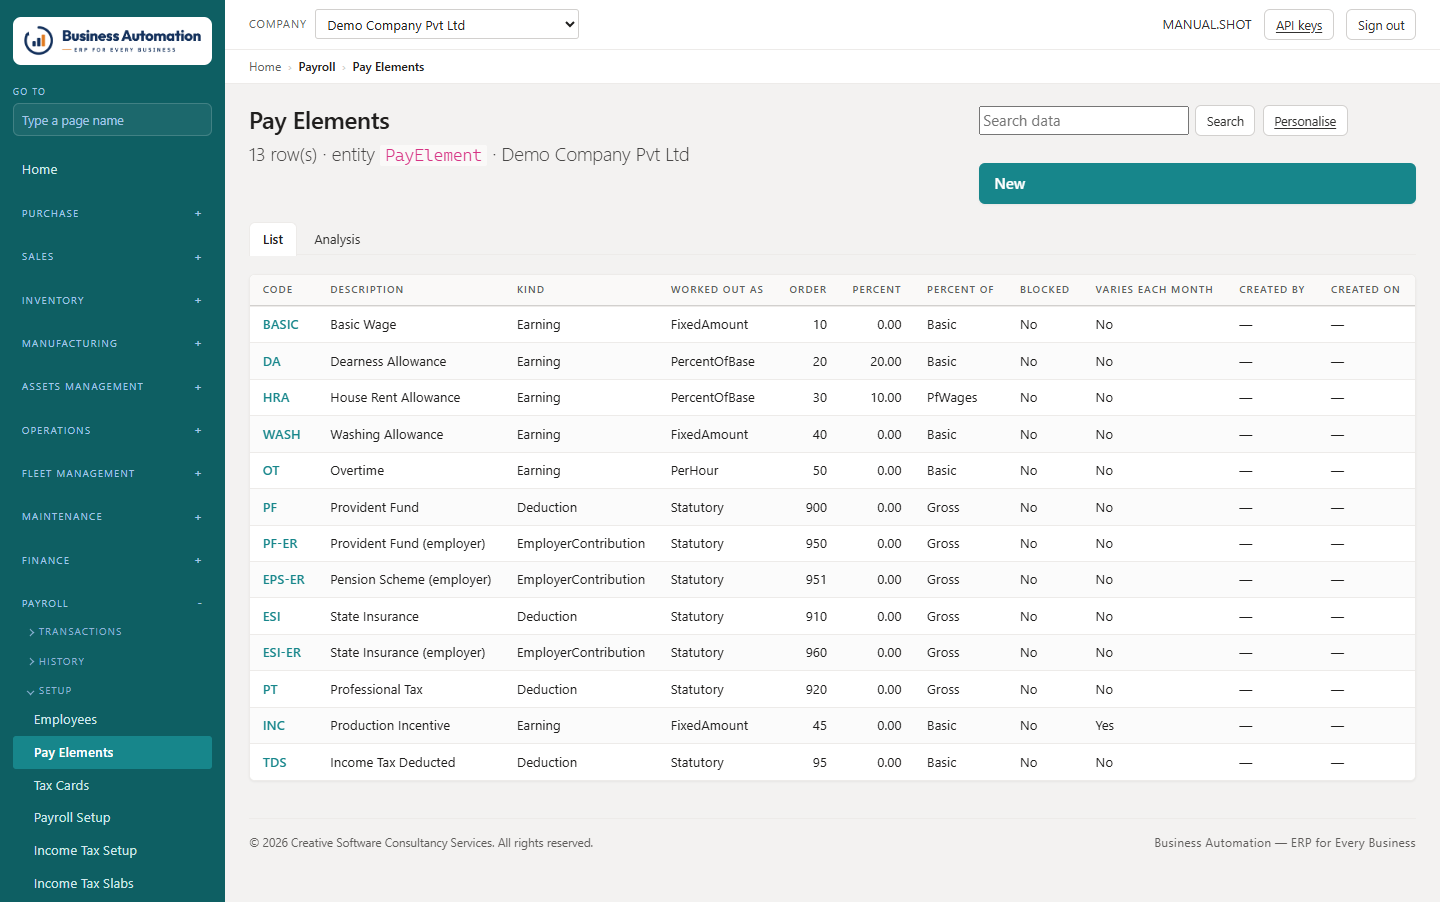
    In Pay Elements, review basic, DA, HRA, allowances and deductions, and whether each counts for PF and ESI.
  5. 5
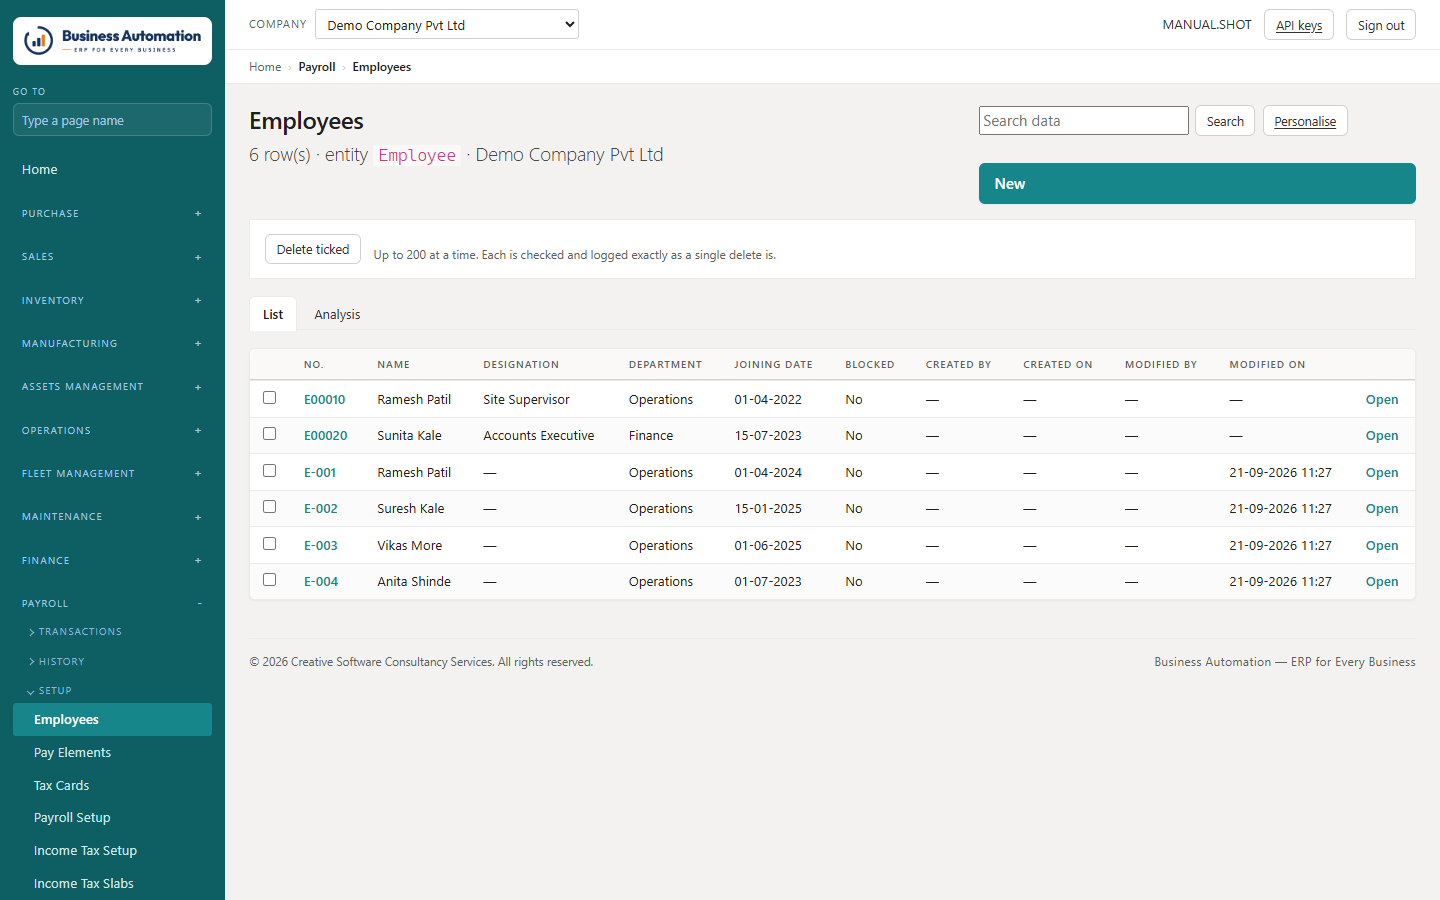
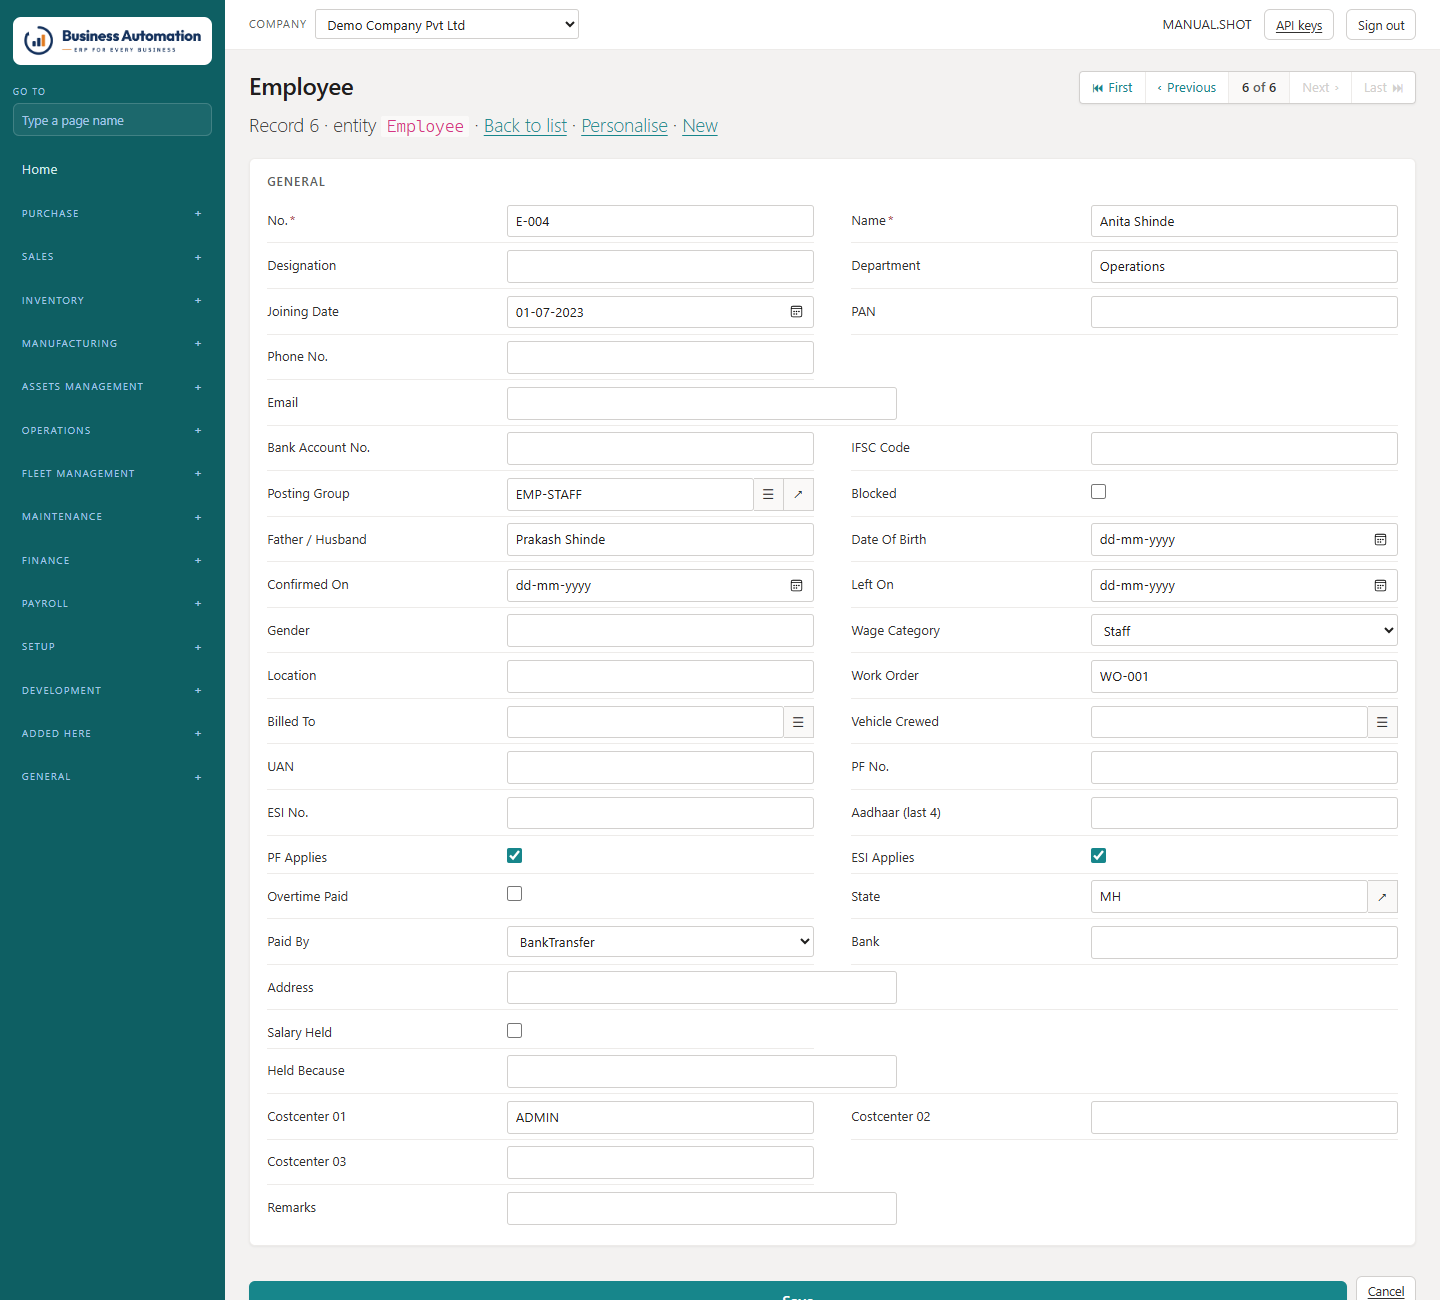
    In Employees, fill each person's joining date, category, bank details, PF/ESI numbers, posting group and pay elements.
Business Automation
Payroll setup
Figure 6.1 Payroll setup
Business Automation
Pay elements
Figure 6.2 Pay elements
Business Automation
Employees
Figure 6.3 Employees
Business Automation
An employee card
Figure 6.4 An employee card

The attendance: muster roll

Mark the month, day by day.

WherePayroll › Muster Roll (/payroll/muster)
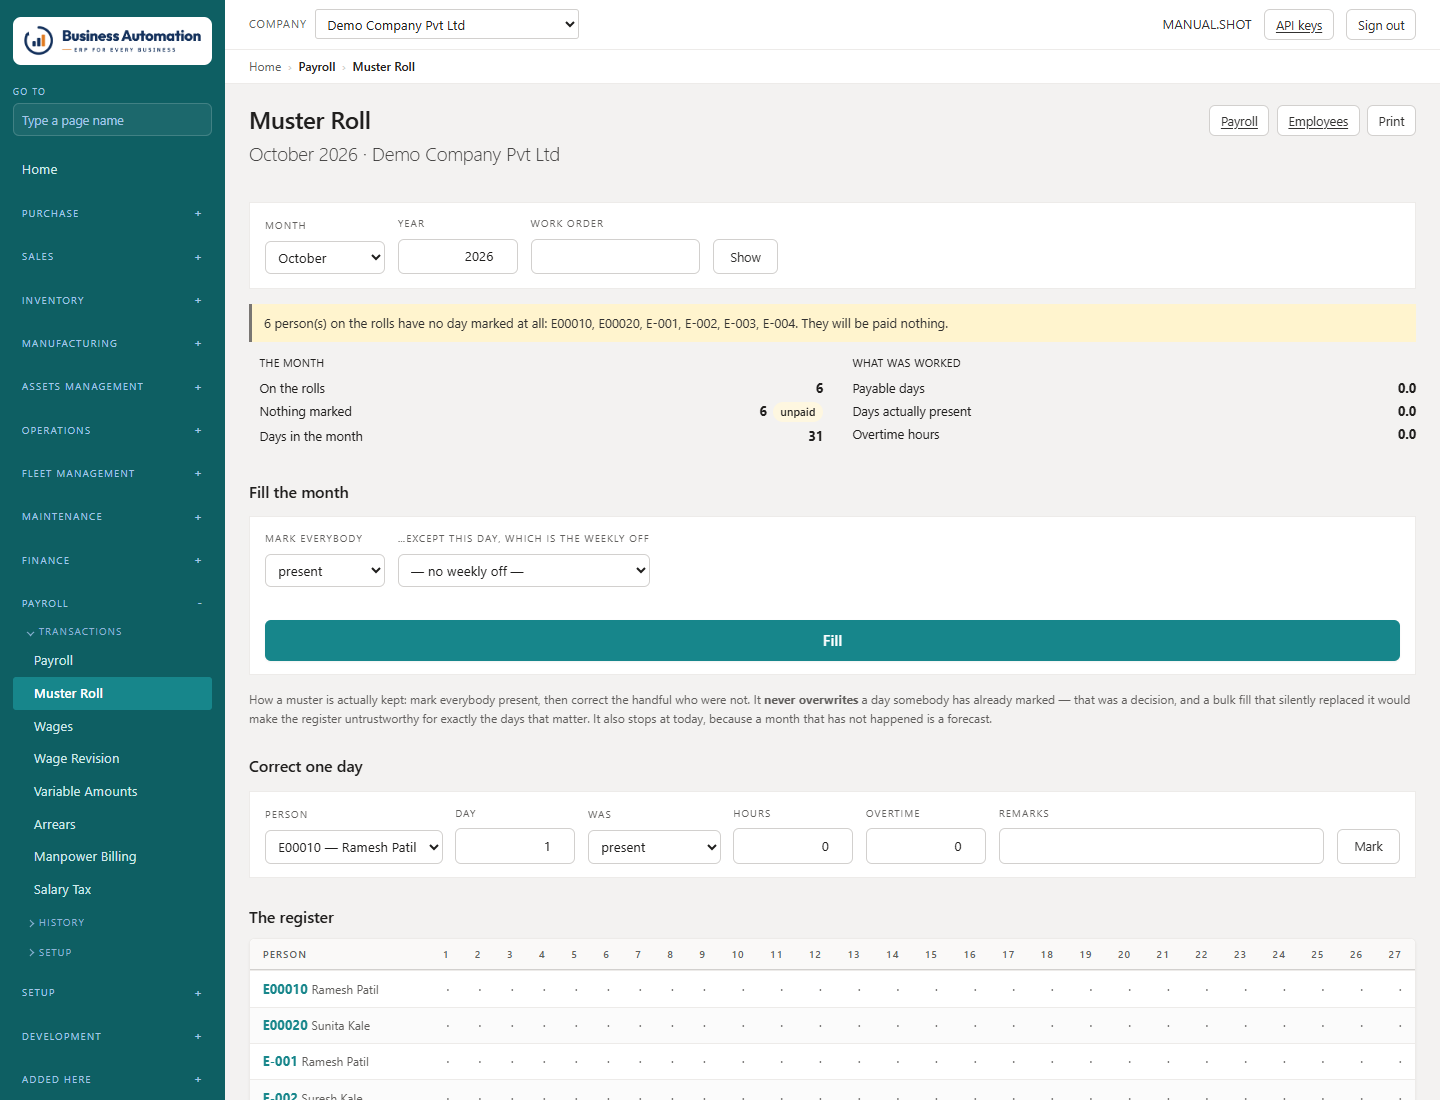
  1. 1
    Choose the month.
  2. 2
    Mark each person's days: present, absent, paid leave, unpaid leave, half day, weekly off.
  3. 3
    Make sure no day is left blank before running the month.
Business Automation
The muster roll
Figure 6.5 The muster roll
⚠
Important. Absent and blank are not the same thing. A blank day is one nobody marked; a month with unmarked days is not ready to run. The muster will not mark paid leave for somebody with less than a day left.
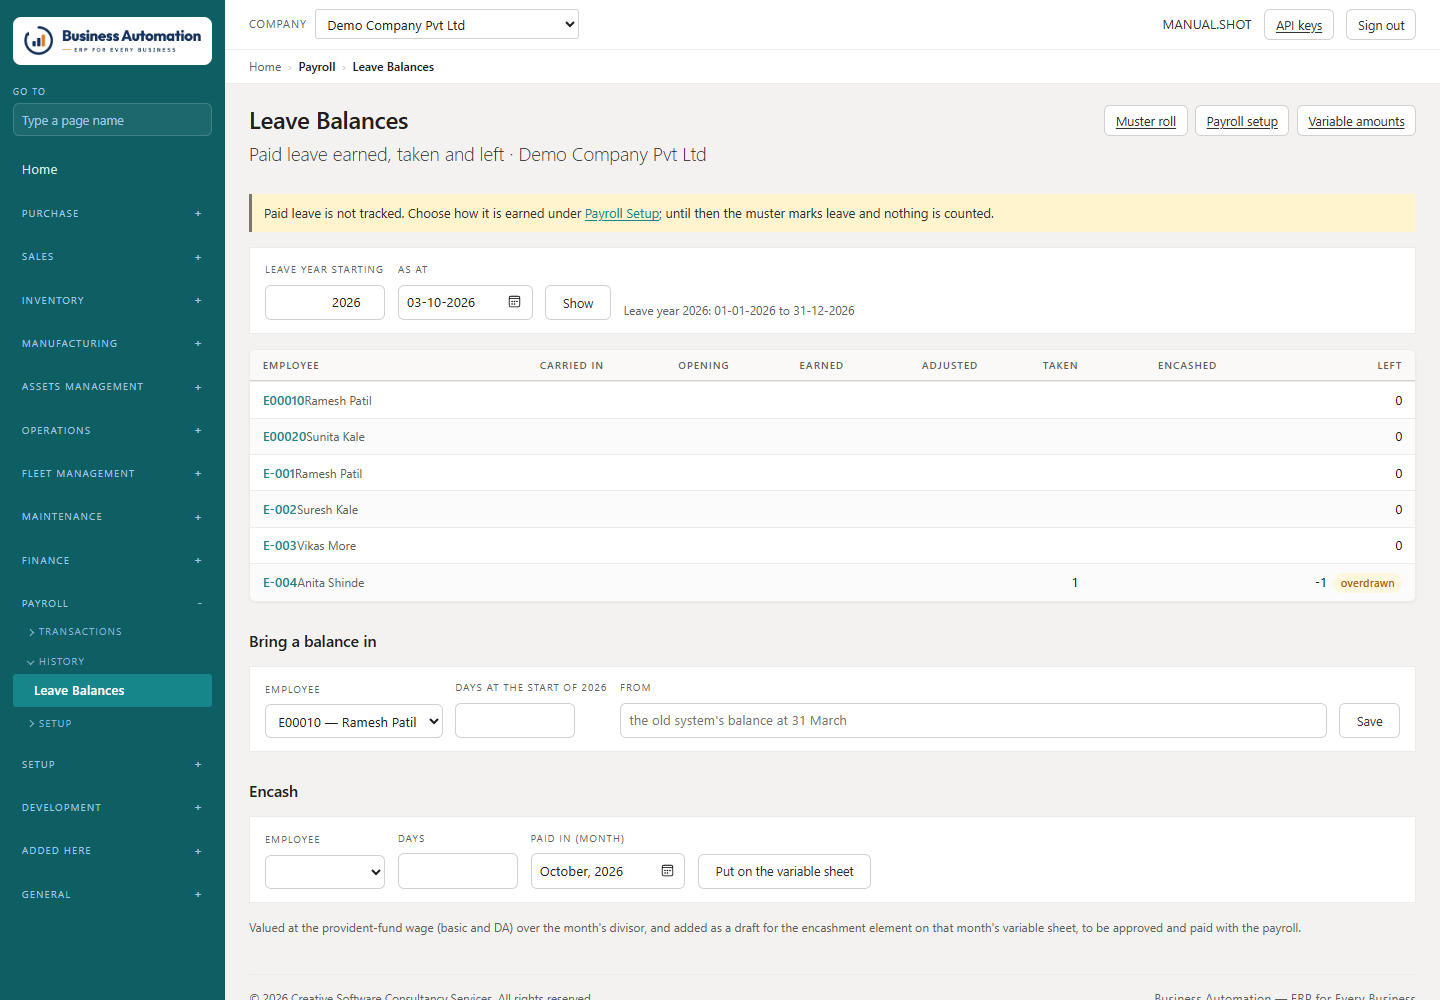
  • Leave Balances shows each person's opening, earned, taken, encashed and left. Enter opening balances under Bring a balance in; Encash puts the amount on that month's variable sheet.
Business Automation
Leave balances
Figure 6.6 Leave balances

Wages and revisions

What each employee is on, with effect from a date.

WherePayroll › Wages (/payroll/wages) · Wage Revision (/payroll/revision)
  1. 1
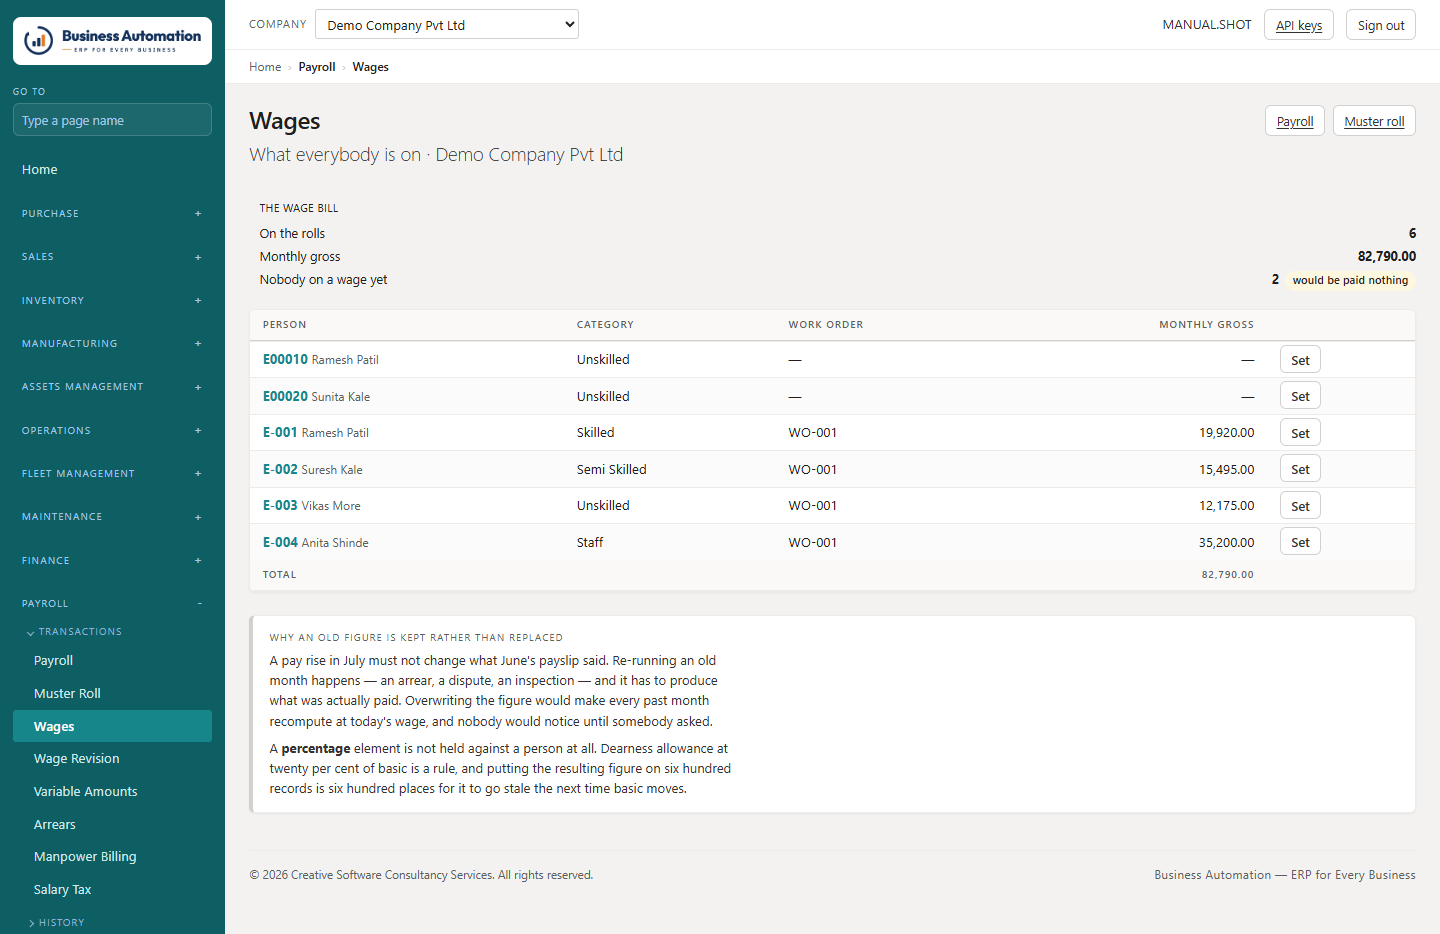
    On Wages, set a person's wage with a from-date. The old rate is closed the day before.
  2. 2
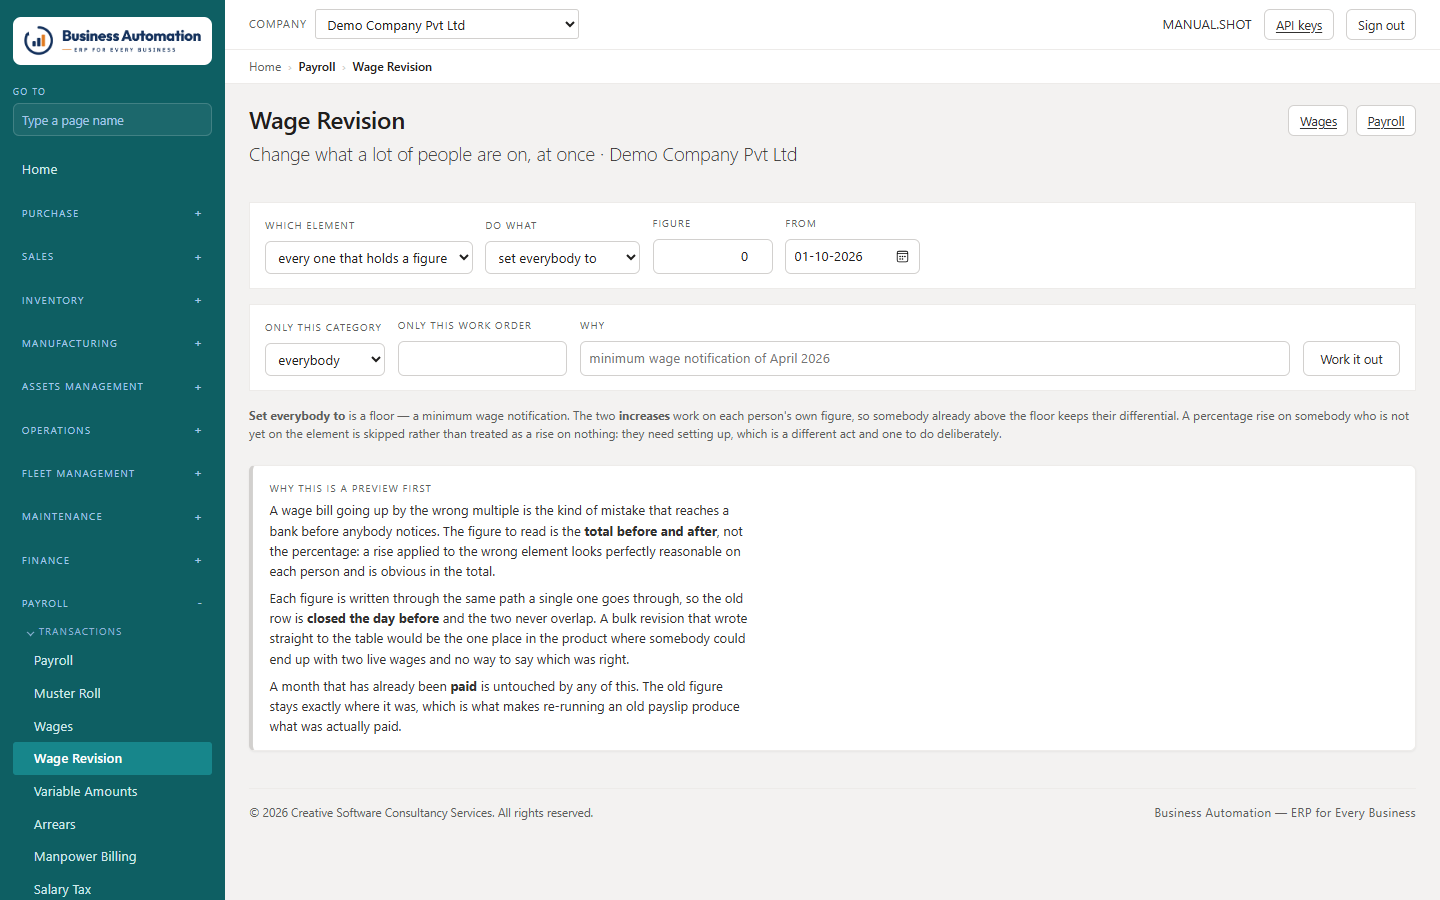
    For a rise for many: on Wage Revision choose who (everybody, a category, a department), how (amount, percentage, or increase by an amount) and the date.
  3. 3
    Press Preview and read the old and new figures for every employee.
  4. 4
    Apply.
Business Automation
Wages
Figure 6.7 Wages
Business Automation
Wage revision with its preview
Figure 6.8 Wage revision with its preview
💡
Tip. The preview is the point: 110% typed instead of 10% is obvious in the list and invisible in a confirmation box. For back-dated revisions use Payroll › Arrears.

Amounts that change every month

Overtime, incentive, advance instalments — entered fresh each month.

WherePayroll › Variable Amounts (/payroll/variables)
  1. 1
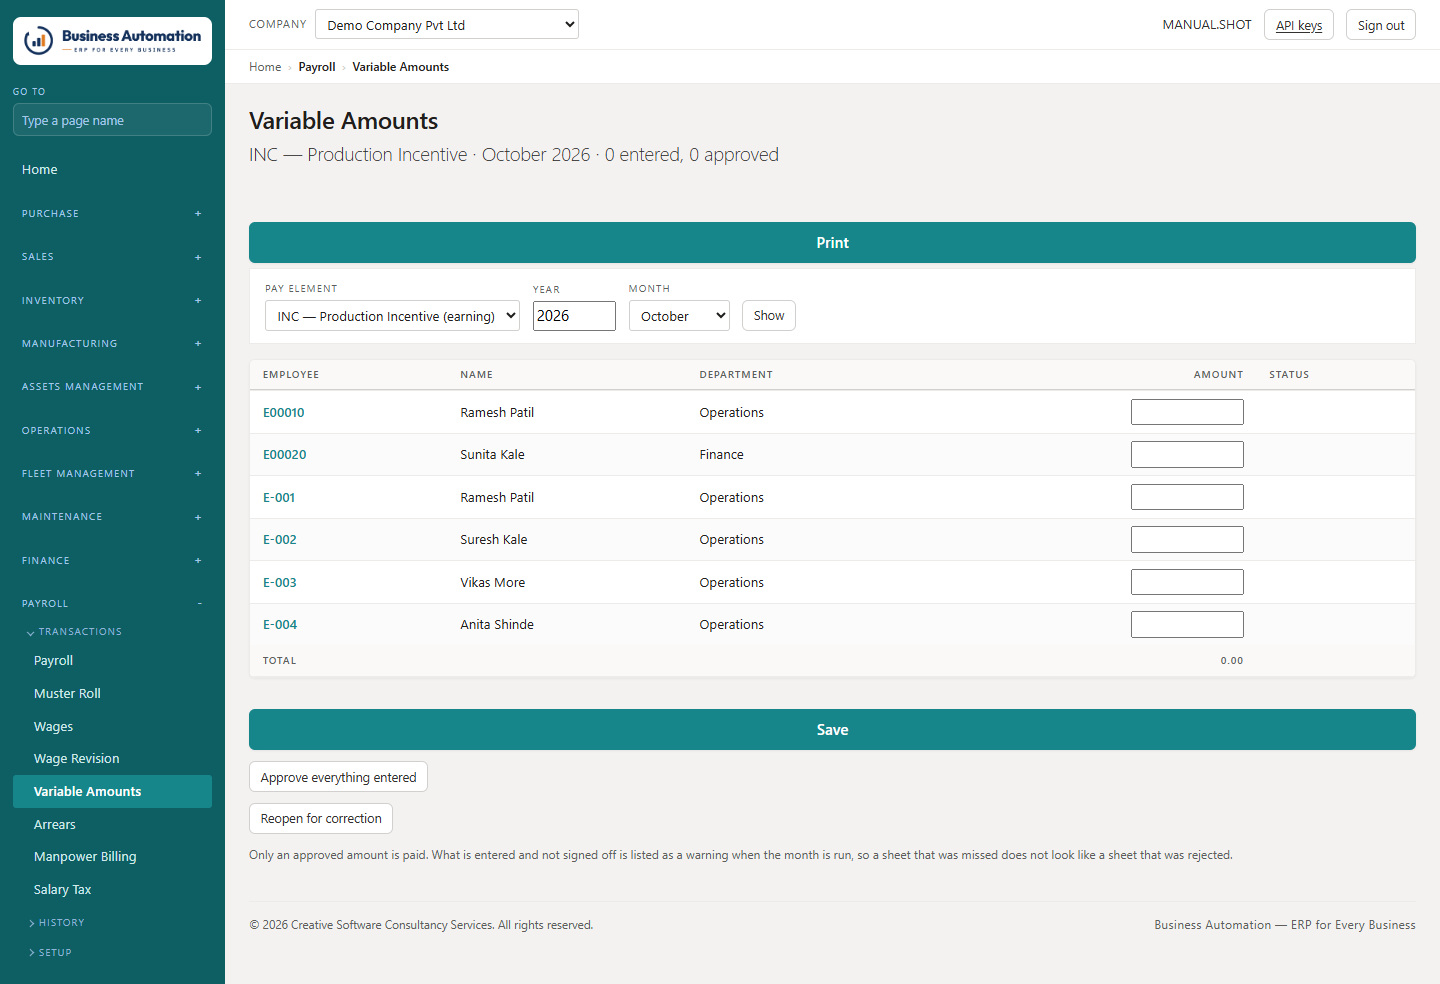
    Choose the pay element and the month.
  2. 2
    Type the amounts against the people; leave the rest blank (blank means nought).
  3. 3
    Press Save.
  4. 4
    When checked, press Approve everything entered. Only approved amounts are paid.
Business Automation
Variable amounts
Figure 6.9 Variable amounts

Income tax on salaries

Tax cards, declarations and the full computation.

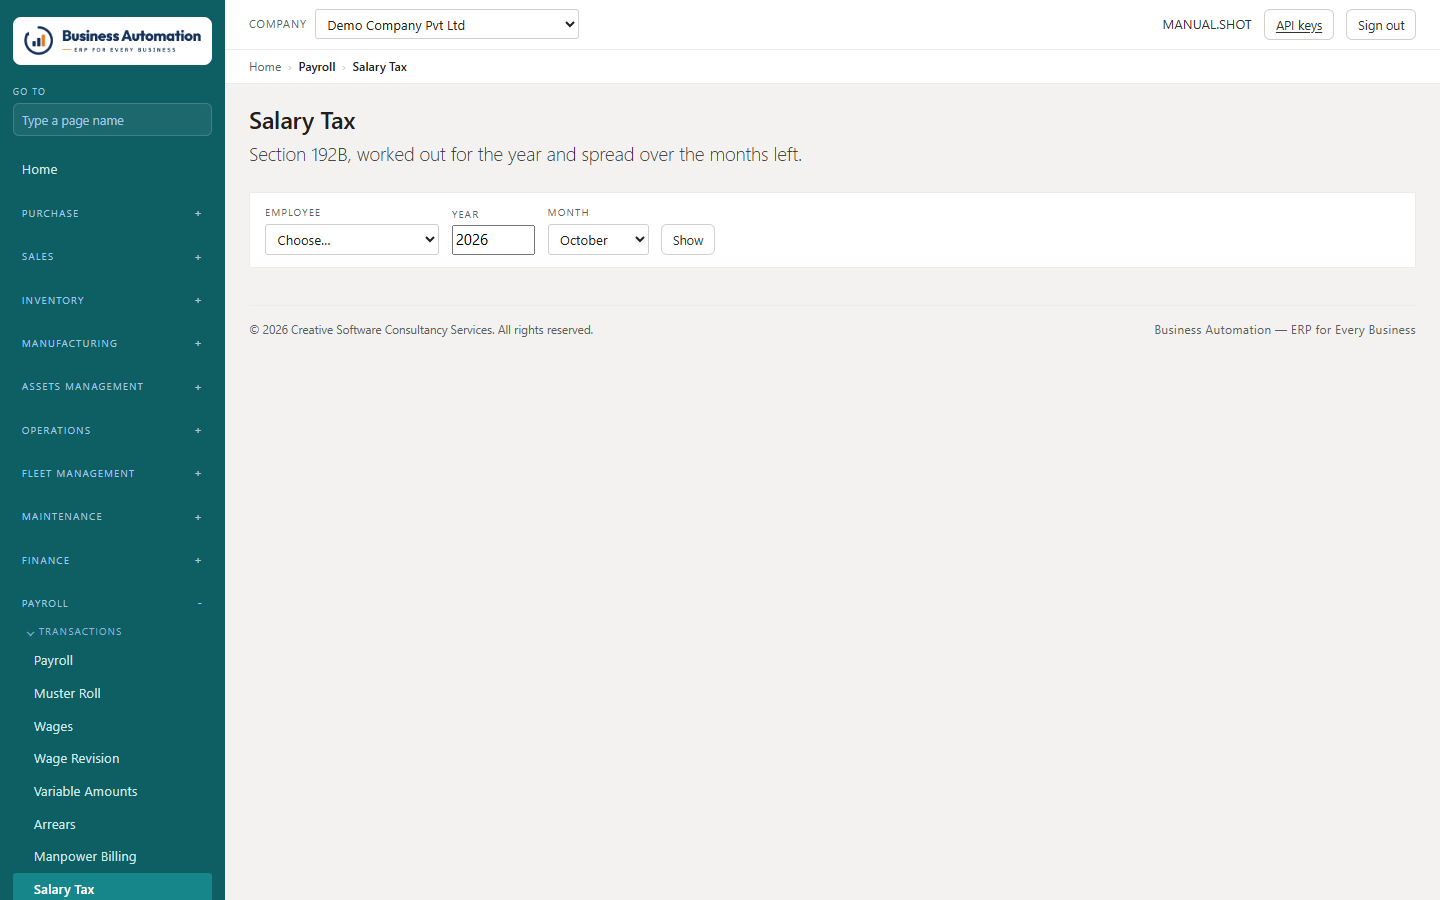
WherePayroll › Tax Cards · Salary Tax (/payroll/tax)
  1. 1
    Open a tax card for the employee and year; record the regime (new or old).
  2. 2
    Enter declarations (80C, 80D, rent, housing loan interest…) and, for a mid-year joiner, the previous employer's salary and TDS.
  3. 3
    Tick Declaration received.
  4. 4
    Salary Tax shows the whole computation for one employee. Print it when somebody asks.
Business Automation
Salary tax computation
Figure 6.10 Salary tax computation
ℹ
Note. No card means the default regime with nothing allowed — it deducts more than less, deliberately. Check the slabs against the current Finance Act before the year's first payroll.

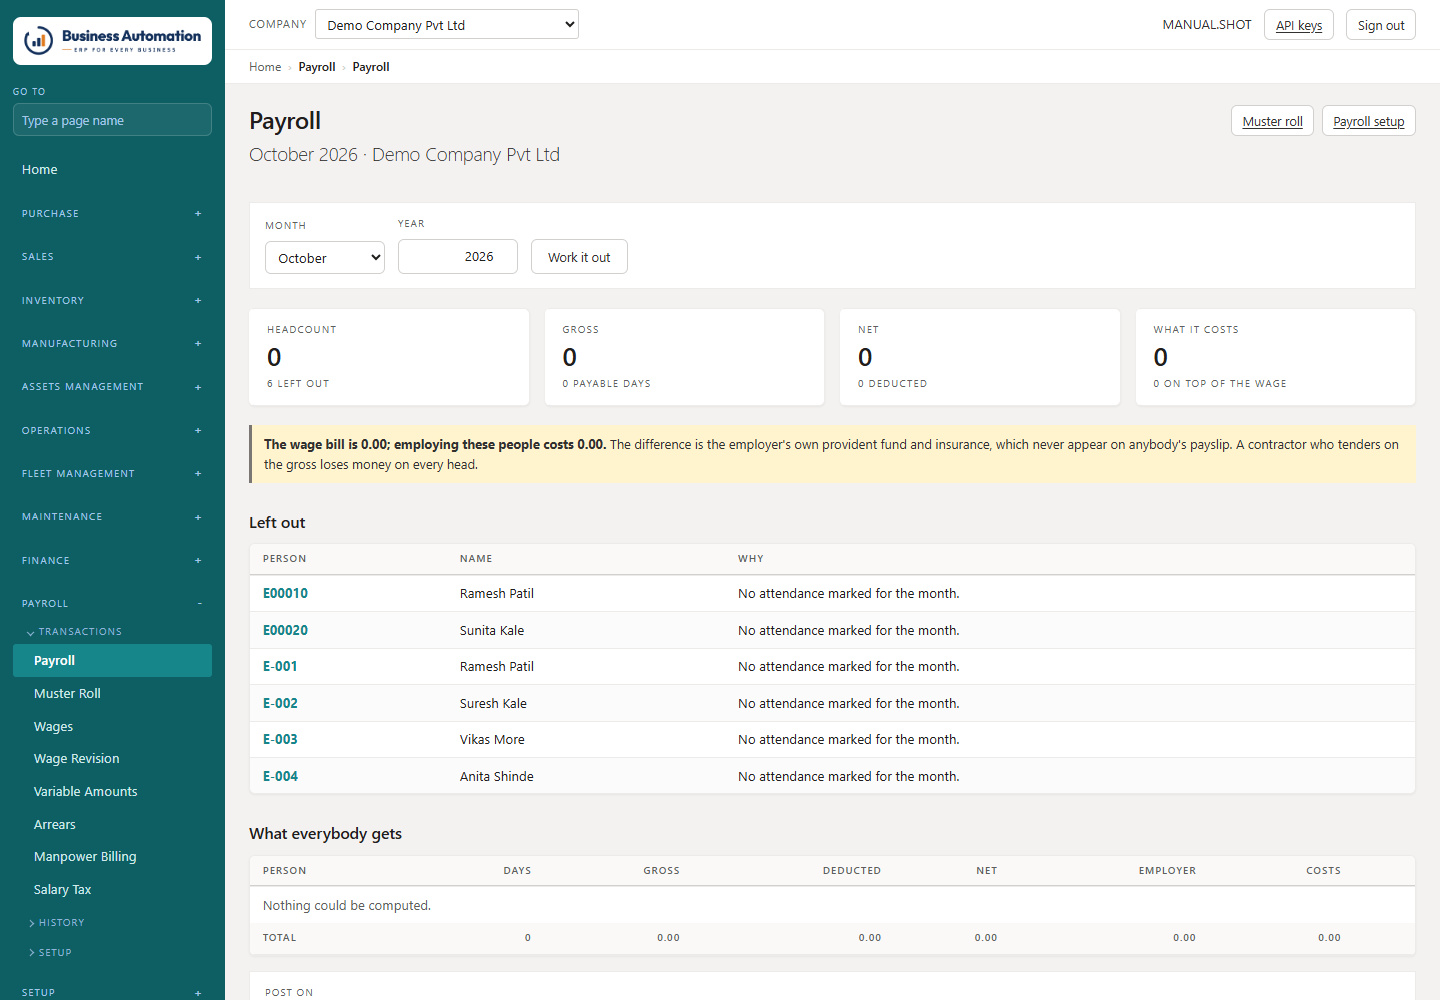
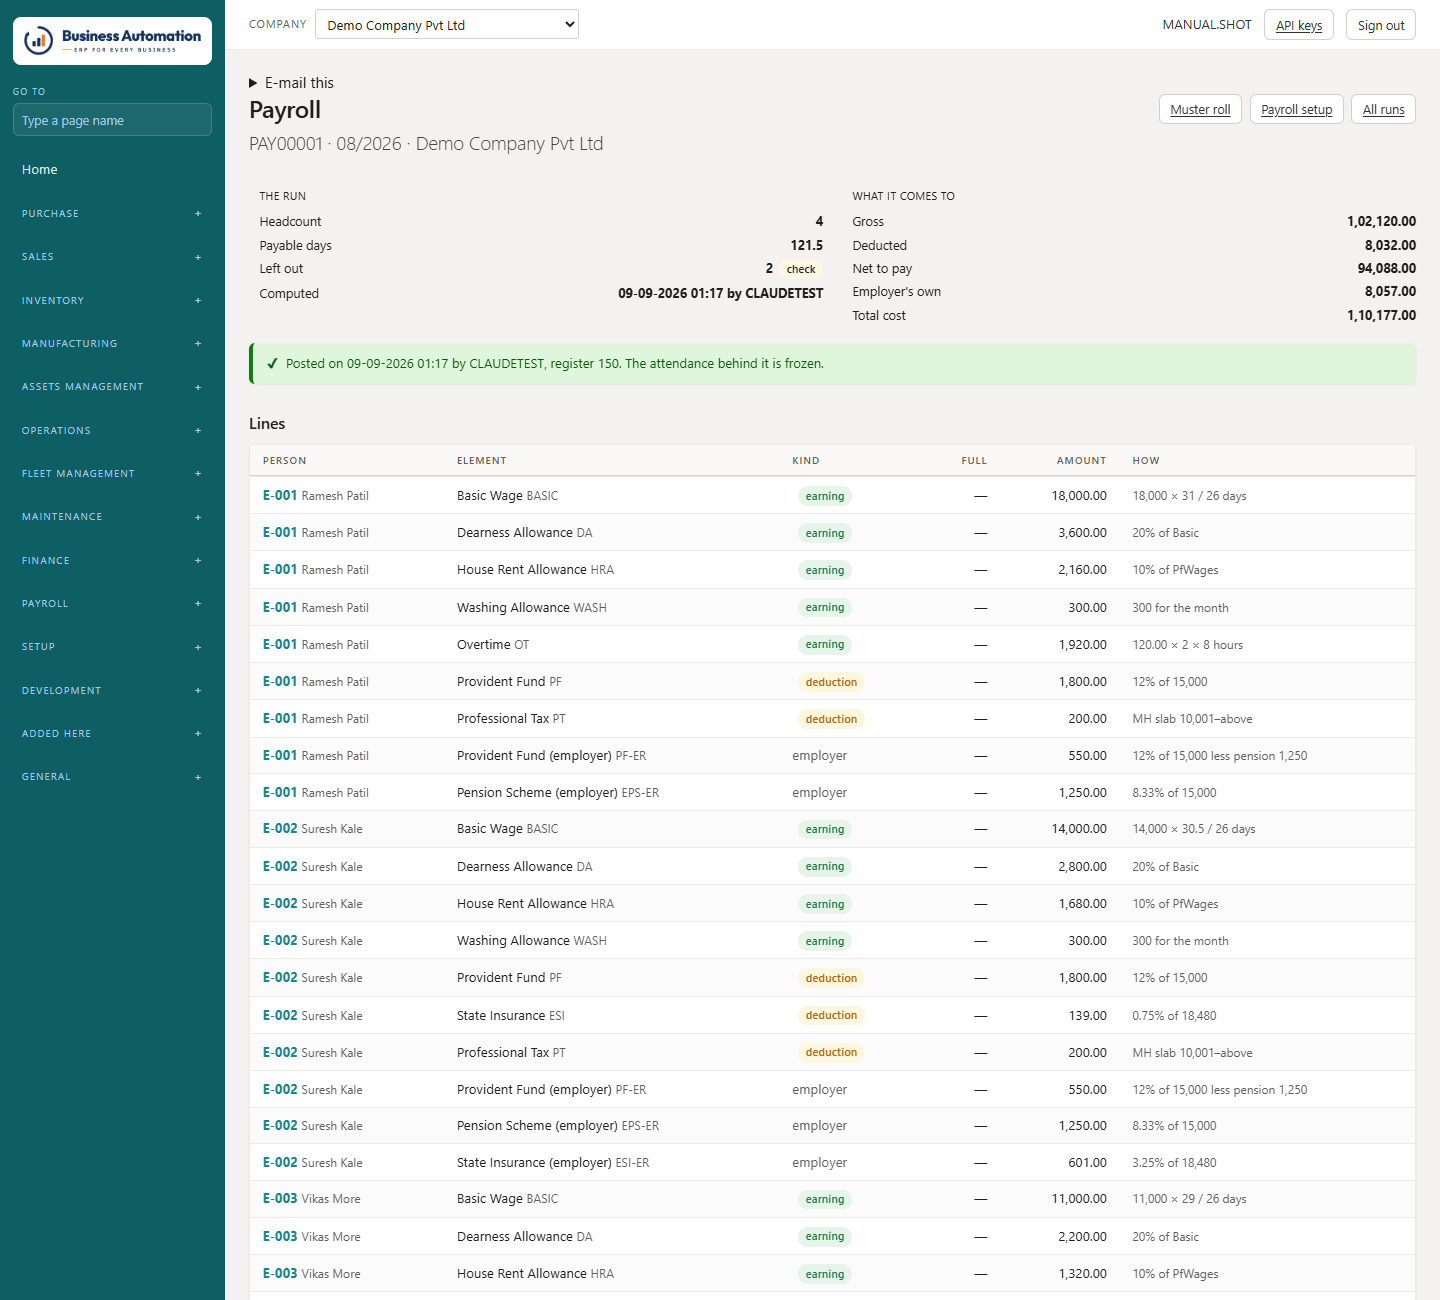
Running and posting the month

Calculate everybody, check, and post.

WherePayroll › Payroll (/payroll) → New run
  1. 1
    Press New run and choose the month.
  2. 2
    Run it. Every employee is calculated from the muster and the wage.
  3. 3
    Check the lines — gross, each deduction and net per person. Payslip on a line shows a provisional slip before posting.
  4. 4
    Press Post. Net pay is credited to each employee; deductions go to their payable accounts; employer contributions are charged as cost.
  5. 5
    On the posted run, use Files for the bank and the returns: Payslips, Salary bank file, PF ECR, ESI contribution sheet.
Business Automation
Payroll runs
Figure 6.11 Payroll runs
Business Automation
A payroll run
Figure 6.12 A payroll run
⚠
Important. Read the Not in the files box before uploading anything. It names everybody a file left out and why (missing UAN, bad IFSC, paid in cash).
  • Billing customers for manpower: set Manpower Rates per work order, keep the work order on the muster, then Manpower Billing › Raise the invoices.
What this chapter covers. The daily MIS, the gate and fleet compliance, the weighbridge, trips and billing, making things, fuel, job cards, and the tyre and battery bank.

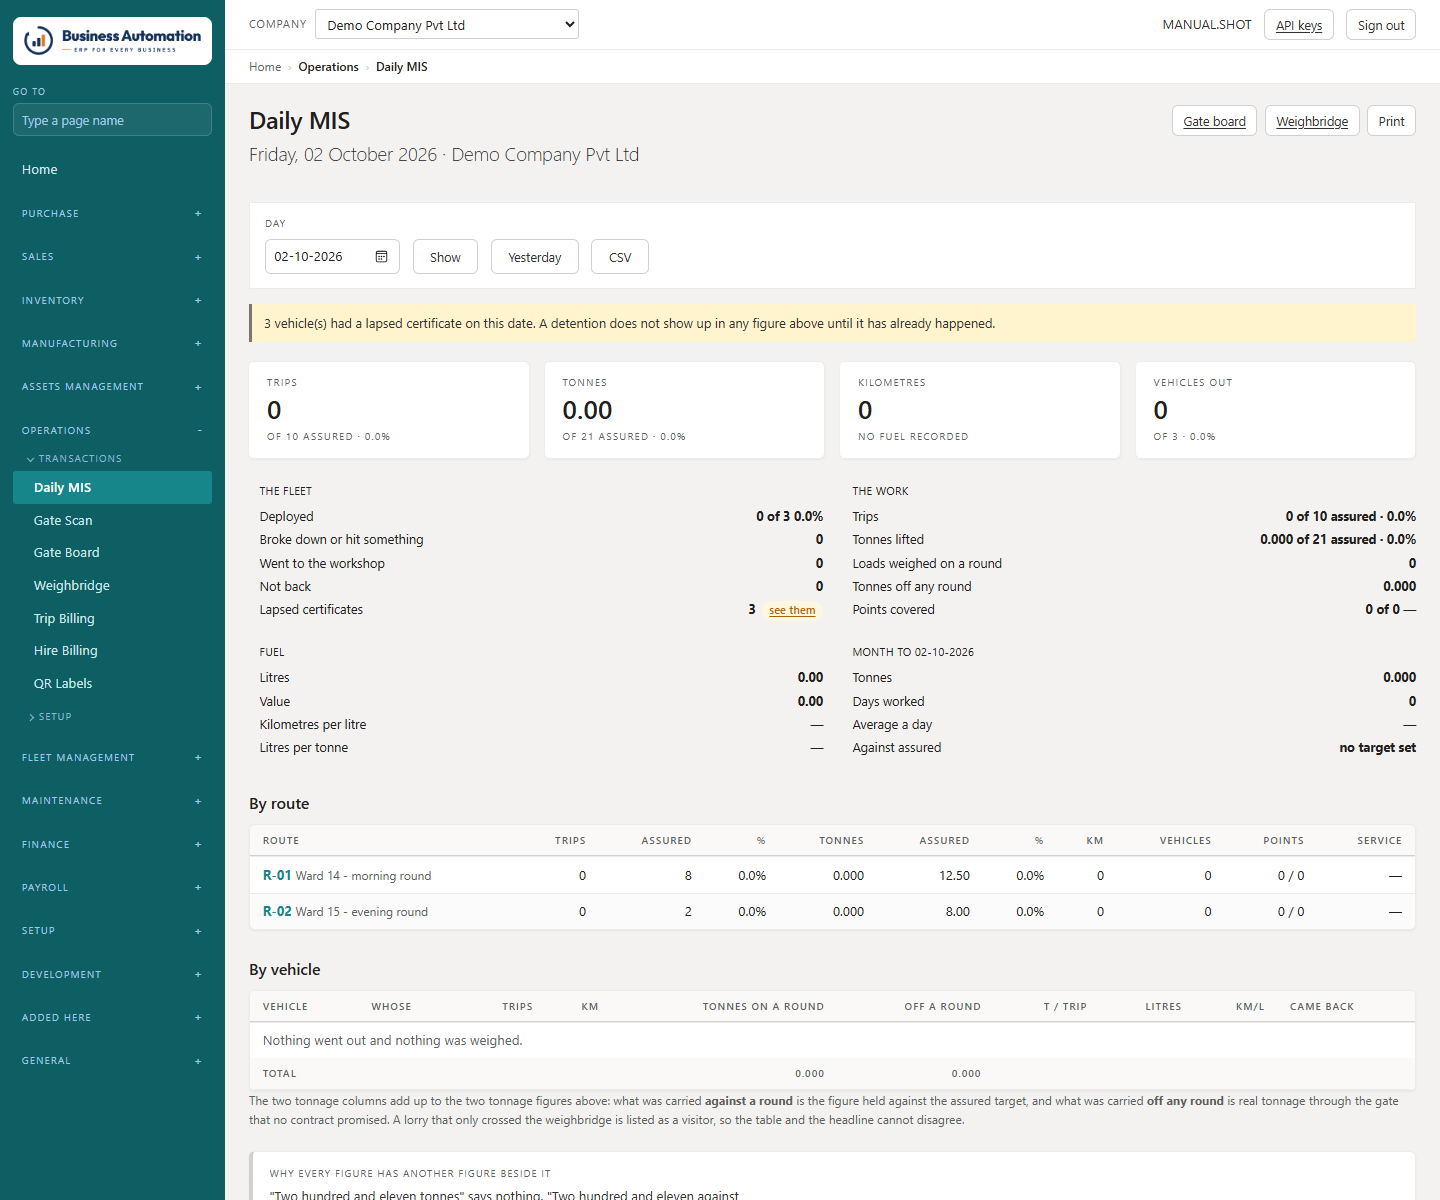
The morning list: Daily MIS

What happened yesterday on one page — the page a morning meeting runs from.

WhereOperations › Daily MIS (/mis)
  1. 1
    Open Daily MIS and choose the day.
  2. 2
    Read what went out, what came in, what each vehicle did (on the round and off it), and what crossed the weighbridge.
Business Automation
The daily MIS
Figure 7.1 The daily MIS

The gate

Scan vehicles in and out; see what is inside now.

WhereOperations › Gate Scan (/gate/scan) · Gate Board (/gate)
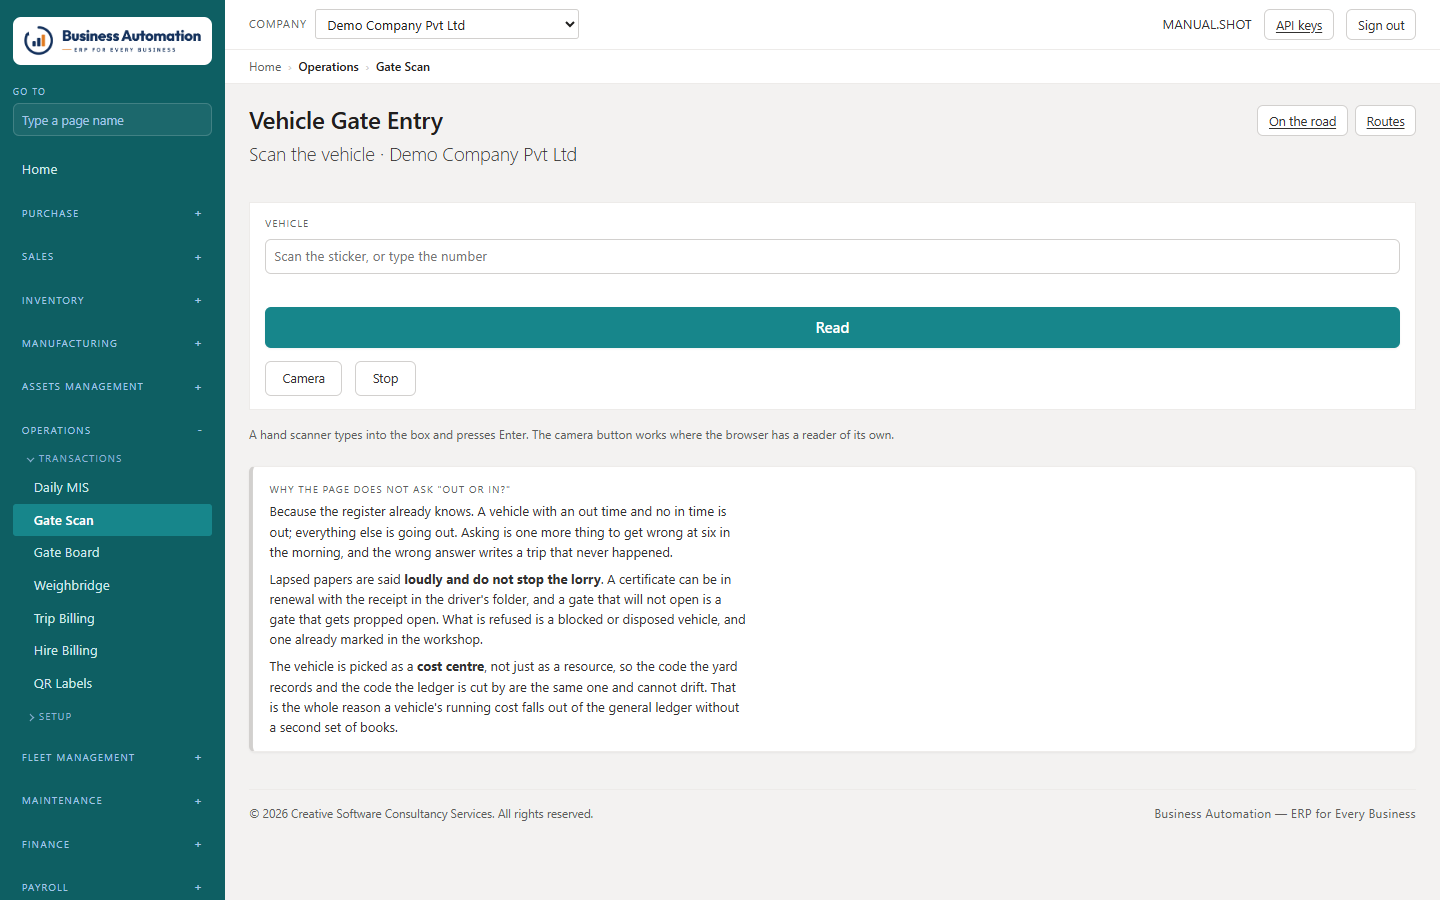
  1. 1
    On Gate Scan, scan the vehicle's QR label (a full label or just the code).
  2. 2
    Going out, the Opening km is filled from the last entry; a lower figure is refused. Tick Meter replaced if the meter was changed.
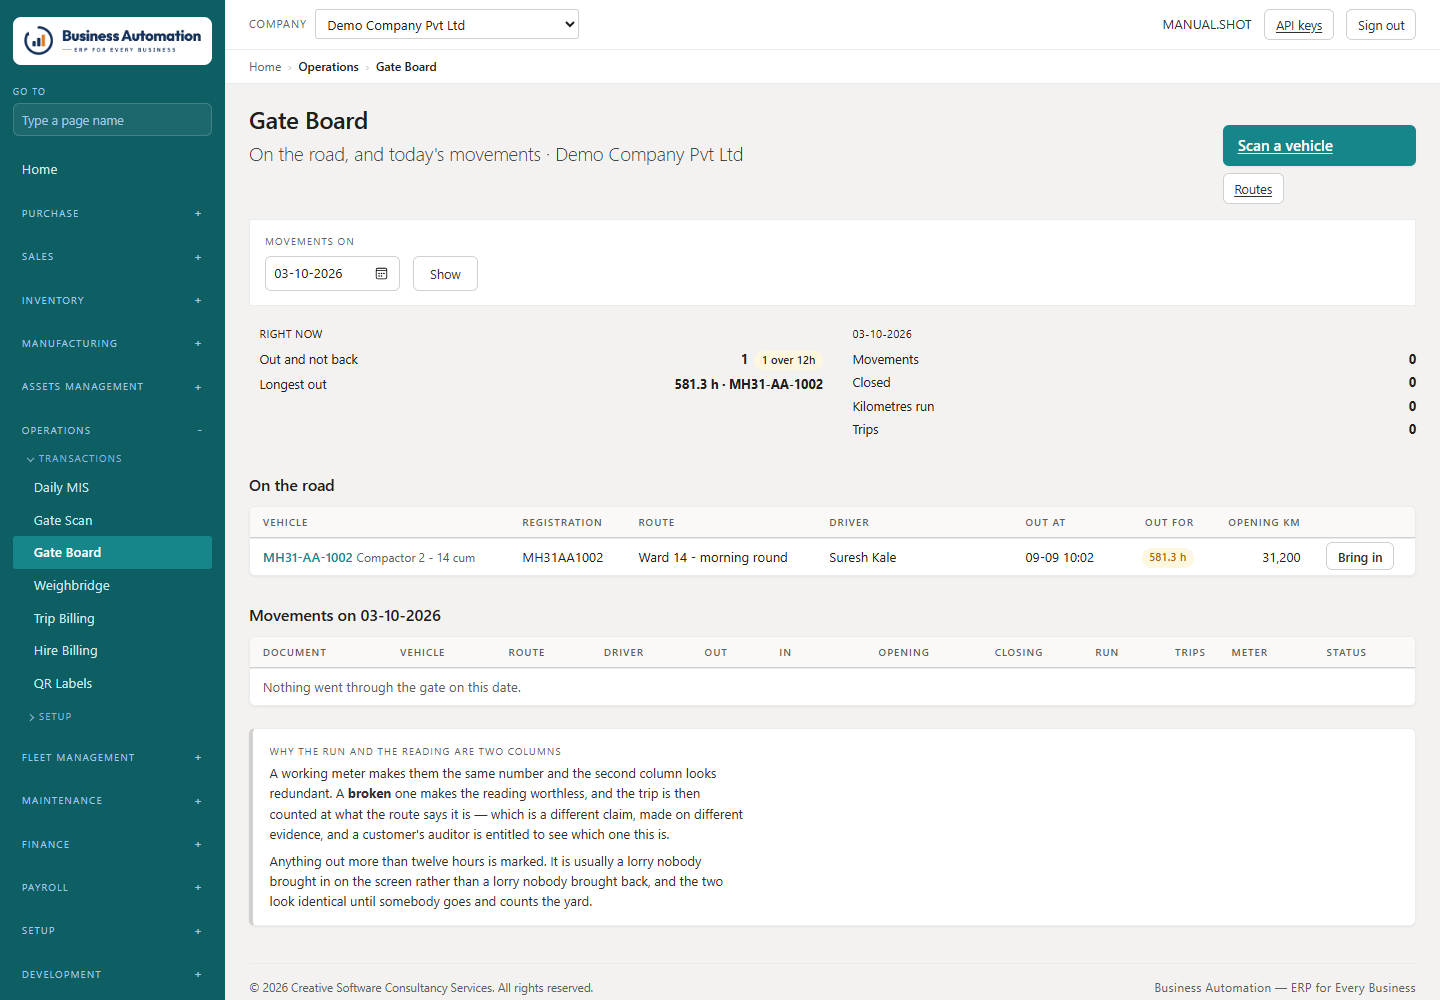
  3. 3
    The Gate Board shows what is inside the premises right now.
Business Automation
Gate scan
Figure 7.2 Gate scan
Business Automation
The gate board
Figure 7.3 The gate board
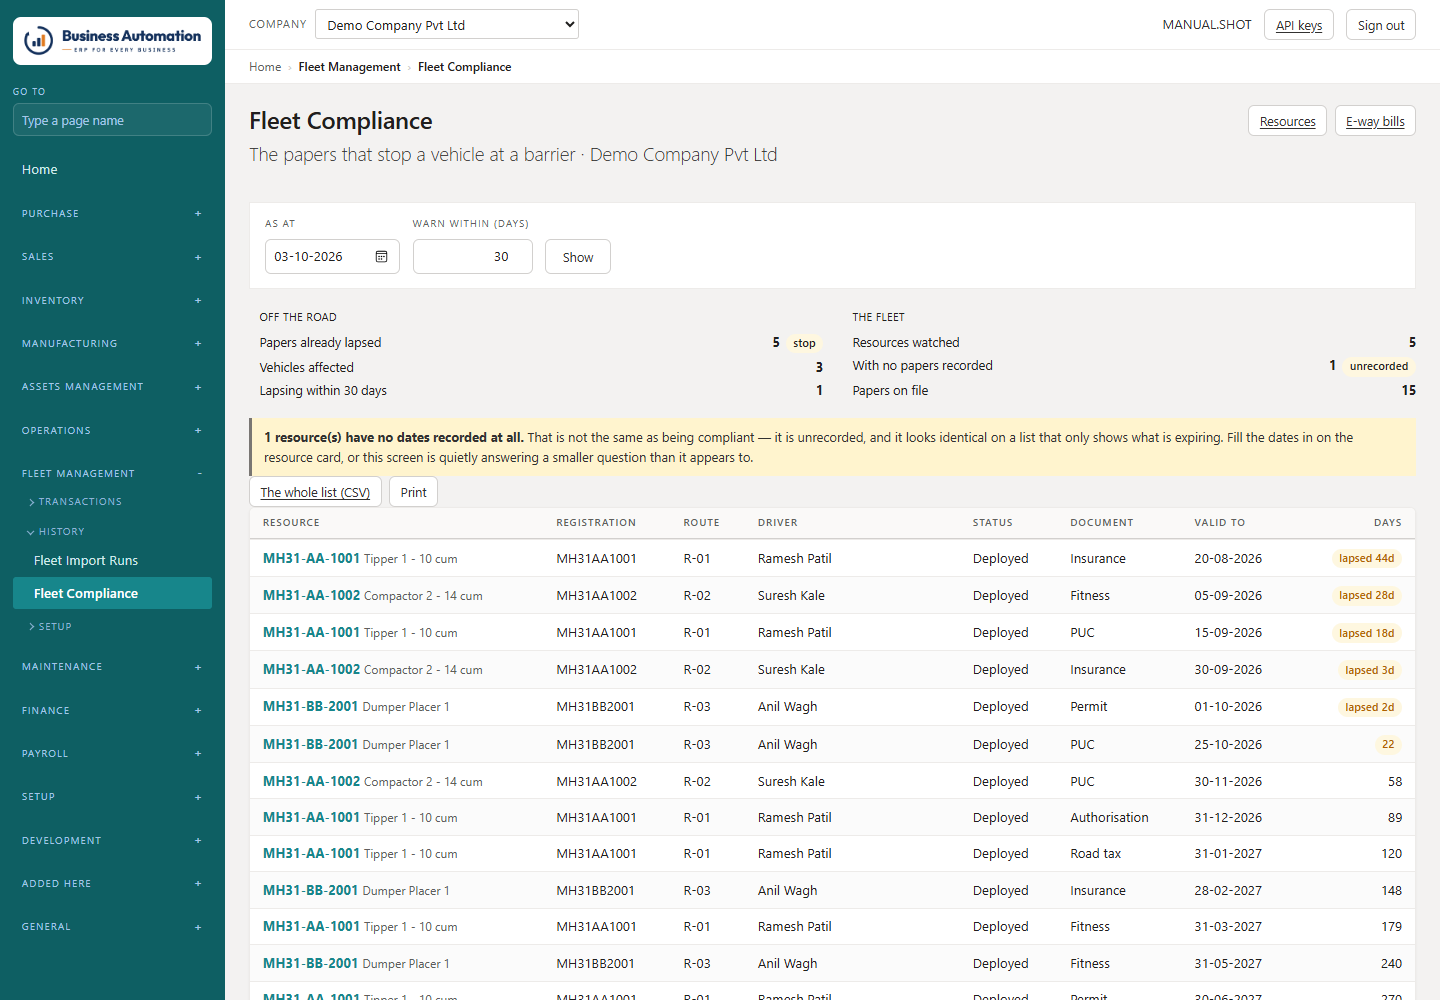
  • Fleet Management › Fleet Compliance shows insurance, fitness, permit, pollution, road tax and licence dates — expired and due, worst first. The gate refuses a driver whose licence has run out.
Business Automation
Fleet compliance
Figure 7.4 Fleet compliance

The weighbridge

Gross and tare in either order; net is what everything bills on.

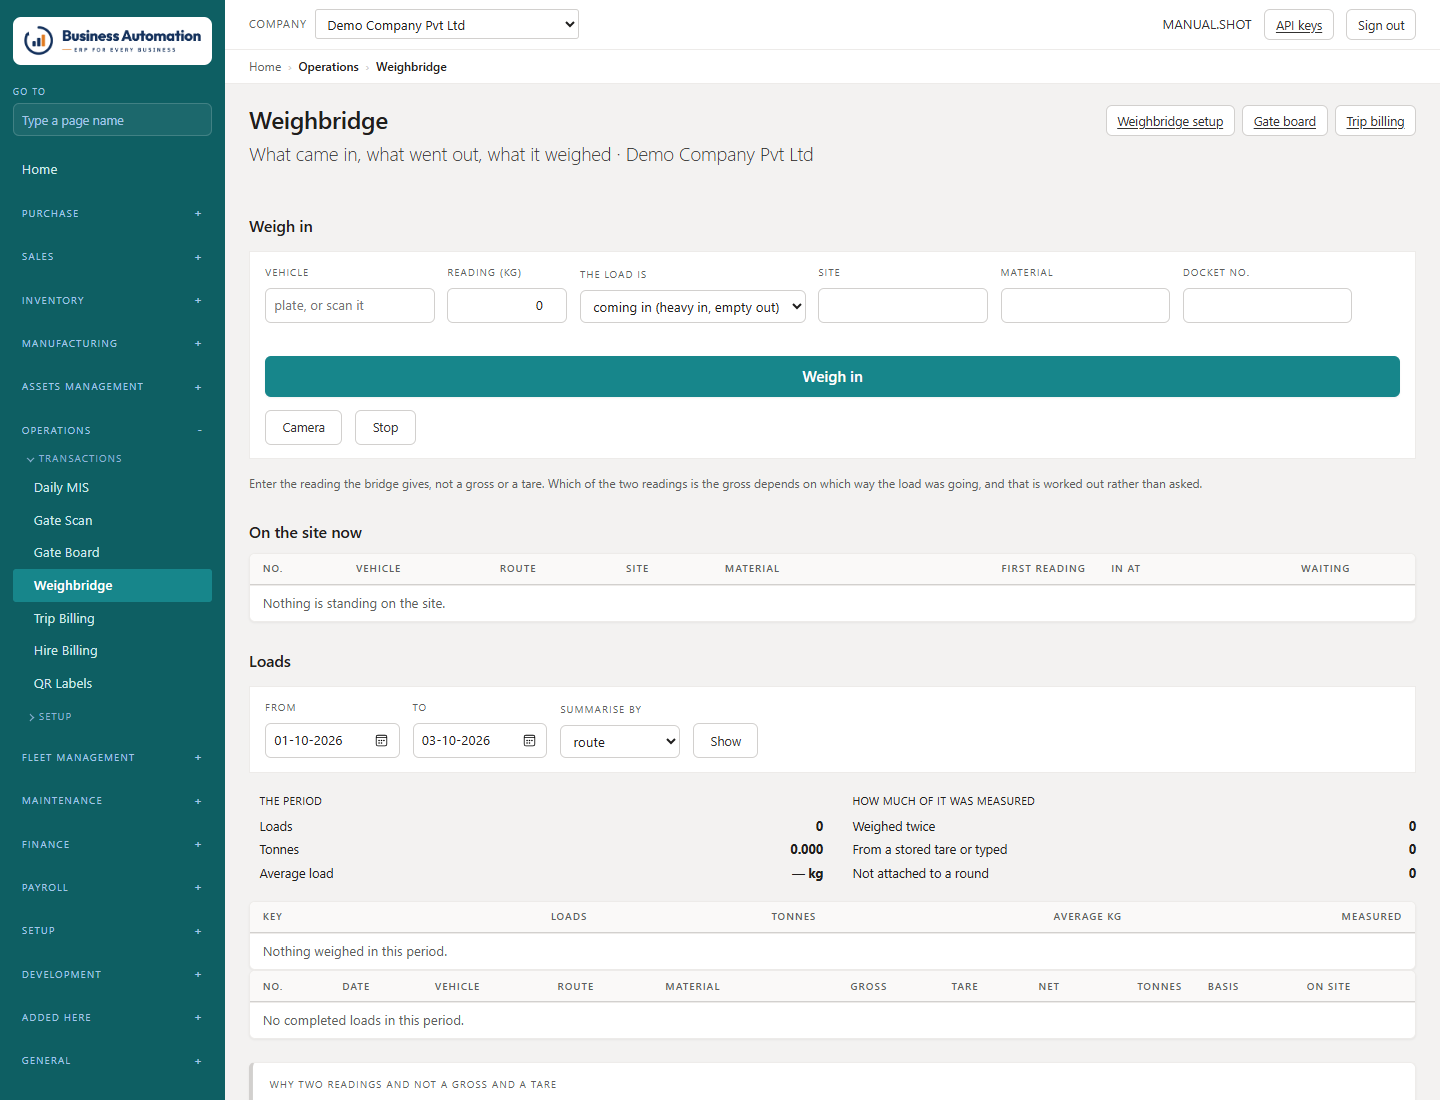
WhereOperations › Weighbridge (/weighbridge)
  1. 1
    Record the first weighing (gross or tare) with the vehicle and driver.
  2. 2
    Record the second weighing. Net is the difference.
  3. 3
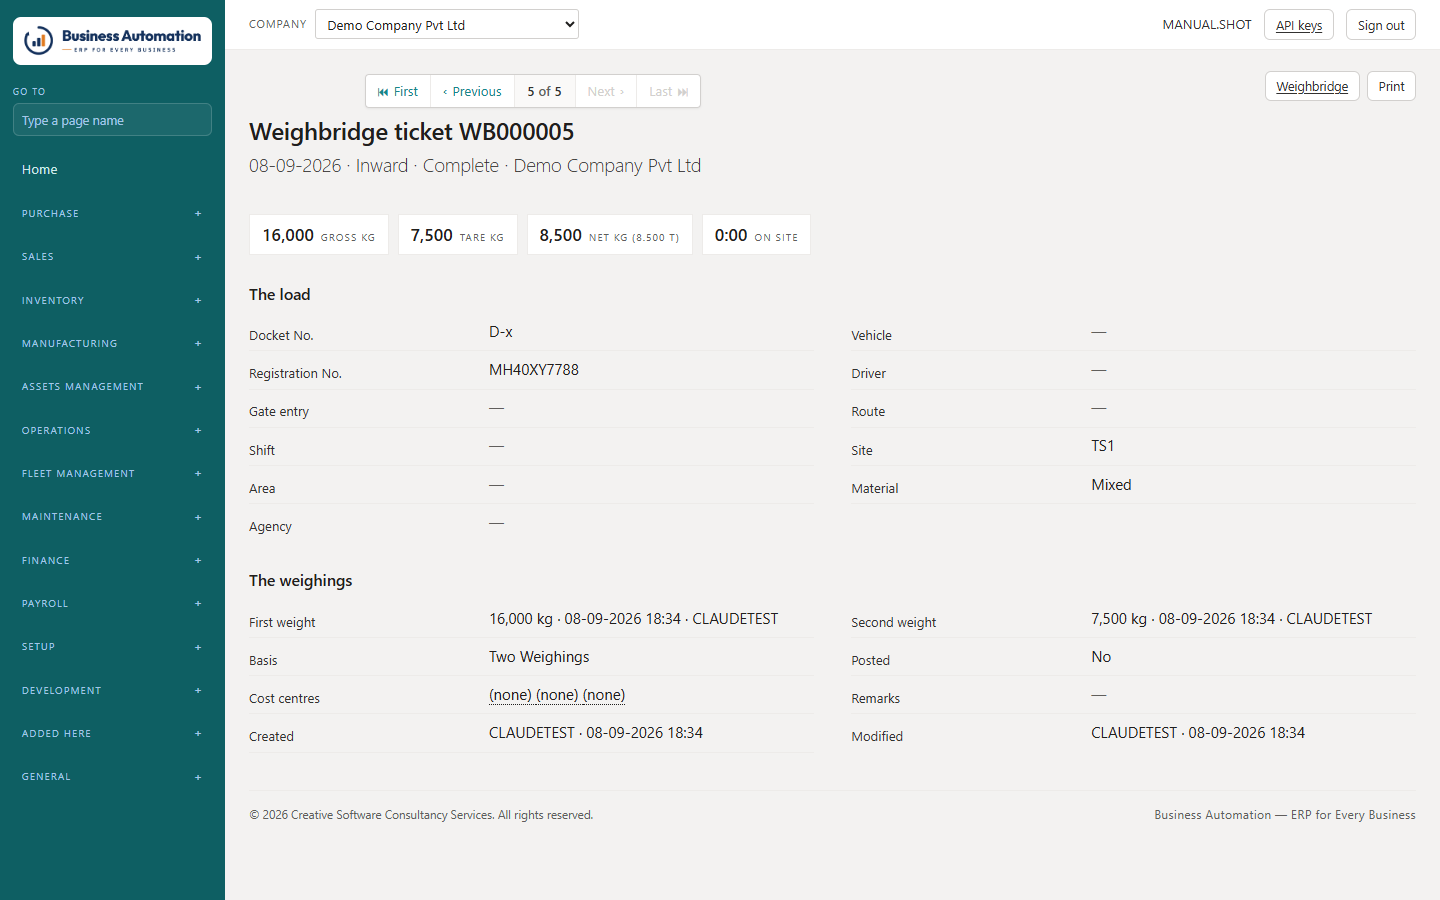
    Click the ticket number to open it; Print gives the paper ticket.
Business Automation
Weighments
Figure 7.5 Weighments
Business Automation
A weighbridge ticket
Figure 7.6 A weighbridge ticket

Trips against a contract

For work billed by weight or by shift, against a released sales order.

WhereOperations › Trip Entry (/trips/entry) · Trip List (/trips) · Trip Invoice (/trips/invoice)
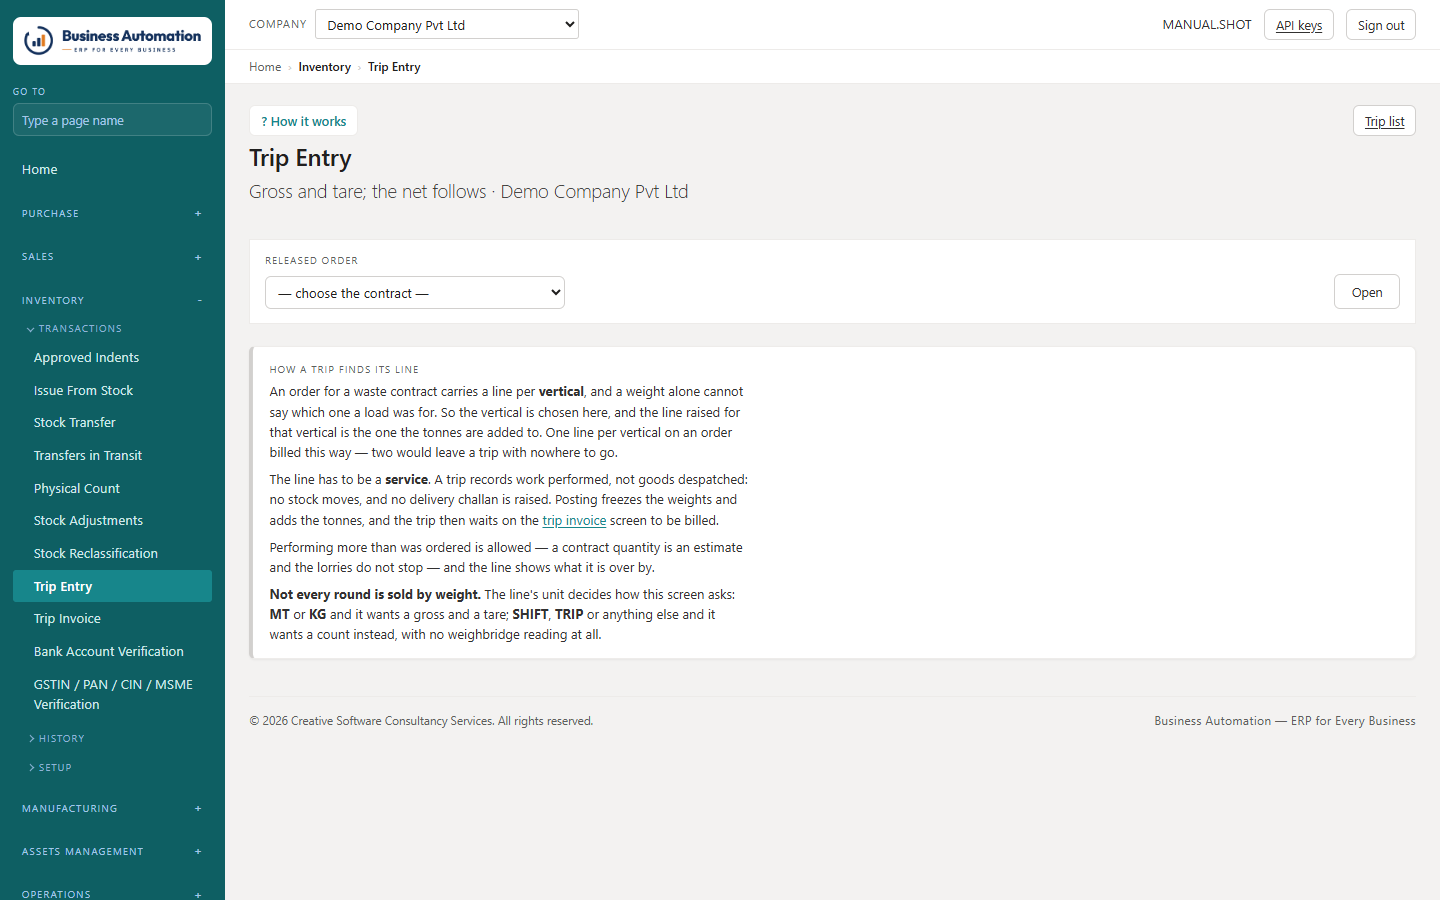
  1. 1
    On Trip Entry, choose the order, then the vertical the load was for.
  2. 2
    Sold in MT or KG: type the gross and tare in kg. Sold in SHIFT or TRIP: type how many.
  3. 3
    Add the slip number, lorry, time and site, and attach the weighbridge slip.
  4. 4
    Press Post trip.
  5. 5
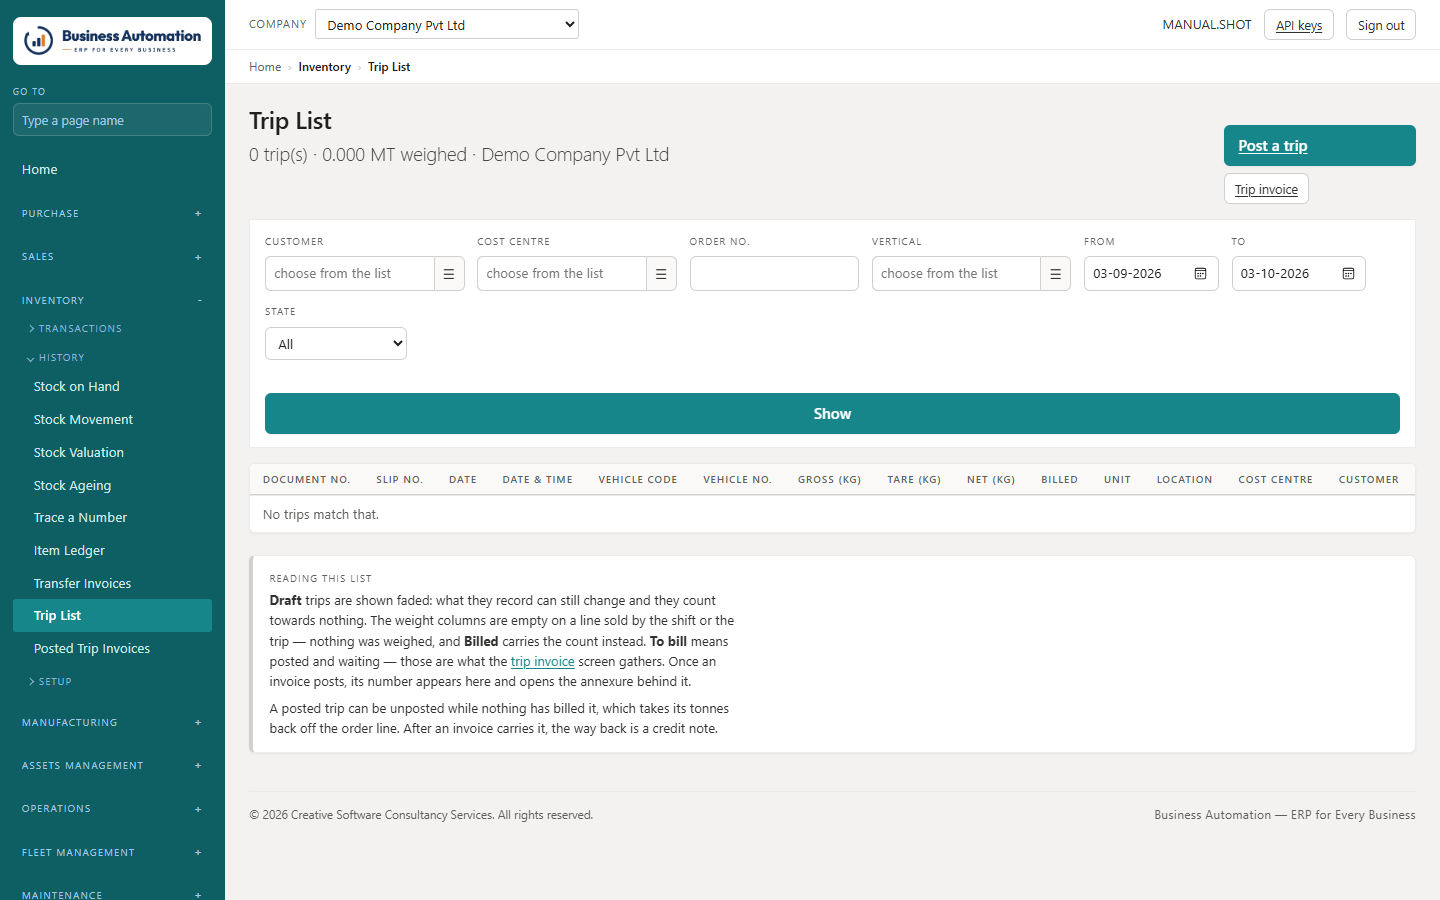
    To bill: on Trip Invoice, pick the customer, narrow by cost centre, order, dates and vertical, and press Raise the invoice. Post it as any invoice; Posted Trip Invoices gives the annexure.
Business Automation
Trip entry
Figure 7.7 Trip entry
Business Automation
The trip list
Figure 7.8 The trip list

Making things: manufacturing

Bills of material, routings, production orders and the planning worksheet.

WhereManufacturing › Bills of Material · Routings · Production Orders · Planning Worksheet
  1. 1
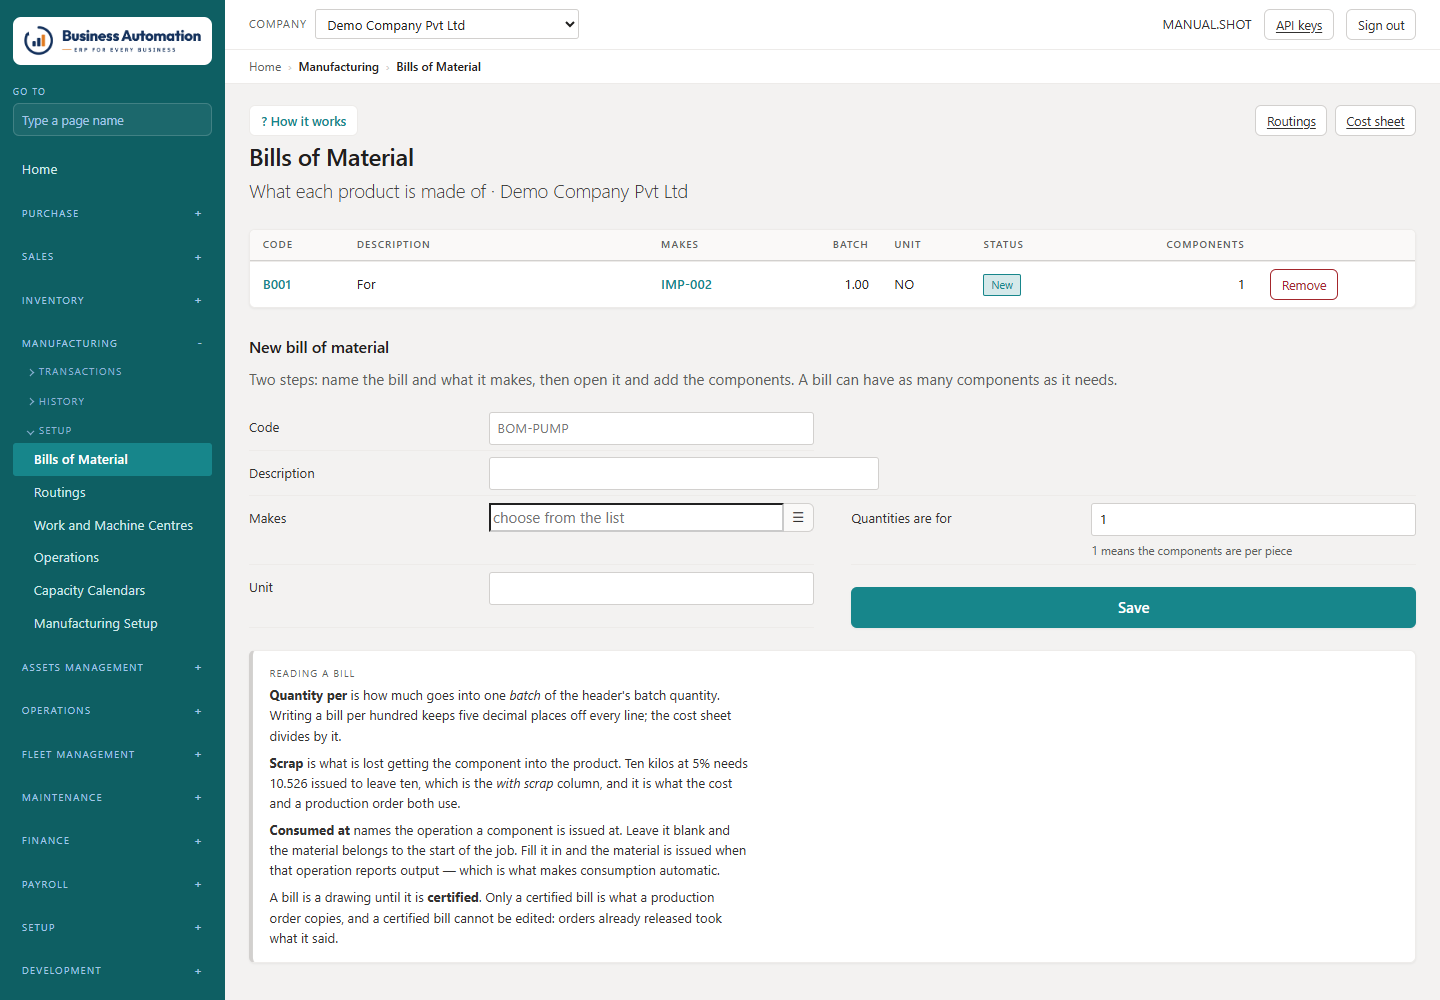
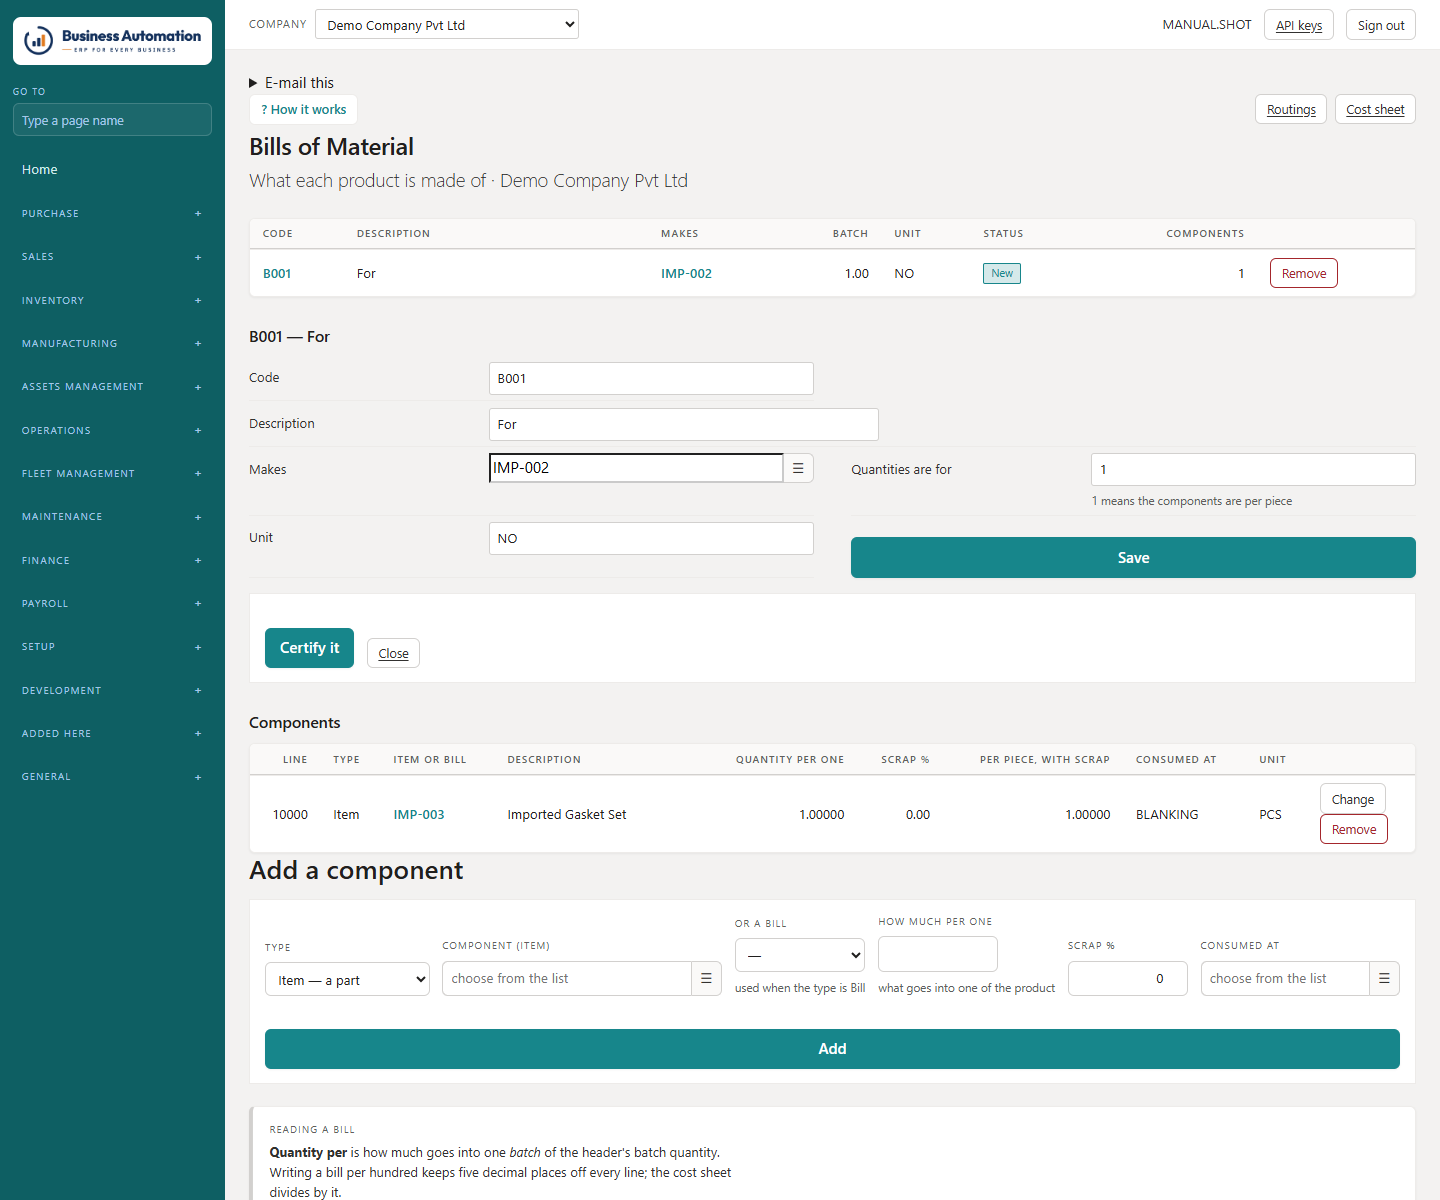
    Bill of material: name the bill and the item it makes, save, then open it and add components (type, quantity per, scrap %, consumed at). Certify it (after approval where required).
  2. 2
    Routing: the operations in order — work centre, setup minutes and run minutes per unit. Certify it.
  3. 3
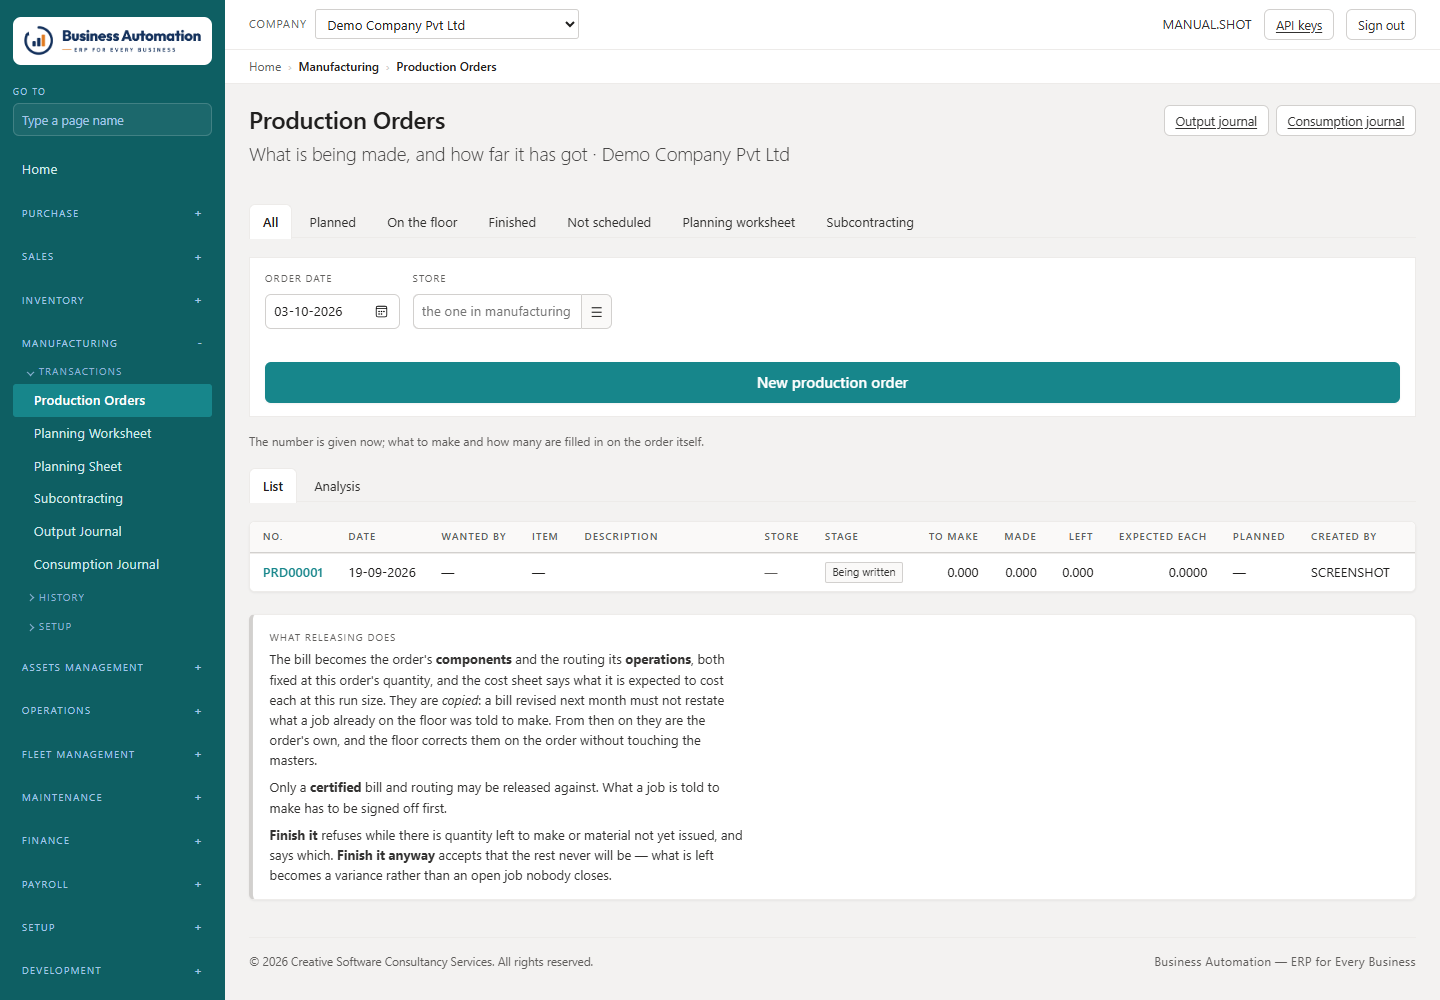
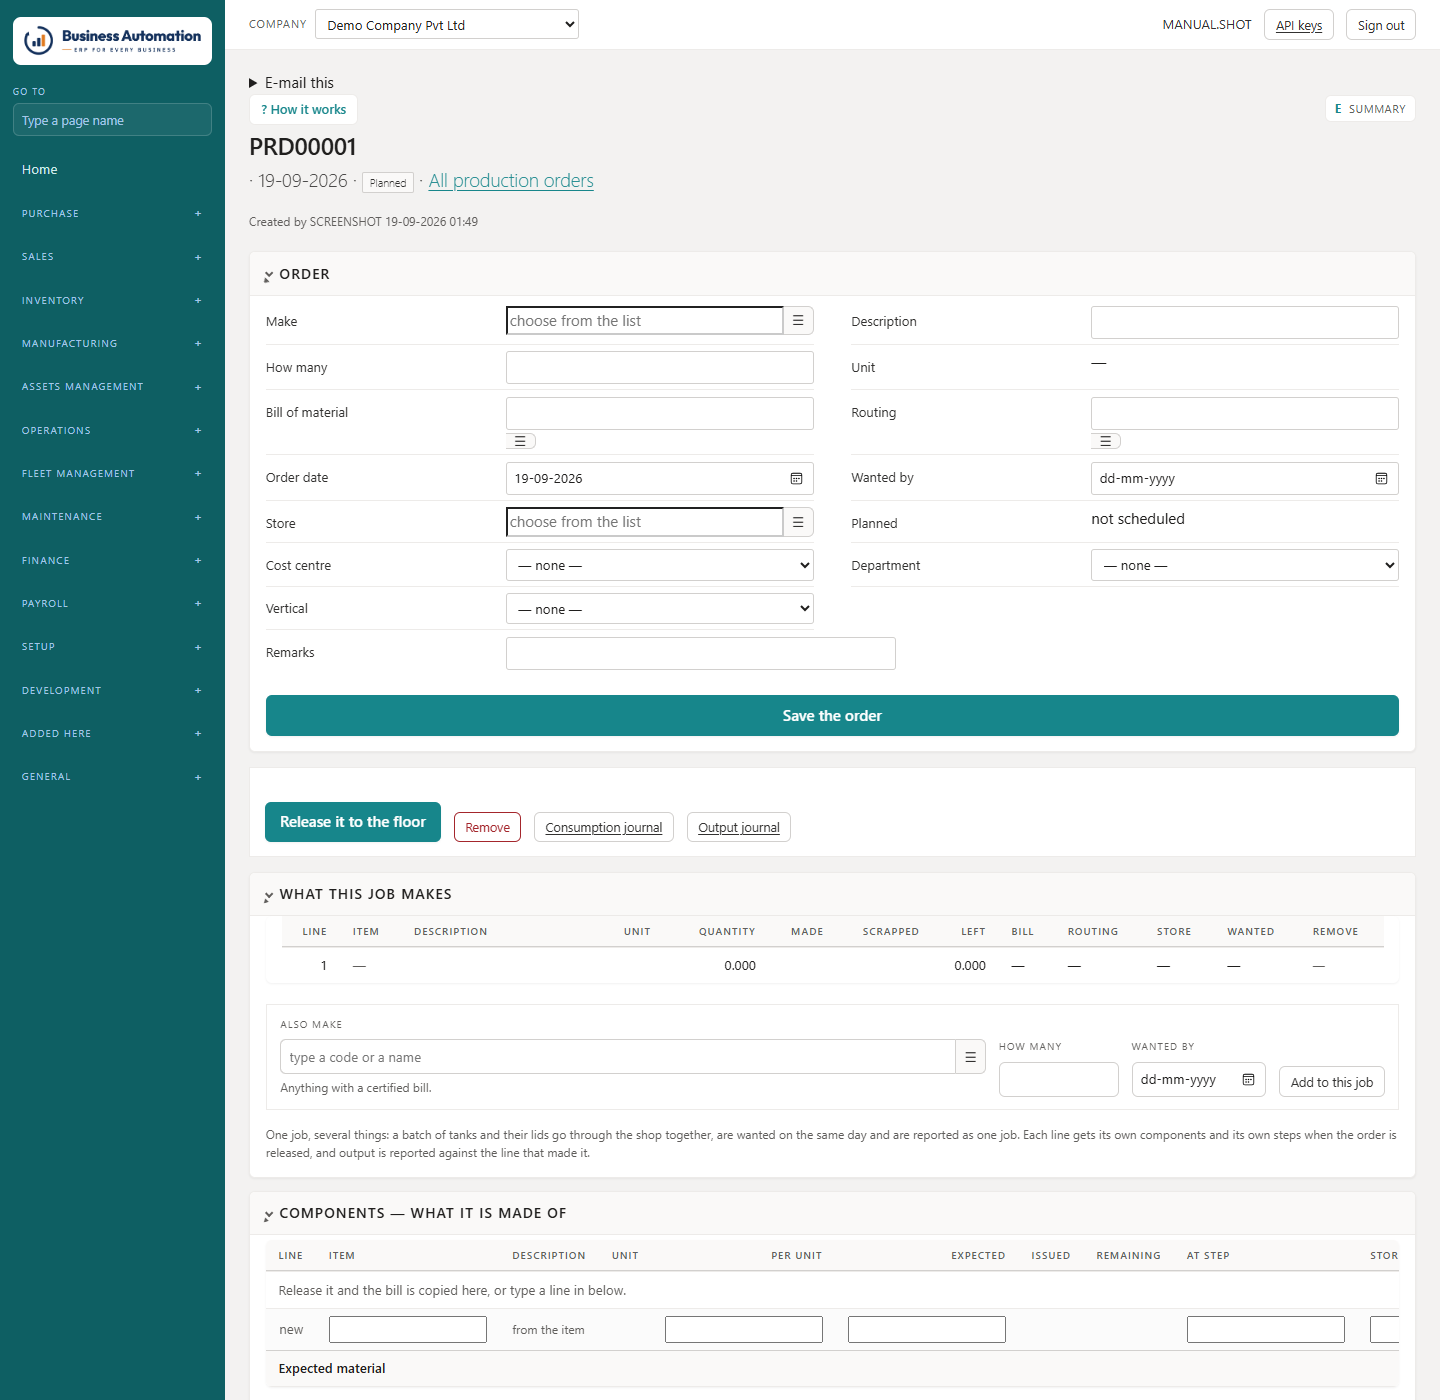
    Production order: press New production order, choose what to make, how many and when, and Release it. The certified bill and routing are copied onto the job.
  4. 4
    Report output in the Output Journal and material in the Consumption Journal, and post them.
  5. 5
    Finish it when nothing more will be booked; what is left in work in progress goes to the variance accounts.
  6. 6
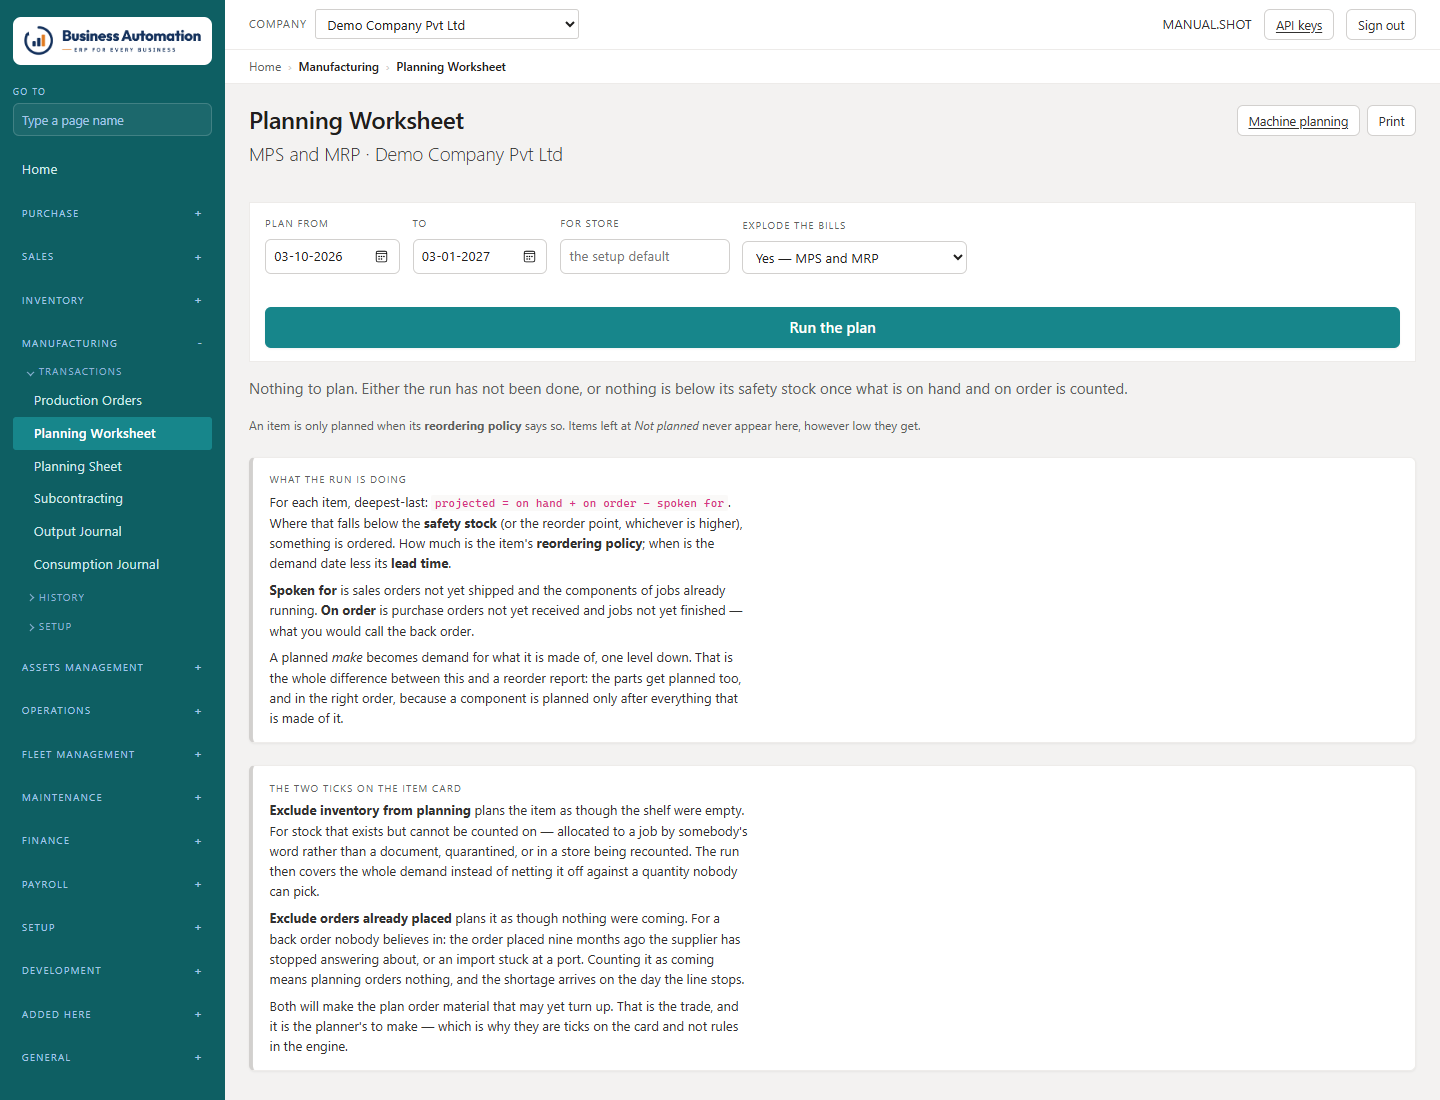
    Planning Worksheet: pick a window and Run the plan; check the lines and Carry out the sheet to raise production and purchase orders.
Business Automation
Bills of material
Figure 7.9 Bills of material
Business Automation
A bill of material
Figure 7.10 A bill of material
Business Automation
Production orders
Figure 7.11 Production orders
Business Automation
A production order: head, components and operations
Figure 7.12 A production order: head, components and operations
Business Automation
The planning worksheet
Figure 7.13 The planning worksheet
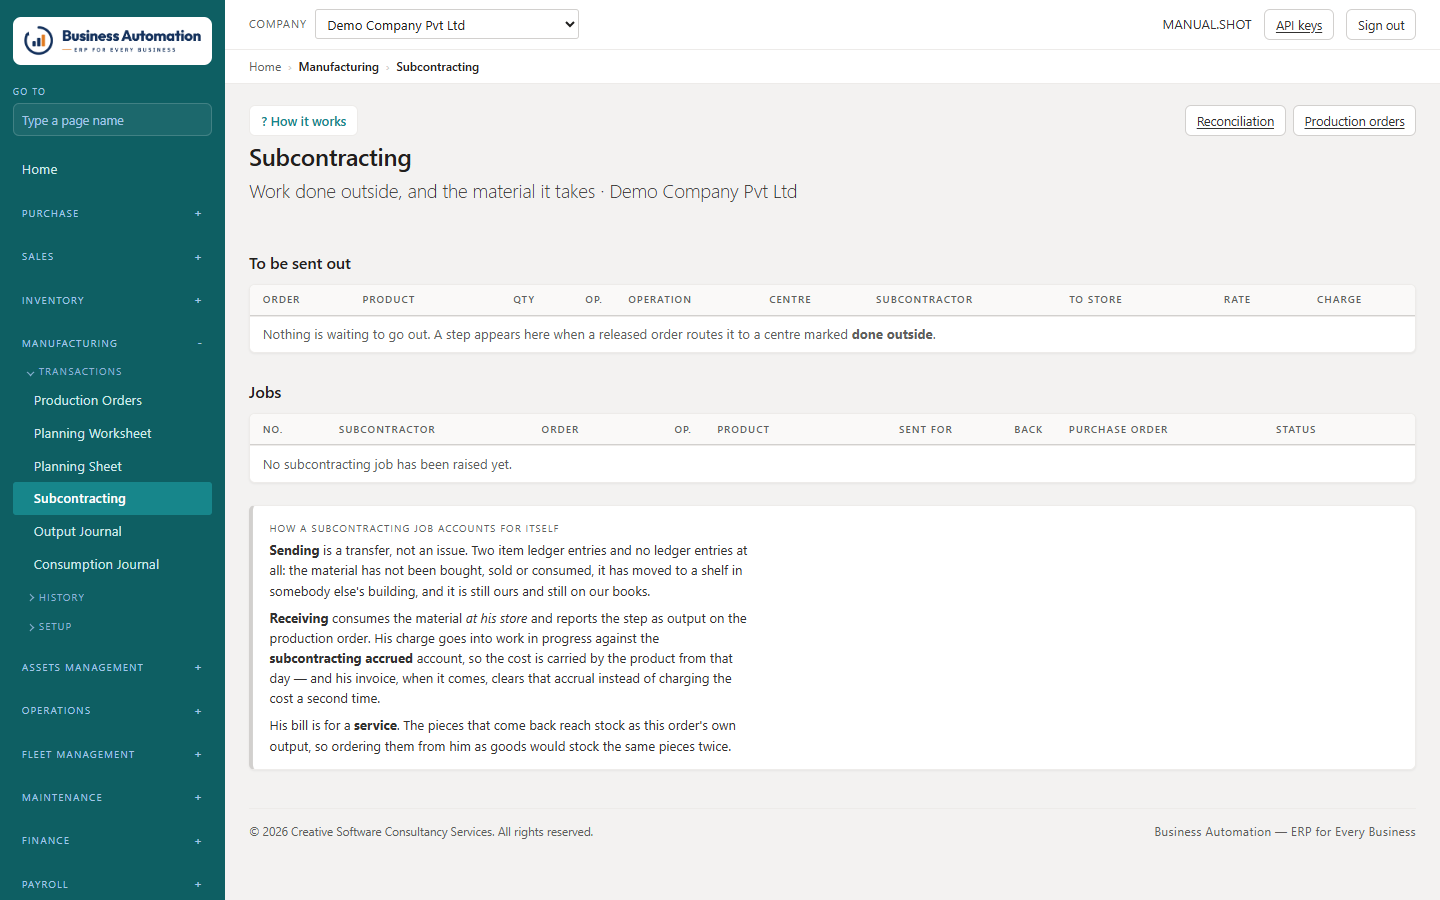
Business Automation
Subcontracting: work sent outside
Figure 7.14 Subcontracting: work sent outside
ℹ
Note. Items at reordering policy None never appear on the planning sheet. Set Reordering Policy, Safety Stock and Lead Time on the item card.

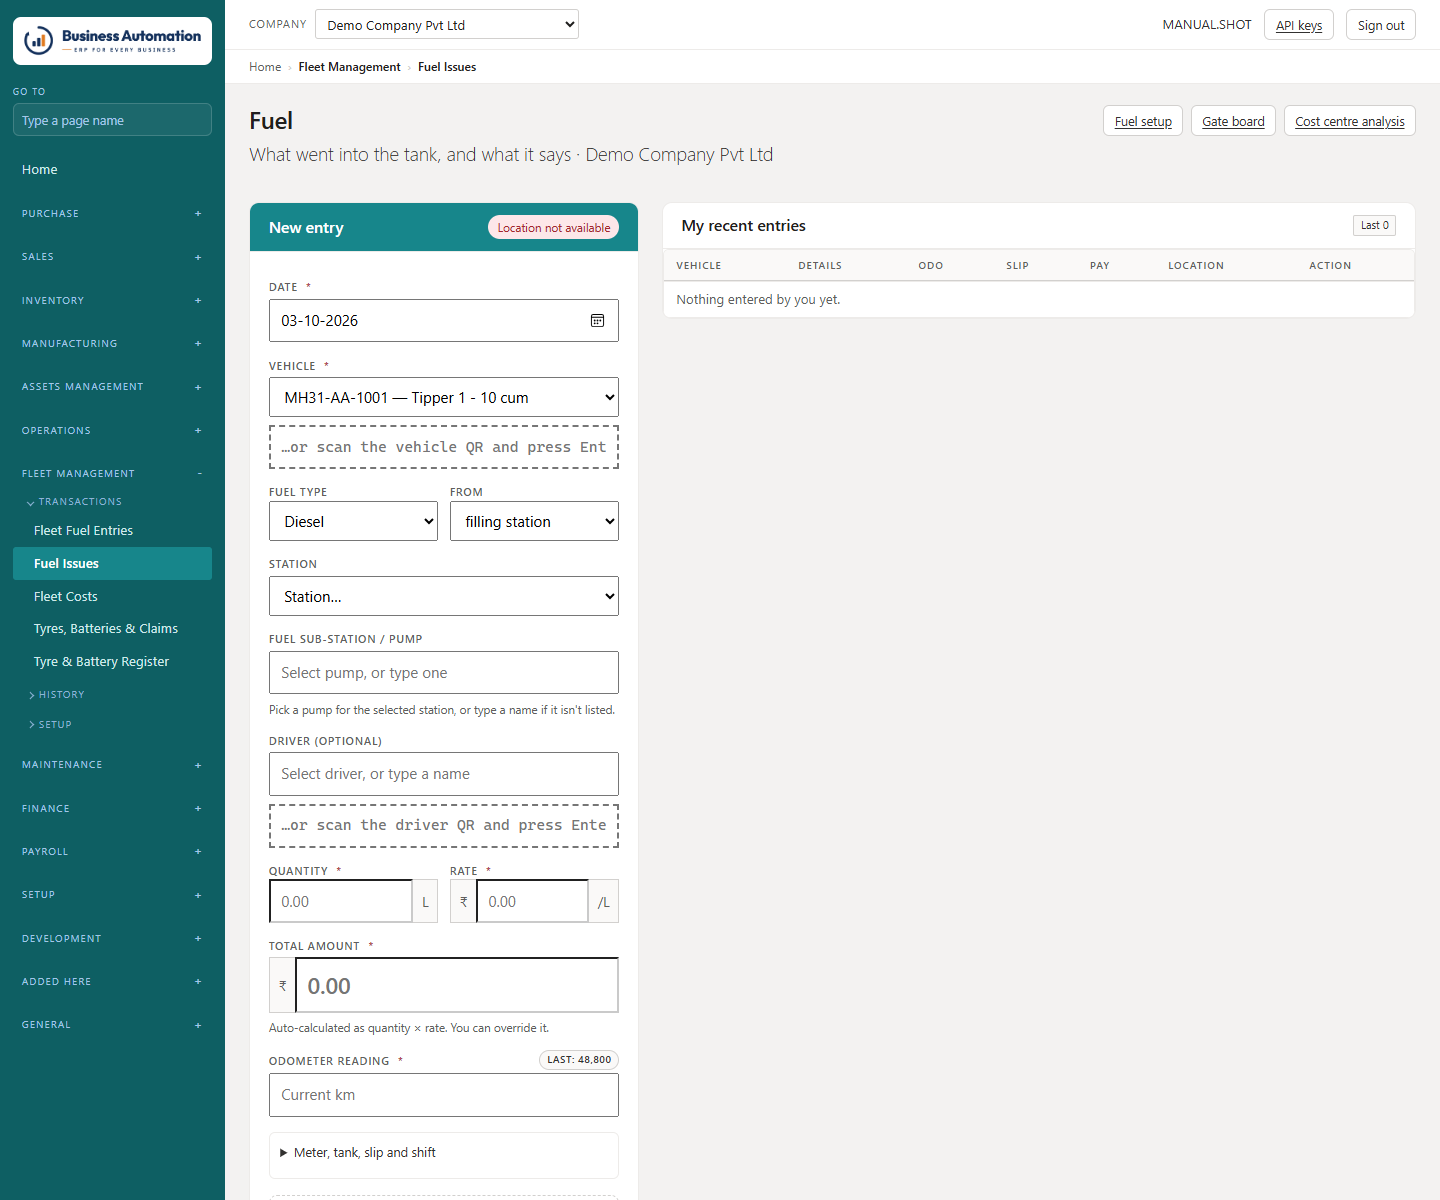
Fuel

Record each fill with its photographs, and see what each vehicle costs.

WhereFleet Management › Fuel Issues (/fuel)
  1. 1
    Vehicle — pick it or scan its QR label. The driver can be scanned too.
  2. 2
    Check the last odometer and type today's reading.
  3. 3
    Type Litres and Rate; the total fills in (type over it if the slip differs).
  4. 4
    Choose the Station and Pump, and Left in tank if not brimmed.
  5. 5
    Photograph the odometer, the fuel slip and the payment.
  6. 6
    Save. A fill missing something compulsory is refused and says what.
Business Automation
Fuel issues, with your recent entries
Figure 7.15 Fuel issues, with your recent entries
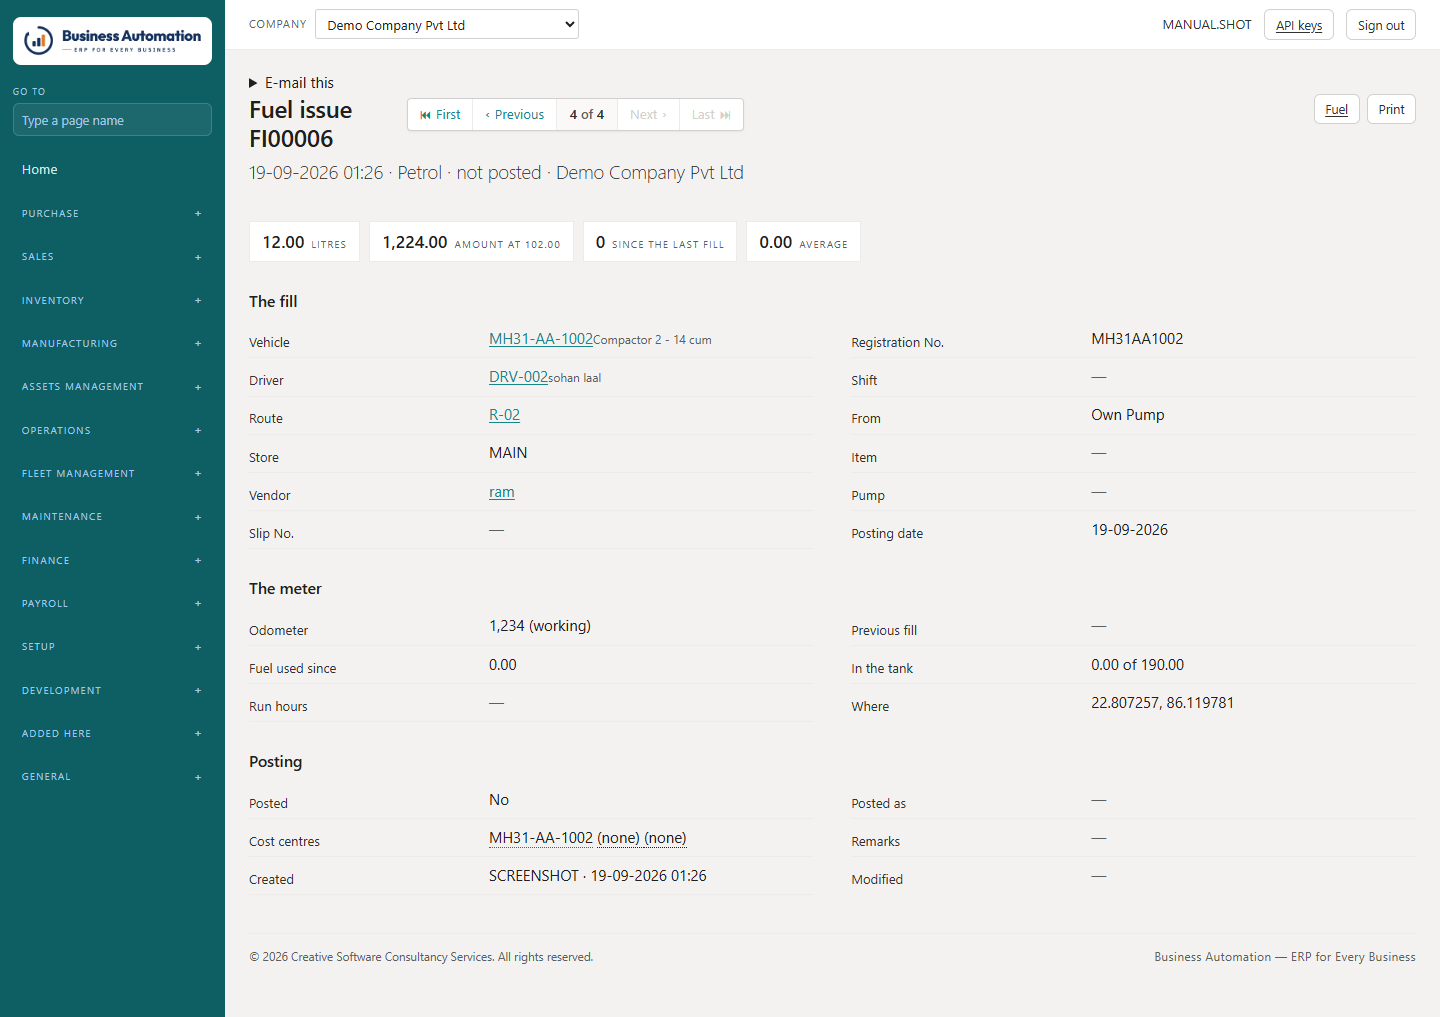
Business Automation
One fuel fill
Figure 7.16 One fuel fill
💡
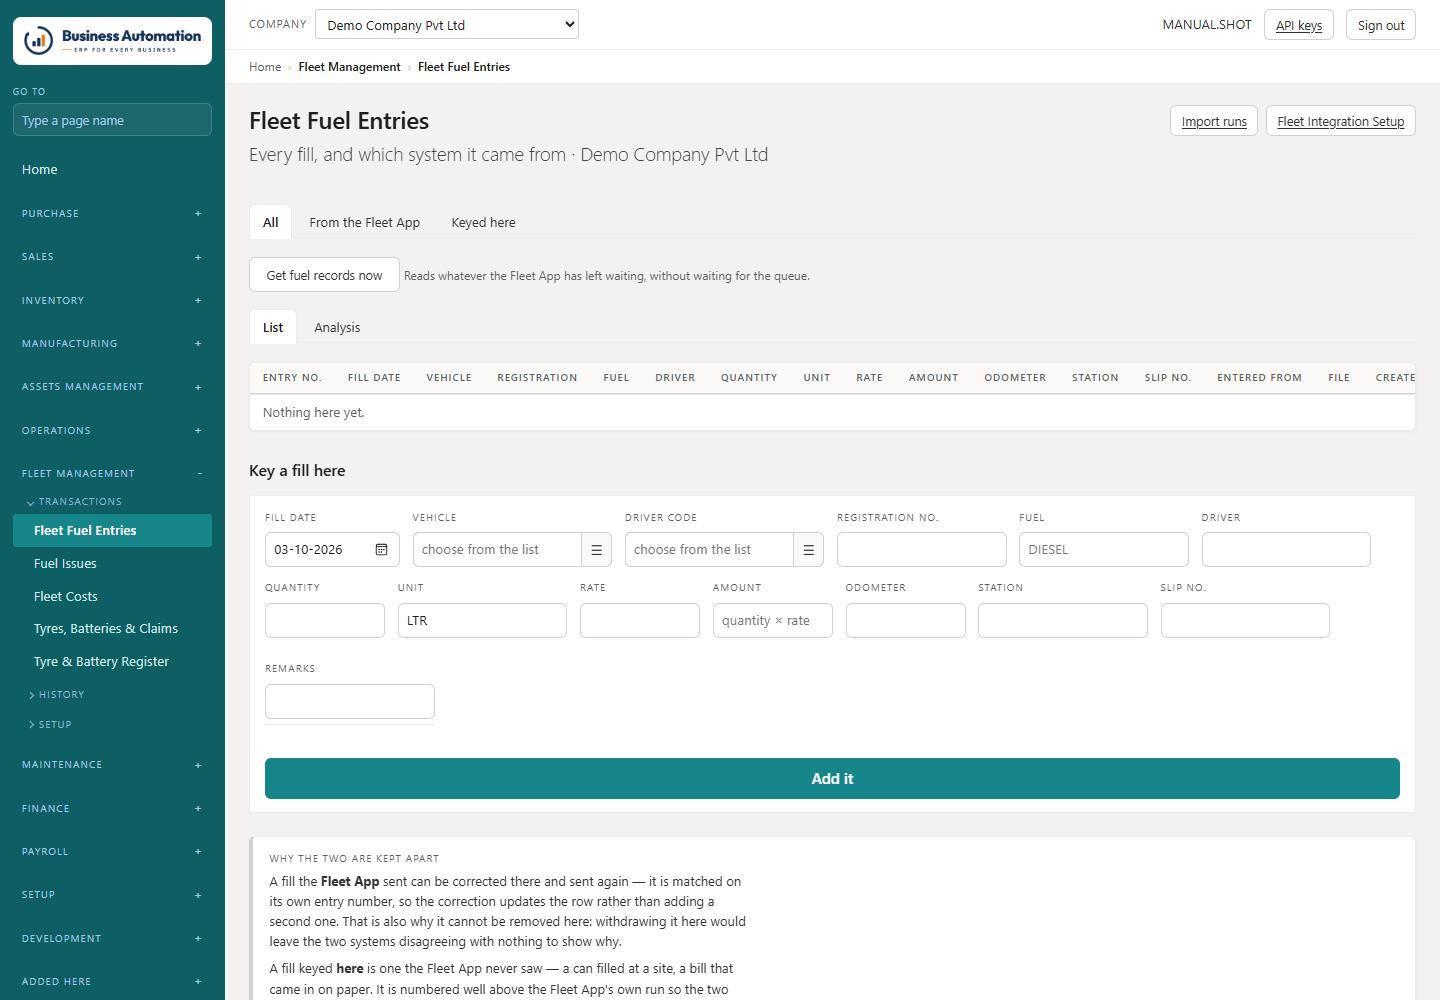
Tip. ✎ Correct and 🗑 Delete work only on the latest fill for a vehicle, before it is posted. Fleet Fuel Entries brings in fills from your fleet application.
Business Automation
Fleet fuel entries
Figure 7.17 Fleet fuel entries

Maintenance: job cards

From breakdown to closed job: the fault, the spares, approval and the old part.

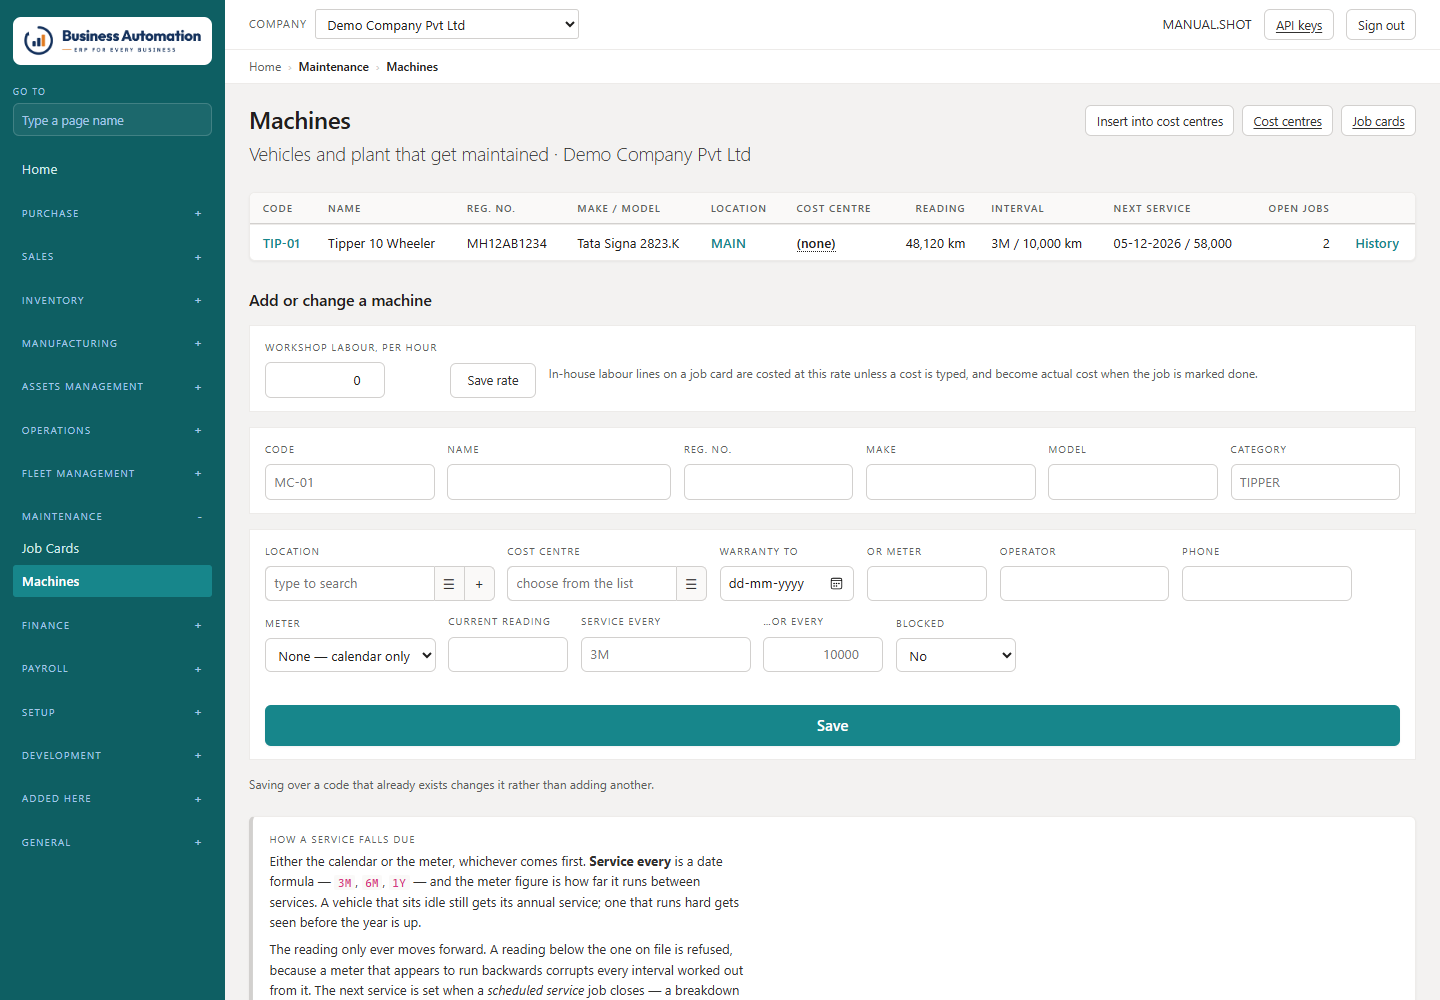
WhereMaintenance › Job Cards (/maintenance) · Machines (/machines)
  1. 1
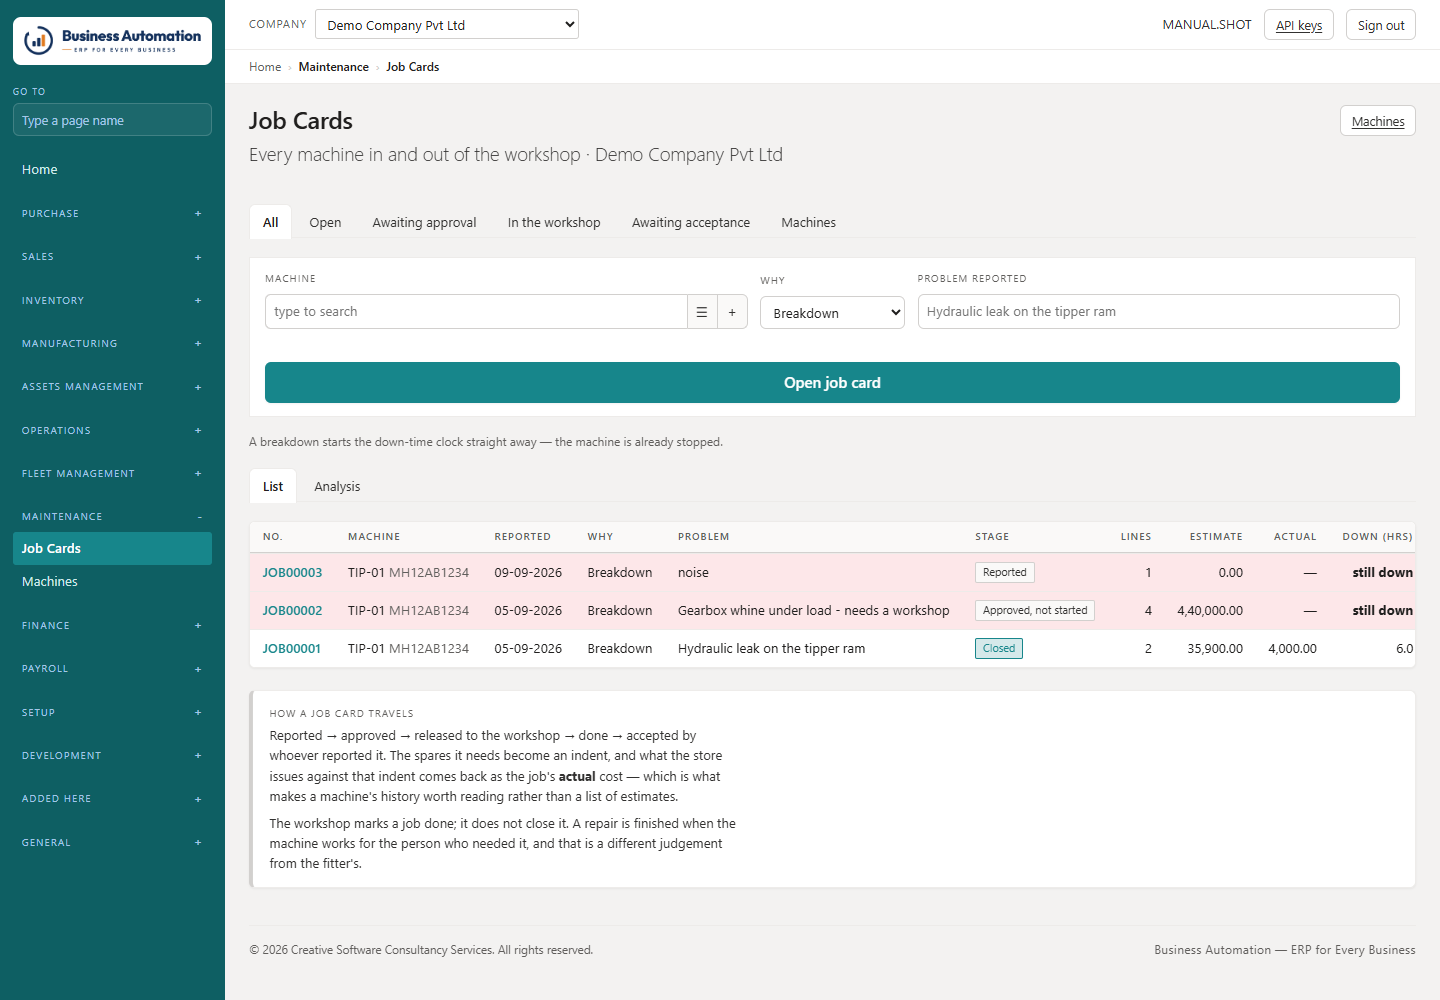
    Start a job card. A breakdown starts the clock immediately.
  2. 2
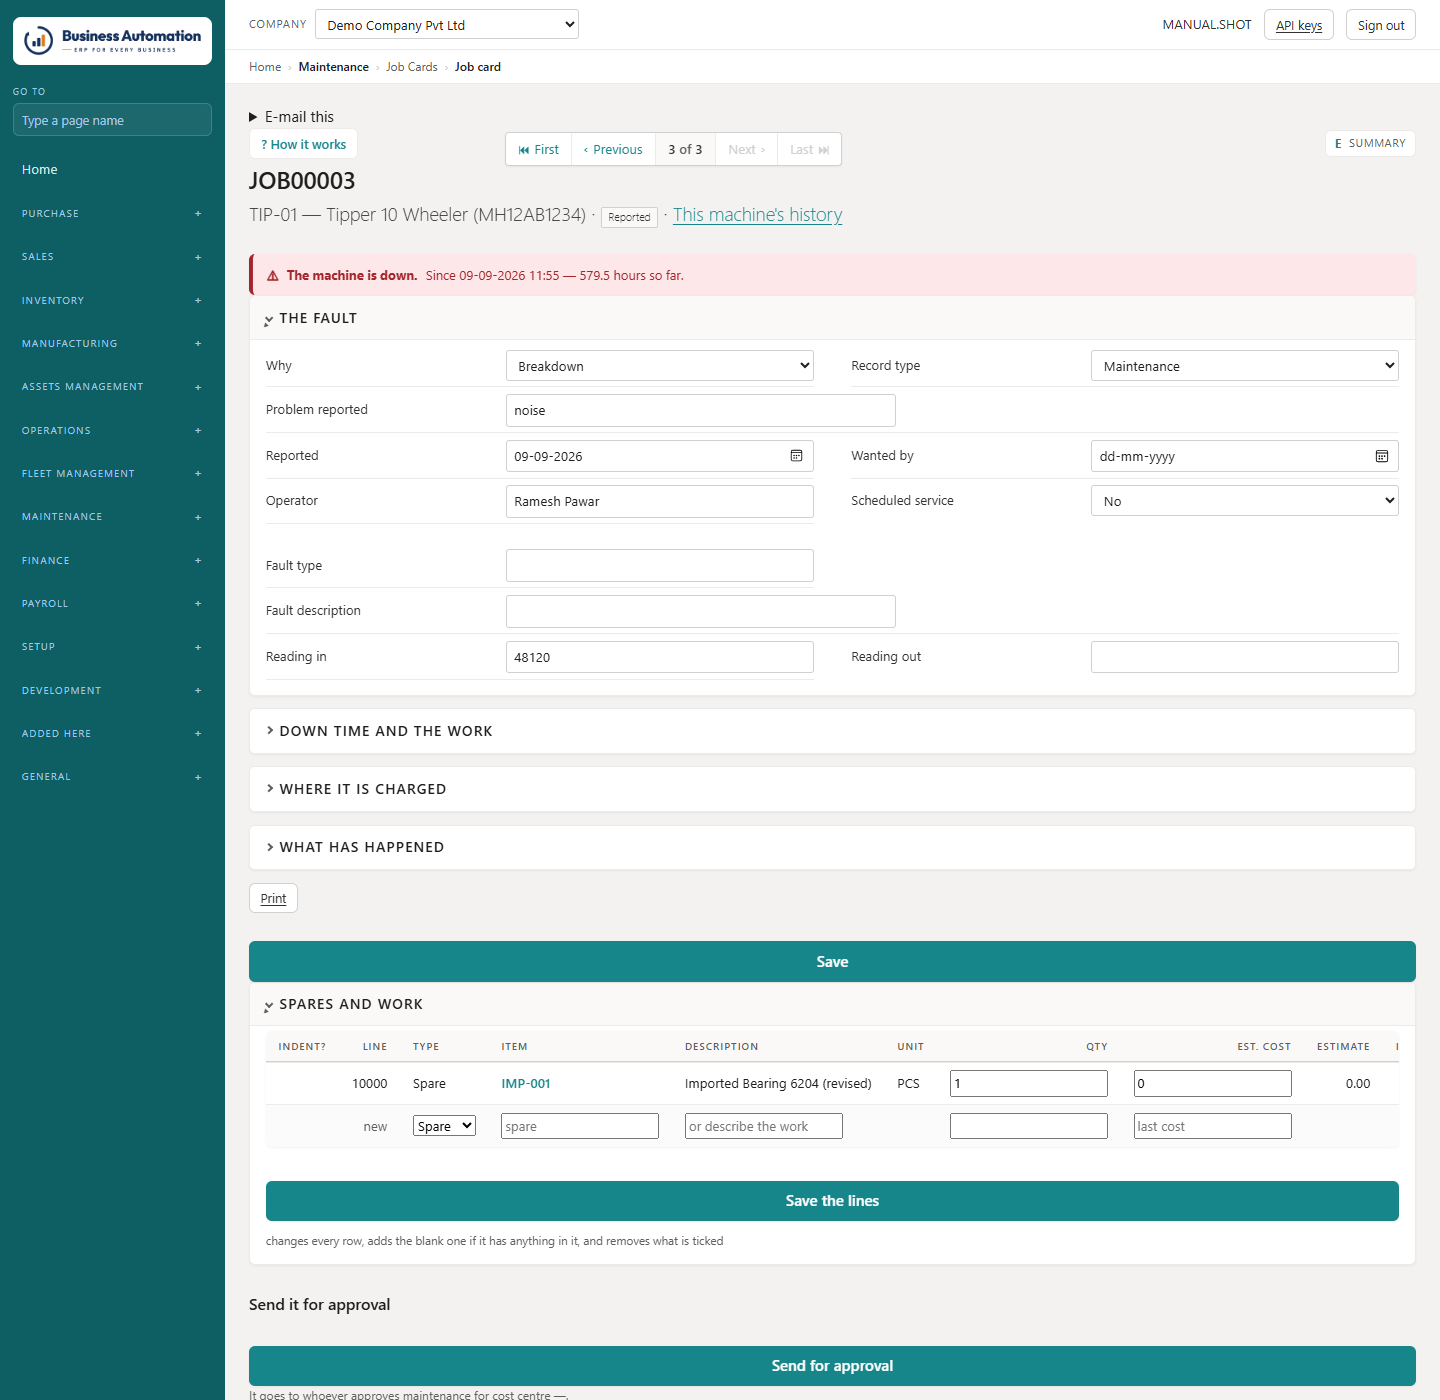
    Record what is wrong and who reported it. Type spares, labour and other charges straight into the grid; Save the lines.
  3. 3
    Send it for approval and Release it — the workshop may start.
  4. 4
    Raise the indent for spares — a direct issue where the store holds the part, a purchase requisition where it does not.
  5. 5
    Record the old part coming off the machine (press Receive on the spare line).
  6. 6
    Complete (the workshop) and then Close (the person who reported it). Closing updates the machine's meter and next service date.
Business Automation
Job cards and their stage
Figure 7.18 Job cards and their stage
Business Automation
A job card
Figure 7.19 A job card
Business Automation
Machines
Figure 7.20 Machines
💡
Tip. Print on any job card gives the workshop's sheet with spaces for prepared, approved and received.

Tyres and batteries: the tyre bank

Follow every numbered tyre and battery: on which lorry, in the store, at the retreader, or scrapped.

WhereFleet › Tyre & Battery Register (/rotation)
  1. 1
    On the item card set Rotating part to Tyre, Battery or Other, and Tracked by Serial No.
  2. 2
    Issue a tyre on an indent — the register records the unit, machine and date by itself.
  3. 3
    When it comes off, on the job card press Receive on the spare line, tick the numbers, give the reading, Why it came off and the tread left, and choose where it goes: Back to store, Away for retreading or repair, Scrapped or Claimed.
  4. 4
    When it returns from the retreader, open the tyre's page and press It is back from the retreader — tread now, cost and store — then Back in the bank.
  5. 5
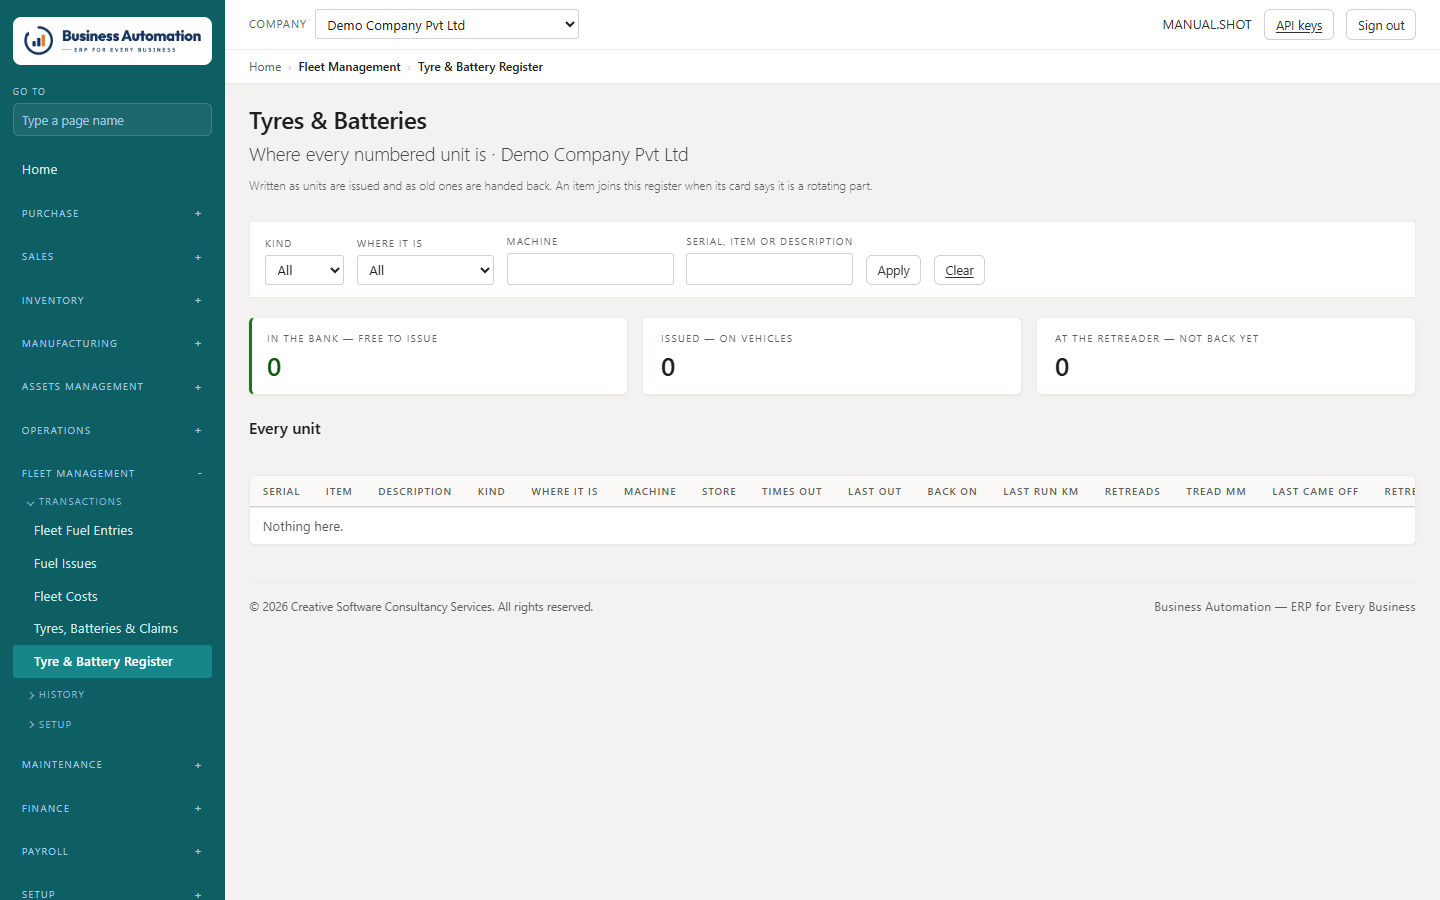
    The top of the page shows In the bank, Issued (vehicle by vehicle) and At the retreader.
Business Automation
The tyre and battery register: the bank at a glance
Figure 7.21 The tyre and battery register: the bank at a glance
Business Automation
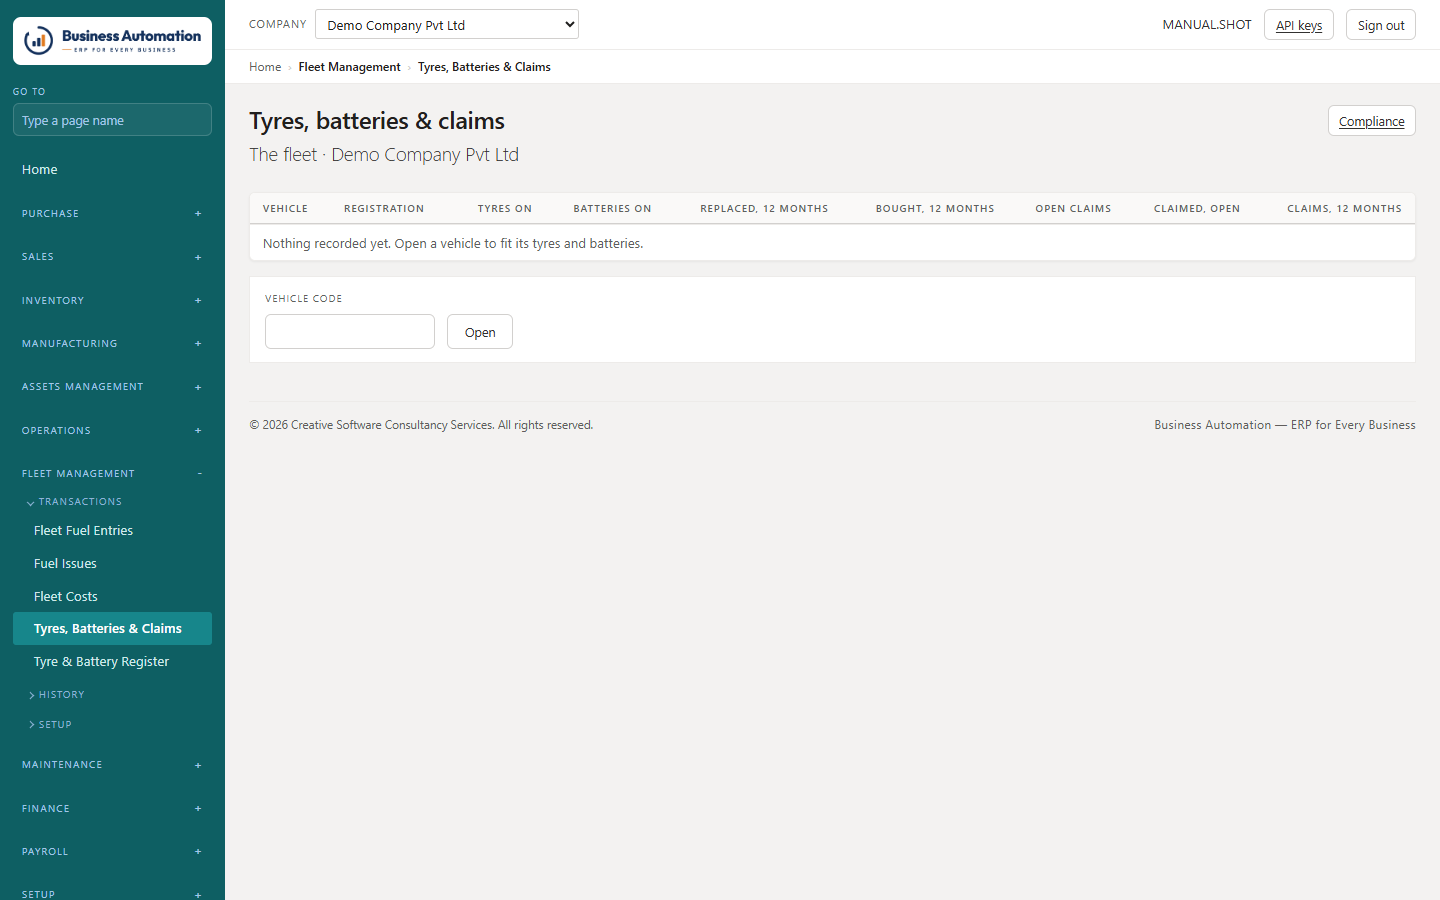
Tyres, batteries and claims by vehicle
Figure 7.22 Tyres, batteries and claims by vehicle
ℹ
Note. "Worth coming back" defaults to 0: the first job was already charged the whole tyre, so at nought the two jobs together cost one tyre.
What this chapter covers. The dashboard, balances that prove themselves against their control accounts, ageing, cost-centre analysis, the statements, registers, stock reports and building your own reports.

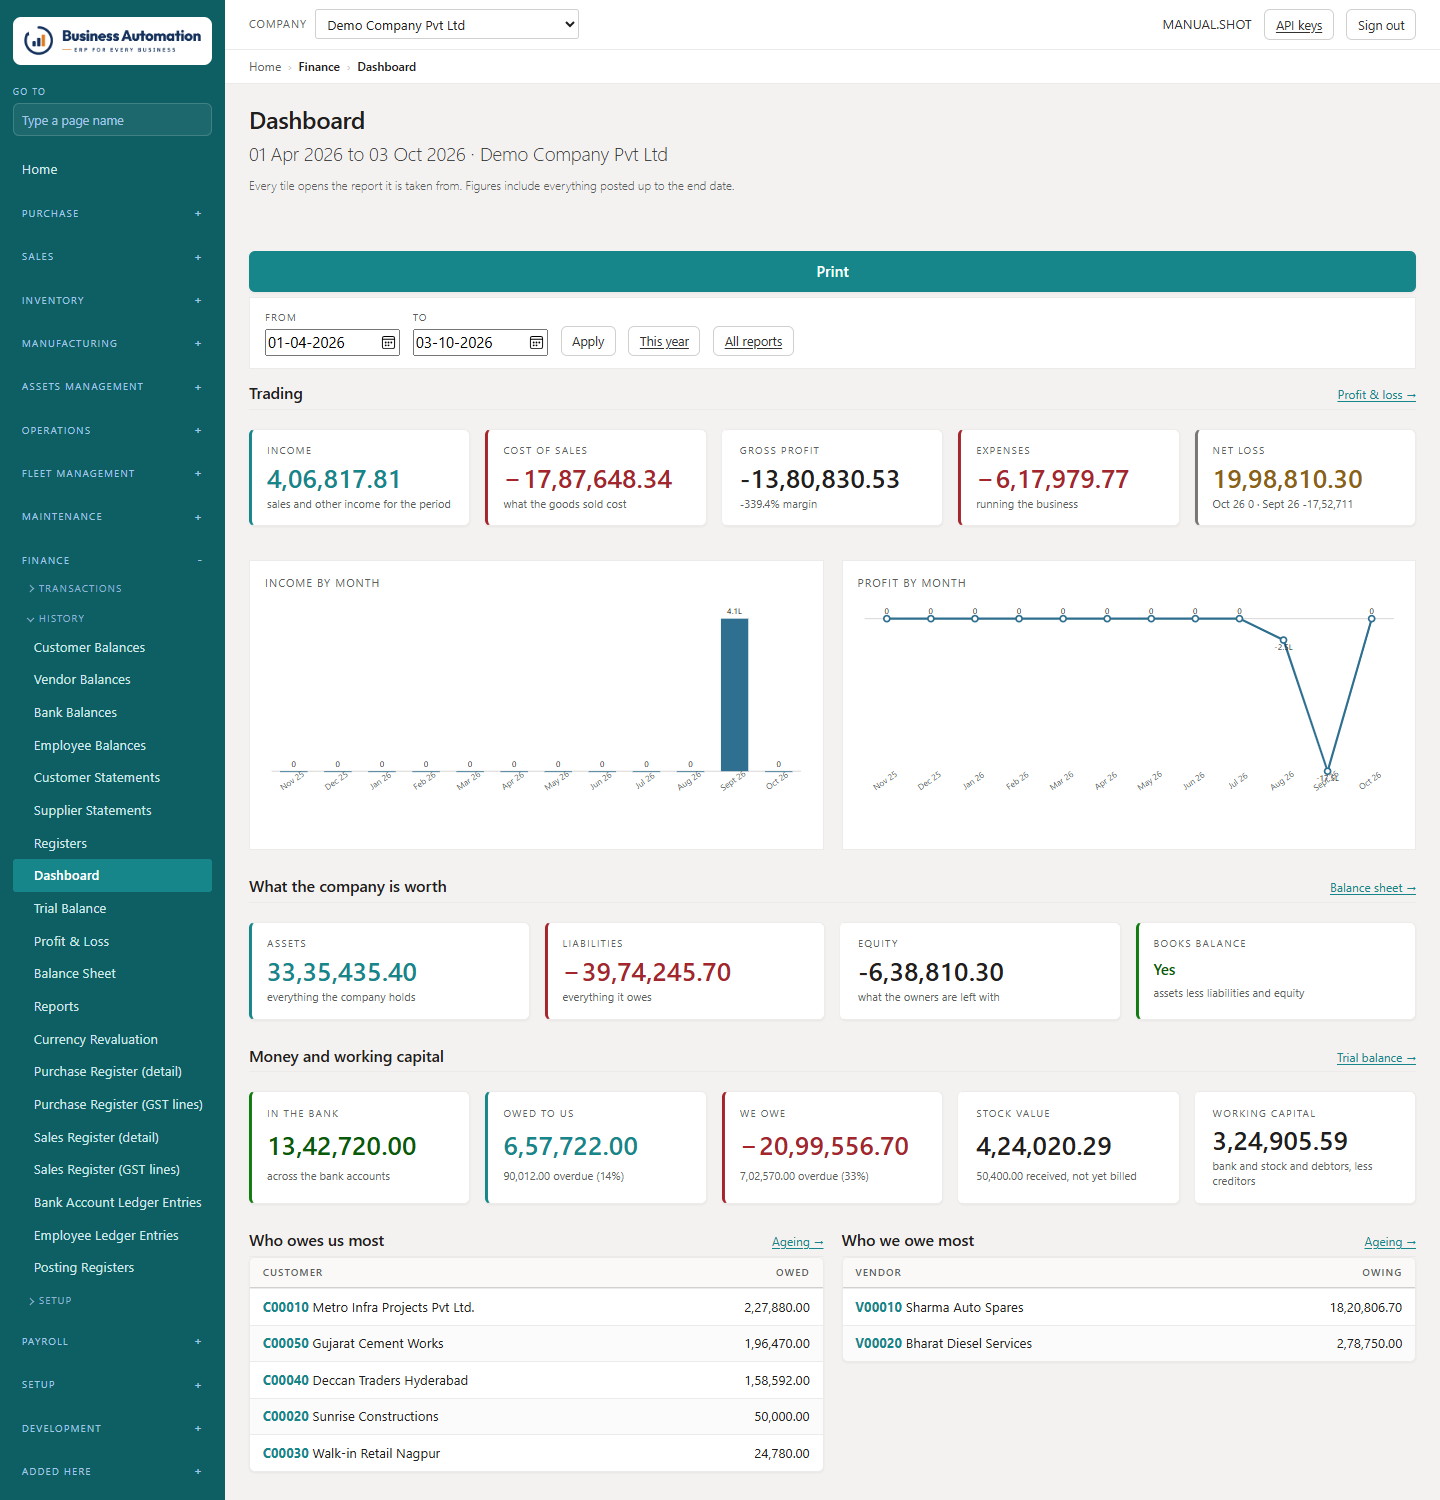
The company on one page: Dashboard

Profit, what the company owns and owes, the bank, receivables, payables and stock — each tile opens its report.

WhereFinance › Dashboard (/dashboard)
  1. 1
    Set the period at the top (it starts at 1 April by default).
  2. 2
    Click any tile to open the report the figure came from, with the same dates.
  3. 3
    Glance at Books balance every morning: it should come to nothing.
Business Automation
The dashboard
Figure 8.1 The dashboard
ℹ
Note. In the bank does not include cash in hand unless a bank account is set up over the cash account.

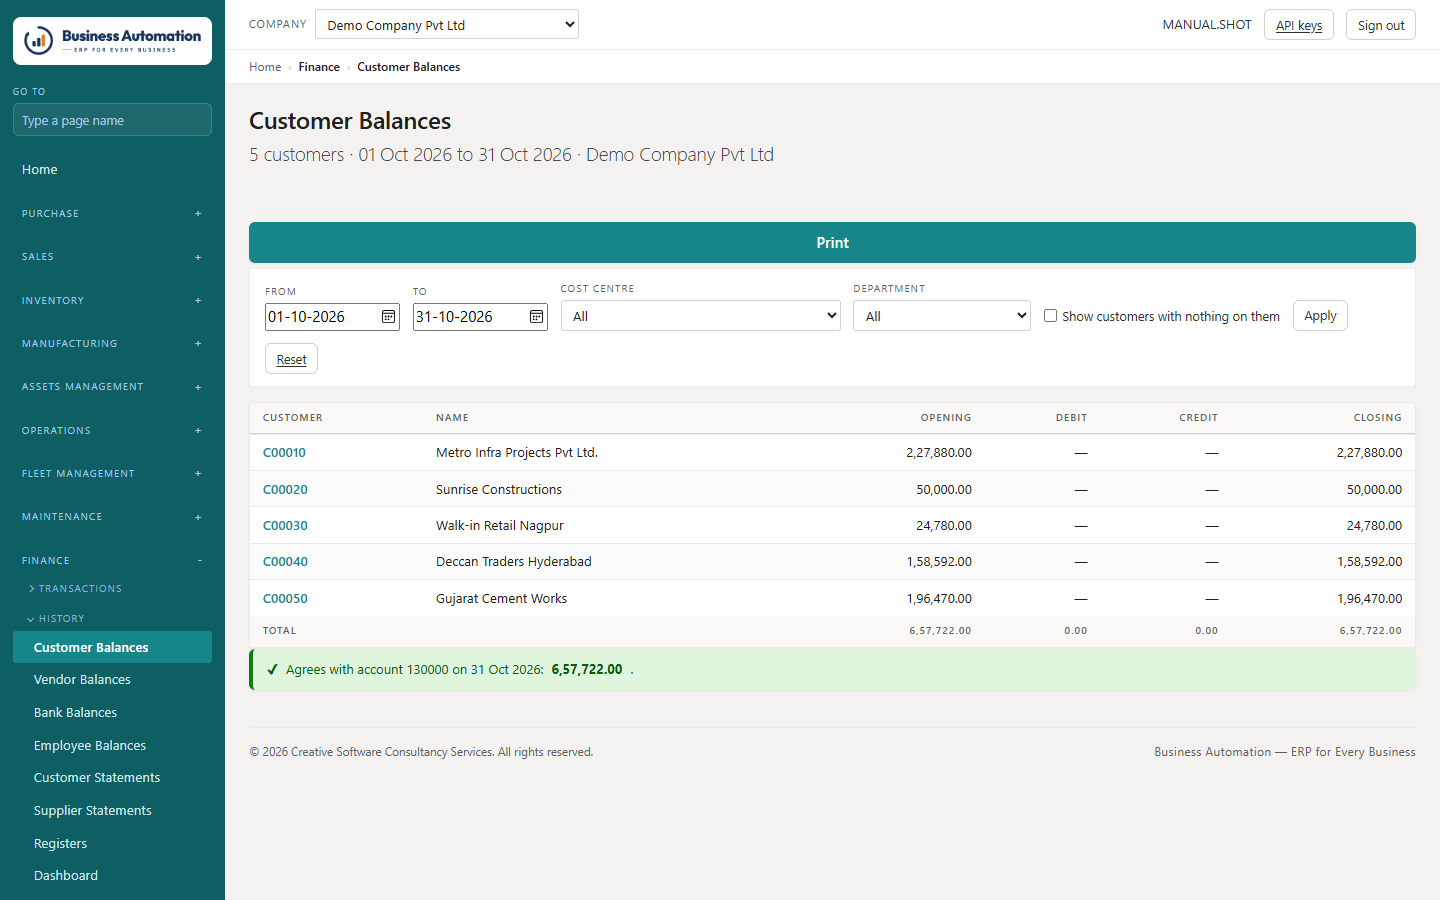
Balances that prove themselves

Customer, vendor, bank and employee balances, each reconciled to its control account.

WhereFinance › Customer Balances (/ledgers/Customer) and Vendor, Bank, Employee
  1. 1
    Choose the period and cost centres.
  2. 2
    Click a party to open their ledger with the filter carried across.
  3. 3
    Read the line at the top: the ledger agrees with its control account, or by how much it differs. What makes up the difference lists the entries behind it.
Business Automation
Customer balances, agreed with the control account
Figure 8.2 Customer balances, agreed with the control account

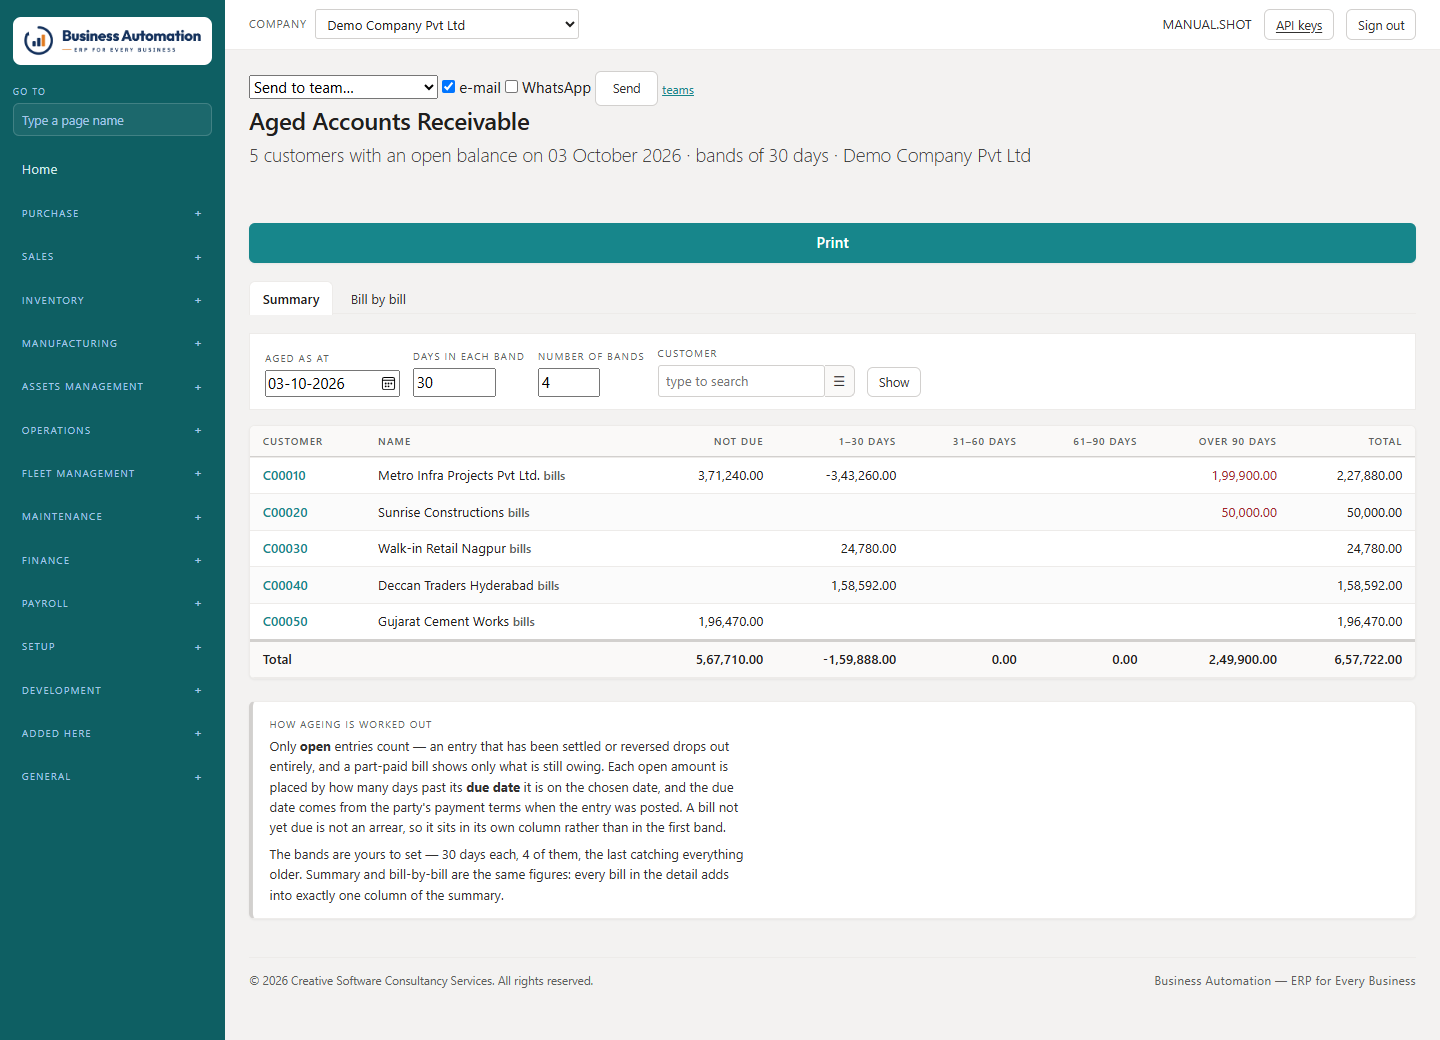
Who is late: ageing

Summary per party, or bill by bill.

WhereReports › Aged Accounts Receivable (/report/Ageing/Customer) · Payable
  1. 1
    Set Aged as at, the days in each band and the number of bands.
  2. 2
    Switch between Summary and Bill by bill.
  3. 3
    Click a document number to see why it is still showing.
Business Automation
Aged accounts receivable
Figure 8.3 Aged accounts receivable
ℹ
Note. A bill not yet due sits in its own column, and bills are aged by their due date, not the posting date.

What a project or department cost

Cost-centre analysis and the cross-tab.

WhereSetup › Cost Centre Analysis (/dimensions/analysis) · Cost Centre Cross-Tab (/dimensions/cross-tab)
  1. 1
    Pick a slot and a period. Each value shows its debits, credits and net, with the entries underneath.
  2. 2
    Look first at the no code row — entries with nothing in that slot.
  3. 3
    By item gives the quantities received and issued under a code.
  4. 4
    On the Cross-Tab, put one analysis down the side and another across the top. Set profit and loss only for "what did this cost".
Business Automation
Cost-centre analysis
Figure 8.4 Cost-centre analysis
Business Automation
Cost-centre cross-tab
Figure 8.5 Cost-centre cross-tab

The statements and the trial balance

Profit & loss, balance sheet and trial balance — every amount is a link.

WhereFinance › Profit & Loss (/report/ProfitAndLoss) · Balance Sheet (/report/BalanceSheet) · Trial Balance (/report/TrialBalance)
  1. 1
    Choose the period. Both statements show comparatives.
  2. 2
    Click an amount to open the account's entries.
  3. 3
    On the Trial Balance, set from and to dates for opening, debit, credit and closing, and choose Grouped by: chart headings, statement category or nothing.
Business Automation
Profit and loss
Figure 8.6 Profit and loss
Business Automation
Balance sheet
Figure 8.7 Balance sheet
Business Automation
Trial balance
Figure 8.8 Trial balance
⚠
Important. A group called Posted onto a heading means somebody posted onto a caption. Move it to a posting account with a journal.

Everything that was posted: registers

Every posting run — who, when and which entries. The unit of reversal.

WhereFinance › Registers (/registers)
  1. 1
    Find the posting run and open its entries or voucher.
  2. 2
    Reverse a whole run if needed. It is refused for a run that moved stock — use Undo on the receipt or a credit note instead.
Business Automation
Posting registers
Figure 8.9 Posting registers

Reports and stock reports

The catalogue, the line-by-line registers, and stock movement, valuation and ageing.

WhereFinance › Reports (/reports)
  1. 1
    Open Reports and choose a report. Each takes its own parameters and can be printed or exported. A cleared parameter means no filter.
  2. 2
    Sales / Purchase Register (detail) gives a row for every line of every posted invoice and credit note.
  3. 3
    Stock Movement: opening, received, issued, value adjusted and closing for a period. Click any figure.
  4. 4
    Stock Valuation: stock by item group as at a date, agreed with the books. Print gives a signed statement.
  5. 5
    Stock Ageing: stock by age brackets; tick non-moving only for the list to chase.
  6. 6
    Send to team at the top of every report e-mails or WhatsApps it to a report team.
Business Automation
The report catalogue
Figure 8.10 The report catalogue
Business Automation
Sales register, line by line
Figure 8.11 Sales register, line by line
Business Automation
Stock movement
Figure 8.12 Stock movement
Business Automation
Stock valuation statement
Figure 8.13 Stock valuation statement
Business Automation
Stock ageing and non-moving stock
Figure 8.14 Stock ageing and non-moving stock

Drawing your own report

The Report Wizard builds lists, groups, matrices, charts and pivots — no SQL.

WhereDevelopment › Report Wizard › New report, step by step (/designer/report-wizard)
  1. 1
    Choose the kind of report: List, Group & subgroup, Matrix, Chart or Pivot.
  2. 2
    Choose the table and title, then tick the columns and order them.
  3. 3
    Set grouping and sort, totals, what goes across the top, which records, and how it looks.
  4. 4
    Watch the preview on the right — it is the real report. Save it; it joins the catalogue.
Business Automation
The report wizard
Figure 8.15 The report wizard
💡
Tip. On a grouped report, Top N keeps the top ten (say) and gathers the rest into All others, so the grand total is still the whole business.

The company itself

What the company says about itself on its paperwork.

WhereSetup › Companies (/list/CompanyList) → the company card
  1. 1
    Open the company card.
  2. 2
    Fill in GSTIN, CIN, PAN, TAN, PF and ESIC codes, the labour identification number and the CLRA licence.
  3. 3
    Fill the registered office separately from the address where it differs.
  4. 4
    Under Setup › Company Branding, upload the logo (up to half a megabyte).
Business Automation
The companies in this database
Figure 9.1 The companies in this database
Business Automation
The company card
Figure 9.2 The company card
Business Automation
Company branding
Figure 9.3 Company branding

Number series

Gap-free numbering for every document, optionally per location.

WhereSetup › Number Series (/list/NoSeriesList) · Number Series by Location (/setup/number-series/locations)
  1. 1
    Open the series. To change it, add a new line with a starting date — do not edit the old one.
  2. 2
    For a branch's own numbers: create the series (for example MNPSI, starting MNINV0001), then on Number Series by Location choose the Document, Location and Number series, and press Use it.
  3. 3
    For tax invoices choose Sales invoice (posted) and Purchase invoice (posted) — the invoice takes the location's number when it posts.
Business Automation
Number series
Figure 9.4 Number series
Business Automation
Number series by location
Figure 9.5 Number series by location

Cost centres, states and terms

The masters every document reads.

WhereSetup › Dimensions (/dimensions) · States (/setup/states) · Payment Terms (/payment-terms) · Terms and Conditions (/terms)
  1. 1
    Dimensions: three slots and what each means. Their values are on Cost Centre Records. Only a standard value can be posted to; mark a dimension mandatory to check it on posting.
  2. 2
    States: each with its GST code and eTDS/TCS code. Block a state instead of deleting it.
  3. 3
    PIN Codes: enter your PINs once and pick them — the city and state fill in.
  4. 4
    Payment Terms: where due dates are worked out. Click a code to change it.
  5. 5
    Terms and Conditions: clauses by category; an order takes a copy.
Business Automation
The three cost-centre slots
Figure 9.6 The three cost-centre slots
Business Automation
States, with GST and eTDS codes
Figure 9.7 States, with GST and eTDS codes
Business Automation
Payment terms
Figure 9.8 Payment terms

Copying a company

Open a new company from an existing one — masters only, or everything.

WhereSetup › Copy a Company (/setup/companies/copy) — super users only
  1. 1
    Choose the company to copy from and What to copy: Setup and masters only or Everything, with all transactions.
  2. 2
    Give the new company a code and name.
  3. 3
    Press Show what would be copied and read the table counts.
  4. 4
    Press Copy it. It is one transaction — complete, or nothing.
  5. 5
    Switch to the new company and give it its own name, address and GST registration.
Business Automation
Copy a company
Figure 9.9 Copy a company
⚠
Important. Delete a Company removes every master and entry of a company and cannot be undone. Take a database backup first.

Free trials for website visitors

Let visitors register their own trial company.

WhereSetup › Trial Sign-up Setup (/setup/trial) — super users only
  1. 1
    Choose the Template company every trial is copied from (block it).
  2. 2
    Choose the company whose mail setup sends the e-mails, and your e-mail for notices.
  3. 3
    Set Approval required, Trial days (45) and Most requests a day (25).
  4. 4
    Set Enabled = Yes and Save. With approval required, approve requests on Setup › Trial Requests.
Business Automation
Trial sign-up setup
Figure 9.10 Trial sign-up setup

Users and User Setup

Who can sign in, and how each person works in each company.

WhereSetup › Users (/list/UserList) · User Setup (/list/UserSetupList)
  1. 1
    On Users, press New, type the user name and full name, and set a first password (they must change it on first sign-in).
  2. 2
    On User Setup, open (or add) the person's line for this company.
  3. 3
    Set their approver, store, role centre (home page), notification e-mail and WhatsApp number.
  4. 4
    Set Allow posting from / to and, for the accountant, May post to closed months.
  5. 5
    For leave, fill Away from, Away to and a Substitute — approvals route to the substitute for those dates.
Business Automation
Users
Figure 9.11 Users
Business Automation
User setup: per person, per company
Figure 9.12 User setup: per person, per company
Business Automation
A user setup card
Figure 9.13 A user setup card

Special rights: taking back posted documents

Reversing posted work is given person by person, per company.

WhereSetup › User Setup → open the user's line
  1. 1
    Open the user's User Setup card for the company.
  2. 2
    Tick what they may do: May Reverse Sales Invoices, May Reverse Purchase Invoices, May Undo Goods Receipts, May Reverse Registers, May Unapply Settlements, May Reverse Opening Balances, May Cancel E-Way Bills, TDS Certificates and Trips.
  3. 3
    Save.
Business Automation
Special rights on the user setup card
Figure 9.14 Special rights on the user setup card
⚠
Important. Without the tick the button is not shown, and the system refuses the action anyway. Super users always may. Posted data is view only for everyone — mistakes are put right by reversing or with a credit note.

Permission sets

Named lists of what may be seen, written, deleted and posted. Sets add up.

WhereSetup › Permission Sets (/permissions/sets)
  1. 1
    Open Permission Sets. Ready-made sets by department: PURCHASE, SALES, STORE, FINANCE, PAYROLL, ASSETS, OPERATIONS, MANUFACTURING, FLEET and MAINTENANCE; VIEWALL to look everywhere and change nothing; parts of Setup (GSTSETUP, TDSSETUP, TCSSETUP, AUTOMATION, STORAGE, WEBSERVICES).
  2. 2
    Open a set. The Departments grid has View, Write, Delete and Post (Post includes releasing and approving).
  3. 3
    The Tables grid gives rights table by table.
  4. 4
    Posting actions are given separately: SALES-POST (post challan, post challan and invoice, raise invoice from shipped not invoiced, post sales invoice) and PURCHASE-POST (post GRN, raise invoice from received not invoiced, post purchase invoice).
  5. 5
    SUPER and MASTERS belong to the system. Press Copy into a new set to make your own — for example a dispatcher who may post challans but not invoices: tick only that line under Posting actions.
Business Automation
Permission sets
Figure 9.15 Permission sets
Business Automation
The SALES permission set
Figure 9.16 The SALES permission set
Business Automation
The Departments grid: View, Write, Delete, Post
Figure 9.17 The Departments grid: View, Write, Delete, Post
Business Automation
Posting actions on the SALES-POST set
Figure 9.18 Posting actions on the SALES-POST set

Giving someone access: User Permissions

Tick the sets a person needs and the companies they work in.

WhereSetup › User Permissions (/users/permissions)
  1. 1
    Choose the user.
  2. 2
    Tick the sets they need (for example STORE, or SALES with SALES-POST).
  3. 3
    Tick the companies they work in, or Every company.
  4. 4
    Press Grant. They see only the menus their sets open, in the companies ticked.
Business Automation
User permissions: sets and companies
Figure 9.19 User permissions: sets and companies
💡
Tip. What Permissions Allow (/permissions/matrix) shows every table and page with ticks for read, insert, modify, delete and run for a set or a person, and which set gave each.
Business Automation
What permissions allow
Figure 9.20 What permissions allow

Approvals: workflow approvers

Who signs for this person, and who signs for this budget.

WhereSetup › Workflow Approvers (/workflow/approvers)
  1. 1
    Add a rule: the document kind, the user (blank = everyone), cost centre, level, approver, title and From amount.
  2. 2
    An exact rule wins; a rule with a blank key is the fallback.
  3. 3
    Add no second-level rule and one signature is the whole approval.
  4. 4
    Click a rule's document in the list to change it.
Business Automation
Workflow approvers
Figure 9.21 Workflow approvers
ℹ
Note. Adding a rule for PurchaseOrder, SalesOrder or GeneralJournal switches approval on for that kind.

Theme, home page and role centres

The look of each company, and what each person lands on.

WhereSetup › Theme (/setup/theme) · Home Page (/setup/home) · Role Centres (/rolecenters)
  1. 1
    Theme: choose a palette (Business Central, Midnight, Teal, Forest, Plum, Aubergine, Graphite), or your own hex colours, and the Density.
  2. 2
    Home Page: the greeting, headline, picture, button, Colour and Depth. The card above the form is a live preview.
  3. 3
    Role Centres: a set of links per job. Open one to choose the figures on the strip, or press Suggest figures for this job.
Business Automation
Theme
Figure 9.22 Theme
Business Automation
Home page setup with live preview
Figure 9.23 Home page setup with live preview
Business Automation
Role centres
Figure 9.24 Role centres

Mail, outbox and digital signatures

Send e-mail from the application and sign documents with your DSC.

WhereSetup › Mail Setup (/setup/mail) · Outbox (/outbox) · Digital Signature Setup (/setup/digital-signature)
  1. 1
    In Mail Setup, enter the SMTP server, port (587 with Use SSL, or 465), user (the full mailbox address) and password (tick Replace the saved password with this). Set the Public address of this application.
  2. 2
    Press Check login, then Send a test e-mail.
  3. 3
    The Outbox shows what was queued, sent and failed.
  4. 4
    In Digital Signature Setup, choose the provider (Webtel, JSON API or My DSC on this computer), the certificate, tick what is signed and set Enabled to Yes.
Business Automation
Mail setup
Figure 9.25 Mail setup
Business Automation
The outbox
Figure 9.26 The outbox
Business Automation
Digital signature setup
Figure 9.27 Digital signature setup

Currencies

Other currencies and their dated rates.

WhereSetup › Currencies (/setup/currencies)
  1. 1
    Add the currency: code, description, symbol and the exchange gain and loss accounts.
  2. 2
    Add rates date by date. For a new rate, add a row — do not change the old one.
Business Automation
Currencies and exchange rates
Figure 9.28 Currencies and exchange rates

Bringing data in

Load masters from a spreadsheet, checked by the same rules as the card.

WhereSetup › Upload Layouts (/import/layouts) · Import (/import)
  1. 1
    On Upload Layouts, choose a table, tick its columns, save it under a name and download the template.
  2. 2
    Fill the template.
  3. 3
    On Import, read the file. A bad row does not stop the file — you get the rows that went in and the reasons for the rest.
Business Automation
Upload layouts
Figure 9.29 Upload layouts
Business Automation
Import
Figure 9.30 Import
💡
Tip. A column not in the file is not touched — so loading the same table twice, for different columns, is safe.

Audit trail, web services and the wizards

Who changed what; Excel and Power BI feeds; your own tables and phone apps.

WhereSetup › Audit Trail Setup · Web Services · Development › Table Wizard · Mobile App Wizard
  1. 1
    Audit Trail Setup: tick Audit trail activated and Save. Choose No, Some Fields or All Fields per table. Audit Trail Entries shows old and new values.
  2. 2
    Web Services: Publish all list pages, copy a service's address, and in Excel use Data › Get Data › From OData Feed with Basic sign-in — your user name and an API key as the password.
  3. 3
    Table Wizard: name the table, add fields, check, done.
  4. 4
    Mobile App Wizard: name, operations (tiles), role-centre figures, people, then scan the QR code to install the app on a phone.
Business Automation
Audit trail setup
Figure 9.31 Audit trail setup
Business Automation
Web services (OData feeds)
Figure 9.32 Web services (OData feeds)
Business Automation
The table wizard
Figure 9.33 The table wizard
Business Automation
The mobile app wizard
Figure 9.34 The mobile app wizard

The licence

Who it is issued to, when it expires, and what your plan includes.

WhereSetup › Licence (/licence)
  1. 1
    Open Licence to see the plan (Starter, SME, Business, Professional or Enterprise) and every feature ticked against it.
  2. 2
    To renew or upgrade, paste the licence file CSCS sends and install it. The menus open with your data already in them.
Business Automation
The licence and plan
Figure 9.35 The licence and plan
ℹ
Note. A super user can still sign in after expiry — the page for installing the renewal is inside the product.

Where do I find…

Quick reference: the job, and where it is done.

I want to…Go to
Raise an indentPurchase › Indents › New
Send enquiries to suppliersPurchase › Purchase Quotations › Suggest / Generate
Compare quotations and make ordersPurchase › Comparative Statement
Release and e-mail a purchase orderPurchase › Purchase Orders › open › Release › E-mail to vendor
Receive goods (GRN)Purchase › GRN / SRN List › New from order
Raise a purchase invoicePurchase › GRN Posted, Not Invoiced
Issue material to a jobInventory › Approved Indents
Move stock between storesInventory › Stock Transfer
Count the storeInventory › Physical Count
See stock by store or binInventory › Stock on Hand › By bin
Give an item a default binItem card › Bins (bottom)
Add a customer delivery addressCustomer card › Ship-to addresses (bottom)
Add a vendor branch addressVendor card › Receiving addresses (bottom)
Enter and release a sales orderSales › Sales Orders › New › Release
Dispatch goods / post challanSales › Bill cum Dispatch
Invoice several challans togetherSales › Sales Invoices › New invoice › Get shipment lines
Print a tax invoiceSales › Posted Sales Invoices › Print
Raise an e-way billFinance › E-Way Bills
Record money receivedFinance › Receipts (money in)
Pay suppliersFinance › Payment Approvals
Post a journalFinance › General Journal
Reconcile the bankFinance › Bank Reconciliation
File GST returnsFinance › GSTR-1 / GSTR-3B / GSTR-2B Reconciliation
Close a monthFinance › Accounting Periods
Run the payrollPayroll › Payroll › New run
Mark attendancePayroll › Muster Roll
Record a fuel fillFleet Management › Fuel Issues
Open a job cardMaintenance › Job Cards
Follow a tyre or batteryFleet › Tyre & Battery Register
See the company on one pageFinance › Dashboard
Trial balance, P&L, balance sheetFinance › Reports
Add a userSetup › Users, then User Setup
Give a user accessSetup › User Permissions
Let someone reverse posted invoicesSetup › User Setup › May Reverse … ticks
Let someone post challans / invoicesSetup › Permission Sets › SALES-POST / PURCHASE-POST
Change number seriesSetup › Number Series
Change the coloursSetup › Theme

Glossary

The words this manual and the screens use.

Posting
The moment a document becomes part of the accounts. Before posting it is a draft; after, it cannot be edited or deleted — only reversed or credited.
Release
Locking a document's header because the other side has been told — the vendor has the order, the customer has been promised the goods.
Indent
An internal request for material, to be bought or issued from stock, approved by your manager and the cost-centre owner.
RFQ / Enquiry
A request for quotation sent to one vendor. One per vendor, so nobody sees who else was asked.
Comparative statement
Every quotation for an indent side by side, with the landed cost (goods + freight + insurance) of each vendor.
GRN
Goods Receipt Note: what the store counted in against a purchase order. Posting it raises stock and Goods Received Not Invoiced.
SRN
Service Receipt Note: a receipt with no stock line, for services.
Challan
The delivery challan (sales shipment) that goes with the goods. Posting it takes stock out and books the cost of sale.
Bill cum Dispatch
Posting the challan and the tax invoice together in one step.
Ledger
The list of entries for one account, party, bank, item or employee. Every balance on screen is the sum of its ledger.
Control account
The G/L account a sub-ledger (customers, vendors, banks, employees) adds up to. The balances pages prove the two agree.
Register
One posting run — who posted it, when, and the entries it wrote. The unit of reversal.
Voucher
The printable sheet of a posting: accounts debited and credited, amount in words, and signature lines.
Cost centre
One of three analysis codes (Cost centre 01, 02, 03) on every document — project, department, vertical — that let you ask what something cost.
Place of supply
The state the goods or services are delivered to. It decides whether GST is CGST + SGST (same state) or IGST (another state).
GSTIN
The 15-character GST registration number. Its first two digits are the state code; characters 3 to 12 are the PAN.
HSN / SAC
The tax classification code of goods (HSN) or services (SAC), which sets the GST rate.
TDS / TCS
Tax deducted at source (on payments to vendors and salaries) and tax collected at source (on certain sales).
E-invoice / IRN
Registering a sales invoice on the government portal; the IRN and signed QR come back and print on the invoice.
E-way bill
The permission for a consignment to be on the road, raised from the invoice with the vehicle and distance.
Bin
A rack, shelf or yard square inside a store. A store can insist that every movement names a bin.
Role centre
A person's home page: a set of links and figure tiles chosen for their job.
Permission set
A named list of rights (view, write, delete, post) by department and table. People hold sets, and sets add up.
Muster roll
The month's attendance, day by day, from which payroll is calculated.
Number series
A gap-free sequence of document numbers, with dated lines, optionally per location.

Need help? When the system refuses something it says why, in one sentence — read it first. For anything else, contact your administrator or CSCS — Creative Software Consultancy Services.